|
|
Post by Raeder on Dec 21, 2010 23:58:36 GMT -5
This unit will be an eye-catcher when it is finished, that raised DB area behind the cab kind of gives the unit a hunchback appearance.
|
|
drgwguy
Chairman
Modeling the DRGW in the 70s-80s!!
Posts: 528
|
Post by drgwguy on Dec 23, 2010 9:04:04 GMT -5
Dan- Looks like you were able to get started before I was!  Lookin great so far! I'll be keeping an eye on your progress, as you've got me motivated to start mine now, and you've done all the "dirty work"  Rick |
|
|
|
Post by diesel on Dec 24, 2010 11:38:21 GMT -5
that doulbe L shaped cut on the engineer's side made me 'wait' from when I first saw the article. Dan were you able to make a clean cut of that or did you cut into the walkway for that section. That's the only way I can think to do it, I wouldn't want to cut into the long hood-right?
|
|
|
|
Post by danraitz on Dec 24, 2010 22:59:59 GMT -5
Dan,
I cut down to the raised walkway section, but not into it, with the razor saw and then cut up through the lower walkway section to about an even height with the higher walkway level. Then by using the back of a hobby knife blade, held flat against the upper walkway, I scribed/gouged out a line between the the two vertical cuts. The technique of using the back of a knife blade to cut plastic works really well, it just takes longer than using a saw, because you are removing very little plastic with each stroke.
The main advantage of using this techinque is that the resulting cut is very thin.
|
|
|
|
Post by diesel on Dec 26, 2010 17:45:49 GMT -5
Thanks Dan!
|
|
|
|
Post by danraitz on Jan 11, 2011 22:03:52 GMT -5
I got some more work done. Worked on the nose this weekend. 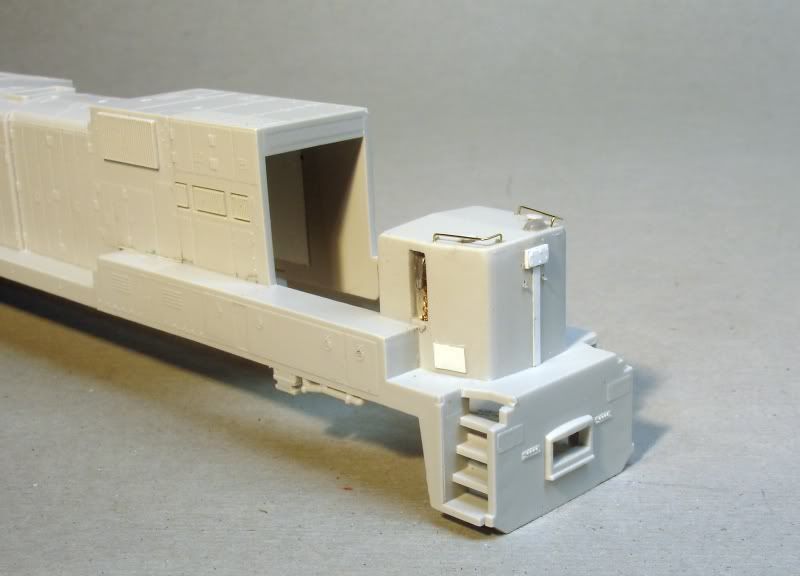 The first I did was scrape & sand away all the molding lines. Then rebuilt the lower headlight area (its NOT flat on the model when it really should be). Added the vertical strip, made from .005x.060 styrene. Installed sand filler hatches and air vent and grab irons made from .012 brass wire. Made the "X" panels as per Ed Ryans' article. 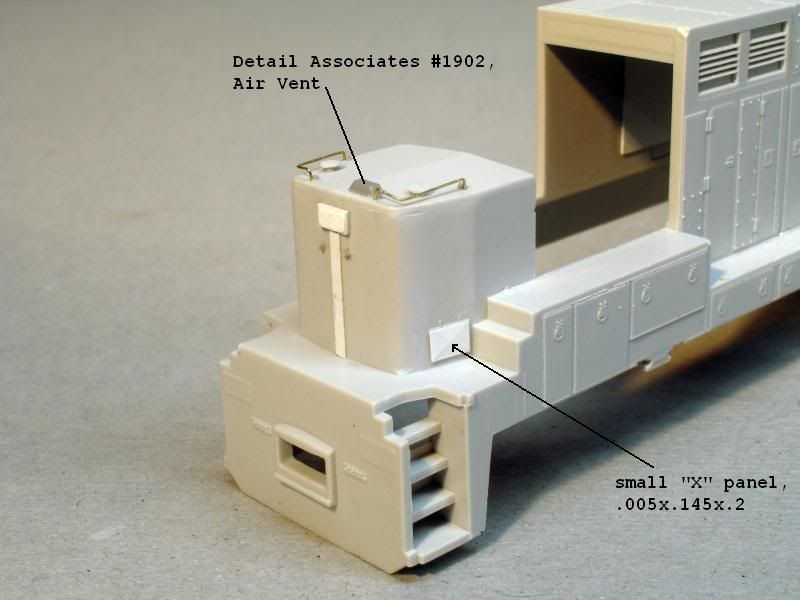 Then I attacked the models lack of a hand brake. 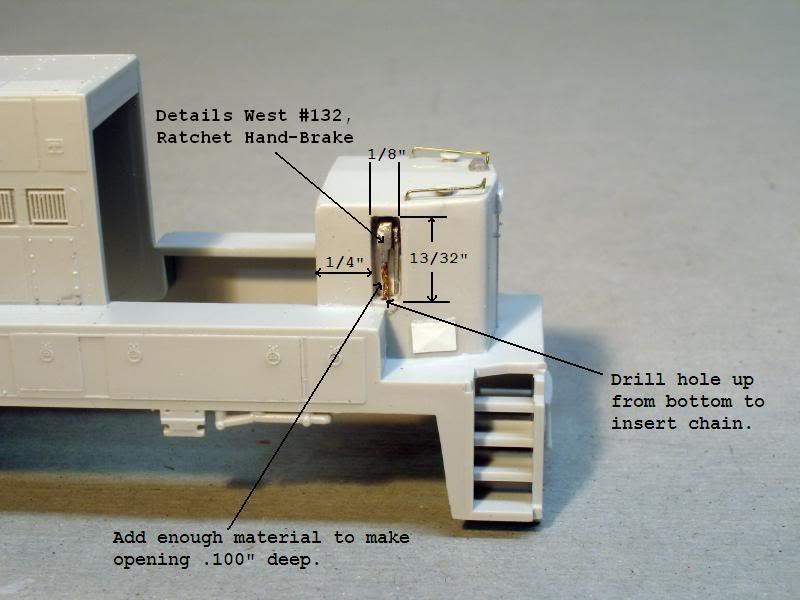 As you can see I had to assemble the DW hand brake "reversed" as to their directions. ratchet handle is now on the right side versus left. Here is a shot showing both units with Cabs & Noses done. 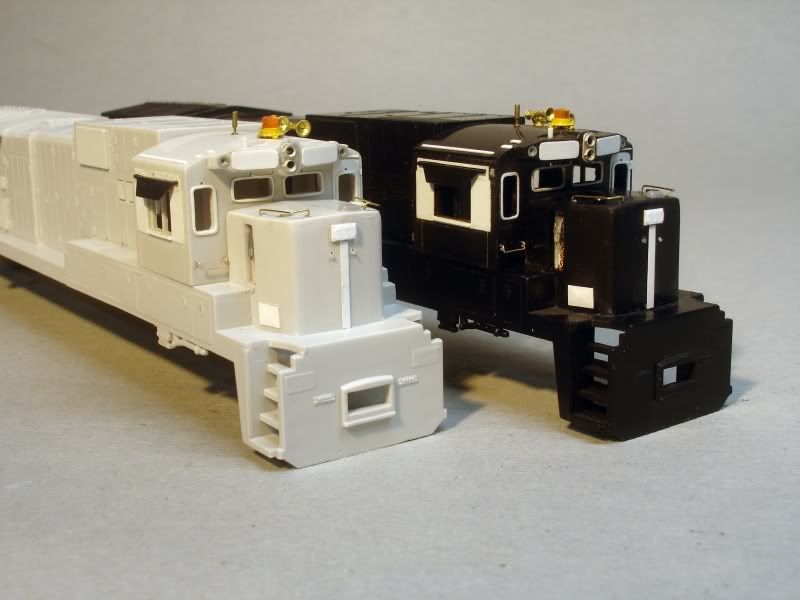 Now on to the dynamic brake section ;D enjoy! |
|
|
|
Post by m636 on Jan 12, 2011 0:52:37 GMT -5
Nice looking projet.....  How did you make the window gasket?   ? |
|
|
|
Post by danraitz on Jan 12, 2011 8:13:23 GMT -5
How did you make the window gasket?   ? First, Thanks for the comment  I covered the window gaskets at the beginning of this thread. ;D Dan |
|
nysw240
Chairman
Modeling the Delaware Valley
Posts: 297
|
Post by nysw240 on Jan 12, 2011 11:52:35 GMT -5
excellent work ! I just sold my OMI C32-8 as it wasn't a good runner and i didn't want to invest in a paint job.Can't wait to see how these turn out
|
|
|
|
Post by danraitz on Jan 12, 2011 16:42:28 GMT -5
Lance,
Nope, they are based upon real locomotives.
There were 3 test bed B32-8's built that ran on the BN from 1984 to 1990. They were numbered 5497, 5498 & 5499. In addition to the Amtak Dash8-32BW's the NS brought some Dash8-32B's, (although some call them B32-8's) that were built in late 1989.
Dan
|
|
|
|
Post by diesel on Jan 14, 2011 0:57:19 GMT -5
caught this post coming up again... nysw240, thanks for posting that, because before I decided I'd add this to the kitbash list I came very close to buying one. If anyone wants that, it's still in the shop here in NYC. Al quoted me 600 beans, but his mood changes like the weather-which affects his price.
|
|
|
|
Post by danraitz on Jan 16, 2011 22:49:38 GMT -5
More progress. This time on the "Auxiliary Cab" as GE calls it. Cut the holes for the etched metal grill from the Detail Associates C32-8 grill set #2722. Here is a shot showing the openings. 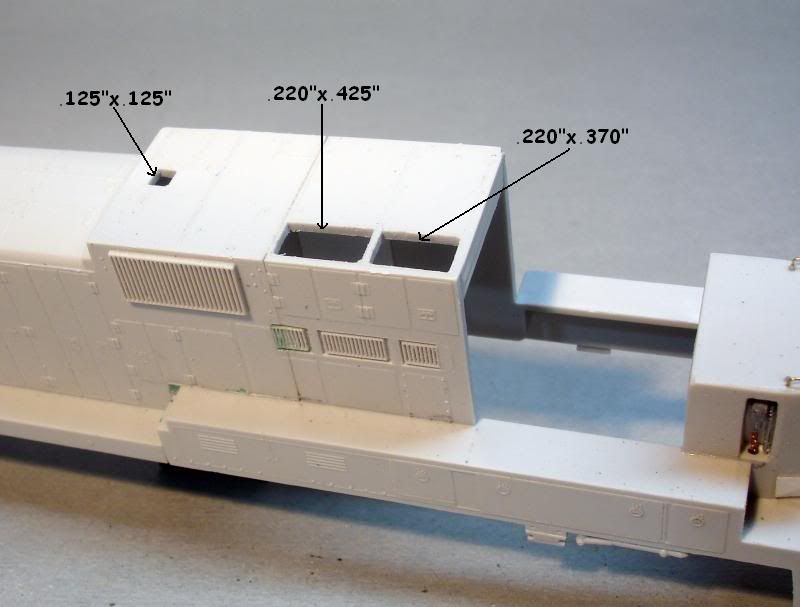 Heres a couple of shots showing how I built the blower motors, as per Ed Ryan's article. 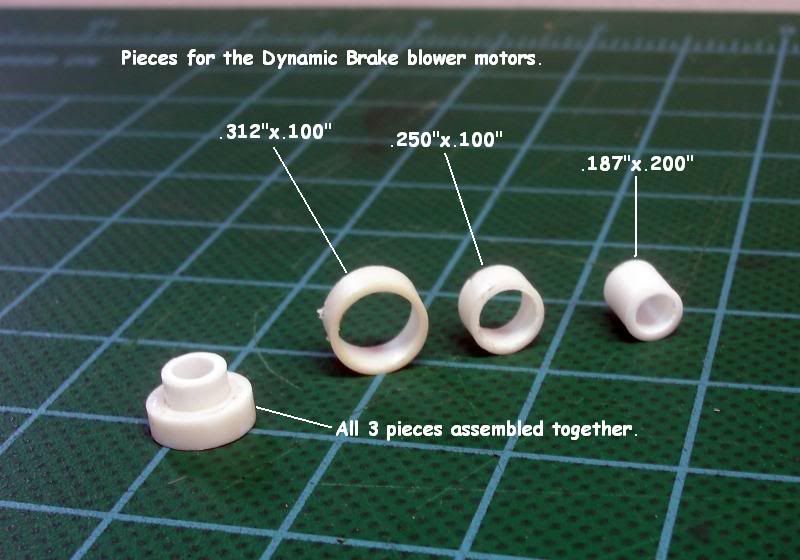 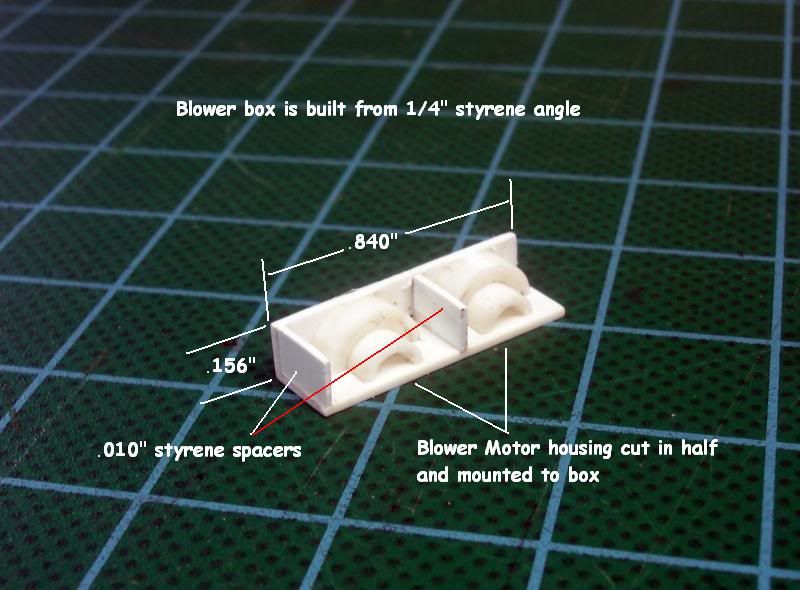 Lastly here is a shot showing them temporarily installed. They will be set aside and permanently installed after the model has been painted, but not before they get a coat of light gray paint though. 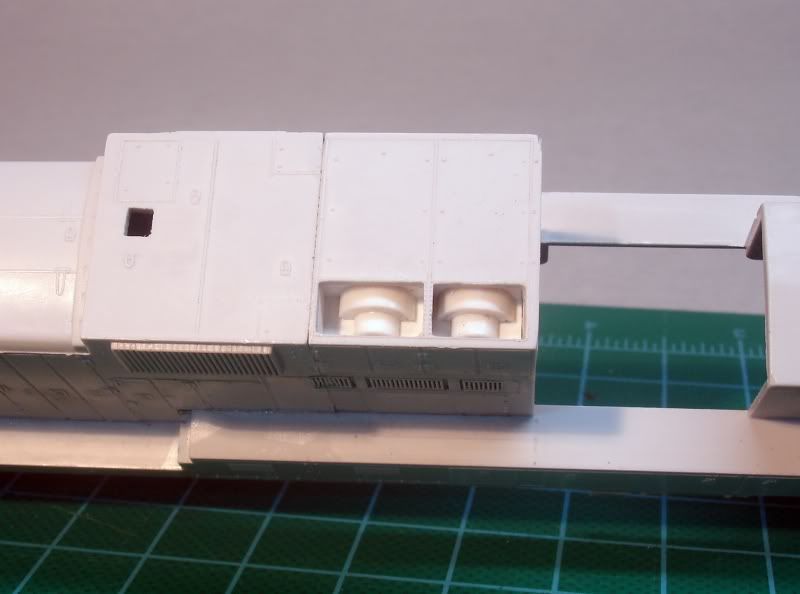 Enjoy Dan |
|
|
|
Post by Randy Earle on Jan 16, 2011 23:12:10 GMT -5
Dan your work so far is great. Take a few moments to file and sand the casting kerf from the molding process, I can see lots of it around the walkways and steps. Railpower units also had heavy flash around the tops of the hood. Just a reminder from one that has been there before.
|
|
|
|
Post by danraitz on Jan 17, 2011 8:18:41 GMT -5
Randy,
Yeah I know, RPP was known for molding lines & injection marks. I'll be attacking those things as I start working in that area. The steps/pilot area will be done when I go to install the A-Line steps. The engine cab area is my next area to work on.
Dan
|
|
|
|
Post by danraitz on Jan 17, 2011 8:30:02 GMT -5
Lance,
These units were built by GE to test the technology for the new Dash8 line. After over 6 years and approximatly 5 million revenue miles on each, They were deemed to have served their purpose and where sent back to GE.
If you want more info? There was a short (9 page) article in the Sept/Oct 1990 Diesel Era.
Dan
|
|
|
|
Post by icghogger on Jan 17, 2011 9:49:44 GMT -5
Nice Work, Dan!! Thanks for the "blow-by-blow" of your handiwork, very impressive!
|
|
|
|
Post by danraitz on Jan 19, 2011 22:46:01 GMT -5
Auxiliary Cab Done! Also finished the Engine Cab.  I followed Ed Ryan's C39-8 article in re-doing this area. The model came with raised lines representing what should be raised panels. To correct this you need to sand the top of this area smooth then install new "correct" panels. 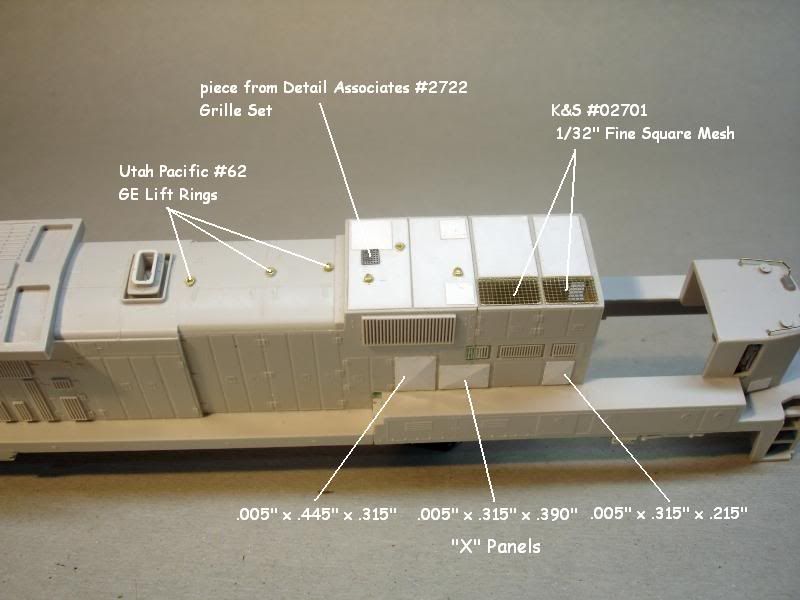 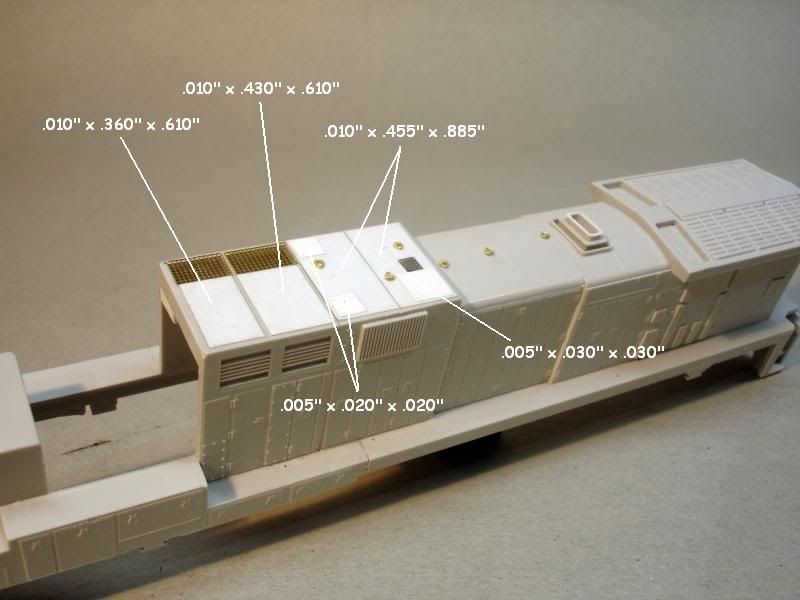 Ran into one problem though.  After installing the Dynamic Brake grilles from the DA set, I felt that they were too crude. I couldn't see the blower motor housings through them. So I changed them out with some 1/32" fine mesh from K&S Engineering. These, I feel are a lot nicer! ;D One thing I need to comment about though. The RPP shell has Dynamic Brake Grilles of two different sizes, whereas on the prototype they are the same size. If I had planned on using the K&S screen from the beginning instead of the DA grilles, I would have made them both the same size. Radiator Cab is next  Dan |
|
|
|
Post by Randy Earle on Jan 20, 2011 2:24:51 GMT -5
Wow! This makes me want to tackle a GE!
|
|
|
|
Post by RunningExtra on Jan 20, 2011 3:11:09 GMT -5
Great job here Dan, I will be watching this one intently!
|
|
|
|
Post by icghogger on Jan 20, 2011 9:38:25 GMT -5
This is one impressive build, Dan!! Tell us how you did the X-braced panels. That detail turned out especially nice. I'm guessing you did it much like a sheet metal worker would, using a metal bending brake. I tried it with an NWSL "Bender" and it did not turn out so hot (musta been holding my mouth wrong, or something!  ) |
|