kcs1967
Chairman
SWLA-SETX PINE SCENTED
Posts: 1,726
|
Post by kcs1967 on Mar 10, 2011 10:29:57 GMT -5
Beautiful work Charlie
|
|
deez
Chairman
Midland Belt Railway
Posts: 949
|
Post by deez on Mar 10, 2011 13:08:19 GMT -5
Looks awesome! Great Job.
|
|
|
|
Post by nssd70m on Mar 11, 2011 3:59:08 GMT -5
Sorry Chris, I forgot to mention the Railflyer bell and sand filler on the long hood end. Both parts look great. I still need to add the air line to the bell. Charlie Good job on the SD. Who makes the brass five chime air horn? Earl is out... |
|
|
|
Post by lindsaya99 on Mar 11, 2011 4:22:28 GMT -5
Thanks for the kind words guys.
The horns are Overland parts. A friend came across a stash recently and he shared a few with me.
|
|
|
|
Post by hotshot3305 on Mar 11, 2011 9:10:32 GMT -5
Thanks for the kind words guys. The horns are Overland parts. A friend came across a stash recently and he shared a few with me. Charlie, your friend must have been one fine fellow to share his five chime horns with you! <G> Bob |
|
|
|
Post by lindsaya99 on Mar 11, 2011 9:49:24 GMT -5
Thanks for the kind words guys. The horns are Overland parts. A friend came across a stash recently and he shared a few with me. Charlie, your friend must have been one fine fellow to share his five chime horns with you! <G> Bob One of the finest. Thanks again! Charlie BTW. Glad you are feeling better. |
|
|
|
Post by ranchwagon on Mar 11, 2011 10:34:41 GMT -5
This is looking great! Keep the updates coming!
|
|
|
|
Post by lindsaya99 on Mar 11, 2011 16:19:24 GMT -5
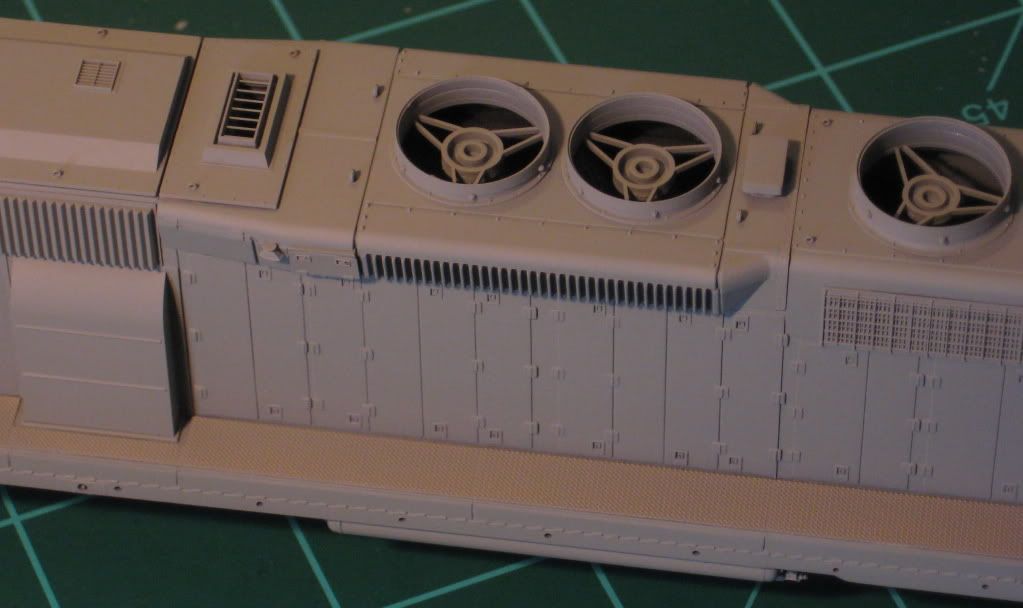
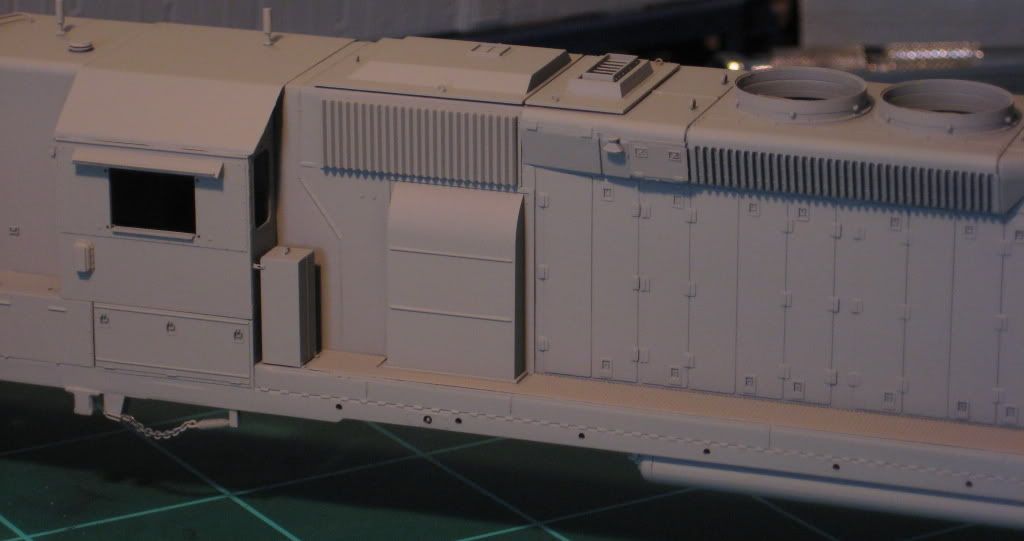
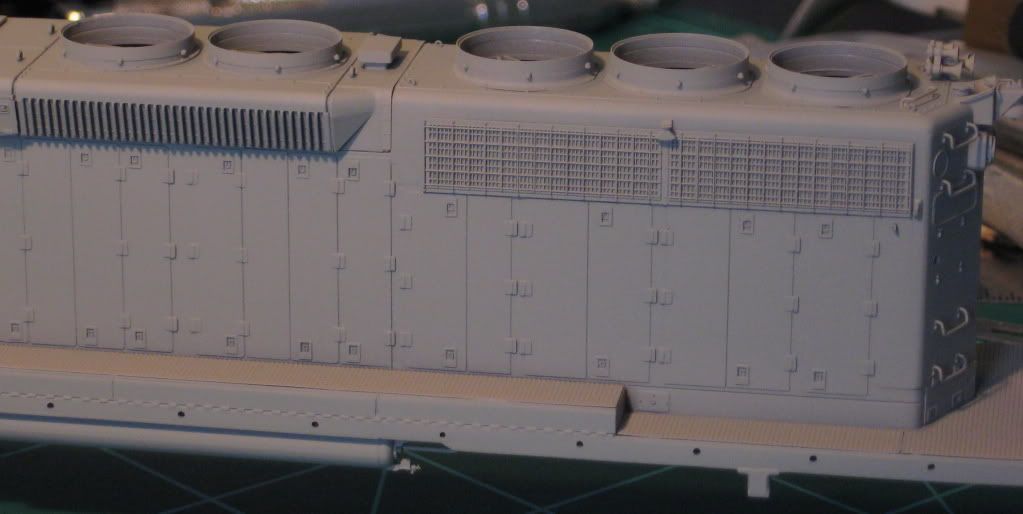
Today I gave it a coat of Tamiya Medium Grey. It was mixed about 40% paint to 60% thinner and shot at 15 PSI. The grey shows off the details nicely so I thought I would post a series of shots and explain all the changes I made to the shell. I'll start off with an overhead shot of the cab and short hood.  Almost the entire front end is from Cannon (high short hood, cab, cab sub-bases). On top of the short hood is a five chime horn from Overland (OMI) and two Details West (DW) firecracker antennae. The sand filler hatch, walkway light, and round vent came with the Cannon hood kit. On the cab we have a set of Hi-Tech Details cab sunshades. The cab vent is from Details Associates (DA). Just behind the cab roof is a weld bead made from 0.010' styrene rod.  The inertial filter and turbo hatches are Cannon with Plano lift rings. I used a couple of different size rings throughout the model. The fans are all Cannon as well. The raised seams fore and aft of the dynamic fans were made from 0.005" styrene sheet. This detail is present on the factory model but I think these look a little better. The dynamic brake vent is from DA. It doesn't show up well in this picture but I added a Railflyer etched brass batten strip between the dynamic section and the radiator section. It shows up better in other photos. The walkway lights are made from Cannon ground lights. Cut off the round mounting pin and use part of the sprue to attach it to the hood. It works pretty well.  This shot shows off the Cannon brake tensioner and ECAFB. You can also see how that weld seam runs down the side of the hood. The intertial filter screens and blower housing are also Cannon. I made some changes to the Athearn blower duct. I used small (approx. 0.030") lengths of 0.010" styrene rod to represent the small weld beads that run the length of the duct. The vertical seams were scribed out after adding the treadplate to insure they would line up correctly. The last thing in this shot is the Cannon air reserviors. The plumbing was made with .019" brass rod.  The walkway light is mounted on a small piece of scrap 0.010" styrene. It simulates the mounting bracket (sort of). There are a few spots where the treadplate isn't completely flush with the deck. Hopefully that won't stand out too much once it is painted black.  The long hood end shows off the Railflyer bell. The air line is 0.008" brass wire. The sand filler hatch is also Railflyer. The fans and radiator grilles are Cannon. The grab irons and headlight casting are from DA. The Overland horn is identical to the one on the other end. Because NS (Southern) has horns mounted here, there is no room for the normal circular grab next to the fan. The solution was to simply have a drop grab in its place. On the side of the hood is a flag holder from DW and another Plano lift ring.  The Railflyer batten strip shows up much better in this shot. The only problem is that the radius of the curve in the roof doen't match up. That was one Athearn-ism I didn't feel like fixing. Again, it is a good thing this will be black.  Here is the other side of the clean air room. You can see the weld seam really well in this picture (as you can tell, I'm kinda proud of that). I replace the Athearn alternator door and plate with Cannon parts. The door handle was a left over from an Intermountain F7 shell kit. Hey, it looks close.  Here is another shot of the cab. More small gabs. Remind me not to do a KCS engine. The air filter and ground light are both DW. The holes on either side of the cab window for Details West's new etched wind deflectors/mirrors. That just about covers everything on the shell except for the pilots. |
|
kcs1967
Chairman
SWLA-SETX PINE SCENTED
Posts: 1,726
|
Post by kcs1967 on Mar 11, 2011 17:14:54 GMT -5
WOW!!!!
|
|
|
|
Post by hotshot3305 on Mar 11, 2011 21:54:37 GMT -5
Charlie,
That is one fantastic model. You have raised the bar to a whole new level.
Bob
|
|
|
|
Post by Randy Earle on Mar 11, 2011 22:58:24 GMT -5
Very good job Charlie. Can't wait to see it done.
|
|
|
|
Post by lindsaya99 on Mar 15, 2011 11:14:55 GMT -5
Thanks guys. I did a little painting this morning. I loaded up my airbrush with Tamiya flat black and hit the grilles, steps, and any little nooks and crannies that might be hard to get paint into. Once that dries, I'll go back over the entire shell with black.
I did make one significant change to the model. Instead of using the original Blue Box drive, I was able to get a RTR model for cheap. I'll need to make some modifications so the shell will fit but I think it will be well worth the effort. Once the donor unit arrives, I will post some pics of my progress on the trucks and fuel tank. I will have to redo the traction motor cabling but that is a small price to pay for the improved drive.
Charlie
|
|
|
|
Post by lindsaya99 on Mar 16, 2011 12:59:44 GMT -5
I did the second coat of black this morning. One of the things I love about acrylic paint is how quickly it drys. After lunch I sprayed on the gloss coat. Here is a new tidbit of knowledge I picked up. In the past I had issues using Future. I sprayed it on at low pressure (15 PSI) but I was still getting an orange peel finish. As it turns out, the problem was I should have been thinning it with isopropyl alocohol. The results are much better. Also, a side benefit is the Future dries much faster. When I used it full strength, it was tacky for hours. I accidently touched the air tanks as I was putting it down and my finger didn't stick or leave a mark. Here is a web page about using Future floor polish. There are some other nice tips on here too. www.swannysmodels.com/TheCompleteFuture.htmlCharlie |
|
csxt
Trainmaster
Posts: 100
|
Post by csxt on Mar 16, 2011 16:02:00 GMT -5
Very nice, looks great!
|
|
|
|
Post by johnnetzlof on Mar 16, 2011 22:41:57 GMT -5
I just wanted to say, having spent hours crawling around the roofs of EMDs while sandblasting them, the details on your model are just SO CRISP and just wow. Great job!
|
|
|
|
Post by lindsaya99 on Mar 17, 2011 11:50:23 GMT -5
$#@%!!!!!!!!!!!!!!!!!!!!!!!!!!!!!!!!!!!!!!!!!!!!!!!!!!!!!!!  I hit my first SNAFU of the project. I started on the decals today. The first one was the large NS logo on the engineer side of the long hood. I very carefully positioned it. Precisely lined it up with the door hinges. Applied my decal setting solution and took a break for lunch. I returned to see that it had snuggled down nicely across all the door details. Just one problem. I put it on too low. The top of the logo is supposed to be aligned with the top of the higher row of door hinges. I lined it up with the bottom of the hinges which put it about 4 scale inches too low. Maybe not a huge deal if that wouldn't throw off the position of the road name below it. Crap. I got the decal off but the damage to the finish was done. I probably could have salvaged it but I would rather just start over with the paint job. After all, its not like I had to mask anything. 30 seconds in hot water and Oxi-clean and the paint just melted off. No damage to the details or the body work. I'll repaint it tomorrow. Another opportunity for excellence! or so I keep telling myself.  Charlie |
|
|
|
Post by lindsaya99 on Mar 19, 2011 9:01:54 GMT -5
Ok. Once again it is black, shiny, and ready for decals. To be continued.....
|
|
jtnrr
Trainmaster
Posts: 127
|
Post by jtnrr on Apr 22, 2011 17:49:21 GMT -5
Amazing work! The gray paint really brings out the detail. Keep up the great work!
|
|
|
|
Post by diesel on May 26, 2011 9:37:57 GMT -5
-can't wait to see pics of that!
|
|
|
|
Post by ChessieFan1978 on Jun 3, 2011 12:35:26 GMT -5
Wow, this locomotive has been spending alot of time in Columbus, Ohio at Watkins Yard. Neat to see it here in model form!!!!
|
|