SP_Modeler
Chairman
SP never died in my world.
Posts: 389
|
Post by SP_Modeler on Sept 4, 2010 1:43:45 GMT -5
Diesel, Thanks for the kind words. I pushed this one farther then I though I would. I'll post a couple pics here. I used .010 styrene and various sizes of brass and styrene rod to simulate the underframe. I also used the Cannon and Co fuel tank detail set and after seeing how much it adds to the level of detail, I wont ever NOT use one again. I also scratch built several parts and modifed most of the others ( including moving 8 door latches). The speed recorder and modified late style A/C unit were both a lot of fun to do. I just got the model painted (mostly) and hopefully by tommorow night I'll have any touch ups done, and by this time next week It's all done. Thanks for looking, Paul 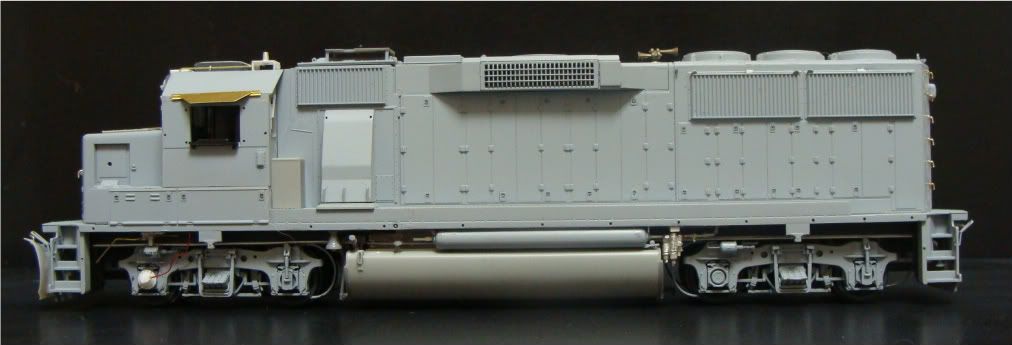 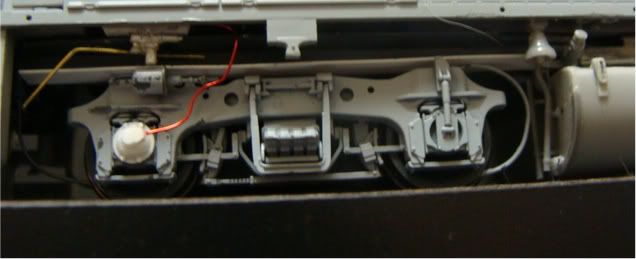 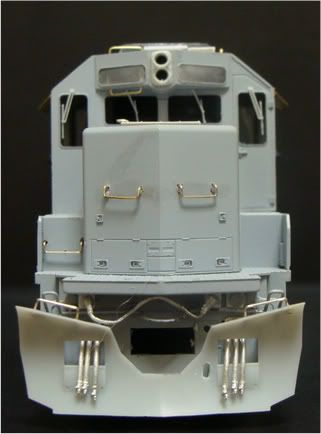 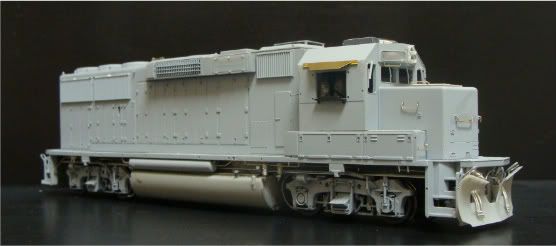  |
|
kcs1967
Chairman
SWLA-SETX PINE SCENTED
Posts: 1,726
|
Post by kcs1967 on Sept 4, 2010 2:52:44 GMT -5
Paul!!!!!
Holy Mother of Molded Plastics!!!!!!!!
Amazing!!!!!!
|
|
SP_Modeler
Chairman
SP never died in my world.
Posts: 389
|
Post by SP_Modeler on Sept 4, 2010 3:01:43 GMT -5
Thanks for the kind words Justin , I just try to model what I see and If I dont have parts, I make them ;D Milling the frame back around the motor area on the model was fun, I dont have a milling machine so it was reference lines calipers and Mk 1 eyeball oh, and Mr Dremmel and every bit I could find to do what I wanted.. The frame details were from starring at way to many pics of GP-60s for the last 3 weeks. It is going to look prety sharp in paint I think.. Stay tuned for more. Paul 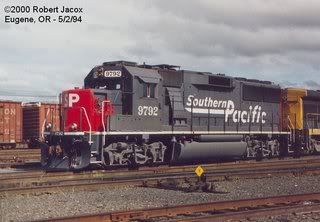 |
|
|
|
Post by RunningExtra on Sept 4, 2010 7:19:47 GMT -5
Really nice work here Paul, you can clearly see all the details that you have added to this model, it really does set it apart from the crowd, great job!
|
|
|
|
Post by icghogger on Sept 4, 2010 8:43:39 GMT -5
WOW, Paul, your efforts have really paid off in a big way! And the work on those trucks is Outstanding!
|
|
|
|
Post by antlorch on Sept 4, 2010 8:43:43 GMT -5
Hey Paul that is an awesome job with the detail work you put into it... If I may though I would like to give you 2 recommendations. 1) Your work is so great scale grabirons from BMLA or Railfyler would look so much better.. 2) On the MU cable from DW cut the "wire" part off and use a #80 or #79 bit and drill a hole in the cable plug,then take a 1.5v light and cut the wire from the bulb and trim to length. Then trim the insulation off exposing the wire on both ends and glue that end into the hole in the plug.. Then paint,makes for a much better looking plug with a more correct length to it.. 3) The sanding lines on the trucks look like the original LL ones ,look at the article from Brian Banna and try this next time,I think you will really like the end result better.. www.6axlepwr.com/NREX_9402_10.html This article applies to 4 axle trucks also.. Otherwise you have done an outstanding job all around and I cant wait till it all complete.. |
|
|
|
Post by atsf90 on Sept 4, 2010 11:42:31 GMT -5
That is looking great. I can't wait to see it in paint. Hope you don't mind one more suggestion, use the scale pilot buffer plates, 235-363. I just used the scale coupler pilot buffer plates for the first time and I really liked the improvement it made.
|
|
drgwguy
Chairman
Modeling the DRGW in the 70s-80s!!
Posts: 528
|
Post by drgwguy on Sept 4, 2010 14:28:08 GMT -5
Paul-
Looking phenominal! I'm waiting for paint shots....
Rick
|
|
SP_Modeler
Chairman
SP never died in my world.
Posts: 389
|
Post by SP_Modeler on Sept 4, 2010 14:37:11 GMT -5
Really nice work here Paul, you can clearly see all the details that you have added to this model, it really does set it apart from the crowd, great job! Thanks Scott ;D I'm pretty happy with it overall, I'm starting to get a picture in my head of it finished and that's always a help.. Some projects I don't quite visualize till their almost done ..this one wont leave my head !  |
|
SP_Modeler
Chairman
SP never died in my world.
Posts: 389
|
Post by SP_Modeler on Sept 4, 2010 14:39:42 GMT -5
WOW, Paul, your efforts have really paid off in a big way! And the work on those trucks is Outstanding! Thanks Robert, Glad you like it so far ;D I think Im going to see about getting some sanding brackets...I have them for my 45T-2 and I think they might look good on this too. Paul |
|
SP_Modeler
Chairman
SP never died in my world.
Posts: 389
|
Post by SP_Modeler on Sept 4, 2010 14:50:05 GMT -5
Hey Paul that is an awesome job with the detail work you put into it... If I may though I would like to give you 2 recommendations. 1) Your work is so great scale grab irons from BMLA or Railfyler would look so much better.. 2) On the MU cable from DW cut the "wire" part off and use a #80 or #79 bit and drill a hole in the cable plug,then take a 1.5v light and cut the wire from the bulb and trim to length. Then trim the insulation off exposing the wire on both ends and glue that end into the hole in the plug.. Then paint,makes for a much better looking plug with a more correct length to it.. 3) The sanding lines on the trucks look like the original LL ones ,look at the article from Brian Banna and try this next time,I think you will really like the end result better.. www.6axlepwr.com/NREX_9402_10.html This article applies to 4 axle trucks also.. Otherwise you have done an outstanding job all around and I cant wait till it all complete.. Thank you Anthony for the kind words and suggestions.  I just tacked the MU Cables on for "show" to get an idea of the look of it..they actually are already off prior to paint. I use fine solder to replicate the cable parts, same idea as the wire, but they take more contorted shapes. As for the Grabs, I don't see a huge difference in the DA grabs Vs BLMA or Railflyer.. but then again I've never used those yet! ( maybe next time) Anyway, the DA grabs are what I had and they are CA'd in so they must stay ;D I'm going to see about getting some sanding brackets, I just put them on the 45T-2 and was going to attach the lines on that model with Micro bulb wire as suggested. Thanks for checking in! Stay tuned for more later! Paul |
|
SP_Modeler
Chairman
SP never died in my world.
Posts: 389
|
Post by SP_Modeler on Sept 4, 2010 14:54:49 GMT -5
That is looking great. I can't wait to see it in paint. Hope you don't mind one more suggestion, use the scale pilot buffer plates, 235-363. I just used the scale coupler pilot buffer plates for the first time and I really liked the improvement it made. Thanks Eric for the kind words! I'll go pick up a set of the DW pockets and check them out. I had used a set on a an old BB GP40-2 I did, but after I slid the pocket/coupler parts the P2K 60 came with into the holes thought they looked good.. We'll see how the DW parts look compared to them and if its not going to mess up my whole pilot, I'll put em on, never to late to add parts! ;D Paul |
|
SP_Modeler
Chairman
SP never died in my world.
Posts: 389
|
Post by SP_Modeler on Sept 4, 2010 14:58:01 GMT -5
Paul- Looking phenominal! I'm waiting for paint shots.... Rick Thanks for the kind words Rick! Im waiting for paint shots too! ;D I'm going to try adding a few parts and suggestions to the mix as provided by the guys above and see how much more prototypical they make things, then more paint! Wish me luck! Paul |
|
|
|
Post by Randy Earle on Sept 4, 2010 15:50:42 GMT -5
Looks really good. I'm glad to see builds like this.
|
|
SP_Modeler
Chairman
SP never died in my world.
Posts: 389
|
Post by SP_Modeler on Sept 4, 2010 16:51:06 GMT -5
Looks really good. I'm glad to see builds like this. Thanks Randy! ;D I'm glad I found the DD and got the chance to share ideas and show off some projects too! LOTS of talent here at the DD, would be cool to try and meet some of the guys some day and run trains. Thanks again for looking more soon, Paul |
|
SP_Modeler
Chairman
SP never died in my world.
Posts: 389
|
Post by SP_Modeler on Sept 13, 2010 3:36:56 GMT -5
Just a quick update on this one, the Unit is painted and I'm waiting for the GP60 decals and some parts to show up at the LHS..I'm about to paint the 45T-2R, and start my second GP60 project this week. the new GP-60 will be a third order SSW non speed lettered unit , havent decided on the road number yet. As of Sept 11th Iv'e been on the DD one month...thus far I have done the following since joining Touched up and weathered a Overland brass B40-8 Stripped detailed and re-painted and weathered an Atlas B30-7 Stripped detailed and re-painted a P2K GP-60 Stripped detailed and repainting a Athearn SD45T-2 R About to start another P2K GP60 project... You guys and your awesome work are what's inspiring me to get my stuff done for a change before I get burried in a couple of large multi unit projects I have comming in. As always, thanks for looking and I'll post more later! Paul 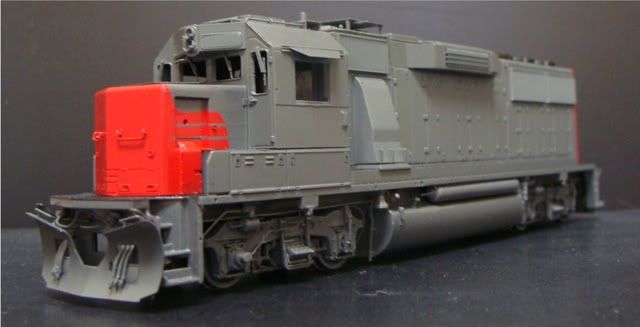   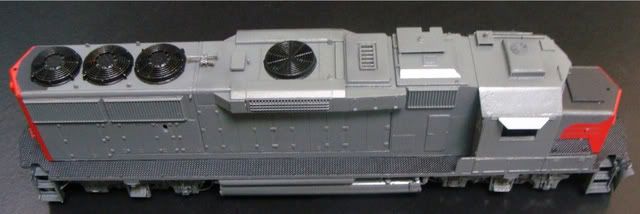 Paul |
|
SP_Modeler
Chairman
SP never died in my world.
Posts: 389
|
Post by SP_Modeler on Oct 3, 2010 2:15:18 GMT -5
Just a small update on GP60 Phase II 9792,
I got some decals on after waiting what seems like forever for them to arrive. They had been dry and set for a few days, and looking at them I could see "cracks" in the lettering, so I stripped the entire long hood. I'll lightly sand down the protruding ( a bit to high) hinges and I'm going to repaint it, re-decal it and move forward ;D
I think the details of the hinges were just a bit to much for the old decals I must have gotten. When the decal setting solution did its thing , instead of doing what it normally does, it set stronger then the decal could stand, causing them to crack when they dried.
I'll keep anybody who wants to know how it comes out updated..
Paul
|
|
|
|
Post by mrlfan on Oct 3, 2010 11:29:01 GMT -5
Paul, I missed this one. I am very impressed with your work. I feel bad that you had to strip your engine but look forward to seeing it done. Thanks for sharing.
Glenn
|
|
|
|
Post by diesel on Oct 3, 2010 15:09:10 GMT -5
YA BABY! I just looked through here again, nice job! I'm glad you have progress shots of this, anyone who thinks this thing came out of the box that way can see what you did,... if you show them that is. This is a very nice job on a very detailed unit. I know you did a lot of work on the brake blister, but I really like how much you put into the underframe.
|
|
SP_Modeler
Chairman
SP never died in my world.
Posts: 389
|
Post by SP_Modeler on Oct 3, 2010 16:08:53 GMT -5
Paul, I missed this one. I am very impressed with your work. I feel bad that you had to strip your engine but look forward to seeing it done. Thanks for sharing. Glenn No worries Glenn, but thanks for the sympathy and kind words. the Long hood separates from the walkways , so it was easy to remove the DB section and long hood and the ELO just took the paint right off. Only set me back a few hours, she'll be good as new soon. ;D HAPPY BIRTHDAY again! Paul |
|