|
|
Post by onequiknova on Feb 6, 2015 14:41:51 GMT -5
I started this build a couple months back, but figured some of you guys may want to see it. Some may already have... I started this build with a BLI E8, and a Highliner F unit kit that gave up it's nose, rear end, and some other parts. Here is one of many proto photos I worked from. www.flickr.com/photos/5632/6377554881/sizes/l/ This is an ex UP E8, and although the RI changed certain things to their standards, many UP details remained. First thing I did was graft the Highliner nose to the BLI shell. 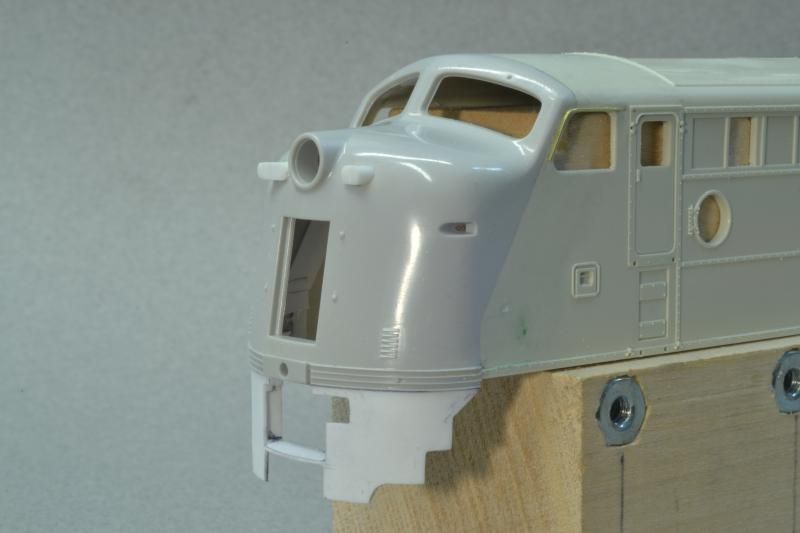 You can see the splice above. I follow the Highliner parting lines to make my cuts, then transfer them to the BLI shell. The scratch built pilot has been started in this pic. Before gluing the Highliner nose to the shell, I set the nose up in my end mill to cut the oval shaped holes for the nose MU receptacle bosses. 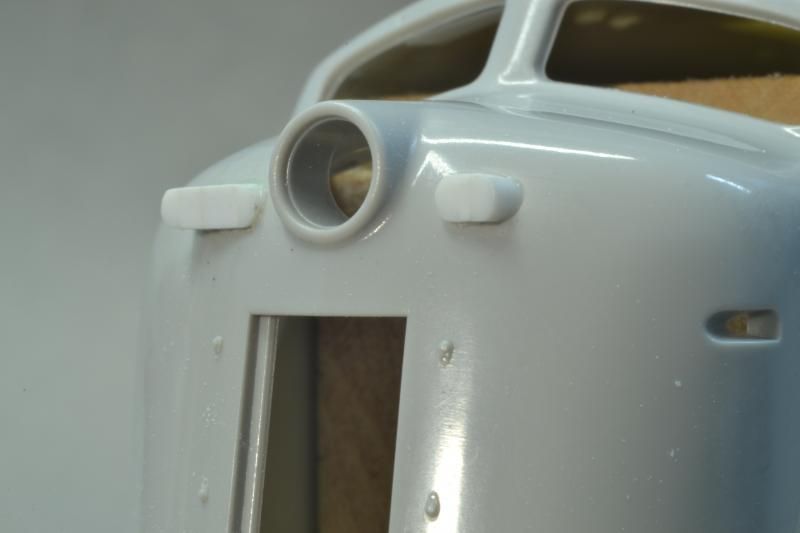 Another view of the nose splice.  The opposite end received a similar treatment as the front. Replacing the ugly BLI part, with the much nicer Highliner part. 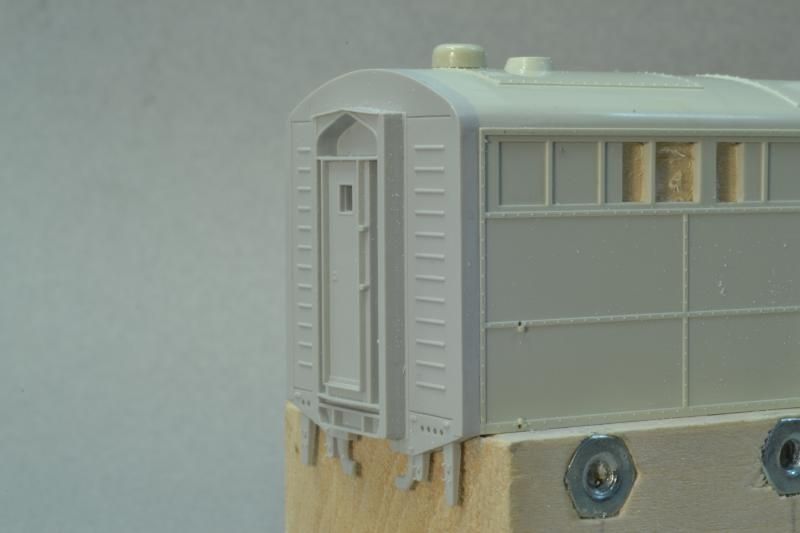 |
|
|
|
Post by onequiknova on Feb 6, 2015 14:51:19 GMT -5
Turning to the roof next. The BLI witerization hatches are too narrow, and there are no hatches available in the aftermarket, so I had to make my own. I made the hatches themselves on my mill, and designed the photo etched parts to finish them off. 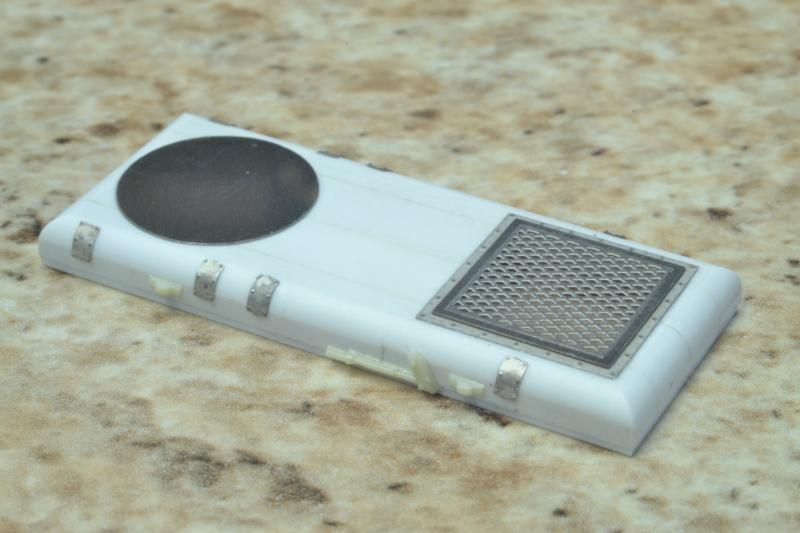 Again, these are ex UP E's. When the RI removed the snow shields, they left behind parts of the brackets. The round disc is a patch used to seal up the hole under the snow shields. 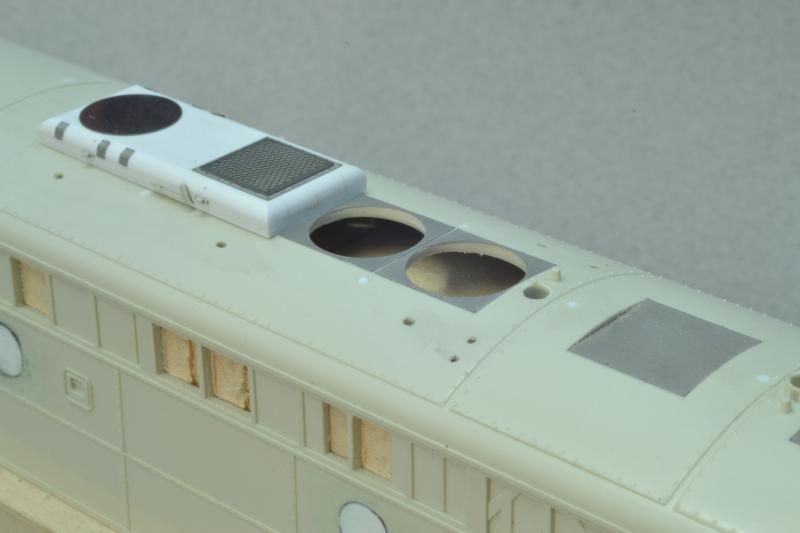 The fan hatches are also my etchings, along with the DB block off. The hatches will accept Cannon 36" cap top fans. 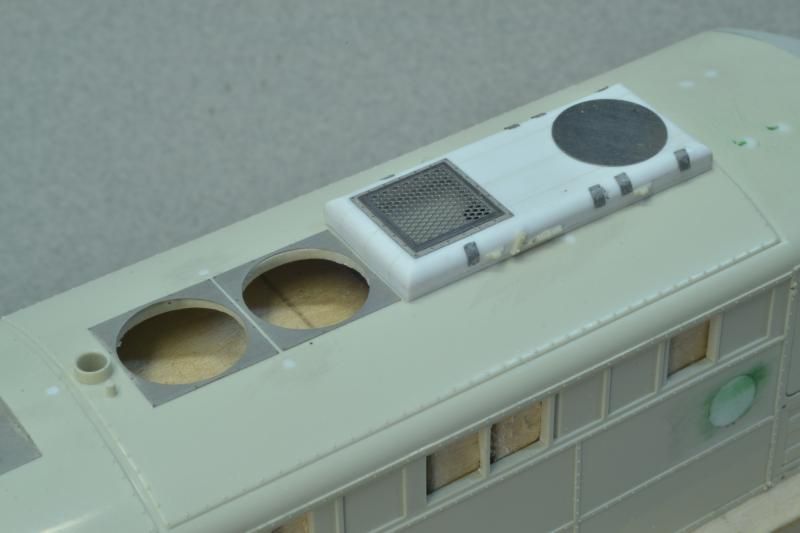 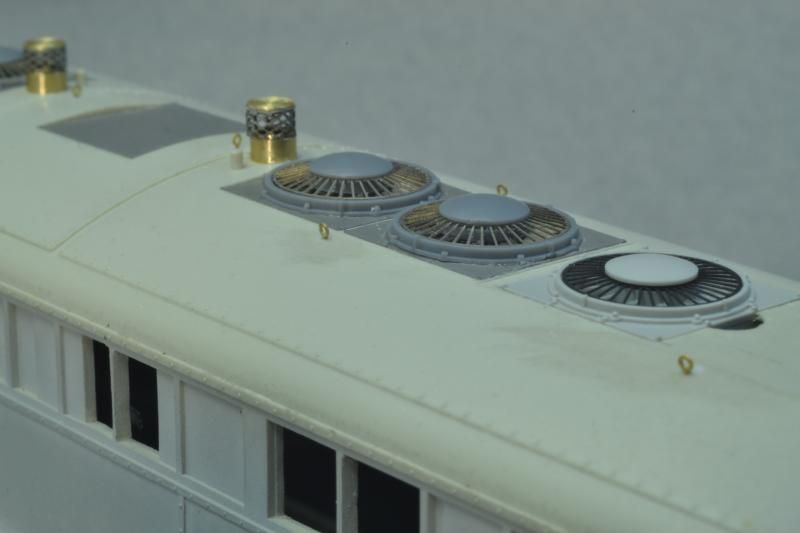 The steam generator intake and exhaust were relocated. I wasn't happy with any of the intakes I had here, so I turned my own on a lathe, and bent some etched mesh to fit inside. 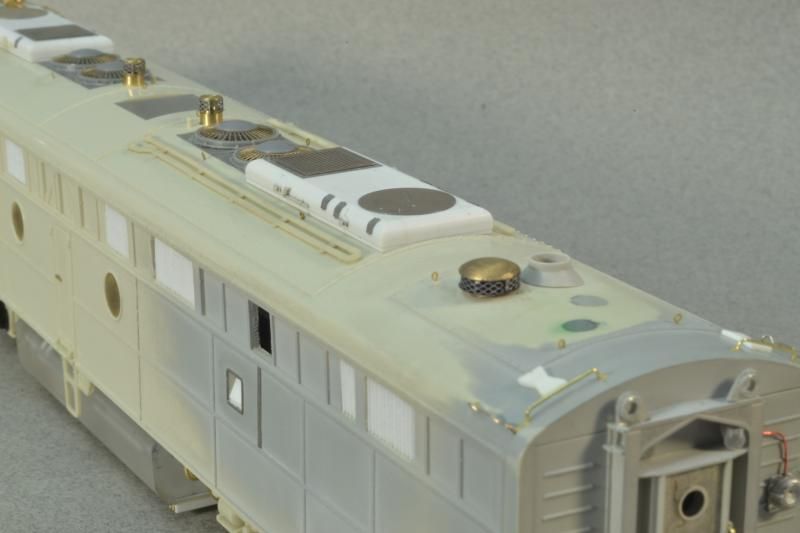 The cab roof got the appropriate details.  |
|
|
|
Post by onequiknova on Feb 6, 2015 15:03:58 GMT -5
As was hinted to earlier, the pilot was scratch built. The proto pilot was a shop made pilot, and was just a sheet of steel wraped around the anti climber. It is perfectly vertical. No slope like an original EMD pilot. There is nothing available that really matches, so I scratch built it. I started by shaping some styrene over a wooden form. A quick dunk in boiling water sets the styrene to the form. 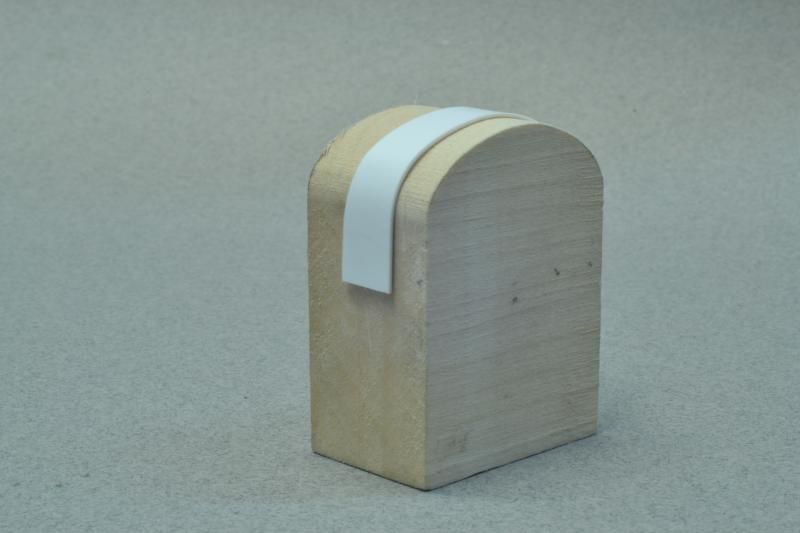 I then wrap the styrene around the anticlimber and laid out the outside edges of the pilot. I use a Sharpie to make the scribed lines show up better. 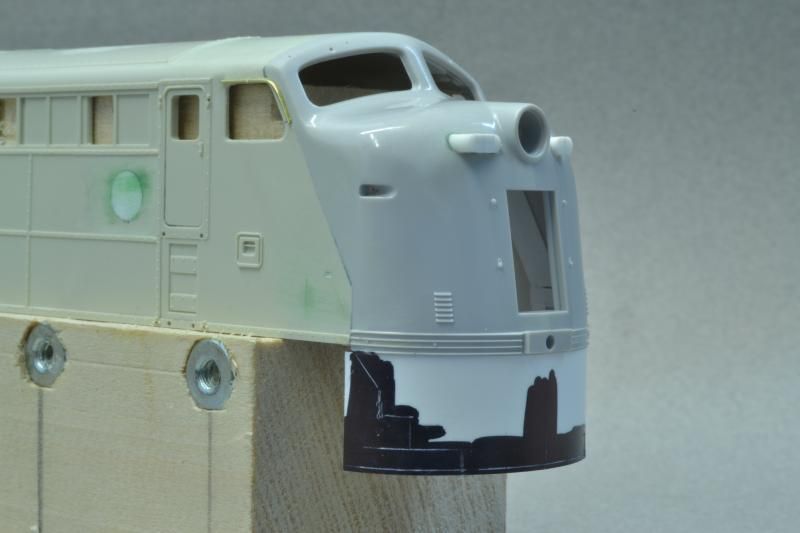 With the shape of the pilot filed to shape, I can layout the draftgear opening. 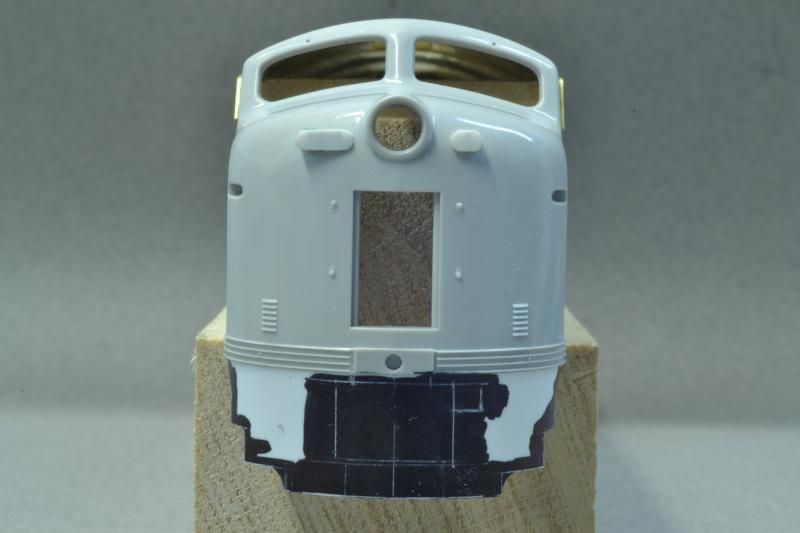 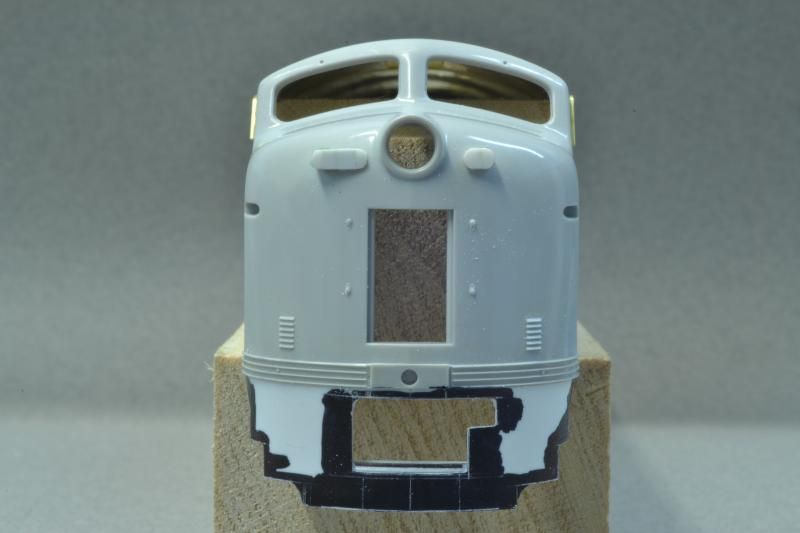 With the draft gear opening cut out, I brace the inside of the pilot following what I can see in proto photo's. 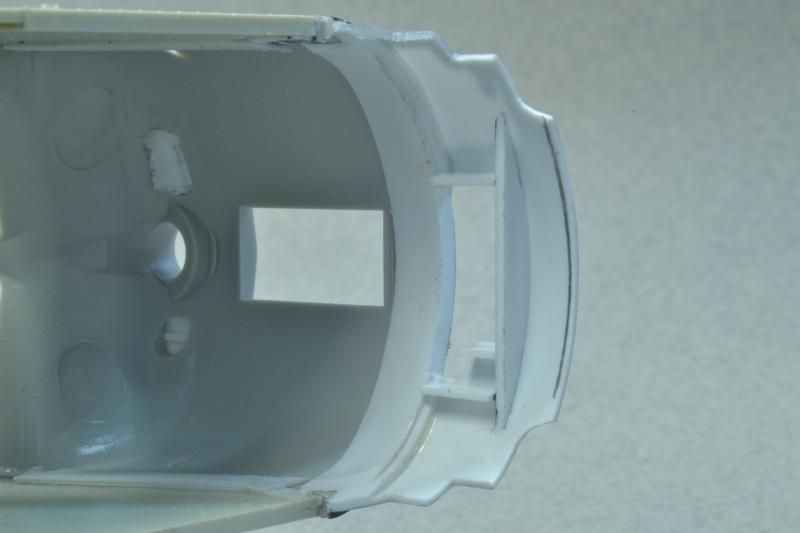 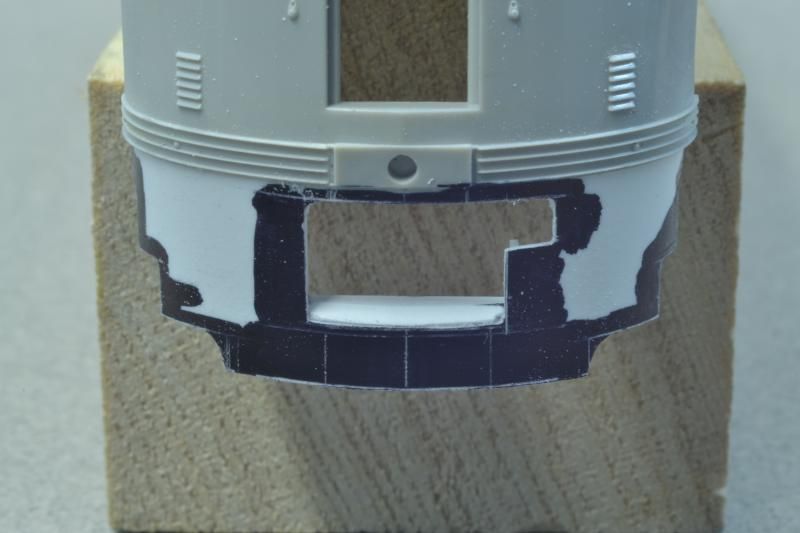 Now with the pilot braced, I can cut out the opening for the steam line without fear of the pilot springing open. 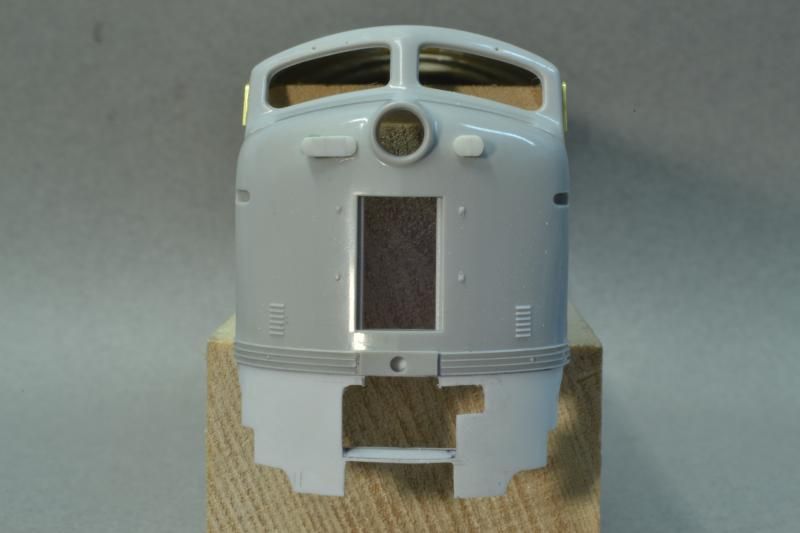 Mostly done. The rest of the details will wait til later. 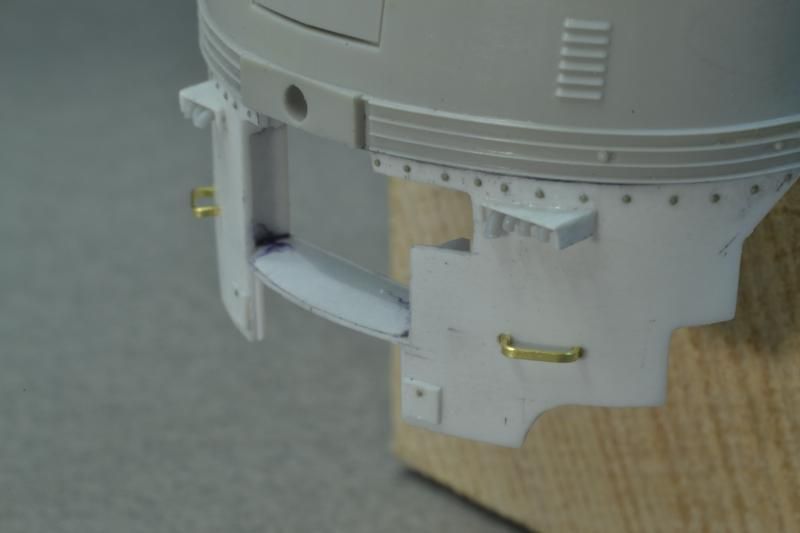 |
|
|
|
Post by onequiknova on Feb 6, 2015 15:16:22 GMT -5
I'm going to shift gears a little bit and show some of the chassis modifications. The BLI E's don't really allow for de-skirting. This is what you get when you remove the skirts.  I will have to extensively mill the frame, and while I'm at it, I'll make a new, full sized fuel tank. This first pic gives you an idea how much material had to be removed to give some depth above the tank for detailing. The original motor cradle came out nearly flush with the side of the shell.  The fuel tank is milled from a solid block of clear acrylic following prototype photo's. 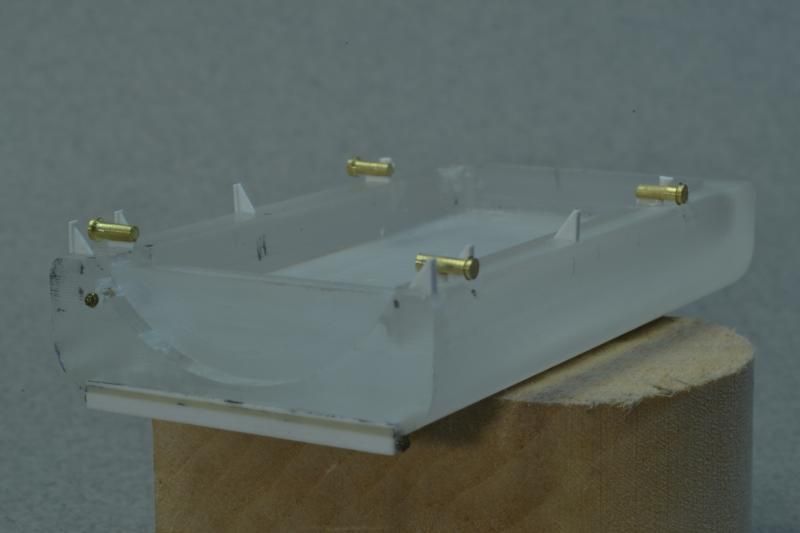 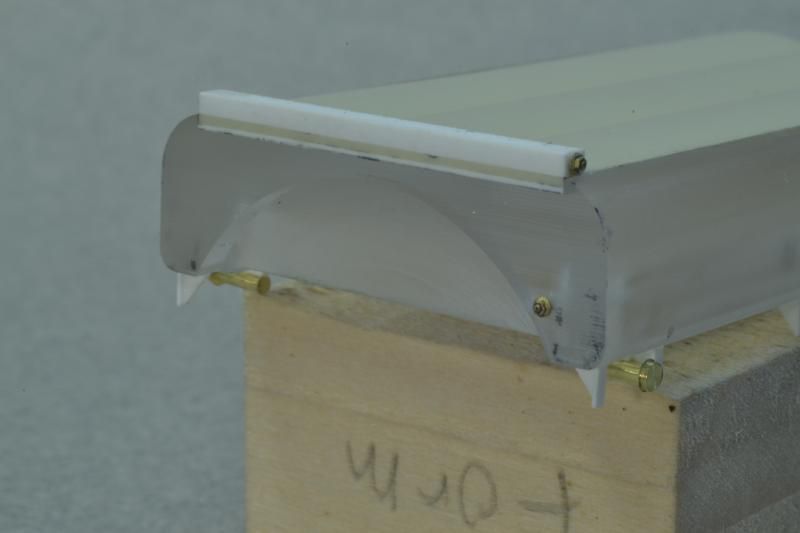 Styrene C channel was added for frame rails. The air tanks were turned from brass stock. 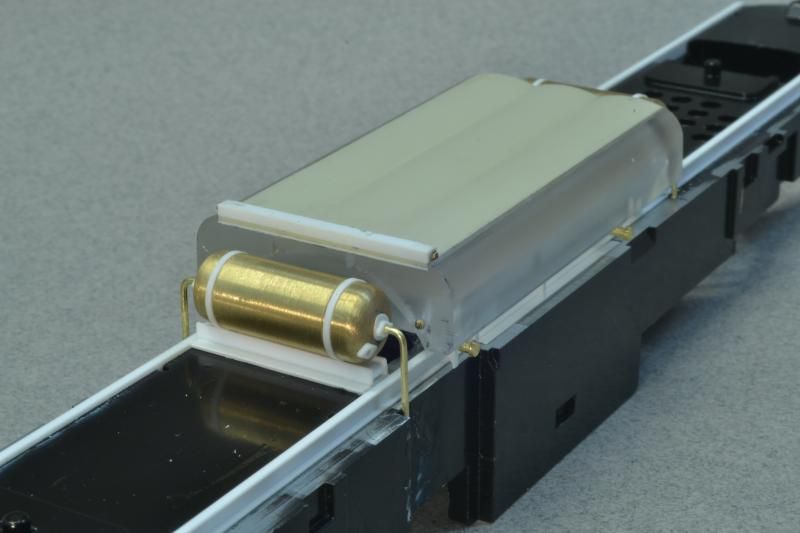 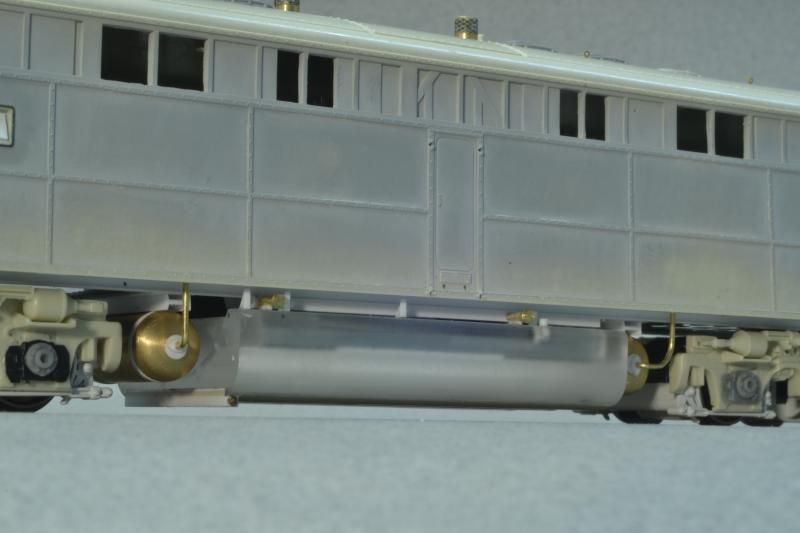 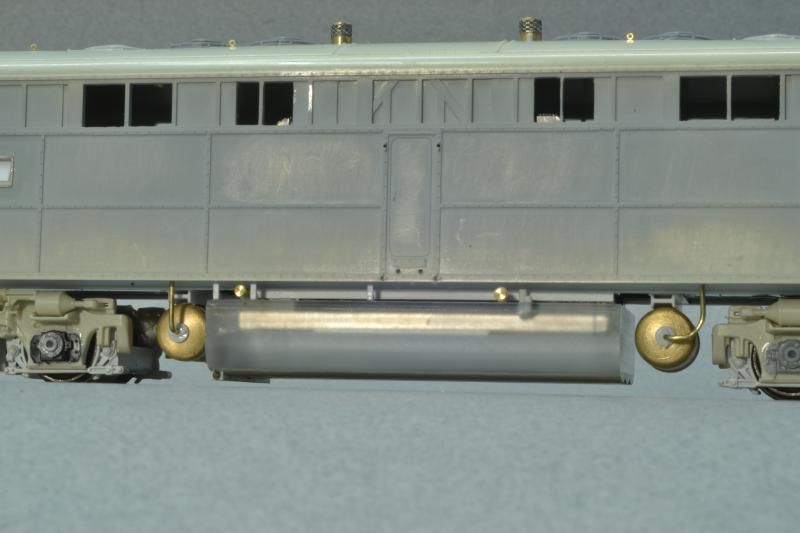 |
|
|
|
Post by onequiknova on Feb 6, 2015 15:24:46 GMT -5
|
|
|
|
Post by icghogger on Feb 6, 2015 17:05:20 GMT -5
Damn, John, the next time I need surgery, I'm gonna request that you do the work!! That is some fine Slicin' & Dicin'!!
|
|
|
|
Post by iomalley on Feb 6, 2015 18:47:19 GMT -5
Love this build!!
|
|
dekon
Staff Member
Posts: 634
|
Post by dekon on Feb 10, 2015 15:22:49 GMT -5
WOW!
|
|
|
|
Post by jakeloyst on Feb 10, 2015 20:00:05 GMT -5
looks awesome, I like the way you grafted on the nose
|
|
efram
Chairman
Posts: 206
|
Post by efram on Feb 10, 2015 21:05:39 GMT -5
More pictures! Amazing craftsmanship.
|
|
|
|
Post by onequiknova on Feb 10, 2015 23:03:43 GMT -5
Thanks guys.
It is currently in paint and am finishing up the decals. Trying to get the large billboard lettering to settle over the batten strips is almost too much for my MicroSol to handle. After 10 or so applications, I'm finally getting there.
I'll get some pics up before I start the weathering process.
|
|
dale
Superintendent
Posts: 157
|
Post by dale on Feb 10, 2015 23:37:02 GMT -5
That's some good work! That Highliner nose is very impressive.
|
|
|
|
Post by simulatortrain on Feb 11, 2015 0:06:43 GMT -5
On its way to being another masterpiece!
|
|
efram
Chairman
Posts: 206
|
Post by efram on Feb 11, 2015 7:26:03 GMT -5
John, do you attend RPM Naperville? I see your screen picture is the RI AB6 and I'm certain I've spied it in the display area...?
Also, it appears the cab ladder/steps and stirrups (below the side access door) appear to be a separately-applied piece. If so, who makes it?
|
|
|
|
Post by onequiknova on Feb 11, 2015 11:47:09 GMT -5
John, do you attenddisplayperville? I see your screen picture is the RI AB6 and I'm certain I've spied it in the display area...? Also, it appears the cab ladder/steps and stirrups (below the side access door) appear to be a separately-applied piece. If so, who makes it? I attended the 2013 Naperville RPM and did have the AB6 on display. The stirrups are the BLI part. I think they retooled them recently, as they are much nicer than the older stirrups. |
|
|
|
Post by tamaman on Feb 11, 2015 12:46:45 GMT -5
Very nice build, I like the look of models in this state.
|
|
artur
Chairman
Posts: 580
|
Post by artur on Feb 11, 2015 14:32:11 GMT -5
Very impressive work, I like how you attached the highliner nose. I wish I saw this before starting my build.
|
|
efram
Chairman
Posts: 206
|
Post by efram on Feb 11, 2015 17:44:26 GMT -5
Thanks! I can't find a listing for those BLI steps anywhere.. did they come with the E unit shell?
|
|
|
|
Post by onequiknova on Feb 11, 2015 18:04:29 GMT -5
They come with the E units. I doubt you'll find them individually. I believe Precision Scale has them as a detail part, but I've never seen one in person to know how nice they are.
|
|
|
|
Post by onequiknova on Feb 11, 2015 23:10:27 GMT -5
A few pics fresh from the paint shop. The colors are a bit washed out in these pics. I wish I knew how to edit photos. 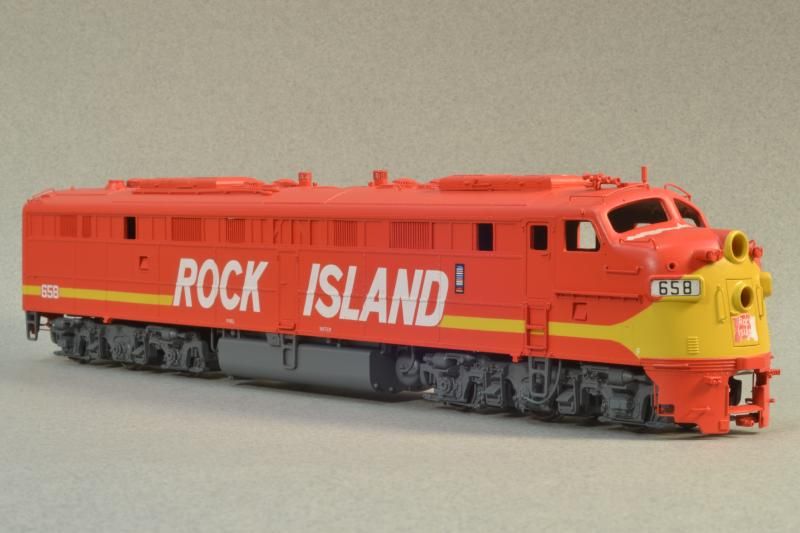 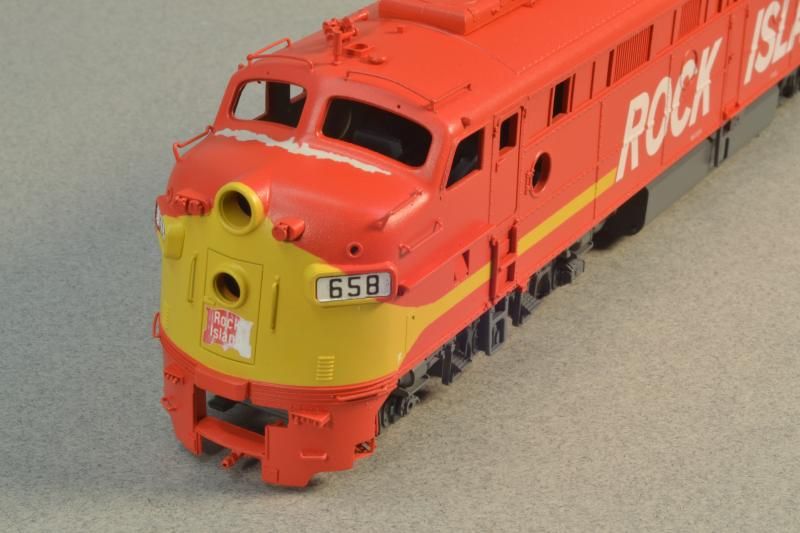 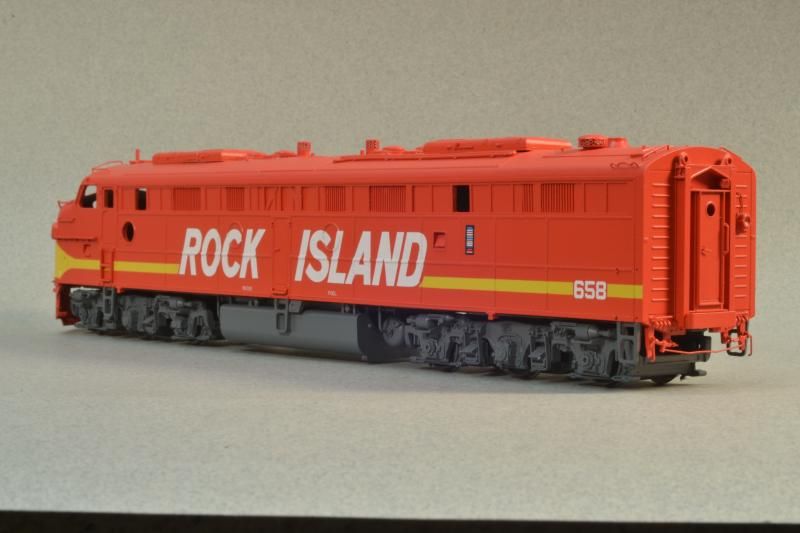 I have done a couple pre-weathering steps already. The chipping on the top of the nose, like in the proto photo below was done with AK Interactive chipping fluid. www.flickr.com/photos/5632/6377554881/sizes/l/Thanks to Brian Banna for turning me onto the stuff. The herald was another road block. The standard stick on herald the RI used had a red border, and this is how most the decals I have here are made. They are too wide to fit on the nose door, and incorrect for this unit. After playing around with some caboose heralds and any other herald I had here, none would work, so I went back to the original herald with the red border and with my 10x lens in the Optivisor, carefully trimmed off the red border free hand while still on the paper. This left a thin white stripe as the new border. I also took this time to fade the herald like the above proto pic. While still on the decal paper, I thinned out some white enamel and applied washes and streaks to fade the red background. Once try, the decal was applied like any other decal. |
|