Deleted
Deleted Member
Posts: 0
|
Post by Deleted on Feb 12, 2015 8:28:18 GMT -5
Nice piece of work John!
it always looks good in primer gray and such, but when you get paint on it, the model really comes to life. Your paintwork is smooth and the lines are super crisp. Unlike what the manufacturers deliver, your model looks very heavy. The details are sharp. What an all around great looking model. Weathering is going to bring this thing to life big time.
|
|
|
|
Post by enginseer on Feb 12, 2015 9:24:01 GMT -5
That is an amazing build.
Is it wrong for me to like the unpainted version more than the painted one?
I guess it's the modeler in me.
Still, wow, what a build to live up to.
Thanks for sharing!
|
|
|
|
Post by icghogger on Feb 12, 2015 10:06:52 GMT -5
Your work weathering the decal is superb, and worth every minute you spent on it!!  |
|
|
|
Post by onequiknova on Feb 12, 2015 19:47:53 GMT -5
Thanks guys.
Now the fun part begins. Weathering.
|
|
|
|
Post by onequiknova on Feb 20, 2015 0:56:40 GMT -5
|
|
|
|
Post by onequiknova on Feb 20, 2015 0:57:40 GMT -5
A few more. I have struggled in the past to try to model chipping paint by painting the chips onto the top coat. It turns out actually chipping the top coat is the way to go. It was done with AK Interactive's chipping fluid. It's similar to the hairspray technique, but you have much more control.  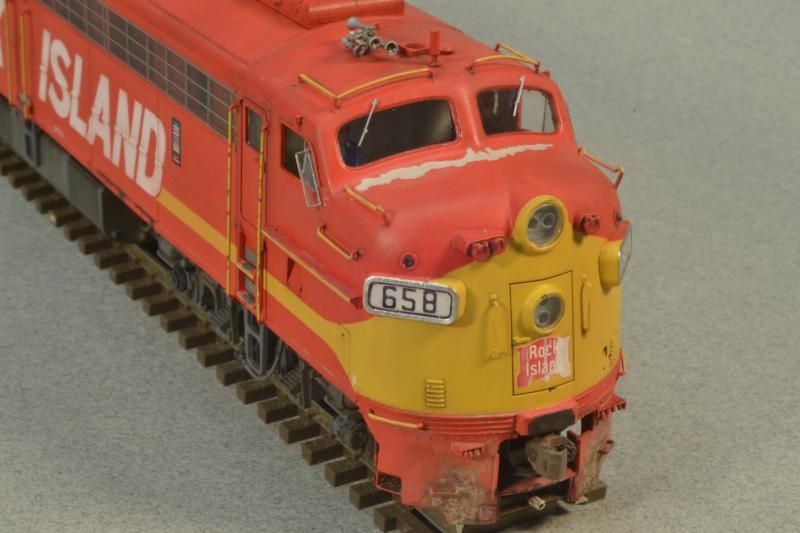 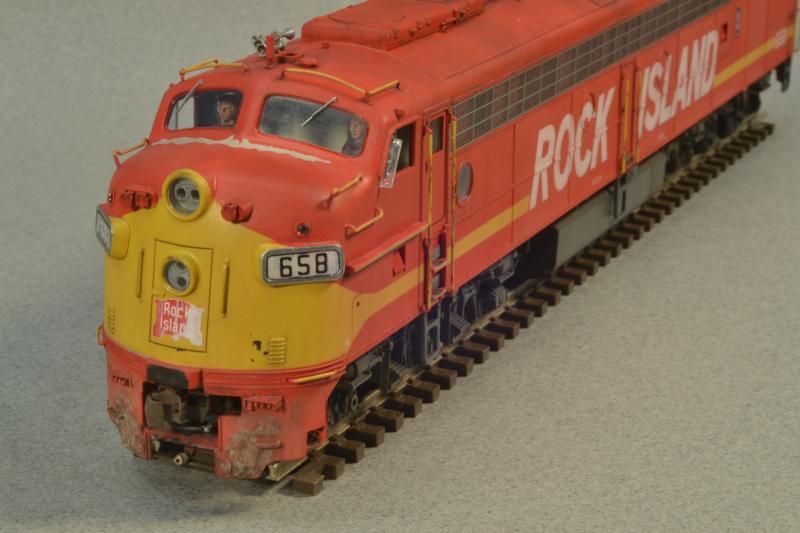 |
|
|
|
Post by Eccentric_Crank on Feb 20, 2015 2:18:13 GMT -5
Your work shows through anyway.
The tips for paint chipping are most valuable.
You need to think about photo editing software.
If you can't afford Photoshop, try Gimp, it's free.
I've been exploring version 2.8, and it's mature enough to do most of what I use Photoshop for.
Open source software is finally coming of age.
Dan M.
|
|
Deleted
Deleted Member
Posts: 0
|
Post by Deleted on Feb 20, 2015 8:23:40 GMT -5
John,
Just a fantastic piece of work!!!!!
|
|
|
|
Post by enginseer on Feb 20, 2015 9:07:38 GMT -5
That is outstanding...
I take back what I said about liking the unpainted version.
Despite having a soft spot for the unpainted version which showed all the work you did, the final product is just top notch.
|
|
|
|
Post by tamaman on Feb 20, 2015 10:56:42 GMT -5
John,
This build is amazing! The detail, weathering and paint chipping tips are top notch!
|
|
dekon
Staff Member
Posts: 634
|
Post by dekon on Feb 20, 2015 12:10:26 GMT -5
OUTSTANDING! BRAVO, BRAVO!
|
|
|
|
Post by iomalley on Feb 20, 2015 12:48:13 GMT -5
Banner Vote!!!
|
|
|
|
Post by onequiknova on Feb 20, 2015 15:59:31 GMT -5
|
|
dtinut
Chairman
Modeling the DT&I of the 60's & 70's
Posts: 661
|
Post by dtinut on Feb 20, 2015 21:46:34 GMT -5
Beautiful work! You knocked it out of the park!
|
|
|
|
Post by m a y o r 79 on Feb 23, 2015 13:32:48 GMT -5
Outstanding work! I like the chipped paint effect, was that the chipping fluid as well or just painting over the decal?
|
|
Deleted
Deleted Member
Posts: 0
|
Post by Deleted on Feb 23, 2015 14:19:51 GMT -5
The chipping effects can be accomplished two ways. You can use the AK Interactive Heavy Chipping Effects or Worn Effects which created a lighter chipping or worn away paint. They both work very well. The application of these fluids is a little concerning, but they dry to a very thin film. So actually no worries about it.
The other method which I use a lot is hair spray. The AK interactive solutions are a little more controllable, but I have had very good success with hair spray. I use the pump bottle hair sprays and not the aerosols.
For both of them you can either brush them on or apply them with an air brush. With an airbrush, you will want to apply at least two coats.
The base color can be any type of paint. mineral based or acrylic. BUT, the top coat you are chipping off HAS to be acrylic. It is not to say a non acrylic will not chip off, but you will not get the fine chipping effects. The non-acrylics will sheet off more than chip off. You will get some good effects, but not the very fine chipping effects you might want to get.
|
|
|
|
Post by onequiknova on Feb 23, 2015 14:30:17 GMT -5
The chipping fluid was only used on top of the nose. Since it was such a concentrated area, I simply applied the fluid with a brush where the chipping was to be done.
The nose herald was faded with thinned white enamel paint, done in layers until the desired effect was reached. This was done while the decal was still on the paper. Once dry, the enamel isn't affected by the decal application.
|
|
|
|
Post by analogbeatmaker on Feb 24, 2015 0:52:49 GMT -5
What a fantastic model John! I really enjoyed and learned from your photo progressions and explanations...thank you. The parts you manufactured look very clean and precise and make the unfinished model a work of art in itself. Then you follow that with a super clean paint/decal job that breathes life into it. Finishing it off with such a well done weathering job gives it the road weariness it deserves. I would really like to see outdoor pics on a dio one day. I look forward to your next work of art!
|
|
|
|
Post by Milwaukee Road 513 on Mar 16, 2015 3:20:01 GMT -5
Outstanding work!
|
|


