|
|
Post by tjmfishing on Aug 17, 2014 6:57:03 GMT -5
For those wanting to build a proper Canadian RS-18, your options have been limited....until now. In the past there was the inaccurate (and now expensize) Proto model or the RS-11, which involved using those brass pieces to fill the notches and hours of filling, sanding, and filing. Now we have a solution for anyone looking to do a high hood MLW road switcher, whether it be CN, CP, BC Rail, ONR, etc etc. www.shapeways.com/model/2498165/rs18-hood-end-ho-scale-1-87.html?li=shortUrl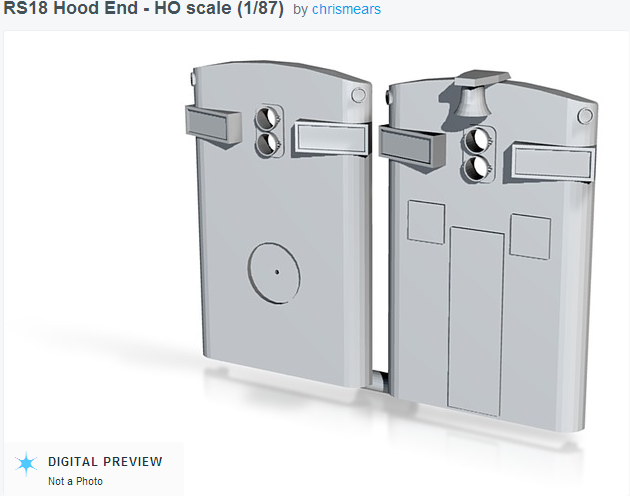 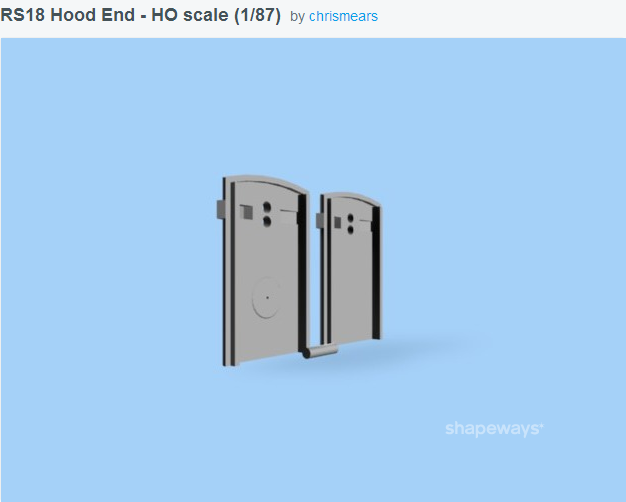 These were designed to fit the Atlas (or Kato) RS-11 and a lip is included to increase the surface area when gluing these in as evident in the second photo. The headlights are drilled and the inside of the numberboards are printed in a really thin layer of translucent material. If you want to light them, you should be able to put a reverse decal right over it. Otherwise, they can be easily knocked out if you had something else in mind. In terms of the RSC-13, there really were no options for an RSC-13 other than heavily modifying an RS-1, 2 or 3. Below we have the correct RSC-13 hood ends, which are designed to fit the Atlas RS-1 shell. Said shell retails for about 5 bucks. 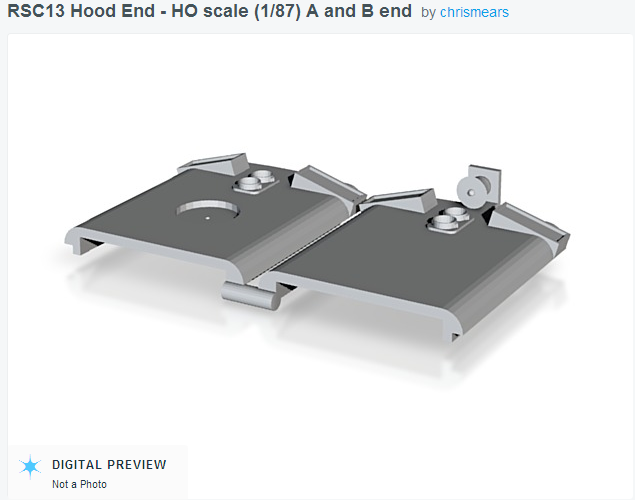 Chris figures that each of these would sell for $15 a pair. That might seem like a lot, but I have the usual detail parts I go through for this build which amounts to roughly $13 taxes included. The most important thing is that you don't have to spend hours trying to get those corner pieces to fit just right on the RS-18. Out of my four engines, only one has all four of them sitting just right. As for the RSC-13, I only know of two HO models. With the hood ends and sideframes now available in great detail, the iron curtain has finally fell on that model as well. |
|
dekon
Staff Member
Posts: 635
|
Post by dekon on Aug 17, 2014 9:20:51 GMT -5
Those are really nice looking. Now he needs to do the parts to convert BLI's RSD-15 into CP's RSD-17.
|
|
|
|
Post by tjmfishing on Aug 17, 2014 9:42:53 GMT -5
That probably wouldn't be hard to do Richard. Chris is doing the design work himself but I've only been "helping" with a very small part of the research but one thing I noticed early on is that like the other manufactures, MLW seems to use what we started calling "generic parts" on their engines, most likely to save on design costs. A good eg is the RS-18 and RSC-13, all the curves on the body are the same, with the big difference being the height of the hood and the obivious differences in door and louver locations. Other than that the basic hood end and carbody shape and curvature are essentially the same. I suspect that everyone's beloved 8921 followed suit. In looking quickly, the RS-18 "front" and "rear" ends above would appear to be a perfect match to the details on the as delivered 8921 - no problem there. My only concern would be if there are any differences between the roof curvature and overall dimensions between the Atlas RS-11 and the BLI RSD-15. I've been lending Chris shells, hoods, etc for him to use as measurements but I don't have an RSD-15 on hand. As for the chop nosed edition, I might suggest that you use Chris's RS-18 end blank and source a PMI cab/nose assembly. I used one on my Gaspe Rail RS-18u build and the detailing is almost as crisp as a Kaslo shell. From a foot away you can't tell the difference. 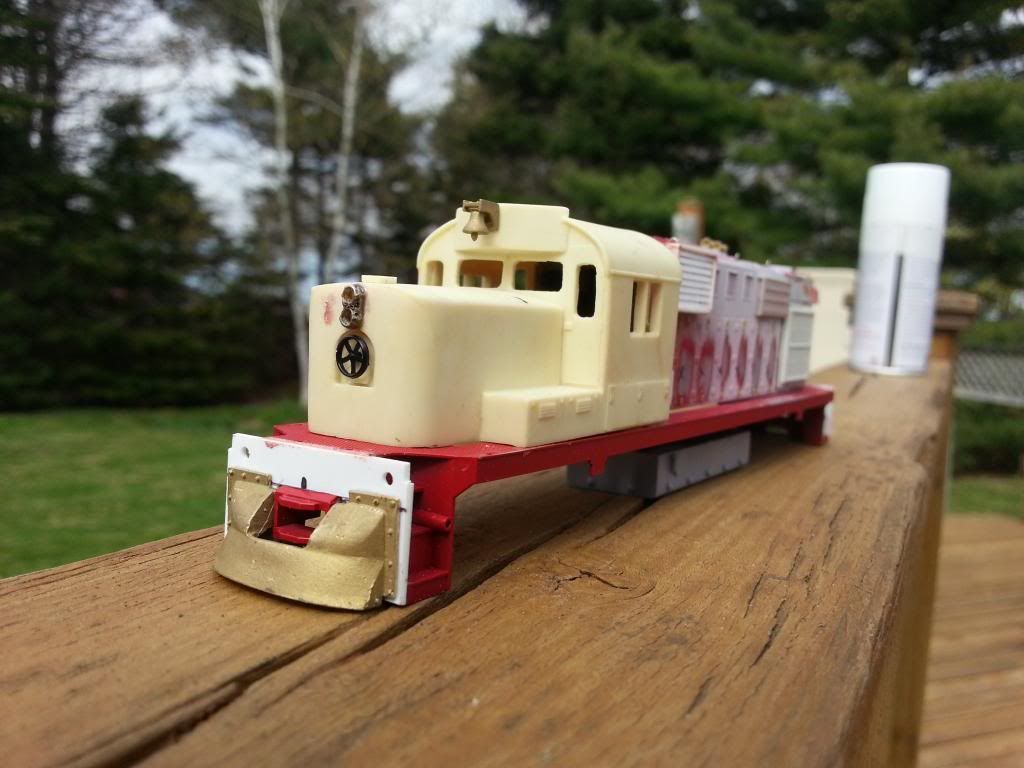 |
|
|
|
Post by iomalley on Aug 17, 2014 13:08:53 GMT -5
Hey Taylor! What Chris really needs to look into is RS18 end handrails in their many configurations, and maybe do the 2nd step of converting them to brass. (lost wax casting) 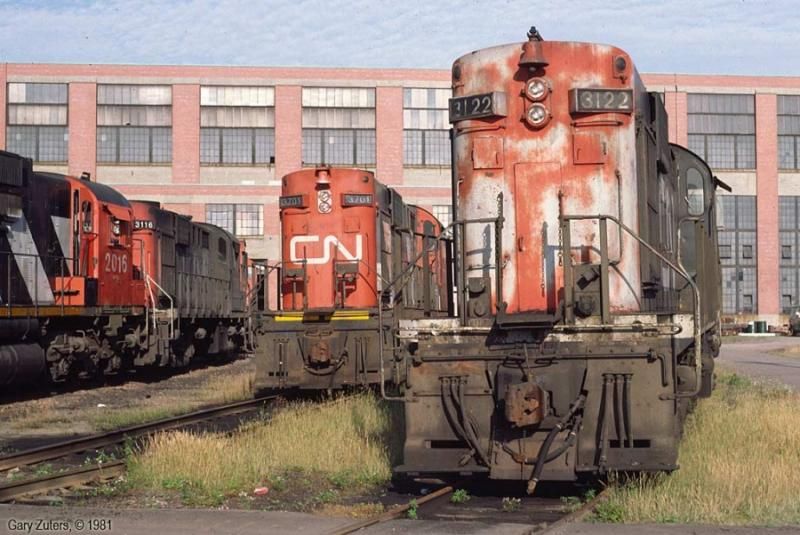 |
|
|
|
Post by sbhunterca on Aug 17, 2014 14:27:54 GMT -5
Looking good, Chris! Hopefully they'll print nicely for you.
Great effort!
Steve
|
|
|
|
Post by tjmfishing on Aug 17, 2014 14:54:12 GMT -5
Sean, I don't think there's anyway to 3D print them and I'm not interested in doing brass castings myself but I can't speak for Chris. I think I'm still doing an RS-18 master for John W and perhaps an RSC-13. I couldn't agree more with you though, the stock RS-11 end rails leave much to be desired.
That photo you linked also demonstrates the two headlight types nicely. He's going to upload a end with the headlight type that 3122 has. (3701's style is already done)
Just as an aside, he also has the style of headlights 3701 has on a Shapeways sprue, 40 for under 20 bucks.
|
|
|
|
Post by jakeloyst on Aug 17, 2014 19:49:53 GMT -5
parts look great heading over to shapeways now.... are there other parts coming shortly, lol, so I can save a bit on the shipping... awesome details!
|
|
|
|
Post by tjmfishing on Aug 17, 2014 21:07:36 GMT -5
Chris figures he can have most of the parts in the MLW catolouge done by the end of September. This includes louvers, rad shutters, etc. Since they are generic designs, its a lot easier.
|
|
|
|
Post by Mark R. on Aug 18, 2014 14:32:32 GMT -5
What kind of finish do these parts have ? Most of the 3D items I've seen have been rather rough and need a fair bit of sanding prior to painting.
Mark.
|
|
|
|
Post by tjmfishing on Aug 18, 2014 14:47:23 GMT -5
I've only worked with his A-1-A sideframes. I was able to paint them without sanding. Naturally they are going to have some grain so it might not hurt to go over the surface lightly with some 400 or 600 grit paper and wet sand it.
|
|
|
|
Post by jakeloyst on Aug 18, 2014 19:09:39 GMT -5
just received my parts, sideframes, the blank ends, and both fuel tanks. The sideframes were out of the higher quality material, and are great, maybe a little touch of sanding around a couple edges. The others I got the lower quality print, its cheaper and I wanted to see for myself what the difference was ,they will require a light sand. Under a magnifying glass, you can see the texture, but unless its a brand new unit, with gleaming sheet steel tanksm after painting, it wont be seen.. Very impressed, and will be watching for the rest of the parts to come out
|
|
|
|
Post by tjmfishing on Aug 18, 2014 19:32:05 GMT -5
Mark, I can't access Photobucket at work, but here is a shot of a painted sideframe. 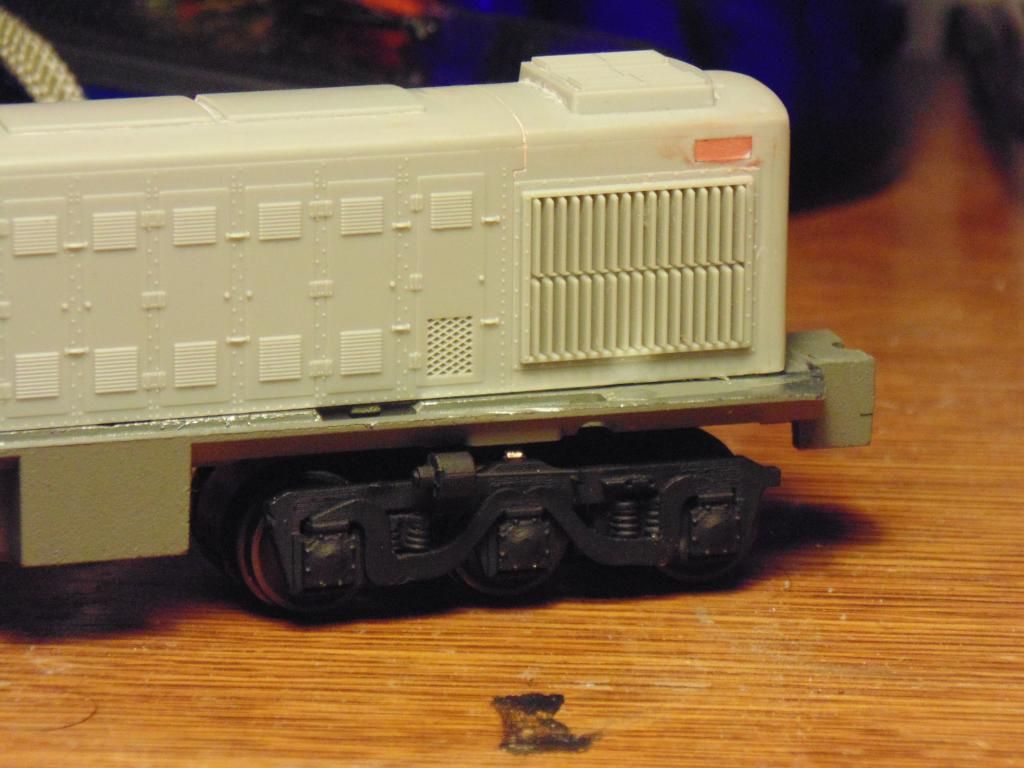 The lighting makes it a little tough to see, but I assure you its perfectly smooth and required no sanding to get it to this point. I applied three coats of Taiyma primer, followed by four coats of Model Master Aircraft Interior Black in rapid succession. As Jake said, they might need a light sanding depending on your preferences, however, I will have to be the judge of that myself. I didn't need to sand the sideframes but I haven't seen the other parts in person so I will reserve my comments until that point. Jake, do you think you could do Chris and I a huge favour and post a couple of well light, in focus shots of a couple of the parts so we can all see what they look like. Many thanks! |
|
|
|
Post by jakeloyst on Aug 18, 2014 21:29:18 GMT -5
|
|
|
|
Post by jakeloyst on Aug 18, 2014 21:29:50 GMT -5
|
|
|
|
Post by jakeloyst on Aug 18, 2014 21:40:43 GMT -5
|
|
|
|
Post by jakeloyst on Aug 18, 2014 21:42:14 GMT -5
For tanks, underframe, etc, I would use the cheaper of the material options, for the detail parts, hood, ends, etc, the frosted ultra detail would probally be the best
|
|
|
|
Post by chrismears on Aug 19, 2014 4:01:28 GMT -5
For tanks, underframe, etc, I would use the cheaper of the material options, for the detail parts, hood, ends, etc, the frosted ultra detail would probally be the best Thanks for posting these terrific photos of the printed parts. They are much better than any I'll ever take. The shots showing the fuel tanks really illustrate the contrast in the print quality between the different materials. I had been thinking along the same lines as you with regard to material choices. When the detailed hood ends are available I will only be listing them in the Frosted Ultra Detail material. Thanks, again. I really appreciate it. |
|
|
|
Post by chrismears on Aug 19, 2014 4:05:33 GMT -5
Hey Taylor! What Chris really needs to look into is RS18 end handrails in their many configurations, and maybe do the 2nd step of converting them to brass. (lost wax casting) Sean, I'd love to support a project that makes these handrails more readily available. 3D printing isn't the answer though. I'm concerned that the stanchions will be pretty tight against the Shapeways printing tolerances and worse, they'll be fragile. I'd like to see these done as an etched product. What I could do using Shapeways would be to make up a couple of jigs to help guide the wire bends. Either way, these handrails are something I'd like to sort out in both HO and N (I need the N ones). Cheers /chris |
|
|
|
Post by tjmfishing on Aug 19, 2014 6:03:45 GMT -5
Hey Taylor! What Chris really needs to look into is RS18 end handrails in their many configurations, and maybe do the 2nd step of converting them to brass. (lost wax casting) Either way, these handrails are something I'd like to sort out in both HO and N (I need the N ones). And Sean and I need the HO ones. A market now exists. |
|
|
|
Post by jakeloyst on Aug 19, 2014 7:15:39 GMT -5
if your looking into the handrail market, and MLW parts in general, you can include me in the list
|
|