|
|
Post by Ridgeline on Jul 24, 2009 10:04:20 GMT -5
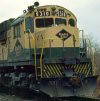
Hey Guys, I finally worked up the gall to attempt my first HO scale detailing project... I'm planning to build NS 6702, which is the only SD60 I could find in the 'Conrail Quality' livery. I want to super-detail this locomotive, so I'm looking for some feedback on things I can add or modify. Also, I've got a couple of questions... The base model is an Athearn RTR SD60. The parts list is as follows: ALine 29200 Windshield Wipers BLMA 4511 18" Drop Grab Irons Canon 1601 Blower Housing Canon 2011 SD60 Side Steps DAssoc 2203 NBW Castings DAssoc 3001 Sand Filler Hatches DAssoc 3102 Fuel Tank Fittings DWest 139 Air Filter DWest 221 MU Cable* DWest 228 Ditch Lights^ DWest 233 Snow Plow* DWest 274 Sinclair, Long DWest 275 Sinclair, Short Plano 14651 Lift Rings Plano 14652 Lift Rings * Is this the correct part? It appeared to be, but I'm not sure. ^ I will modify the Ditch Lights as appropriate. I could not find any that looked correct. There is a box on the prototype where I marked the red arrow... What is that? Is there an aftermarket part I can use or must it be scratchbuilt? Also, is there some kind of handle on the air filter behind the cab (green arrow)?   The prototype:  Any help is much appreciated! ;D |
|
|
|
Post by rdg5310 on Jul 24, 2009 11:19:36 GMT -5
Hi Andy, well your fist model can be a little nerve racking. Your doing the right thing in gathering all the information to do this build. The more research yo do the better off you are. To answer your questions the green arrow is the electrical cabinet and the red arrow is a flange lubricator. Custom Finishing makes the lubricator #295. As for the plow, you can use DW #155. They were delivered with that style plow. It's possible that the plow could have been changed out due to an accident. You just need to get more photo's of the unit to find out. There were only a few that made it to the Quality scheme. Keep us all posted on your progress. Were here to help!  I posted some links for you. crcyc.railfan.net/locos/emd/sd60/sd60.htmlthecrhs.org/?q=ConrailEquipment/Locomotives/EMD/SD60 |
|
Smoke
Chairman
The Ski Train!!!!
Posts: 753
|
Post by Smoke on Jul 24, 2009 12:47:27 GMT -5
|
|
|
|
Post by mrogden on Jul 24, 2009 13:57:36 GMT -5
Stephen,
Conrails SD60 / I / Ms had this unique feature.
Bradley
|
|
|
|
Post by Ridgeline on Jul 24, 2009 18:23:00 GMT -5
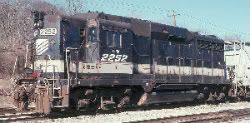
Ron, Andrew, Stephen, Bradley, thank you guys for chiming in! Cool, so I need to source a flange lubricator...  DWest 155 actually looks like the plow that came with the model, which I agree would go on any other NS SD60... But 6702 appears to have a different, much taller plow:   Thanks for all the links, I've got some more reading to do... ;D |
|
|
|
Post by MONONC420 on Jul 24, 2009 20:50:24 GMT -5
It looks like that plow was a post-merger replacement. This is the standard NS plow and can be found on most origional NS units. The only match was made by Overland and was never available seperately.
As to the ditch lights, I've always used DW 229, the Pilot end mounted ditch lights. They work pefectly tucked up under the anticlimber.
The horn should be Details West 190, a Leslie RS3L (?).
I might also reccomend adding Details West 210 Spare knuckle holders as well.
Christian
|
|
|
|
Post by rdg5310 on Jul 24, 2009 22:12:19 GMT -5
Walters has in stock the Custom Finishes lubricator, the part number is 247-295. For the question of the rear sandfiller location, Conrails SD60 and SD60I had them placed at the lower location. I'm not sure if any other roads did this also.
|
|
|
|
Post by Ridgeline on Jul 25, 2009 2:15:13 GMT -5
Christian, the horn that came with the model is a match, so I'm good there. The spare knuckle holder is interesting, except that I have no idea where they would go on the locomotive...  Any help with that would be appreciated. Stephen, I went ahead and ordered Plow 233. I'll post pics of it on the model once it gets here, if it's a close match that is... Ron, I found the flange lubricator, thanks for the part number. EDIT: The part for this model should be -296. It's the same cabinet but with a single handle on the door. -295 has two handles...  One question which appears to have been missed: Does the electrical cabinet air filter (green arrow above) have some kind of handle where the pseudo-detail is on the model? Regarding the sand fill hatch location, my research suggests that NS 6702-6716 are the only SD60s with that modification... I have not looked into other trims of the SD60 so there may be more engines out there with the same change, but, in all likelihood, they would be ex-CR units. Now if I can just find a clear shot of that flat thing on the floor next to the cabinet air filter........ EDIT: Nevermind, that appears to be the distribution manifold that comes with the lubrication cabinet. |
|
|
|
Post by MONONC420 on Jul 25, 2009 10:16:23 GMT -5
Hi Andy, if you look at the photo of the rear of the locomotive, look just below where the rear end handrail is bolted to the pilot, and to the left of the MU hoses. Normaly it sticks out more, but all of the road grime makes it blend in.  |
|
|
|
Post by MONONC420 on Jul 25, 2009 10:17:24 GMT -5
Forgot to add, there is a knuckle holder on each side of the engine, in the same position.
|
|
|
|
Post by antlorch on Jul 25, 2009 11:02:32 GMT -5
Hi Andy, I am going to throw in my 2 cents worth on this subject since the SD60 is one of my all time favorite engine models.... First I would recommend getting the book "EMD'S SD60 Series" by Diesel Era magazine.This is one of the most complete books on the SD60 Series and all of them that where built in the U.S. and Canada. Second it has a section just of the Conrail engines before the NS takeover.Very good info. Looks like the 6702 has had alot of changes early in its NS life,below is a link with 91 different pics of just the 6702 in all different angles,just go through them and decide the year or about when you wish to model this engine and pick the details from there.... rrpicturearchives.net/locoPicture.aspx?id=969&Page=2Dont forget the extra grabs on the nose of this engine....The plow can be modified from a large DW plow by shaping it with a file.Just soft metal so it wouldn't take much effort just as long as it is close.I would use a pencil and draw the lines on the plow first than use it as a guide to file it... One last thing is the ditch lights and cut bars,you can order this from Athearn and it is the correct part.The part number for the ditch lights are G67472-Pilot Mount and the part number for the cut bar is G67467.You can send them an email with a CC number(I wouldn't) or there is a number to call and you might have to call back a bunch of times to just talk to someone(thats what I did). Anyway way hope this helps.... |
|
|
|
Post by rdg5310 on Jul 25, 2009 17:59:34 GMT -5
Andy, just to let you know Conrail used both types of lubricators. For some reason I didn't mention it. But, your doing the right thing here by doing your homework. You can spend just hrs or days finding all the info you can on a project. This is going to be a nice project for you. |
|
|
|
Post by icghogger on Jul 27, 2009 14:13:51 GMT -5
Yes, Andy, the air filter box has a staple-shaped handle on the lid for servicing the unit.
|
|
|
|
Post by Ridgeline on Jul 28, 2009 12:50:28 GMT -5
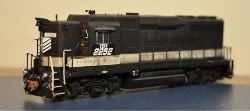
Monon, thanks for pointing out the knuckle holders... I'll be sure to add those also. Anthony, I'll be sure to look up that book. rrpicturearchives is my number 1 source for pictures... If it's not on there, I won't build it...  I wish you had told me sooner about the ditch lights, but I'll keep it in mind for the next build. Cut levers came with the model, so I'm golden there... Ron, thanks again for pointing me to those parts. I wouldn't have noticed the different styles if both parts hadn't been listed in the catalog... ;D Stephen, I'll likely have to modify the 233 plow also... The one on your model looks right... Hopefully it's the 233 that you started with. Robert, thanks for clearing that up... I couldn't find any close pictures of it, but I think I've got an idea of what to do based on the picture of the Canon replacement piece. I spent some time working on the sand-filler hatches.... Need to smooth out the edges on the long-hood hatch. The short-hood hatch is slightly off-center and needed to be modified also. Just waiting for my add-on parts to arrive so I can move forward.  |
|
|
|
Post by Randy Earle on Jul 28, 2009 13:29:28 GMT -5
Andy, that is gonna be a nice unit!
|
|
|
|
Post by Ridgeline on Jul 28, 2009 13:56:36 GMT -5
Randy, I appreciate the kind words... But let's not count our chickens just yet... ;D Anthony, I found another use for the ditch lights I ordered... (a high nose SD40-2 anyone??) So I'm going to try and chase down those Athearn units.... A couple more questions: LEDs. What size should I be using? The factory pieces look like 1.2mm... Is that correct? Can I use the same size for the ditch lights? What voltage should they be? Trucks. What size wire should I be using for the various hoses and lines running around the trucks? Is there an easy supply of such at a hardware store or something? And what is that yellow thing on the left rear truck?  Thanks in advance! You guys have been a HUGE help... |
|
|
|
Post by icghogger on Jul 28, 2009 14:28:29 GMT -5
Andy, the hoses and air lines on the trucks are pretty much on you. While there are some neat castings out there, it is best to form your own for the cylinder air piping. I made a jig from a piece of plywood, with two properly spaced holes and brass rod of the correct size in those holes to get a good radius bend in the piping while keeping the correct length (I actually made it with three holes, one with correct spacing for GP truck air pipes and one for SD truck air pipes). You just place the correct size wire across the jig pins and wrap it around the pins for your bends and cut to fit the cylinder spacing.
The tee connection is a bit of brass wire, annealled and flattened, then the flat is wrapped around the standing pipe, trimmed and soldered or glued in place to represent the tee connection. Brian Banna's site has a lot of good info about piping trucks, so I would look there as well. Hope this helps!
|
|
|
|
Post by icghogger on Jul 28, 2009 16:07:59 GMT -5
Robert could you please post a picture of your air-line jig? I have been bending mine with various degrees of success. I will take a picture tonight and post it tomorrow. |
|
|
|
Post by icghogger on Jul 29, 2009 9:14:44 GMT -5
OK, Gang, this is my crude jig for bending truck air piping and an example of the result. The dimension for GP is 1-11/32" between centers and the SD is 1-15/32". The pins are .062" brass tube stock and the brass wire is .010". I have some other images of the wire being formed, if anyone is interested.   |
|
|
|
Post by RunningExtra on Jul 29, 2009 9:30:46 GMT -5
Sweet!
|
|

 I posted some links for you.


 Any help with that would be appreciated.


 I wish you had told me sooner about the ditch lights, but I'll keep it in mind for the next build. Cut levers came with the model, so I'm golden there...


