Post by CP_8530 on Nov 18, 2012 3:18:29 GMT -5
Forward
One of the quicker things on my list of stuff to build is the CP C424. I've got a few Atlas models in CP colours and while they're nice and the shell is a good representation of the Canadian models, details-wise they're a bit lacking, to say nothing of having the proper pilots. There's also a few other details that seemed a bit off (class lights all offset to one side instead of centered, wonky oversize front cab door, pilot issues, etc).
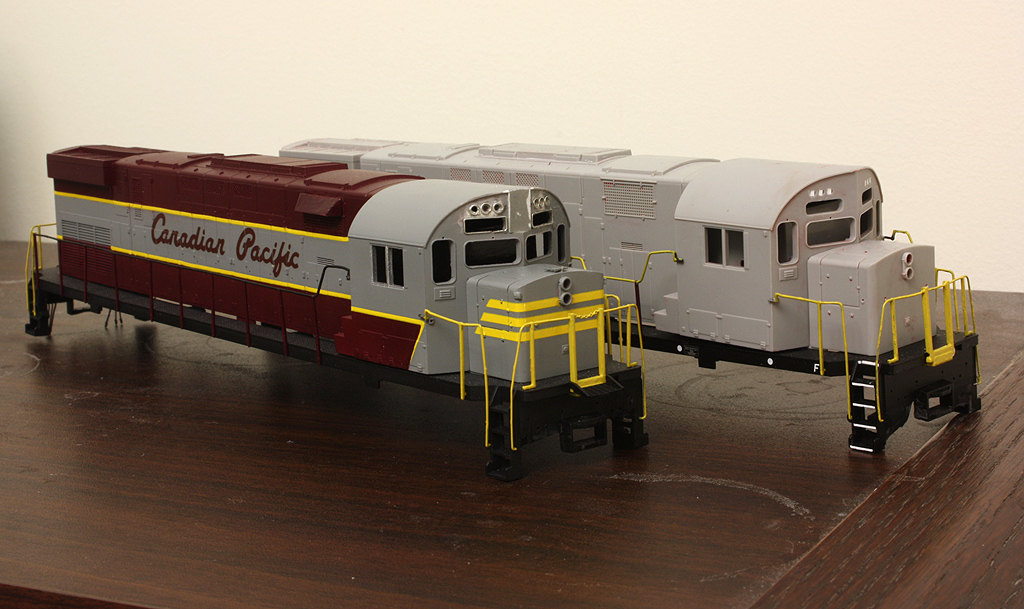
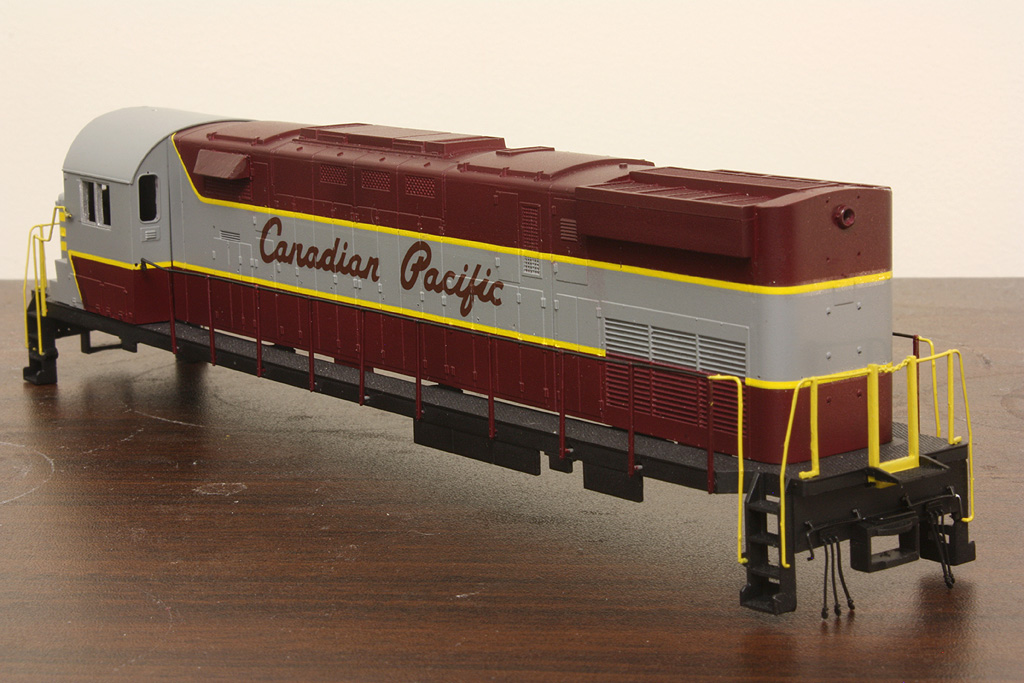
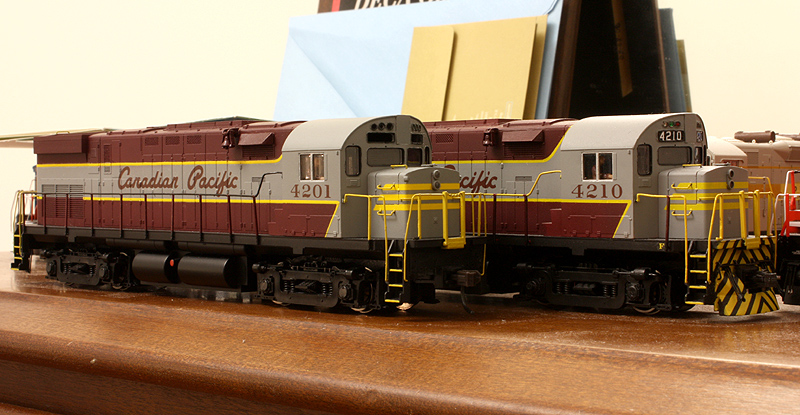
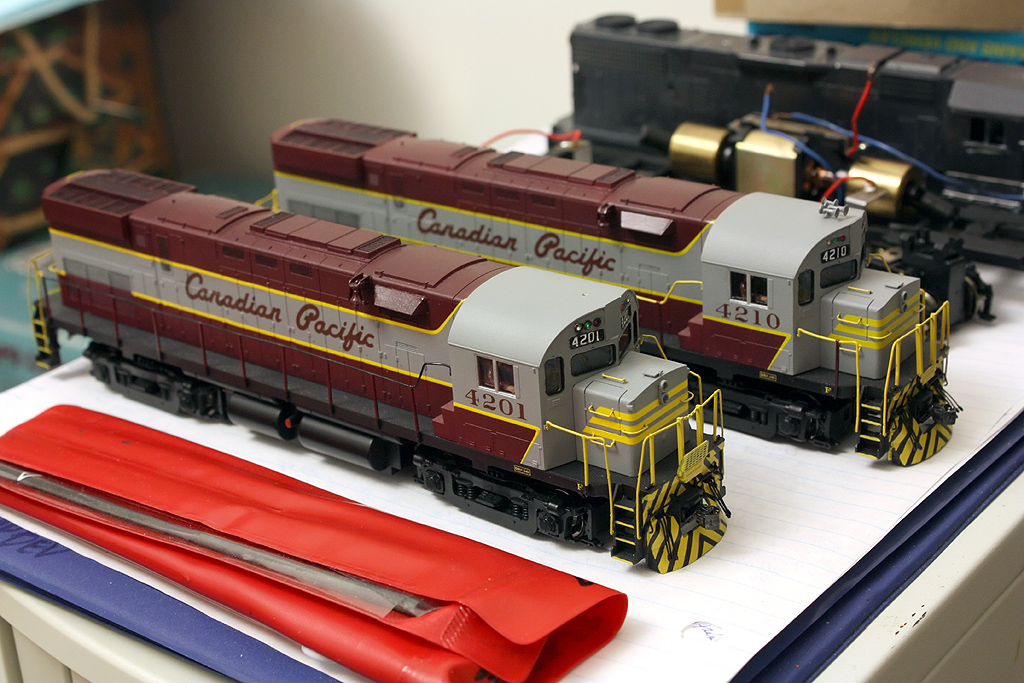
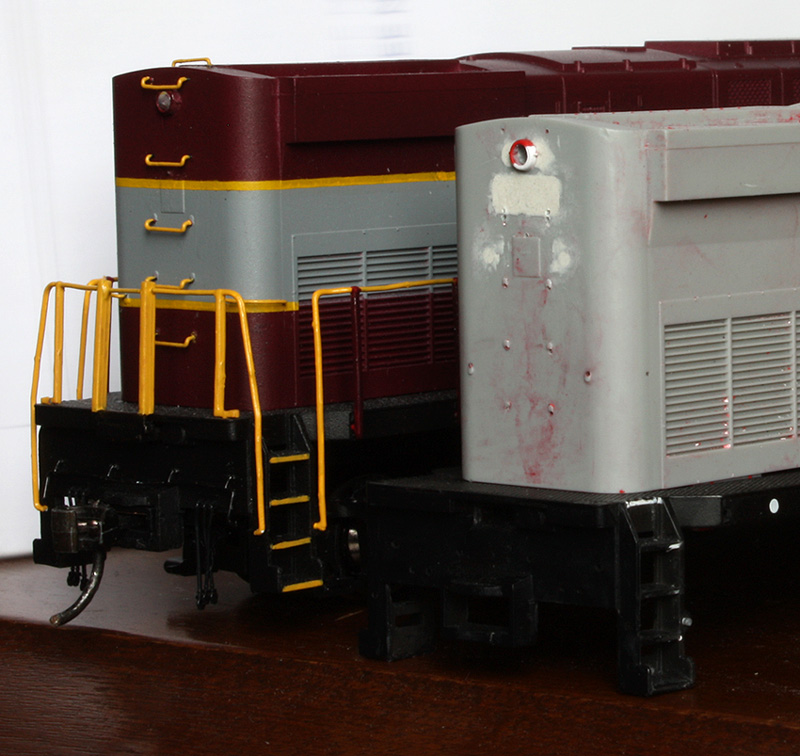
So, when someone advised me of some cheap QGRY shells being sold surplus, I picked a few up to backdate as early CP units with some better detailing. I've almost finished one and have another in the early stages, but will start with some earlier photos. As purchased, CP's C424's were road freight units instead of road switchers, so the later style rear numberboard and lighting packages would have to be removed, as well as leaving the rear pilot open. The units I've chosen are 4210 (nearly complete now) and 4201 in their late 60's/early 70's appearance.
www.railpictures.net/viewphoto.php?id=388039
www.mountainrailway.com/Roster%20Archive/CP%204200/CP%204201.htm
Break out the "Alco"hol
The first step as always is to strip the shell. The grab irons came out ok with pliers and the numberboards/cab glazing/headlights were taken out and put aside. Nothing was really glued in by Atlas, which is nice for this kind of project.
A soaking and scrubbing involving 99% isopropyl alcohol made quick work of the shell and the frame. Also soak and strip the handrails for later repainting (I didn't do this on the first unit as you can see in the photo(s), but did later on the second).
Don't forget to pull the two amputated from the waste down crew members from the cab before dunking it. Give them a lunch break, they'll be back for later.
Let the Mods Begin...
Frame
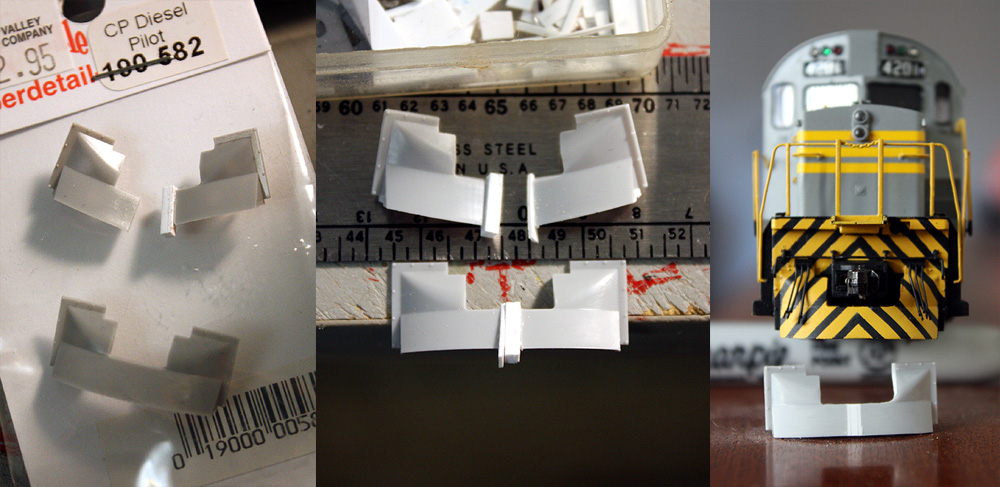
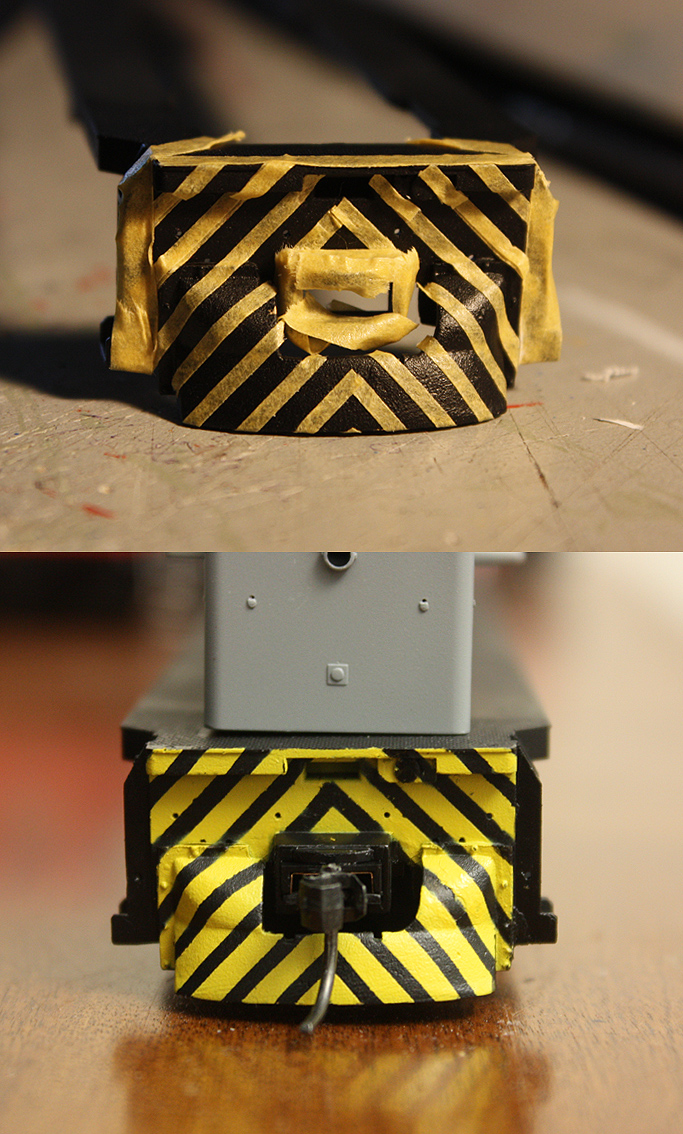
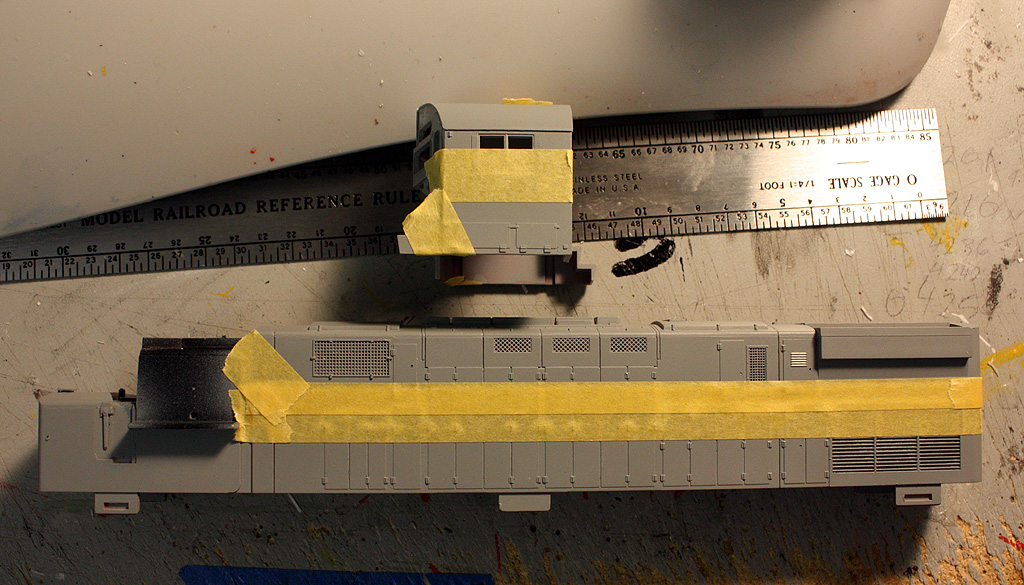
Now it's time to get out the saw, x-acto knife and/or chisel and start the bodywork. I removed the bottom plow sections of the pilot ends, the rear up until the prototypical height and left some more of the front to mount the new CP style rock pilot on (I used a Miniatures by Eric P18 Alco Diesel Pilot for the front). I also removed those square sections on the end steps where the pilot handrails went into.
Cab
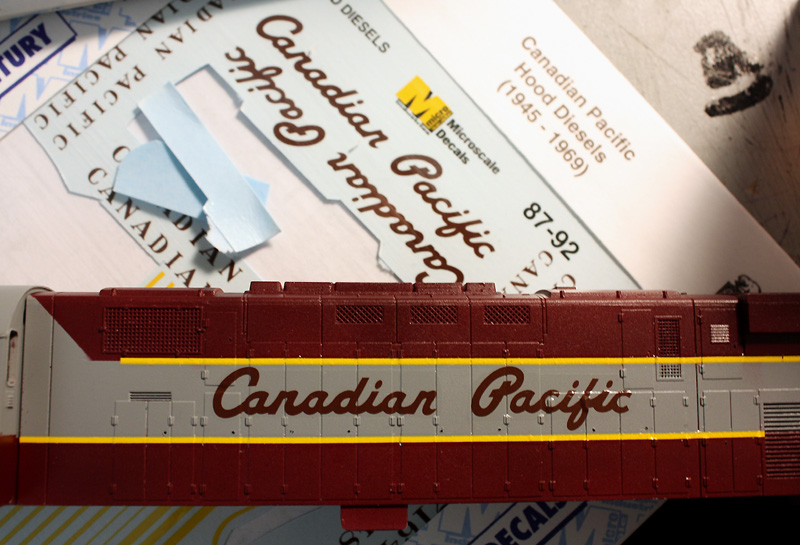
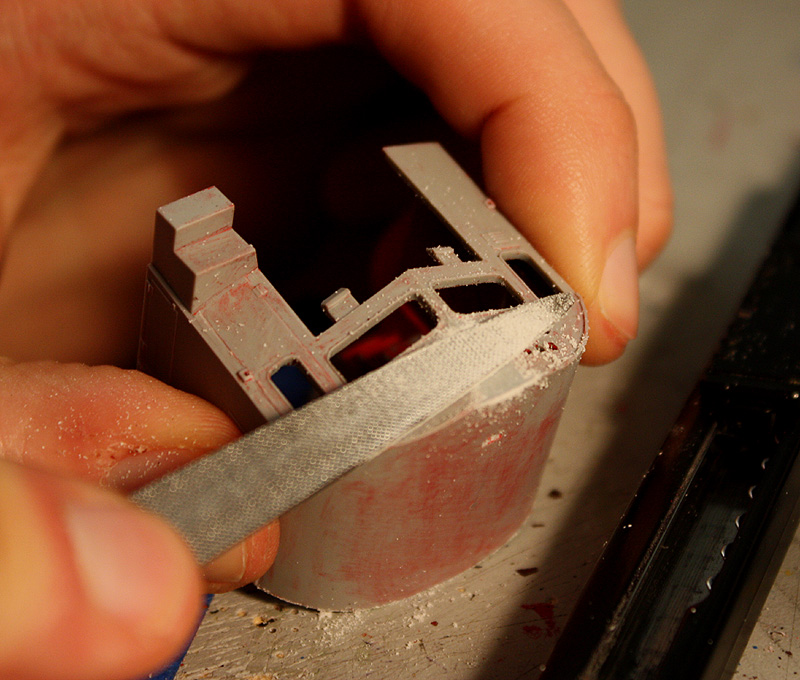
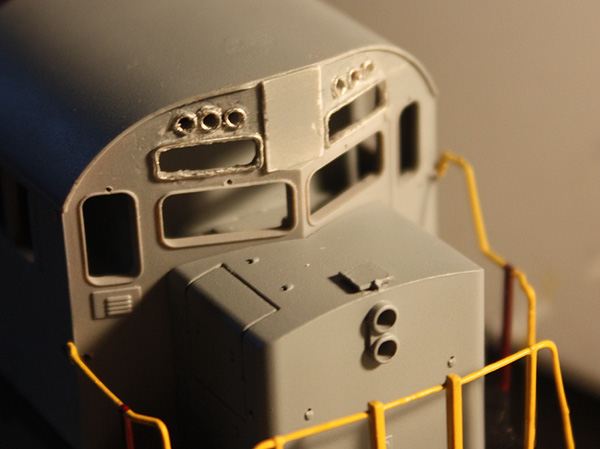
As I wanted to do some unique units, I decided to do mine as early CP units with the headlight relocated from the cab to the nose, with a flat panel left where the old headlight was (fun fact: 4200-4232 had this flat spot, but only 4200-4209 were actually delivered with the high headlight, and had it relocated to the nose in 1966/67-ish). I filed a flat spot into the cab front edge according to photos and filed off the numberboard and class light details, patching these areas with body filler and sanding them (the numberboards will be enlarged as the Atlas ones look too small, and the class lights relocated). I also chiseled off part of the front door on the Atlas, as it is way too wide and extends beyond the handrail. I extended the top of the door a bit with a small piece of styrene. Fill the rectangular hole on the cab roof where the ugly Atlas horn was with styrene and putty and sand.
Hoods
Moving to the hoods, the round sand filler on the short hood was sliced off and replaced with a square one made of 0.010" styrene (they were delivered with skinny square ones, and got the larger boxier SD40-2 style later). I chiseled off all the hood door latches and drilled holes for new ones to be bent from 0.015" wire later. I went by photos as the lower yellow stripe was right in between the door latches and the center door hinges, this proved useful later in painting. As I couldn't find any good roof closeups to show the as-built lift ring configuration, I decided not to modify those and left the (not really good) cast-on Atlas ones in place. The two rain gutters above the air intake screens behind the cab were carved off as well as the two bolt details near the top, and intake shields were fabricated from 0.010" sheet styrene and glued to wires that fit into holes drilled into the screen (useful for removal when painting/decalling/etc). I like some of the larger parts to remain removable.
I patched the numberboard at the rear with a piece of styrene, carved off the rear class lights, numberboard gasket and twin rear headlights and filled it all with body putty sanded smooth. The 2nd grab iron from the top needs to be moved up a bit so new holes for that were drilled just above the old ones. A new hole was drilled for the early single rear headlight and one of the ones carved off was reused in between where the previous two were.
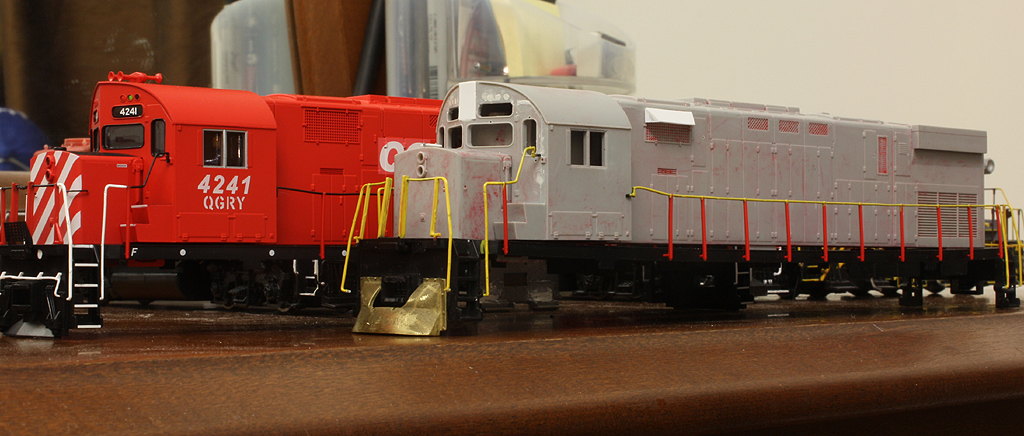
This is about where things would be. Stripped unit is well on its way to becoming CP 4210, and "QGRY 4241" will later be stripped for CP 4201:
More to come...
One of the quicker things on my list of stuff to build is the CP C424. I've got a few Atlas models in CP colours and while they're nice and the shell is a good representation of the Canadian models, details-wise they're a bit lacking, to say nothing of having the proper pilots. There's also a few other details that seemed a bit off (class lights all offset to one side instead of centered, wonky oversize front cab door, pilot issues, etc).
So, when someone advised me of some cheap QGRY shells being sold surplus, I picked a few up to backdate as early CP units with some better detailing. I've almost finished one and have another in the early stages, but will start with some earlier photos. As purchased, CP's C424's were road freight units instead of road switchers, so the later style rear numberboard and lighting packages would have to be removed, as well as leaving the rear pilot open. The units I've chosen are 4210 (nearly complete now) and 4201 in their late 60's/early 70's appearance.
www.railpictures.net/viewphoto.php?id=388039
www.mountainrailway.com/Roster%20Archive/CP%204200/CP%204201.htm
Break out the "Alco"hol
The first step as always is to strip the shell. The grab irons came out ok with pliers and the numberboards/cab glazing/headlights were taken out and put aside. Nothing was really glued in by Atlas, which is nice for this kind of project.
A soaking and scrubbing involving 99% isopropyl alcohol made quick work of the shell and the frame. Also soak and strip the handrails for later repainting (I didn't do this on the first unit as you can see in the photo(s), but did later on the second).
Don't forget to pull the two amputated from the waste down crew members from the cab before dunking it. Give them a lunch break, they'll be back for later.
Let the Mods Begin...
Frame
Now it's time to get out the saw, x-acto knife and/or chisel and start the bodywork. I removed the bottom plow sections of the pilot ends, the rear up until the prototypical height and left some more of the front to mount the new CP style rock pilot on (I used a Miniatures by Eric P18 Alco Diesel Pilot for the front). I also removed those square sections on the end steps where the pilot handrails went into.
Cab
As I wanted to do some unique units, I decided to do mine as early CP units with the headlight relocated from the cab to the nose, with a flat panel left where the old headlight was (fun fact: 4200-4232 had this flat spot, but only 4200-4209 were actually delivered with the high headlight, and had it relocated to the nose in 1966/67-ish). I filed a flat spot into the cab front edge according to photos and filed off the numberboard and class light details, patching these areas with body filler and sanding them (the numberboards will be enlarged as the Atlas ones look too small, and the class lights relocated). I also chiseled off part of the front door on the Atlas, as it is way too wide and extends beyond the handrail. I extended the top of the door a bit with a small piece of styrene. Fill the rectangular hole on the cab roof where the ugly Atlas horn was with styrene and putty and sand.
Hoods
Moving to the hoods, the round sand filler on the short hood was sliced off and replaced with a square one made of 0.010" styrene (they were delivered with skinny square ones, and got the larger boxier SD40-2 style later). I chiseled off all the hood door latches and drilled holes for new ones to be bent from 0.015" wire later. I went by photos as the lower yellow stripe was right in between the door latches and the center door hinges, this proved useful later in painting. As I couldn't find any good roof closeups to show the as-built lift ring configuration, I decided not to modify those and left the (not really good) cast-on Atlas ones in place. The two rain gutters above the air intake screens behind the cab were carved off as well as the two bolt details near the top, and intake shields were fabricated from 0.010" sheet styrene and glued to wires that fit into holes drilled into the screen (useful for removal when painting/decalling/etc). I like some of the larger parts to remain removable.
I patched the numberboard at the rear with a piece of styrene, carved off the rear class lights, numberboard gasket and twin rear headlights and filled it all with body putty sanded smooth. The 2nd grab iron from the top needs to be moved up a bit so new holes for that were drilled just above the old ones. A new hole was drilled for the early single rear headlight and one of the ones carved off was reused in between where the previous two were.
This is about where things would be. Stripped unit is well on its way to becoming CP 4210, and "QGRY 4241" will later be stripped for CP 4201:
More to come...


 (Probably because they were distributed through Hobbycraft Canada, worked with Atlas on Canadianizing their existing C424, hence the doubling of the price).