d10ng
Road Foreman
Modelling the CSS&SB and NICTD.
Posts: 93
|
Post by d10ng on Feb 3, 2012 6:07:25 GMT -5
I've now started my first major rebuild project. A Norfolk Southern rebuilt GP38-3, this model is going to be NS 5807. The aim of this project is to produce a near prototype model as I can get with whats on the detailing market and with some scratchbuilt parts. Starting point is a Athearn BB GP50, paint stripped back and ready for some heavy modification. 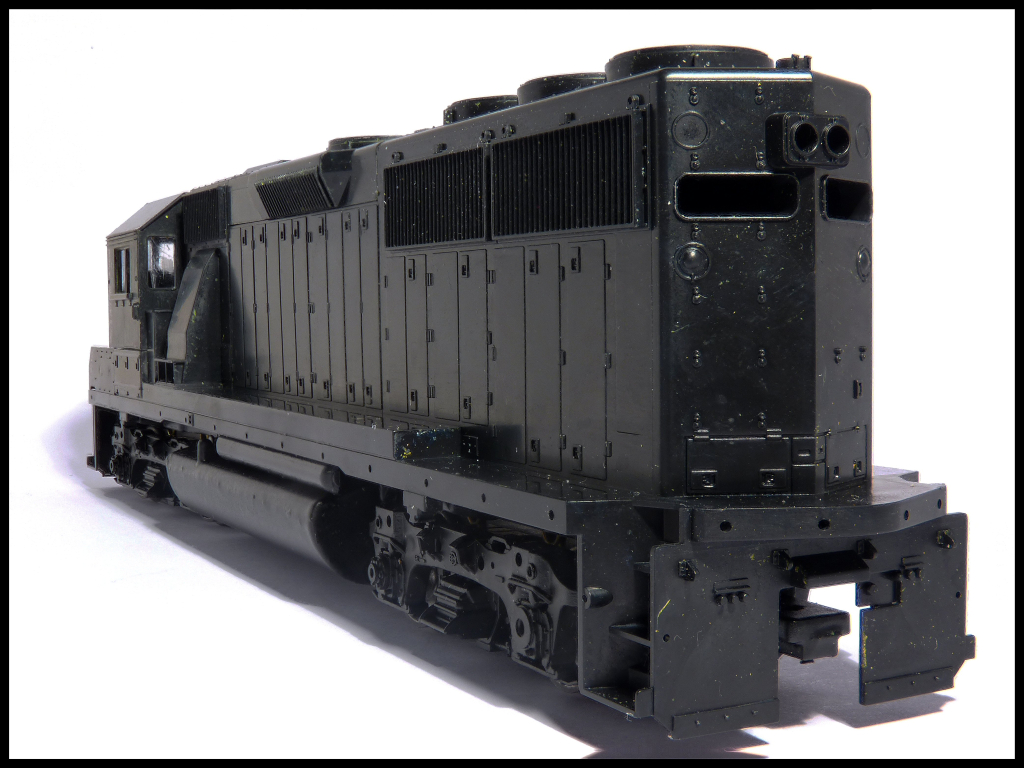 GP50smallnodetails GP50smallnodetails by dave_long, on Flickr Just some of the parts that need modifying are: Remove middle rad fan and plate over Change blower housing as its incorrect replace the undersized athearn Rad grilles Alter the inertial filter exhaust hatch remove the turbo exhaust housing and replace with 2 non turbo exhaust stacks Heavily modify the pilots Replace 81" short hood with 88" hood after removing turbo hatch the air filter box needs adding cab and sub-base replacement (Cannon parts) Remove molded class lights on long hood front Replace rad fans with DA Q fans Replace dynamic brake fan with Cannon part you'll get to see the rest as the thread goes along... I'll put up a parts list once I got all the bits that I need. I've started by removing the old traction motor blower as its was incorrect for this type and need the later EMD type adding. The Inertial filter hatch needs modifying so that was to be replaced too along with the Inertial cooling grilles. A big thanks to Erik C for proto images of NS 5807, all proto images I use in this thread are those of Eriks. The main reason why I've chosen 5807 as thats the unit the photos are of. There's plenty more to come. Thanks for reading. Dave Attachments:
|
|
|
|
Post by icghogger on Feb 3, 2012 7:39:05 GMT -5
Looks like a cool build, Dave, keep us posted for sure!!
|
|
sgoti
Chairman
Posts: 459 
|
Post by sgoti on Feb 3, 2012 11:38:40 GMT -5
Should be a great model, keep us posted!
One comment: Don't know why you replaced the blower bulge. The photo in your post clearly shows the earlier round-top version, not the angled version you applied...
|
|
d10ng
Road Foreman
Modelling the CSS&SB and NICTD.
Posts: 93
|
Post by d10ng on Feb 3, 2012 12:36:13 GMT -5
The model image at the top of the OP is the BB GP50 base model, with no modifications yet. You can see below the replacement of the blower has begun and the cannon part next to it: 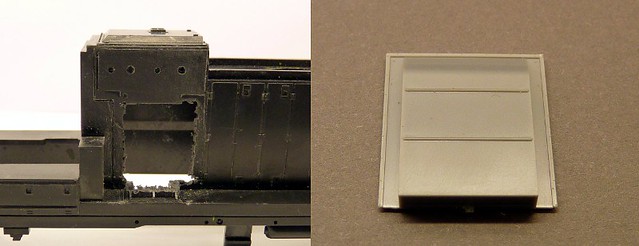 replacingblower replacingblowerThere is quite a lot of delicate filing and sanding to be done in this area so as to not damage the walkway sill and the engine room door. Whilst removing the old blower and just placing the Cannon part in place has also brought to light an error in the original gp50 moulding. There is a panel line from the walkway to the roof that runs up the side, however the only way I can describe this on the model is a 'Trench', this will have to be filled and smoothed and moved further to the left because if I left it as is then it would disappear under the blower housing! 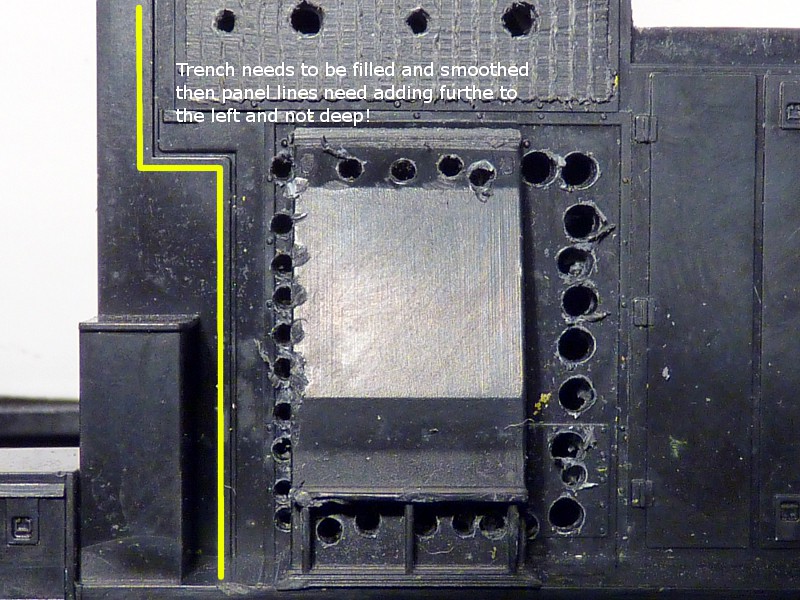 trench trenchThe plan currently is to finish the mods then add a panel of 0.005" brass sheet cut to size in position to show the raised panel. Which would also IMO look more realistic than scribing a new line in the plastic. Dave |
|
sgoti
Chairman
Posts: 459
|
Post by sgoti on Feb 3, 2012 13:13:16 GMT -5
The model image at the top of the OP is the BB GP50 base model, with no modifications yet. Oops... My bad, sorry! I had forgotten that Athearn did the "Phase II GP50", with the newer bulge (yet retaining the old anticlimbers). To quote Roseanne Roseannadanna: "Never Mind!" |
|
d10ng
Road Foreman
Modelling the CSS&SB and NICTD.
Posts: 93
|
Post by d10ng on Feb 16, 2012 4:07:56 GMT -5
Time for a quick update. I've got to the stage where the blower housing has been removed after cutting through the holes with a scalpel. The Inertial filters have been sanded down flush to the body side. I sanded them flush rather than cutting them out so that the body would retain some of its integrity at the top. Here's where this body side is up to now: 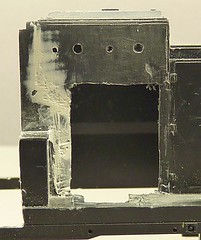 As you can see the hole has been cut and filler has been used to cover over the seam line or trench as I like to call it. The filler is going to need a second coat, as you can see it cracked slightly and wont give a smooth finish when painted. Its hard to get decent fillers these days, this was Revell plasto, but I think I might try some Tamiya basic and vallejo putty, not that keen on Squadron really. I've test fitted the the new blower housing and filters and they look a good fit. Will just need to get the brass to recreate the panel line that I've filled. On this part of the build I've just got the inertial hatch on the roof panel to remove and sand flush, then I'll be able to move on down the long hood to the DB blister. However at the short hood end I've managed to remove the nose and sub base plastic and tidy the whole area up. If you read the Cannon and Co instructions then they recommend fitting a piece of 0.040" styrene sheet under the sill from the front to just under the long hood, to help with strengthening the body while its hacked about. While this is a good idea, the tool I used didn't put much strain on the plastic so I dispensed with the styrene. I used a Zona flush cutting razor saw and sliced from the anticlimber back to the engine doors. The razor saw does like to wander off line if your not careful. All the excess and missed bits were sorted out with a scalpel and grit paper. 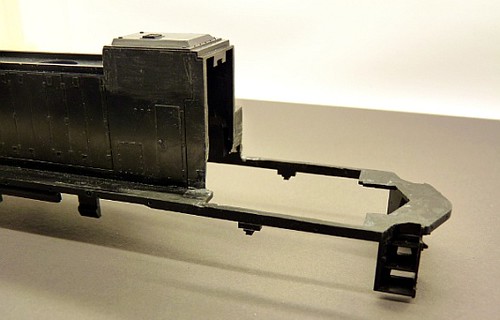 At this point I'm not really concerned with dints and scratches to the anticlimber and sills as they will all get covered with tread plating. The climber will also get replaced with a Cannon part as it needs some surgery which would be too much work to do to the stock solid athearn climber. So now that the sub base has gone my thoughts turned to replacing it with the Cannon kit, the kit states that it includes several variable parts to suit your project with enough parts for 2 complete kits. Not for a NS GP38-3 it doesn't!!  Let me show you: s982.photobucket.com/albums/ae309/WBRoute/NS%20GP38-3/?action=view¤t=PA092592.jpgIf you take a look at the link above you can see the prototype photos that I use and it shows the style of sub base boxes that are needed. Now I can make one set of these from the Cannon kit, albeit with a little bit of work. #5807 has the 2 singular vents on the shorter box, whereas the Cannon version has double vents. This is what I can make from the Cannon kit, but I dont have enough to do both sides as they are identical: 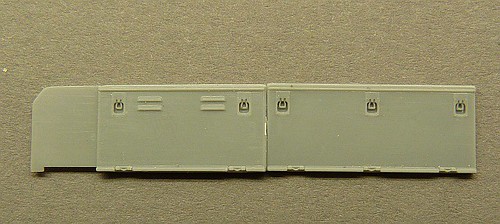 (If anyone has some spare parts from this kit and is happy to ship to the UK I'd be happy to pay the shipping!.) The sub base kit has put a bit of a delay on proceedings. I'll probably start building the cab kit, and the a/c unit. The DB blister needs a lot of work so I might start that next now my DB fan has been delivered. Anyway thanks for sticking with me... Dave |
|
Deleted
Deleted Member
Posts: 0
|
Post by Deleted on Feb 16, 2012 5:16:00 GMT -5
Which sub base kit are you using, I have a 35/40 series one, I think and I am in the UK so shipping isn't an issue. Is this one anygood for you because if it is I can dig it out and send it through.
|
|
|
|
Post by tamaman on Feb 16, 2012 10:24:58 GMT -5
Lookin good Dave.
|
|
d10ng
Road Foreman
Modelling the CSS&SB and NICTD.
Posts: 93
|
Post by d10ng on Feb 16, 2012 10:38:21 GMT -5
Which sub base kit are you using, I have a 35/40 series one, I think and I am in the UK so shipping isn't an issue. Is this one anygood for you because if it is I can dig it out and send it through. I've used the 50/60 series as the prototype was a gp50. However if the parts above match any in the 35/40 then they should work. But I've not used that kit so I don't know what's in it. Regards Dave |
|
Deleted
Deleted Member
Posts: 0
|
Post by Deleted on Feb 16, 2012 18:57:32 GMT -5
The 35/40 series sub base has doors enough to do one side as you require. If you would like the kit let me know and I will message you.
Sent from my GT-I9100 using ProBoards
|
|
d10ng
Road Foreman
Modelling the CSS&SB and NICTD.
Posts: 93
|
Post by d10ng on Feb 17, 2012 9:29:59 GMT -5
Thanks for the offer.
I've been looking over some photos again and think I may have made a school boy error, I'm away from home at the moment but need to check the kit when I get back, I may have made an error on the parts needed on the opposite side.
Dave
|
|
Deleted
Deleted Member
Posts: 0
|
Post by Deleted on Feb 17, 2012 17:40:32 GMT -5
Ok well if you need the parts just shout out and look forward to seeing how this one progresses.
|
|
d10ng
Road Foreman
Modelling the CSS&SB and NICTD.
Posts: 93
|
Post by d10ng on Mar 7, 2012 8:19:01 GMT -5
Hi guys, a couple of question really... I've started looking at the chassis frame. The coupling blocks are going to be removed and a mount made for sergents to the bodyshell. However I'm looking into adding a mock up of the EMD I beams. Could someone let me know whats the best I beam or H beam (mod) to run the length of the frame and what if anything needs to be removed from the frame itself? Another item I'm not too familiar with is what type the headlight is on the front of the cab and who makes the best item that can be lit: 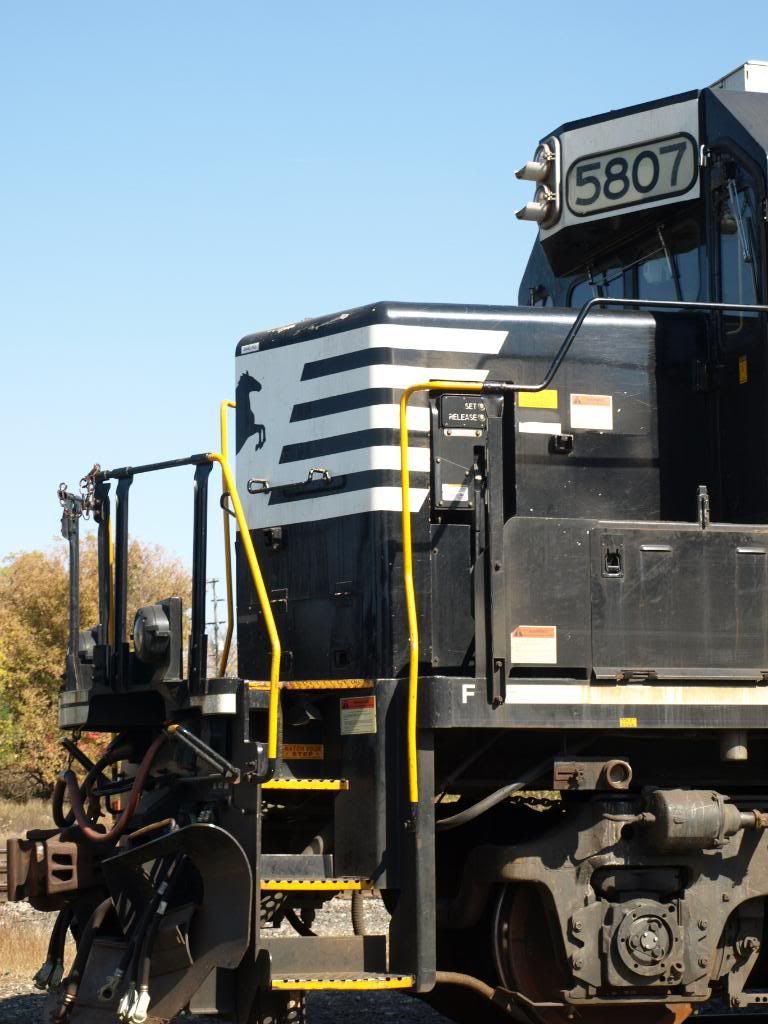 TIA Dave |
|
|
|
Post by iomalley on Mar 9, 2012 11:09:42 GMT -5
Precision Scale make a brass headlight with the lamp visors, ready for LEDs...
|
|
d10ng
Road Foreman
Modelling the CSS&SB and NICTD.
Posts: 93
|
Post by d10ng on Mar 9, 2012 11:49:16 GMT -5
Thanks Sean,
I'll check them out.
Rgds.
Dave
|
|
Deleted
Deleted Member
Posts: 0
|
Post by Deleted on May 27, 2012 8:43:14 GMT -5
Any progress with this? I have a renewed interest in the project and wondered how you are getting on?
|
|
d10ng
Road Foreman
Modelling the CSS&SB and NICTD.
Posts: 93
|
Post by d10ng on May 27, 2012 11:54:05 GMT -5
Hi Thanks for the interest.
There's no photo evidence at the moment but the cannon cab and nose have been built on to the sub frame. I managed to remove one of the louvres each side on the subbase and they've now been filed down. The BB fans have all gone now. The project has stalled a little at the moment as I really try to make my mind up over overhauling and improving the BB motor or puttin another motor or chassis under neath her.
I've got most of the parts I need except for ditch lights, which may well end up being railflyer items that can be lit.
More work will be done in the next few weeks as I've now got leave from work.
Regards
Dave
|
|
Deleted
Deleted Member
Posts: 0
|
Post by Deleted on May 27, 2012 12:27:19 GMT -5
I'd just upgrade the drive with a new motor and if you like, new gears.
I easily added a Kato motor to a bluebox frame with a bit of milling and have some improved versions planned, it's easy if you have spline drive shafts not the older ones. There is also a wealth of info in another post about it.
|
|
kpack
Road Foreman
Posts: 77
|
Post by kpack on May 27, 2012 12:44:14 GMT -5
I highly recommend the Railflyer ditchlights, especially in conjuction with 0402 LEDs (Railflyer has them pre-wired). Excellent detail, easy to install, and the nano LEDs fit right into them. I look forward to more progress pics on this project.
-Kevin
|
|
d10ng
Road Foreman
Modelling the CSS&SB and NICTD.
Posts: 93
|
Post by d10ng on May 27, 2012 16:49:43 GMT -5
Kevin
Thanks for the railflyer recommendation, it certainly looks the part, glad to know its a hit.
I'll try and find the info on fitting a kato motor.
Dave
|
|


