|
|
Post by Dave on May 10, 2010 13:49:07 GMT -5
I have been working on this particular engine for quite a while. When John __ (onequiknova) posted his series ( last year?), I became re-inspired. Great modeling will do that it seems. I have a bit of sanding to do yet on the joints of the louver sections and the pictures show a sag in the radiator screens I hadn’t noted before, so I still have a ways to go. Eventually this engine will be painted in the “Chicago red” color with simplified stripes and herald only.
Thanks for looking
Dave Street
[urlhttp://s783.photobucket.com/albums/yy111/dhs12001/dhs/][/url]
|
|
|
|
Post by Dave on May 10, 2010 14:22:18 GMT -5
sorry fellas.
I surrender, I just can't get the pictures to show.
Dave Street
|
|
|
|
Post by danraitz on May 10, 2010 15:39:36 GMT -5
Dave, All you have to do is when you are viewing the image on PhotoBucket, is to go to the "Share This Image" block on the left side of the screen. There you will right click on code bar just to the right of "IMG code" and copy the code. Then when you are in the post here, all you have to do is right click and "paste" you image into the post. That's all there is to it.  |
|
|
|
Post by onequiknova on May 10, 2010 20:30:32 GMT -5
I made your link clickable. s783.photobucket.com/albums/yy111/dhs12001/dhs/ It looks like it's coming along nicely. It appears you have all the details handled, but if you run into a road block, let me know, I learned quite a bit about them when I researched for my build. I assume your going to number it 751? 750 had some minor detail differences, including an asymmetrical pilot. Likely due to a minor grade crossing accident. If I ever build another one, I think I'll do what you did and use Highliner parts for the side panels instead of the Plano louvers. How does the spacing of the louvers compare to the prototype? John. |
|
|
|
Post by onequiknova on May 10, 2010 21:52:14 GMT -5
It sure seems to me that Rock Island sure butched up its E6's and E7's. Milwaukee Road didn't have a thing on the Rock Island when it came to hacking and slicing on the E6/7's. I think it adds character.  But seriously, they were a shell of their former Rocket selves by the end of their long, abused careers. The Rocks E's sure make interesting modeling projects though. |
|
kcs1967
Chairman
SWLA-SETX PINE SCENTED
Posts: 1,726
|
Post by kcs1967 on May 10, 2010 22:22:36 GMT -5
great job so far  , do tell what did you use for the rear hatch??? |
|
|
|
Post by Dave on May 11, 2010 16:19:08 GMT -5
Dan, thanks for posting the picture. When I preview the post beforehand will the pictures show up for me prior to posting for all?
John, thanks for the clickable link. One of the details I have noted in photos but can’t identify is a small boxlike object on the center of the roof just behind the mars light housing. Could this be an early radio antenna or something else? The Cummings diesel exhaust stacks stopped me for a long time. I have yet to find a photo that shows the placement. The only clue I found was in a dvd of the engine running thru Blue Island showing exhaust fumes at the rear end. I placed the stacks following your model. I am intending to number the unit 751. The photos I found show the oil cooler piping better than on #750, which is a little different. The Highliner louver panels required some selective cutting and re-arrangement to closer reflect the prototype photos .
Jim, the B unit with a view was probably scary at grade crossings, don’t you think? I have never heard why a lot of the f-units and E’s thru 7 had the additional rooftop oil coolers added.
Justin, The rear hatch is 0.010 styrene sheet with Archer rivet decal affixed in future floor finish.
Dave Street
|
|
|
|
Post by onequiknova on May 11, 2010 18:12:47 GMT -5
John, thanks for the clickable link. One of the details I have noted in photos but can’t identify is a small boxlike object on the center of the roof just behind the mars light housing. Could this be an early radio antenna or something else? The Cummings diesel exhaust stacks stopped me for a long time. I have yet to find a photo that shows the placement. The only clue I found was in a dvd of the engine running thru Blue Island showing exhaust fumes at the rear end. I placed the stacks following your model. I am intending to number the unit 751. The photos I found show the oil cooler piping better than on #750, which is a little different. The Highliner louver panels required some selective cutting and re-arrangement to closer reflect the prototype photos . Dave Street First off, when you preview your post the picture will show up. I have found when you copy and paste a picture from Photobucket you will sometimes get an un-needed set of numbers at the end of the link that need to be removed for the picture to appear in a post. Anything after "jpg" in a photo link dhould be discarded. I never found out what the box like object on the roof was. I figured it was some kind of antenna as well, and just used a small scrape of styrene to model it. The HEP exhaust was an educated guess base off of 630's exhaust location and this picture of 750. www.flickr.com/photos/8226029@N06/696291198/sizes/o/in/set-72157607517764351/ It appears as though the exhaust angles back, but I didn't model it that way. |
|
|
|
Post by atsf90 on May 12, 2010 0:54:24 GMT -5
Looks great.
|
|
|
|
Post by icghogger on May 12, 2010 10:19:22 GMT -5
Nice Work, Dave, keep us posted!!
|
|
|
|
Post by Dave on May 12, 2010 14:29:40 GMT -5
thanks for the links guys. John, thats the 1st picture I've seen on the AB-6 exhaust. One of the dvd movies shot from Roosevelt Rd. doesn't show this back end clearly even when I step thru the frames. Jim, the Milw. exhaust shown is about the same as Rock Islands ex U.P. bi-level engines.
Dave Street
|
|
|
|
Post by onequiknova on May 12, 2010 18:02:33 GMT -5
|
|
|
|
Post by onequiknova on May 12, 2010 19:30:32 GMT -5
Comparing the model to the rearend shot in those photos, I can see where the model's Cummins hatch panel comes up short. In the rearend photo the Cummins hatch panel extends all the way to end of the roof. Your correct in that the hatch went flush to the end of the car body. I knew this when I built mine, but since I was splicing in a new panel made from dynamic brake hatches, the car body end prohibited me from installing it that way. I would have lost the end of the thin roof overhang. It was a concession I made to get the model done. If I would have used thin styrene to make the hatch instead like Dave used, I would have butted it up to the end of the roof. 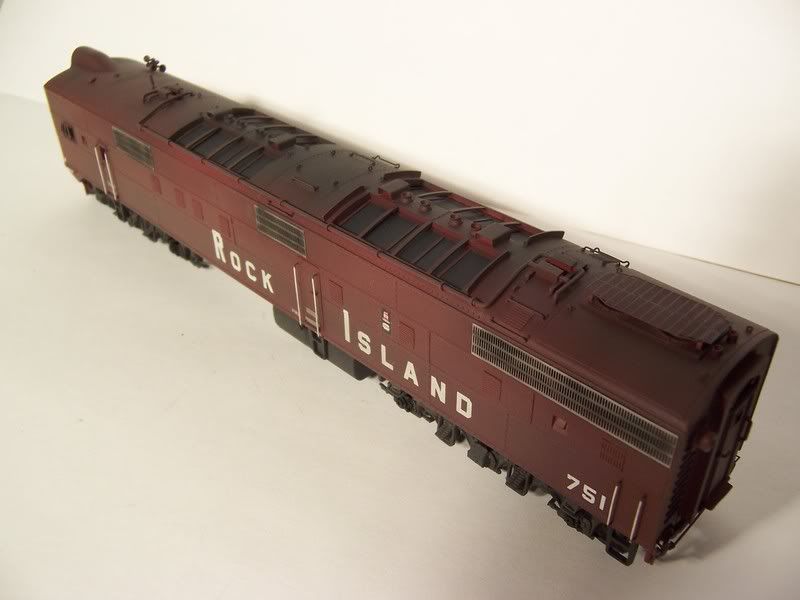  |
|
|
|
Post by Dave on May 12, 2010 20:55:15 GMT -5
oh no- its back to study the photos. I'll try tomorrow when not on a dialup connection.
Thanks
Dave Street
|
|
|
|
Post by Dave on May 13, 2010 9:28:51 GMT -5
I confess I missed the rear hatch length. It will be a relatively easy fix for me to extend the panel and replace the rivet strips. While I’m at it I’ll look seriously into cutting off and replacing the Tichy rivets I used on the nose door and lower body edge. The more I look ,the more they stand out as oversize. The archer rivets are about the size of the Proto shell rivets. For the front end I need to experiment to see if every other rivet can be removed without damaging the decal film.
Dave
|
|
|
|
Post by kcsthebetterway on May 15, 2010 19:14:26 GMT -5
Great work on the roof detail! I just love lots of roof detail  |
|
|
|
Post by Dave on May 24, 2010 7:40:00 GMT -5
I took these photos over the weekend after a light spray of primer to see what needed more work. I was surprised that the multiple side louvers inserts blended in fairly well. On the other hand the front end needs a bit more work. The rounded roof doesn't look quite right. I replaced the Tichy rivets on the front door with archer resin decals, which to my eyes, have now faded back to oblivion. The rear roof hatch has been extended to the end of the roof panel as shown in the photo linked earlier. I have a photo off the web of #751 that was used for roof detail which also shows the hatch clearly. I simply failed to see it until pointed out. The mechanism shown is from a Proto E-7 that was altered some what to fit the E6B body. The motor is mounted at the rear by 2 of the original rubber mounts. The front of the motor is affixed with foam tape to the rear of the air tank. When finances allow, I plan on installing a Tsunami decoder and speaker. Since I'm not a deadline to finish, I'll set this locomotive off to the side and switch back to some R.I. commuter cars already started.      Dave Street |
|
|
|
Post by icghogger on May 24, 2010 9:33:24 GMT -5
Wow, that's coming along nicely, Dave, keep us posted!!
|
|