thomas
Probationary Member
Posts: 4
|
Post by thomas on Sept 5, 2009 9:02:59 GMT -5
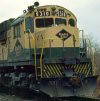
I am just about finished with this unit. It still needs couplers and air hoses to name a few things. Yes, it is an O scale MTH unit. It still has its large flanges which I need to "fix". It is a dummy unit as all I wanted was a weathered display model. It represents a steel mill loco that has come from another line and remarked for its new job.
No air brush was harmed during the painting of this unit. In fact, no air-brush was used at all. I used an under coat of spray can "Mango" which was somewhat close to what I wanted to end up with. The unit was then painted with acrylics by brush. It was basically "stained". All of the painting and weathering was done in this manner. Acrylics will blend nicely if used wet on wet. I treat a locomotive paint job just like a fine art painting, only three dimensional. I used some dry pigments last and then gave it an application of dulling spray.
I made patterns for the new "fixed" pilot and cast these in resin. A Kadee box will slip into the slot - whenever they get here!
This unit is heavily aged and not for the squeamish. It represents one that is being run until it "breaks" and then will be replaced by another.
I am working on a GE 70 ton brass loco now for the Atlantic & Western which I should have soon.
Tom
|
|
|
|
Post by mountaingoatgreg on Sept 5, 2009 10:00:04 GMT -5
This is very well done!! I looks like it needs to be surrounded by weeds in an industrial park. Please post some more pictures when you have it "done."
|
|
|
|
Post by RunningExtra on Sept 5, 2009 17:37:24 GMT -5
That is an excellent job on that loco Tom, the weathering is fantastic, looks like some of the industrial switchers in some of the plants we serve.
|
|
|
|
Post by poweredby251 on Sept 5, 2009 20:33:56 GMT -5
That Baldwins looks like it would have been right at home on the Escanaba & Lake Superior, in and out of the deadline as business warented. Before the EMD invasion, they used quite a few used units that never saw a repaint.
John
|
|
|
|
Post by rdg5310 on Sept 6, 2009 7:23:04 GMT -5
Very nicely done! It looks like something you could find in the weeds of an abandoned yard.  |
|
thomas
Probationary Member
Posts: 4
|
Post by thomas on Sept 6, 2009 8:25:58 GMT -5
Thanks. Here's another view. I've been wanting to do one of these for some time. As can be seen I do like extremely weathered units. I think it makes them look "tougher" and gives them a well used look. It is an MTH 3 rail unit which I will have to "fix" as soon as I get new wheels. The rear pilot is the same as the front for cost savings I'm sure, but this meant the corner under the cab was at a 45 instead of a 90. I had to add a piece of styrene angle to fill it in. That's why there is white at the rear corners - a little filler which needs painting yet. The unit is a dummy because I have no place to run this stuff. I encourage you to try some hand work with acrylics. Once you get the hang of it, it goes really easily. The windows need some grime. Clean windows on a loco as weathered as this one looks like a Windex commercial! One trick I learned from the armor guys is to darken the panel scribe lines. This accentuates the different panels and gives a shadow line.
After I finish this one I still need to finish the 70 tonner. Then it's off to an SW1. I like first generation diesels!
Tom
|
|
thomas
Probationary Member
Posts: 4
|
Post by thomas on Sept 6, 2009 15:15:03 GMT -5
Actually the weathering was done with only washes of colors. I use thin acrylic washes and build these up to a rich depth of finish. Each successive application is changed just a tiny bit to alter the color. If you paint wt on wet the successive applications will blend very nicely. I also use a large pointed sable for most of the work. Sometimes a flat sable is used. For the rust I use a small pointed sable and "spot" on the rust which is really full strength Burnt Umber. That is the undercoat. When that is dry I apply a thin stain of Dr. Ben's Realistic Rust. Just dad it on and let it set on the dark brown spots. I will then go back when dry and use a tiny bit of slightly thinned Terra Cotta. I place a small dot in the center of the rusted area and gently smear down with my finger. I will also use a very thin was of this stuff and lightly scrub around the rust spot so it "bleeds" a little. This will discolor the surface around the spot and make it look as though more rust is forming below the paint. This does take time but I think it is well worth it. A tiny amount of dry pigments are used to blend areas of dust and enhance the rust a bit. Fun work. I really enjoy it
Tom
|
|
|
|
Post by Randy Earle on Sept 6, 2009 17:23:31 GMT -5
Very nice unit Tom.
|
|
|
|
Post by icghogger on Sept 9, 2009 15:35:48 GMT -5
Superb Work, Tom! You did an excellent job with the weathering, the rust is in all the right spots!  |
|
kcs1967
Chairman
SWLA-SETX PINE SCENTED
Posts: 1,726
|
Post by kcs1967 on Feb 25, 2011 16:00:11 GMT -5
Beautiful JOb
|
|
outback
Road Foreman
Recently returned after an 8 year MR hiadus. Now wandering around the railyard again ;-)
Posts: 94
|
Post by outback on Feb 25, 2011 22:57:11 GMT -5
Very Nice. I agree w/ the first response - it really does look like it has been found on a back track destined for scrapping.
|
|