|
|
Post by DelmarJct on Nov 3, 2017 0:18:19 GMT -5
Next up on the chopping block is an SW1200. This is going to be a Milwaukee Road 600 series that spent most of its life in Illinois, some of which was on the Southeastern Division. Unfortunately there aren't many pictures of this locomotive online, and I'll be modeling in an era that these motors went through a few cosmetic changes. This unit had quite a few options on it, so details will be fun.  One issue with these P2k models are the flimsy handrails. I was researching replacements and came across a thread about an NW2 that used the Kato stanchions drilled to fit brass wire. While these stanchions are a little oversize there aren't many other options. KV models also has some etched brass grill parts and hood mounted handrail mounts that will be put on. Other than a few other odds and ends, this seems like a pretty straight-forward build (of course now that I've said that...it'll be nothing but problems!). Now to the actual build! She started life as an N&W model but I've decided I don't like the blue (well, as much as I like the orange). First to go were the thin plastic handrails and grabs. Unfortunately this proved to be more in depth than other models I've done, as half of them broke off in the model and needed to be pushed out from behind. Then the cab was gutted and lights were taken off the inside of the shell. Everything was set aside, but the lights will be replaced with LED's. The shell came apart relatively easy and was soaked in an alcohol bath for a couple hours and scrubbed clean of all its paint. After getting rinsed clean with soap and water, she's sitting on paper drying and waiting for detail parts to show up. 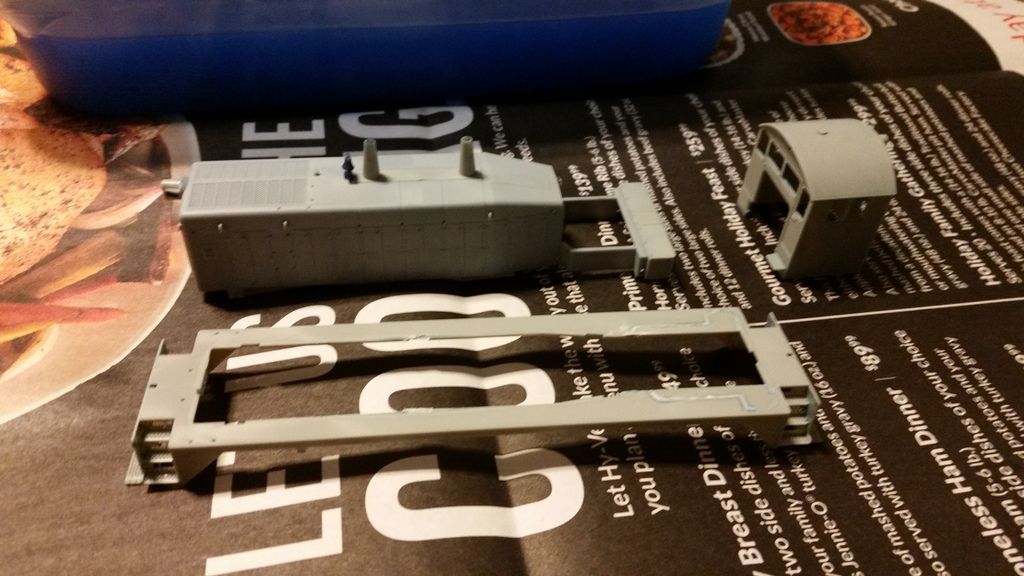 Ryan |
|
|
|
Post by m a y o r 79 on Nov 3, 2017 8:00:05 GMT -5
I think you need to get your photo links fixe, Photobucket doesn't allow free linking anymore unless you pay them. A few of us here started using imgur.com, its free and pretty easy to use.
Glad to see another Milwaukee Road modeler here! This will be an interesting build to follow for me, though I don't think there is anything simple or straight forward about the Milwaukee Road 
Have you checked railroad photo archives for pictures? They have quite a few SW1200 images including a few of #639, here's a link:
Milwaukee Road #639 photos
I've drilled out stanchions before, its doable but tedious. Just take your time.
What details are you adding? Depending on the year the Milwaukee modified these some including spark arrestors, etc. |
|
|
|
Post by DelmarJct on Nov 3, 2017 12:21:09 GMT -5
Thanks Mike! It's been a while since I've posted any pictures but I think I've got it set up. Thankfully it was just a picture of the stripped shell so nothing spectacular.  You're right, there's nothing stock about the Milwaukee! It seems like everything has to be modified in some way. There's a few pictures on rrpicturearchives.net and they give me a good idea of what I need to add. The modifications will be the etched grills and radiator fan in front and the long hood mounted stanchions. They aren't necessary but I like the level of realism it'll add to it, even with the added work I have a good feeling it'll be worth it in the end. Other things are marker lamps (will probably have jewels installed), all weather windows and canvas sun shades, and the handrails. I've been looking for air cooler lines that the Milwaukee had on their SW1200's but I can't find them anywhere. I'll be modeling 1969-73 which is the era that the spark arrestors were installed, but this unit didn't have them in a picture from 1975. She had the small slip-over style in 1968 that the fine people at P2k included with the model! Possibly the easiest way I've come across parts, and I'm not complaining! Ryan |
|
|
|
Post by bigjdme on Nov 6, 2017 17:37:26 GMT -5
DCC and sound too Ryan??
|
|
Deleted
Deleted Member
Posts: 0
|
Post by Deleted on Nov 7, 2017 0:31:05 GMT -5
Be neat to follow this build.
|
|
|
|
Post by DelmarJct on Dec 11, 2017 23:07:12 GMT -5
After a short hiatus, the project is moving again! All the detail parts are in and most mounts have been drilled. The biggest visual change is the etched stainless steel radiator and fan grills I got on Ebay from KV Models. There was also an option for a fan to set behind the louvers that came with this set, but since this unit will be powered with lights I decided to model the louvers "closed" and put styrene behind them to block any "engine fires" from shining through the grills. There will also be styrene below the radiator grill for the same reason.  My first step was cutting the molded grills out by drilling just inside the grill frame and scoring around the holes. I left the center support above the radiator to give me something to attach the stainless center support to and so I bend the angles accurately. Remember, drill holes in your radiators to prevent overheating!   In the last photo you can see the molded hood handrail stanchions have been cut and filed down. The stainless stanchions will be installed before paint. Next step is spraying the stainless details then installing them onto the shell. Hopefully after that the shell will get painted up and detailed, then off to the DCC desk! Ryan |
|
|
|
Post by m a y o r 79 on Dec 15, 2017 8:37:08 GMT -5
Lookin good. I did the radiator screens on my TR4 set but I used the Detail Associates parts. I modeled mine open with a fan behind though. Makes a huge difference in the finished appearance of the model.
|
|
|
|
Post by mikeinwi on Dec 19, 2017 12:30:21 GMT -5
Looking good Ryan. I have so many projects going right now. Coming into the DD gets me all inspired to get back to them.
Mike.
|
|
|
|
Post by m a y o r 79 on Dec 20, 2017 6:41:01 GMT -5
Welcome to the club Mike. I don't want to know how manny projects I have half completed. Winter after the holidays is usually my big modeling season.
|
|
|
|
Post by milwgp30 on Feb 25, 2018 18:15:34 GMT -5
Its been a while since I have modeled much of anything, you project piqued my interests! Looking forward to see more in-progress shot! Here is a link to a prototype shot. Have many more not of Flickr if you need more SW1200 shots. Good Luck,Matt flic.kr/p/23jqvGV |
|
|
|
Post by DelmarJct on Mar 6, 2018 21:13:50 GMT -5
Well guys, I promised myself I wouldn't do this with my first project (this post was supposed to motivate me to keep updates coming) but I need to apologize for not updating in a few months. I walked into work one day a while back and was told I needed to be packed in a month to move 1000 miles away! Everything is finally settling in and I'll be getting back into the swing of modeling, so I'm expecting to post an update within the next few weeks. Thanks for being patient with me.
Mike, I'm with you! I have boxes of locos that I've bought for projects that haven't even been started yet and I'm still finding inspiration for new projects every week it seems like...the girlfriend calls it my addiction but it's better than most addictions!
Ryan
|
|
|
|
Post by coaldog on Mar 7, 2018 4:48:15 GMT -5
Were patiently waiting.
Hoping to see more progress.
I'm getting ready to work on an SW8 in my freelance road.
Also glad to hear the move went well.
|
|
|
|
Post by DelmarJct on Nov 25, 2018 19:49:53 GMT -5
Now that we're back into modeling season, and everything else has FINALLY calmed down, it's time (and has been for a while) to get back into the spirit. The first thing I did was to bring out the shell and clean up around the cut sections out. There was still some extra plastic around the holes that needed to go. Since the grills will be see-through I painted the inside of the shell black. Unfortunately I only had gloss but it wont make a difference unless you put a flashlight directly on it. All this is supposed to do is keep anybody from seeing the grey plastic if they happen to look at the right angle.   Afterward I painted the grills flat black. Because they're stainless, the paint needed 2 coats. Originally the back side was the most important to cut the shine down, but I decided to paint both sides. The grills will be glued to the shell before paint but I'll be waiting to put the fins in until after paint so theres no overspray making fun patterns on them.  I have a few things coming in the mail, including my ultra thin CA and some detail parts, and that'll be one of the last steps until paint (time to get the paint booth unpacked!). I appreciate all of your patience, thank you. -Ryan |
|
Deleted
Deleted Member
Posts: 0
|
Post by Deleted on Nov 26, 2018 0:59:48 GMT -5
Looking good Ryan.
If you click the 2nd from bottom on imgur it will show the image just an FYI.
|
|
EMDX6043
Chairman
Future ex-modeler
Posts: 837
|
Post by EMDX6043 on Nov 26, 2018 17:06:57 GMT -5
Looks good, Ryan.
As info, you can post photos by using the insert image icon off of this forum's menu bar by right-clicking and selecting "copy image location".
Here's one of your photos as an example. You have to use "Reply", not "quick reply" in order to access the extra features.
|
|
|
|
Post by DelmarJct on Nov 26, 2018 20:27:06 GMT -5
Sorry guys, I was posting from my phone and forgot I couldn't link photos the right way from mobile. Thanks Dave!
-Ryan
|
|


