|
|
Post by ironstef70 on Oct 31, 2017 19:26:59 GMT -5
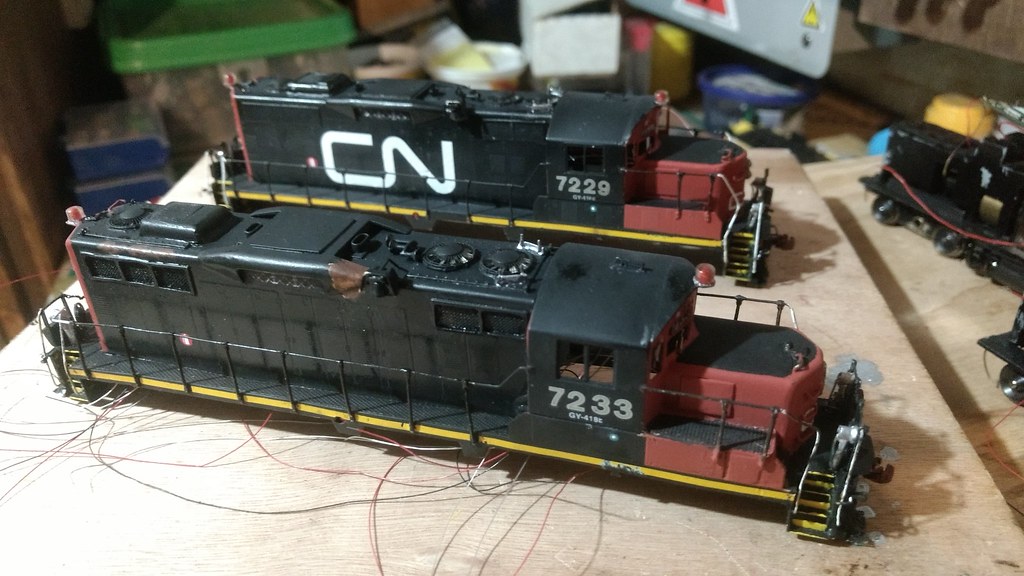
This project was meant to be the logical continuation to CN #274 slug (see "just another GP9 slug" post), from 2 years ago. But back then, I felt like I did not had the skills and tools to make it happen to my satisfaction. Still, a few projects later, I am finally moving forward with this one. First, I need 4 axel engines for operations in other clubs, and also because I wish to give one of the units to my son for X-mas. I have re-tested the Proto2000 bases so to validate they're still functioning, but I will now rather use LockSound decoders instead of these Tsunami ones (anyone interested for two tsunami GP9 decoders, let me know; they'll sell for cheap!). I have just worked on the shells with shaping the dynamic brakes, soldering the fan plates, etched side grilles, sanding cab parts in preparation for the next steps. I also intend to shape opening front doors for both units. Lots of work will also be required for the frames/walkways details, and I also want to do decent underframe detailing with visible air piping. The plastic hatch over one of the shells is just a reference. I will shape new brass ones from brass plates and add etched grilles for better realism. Cannon fans will complete the job. 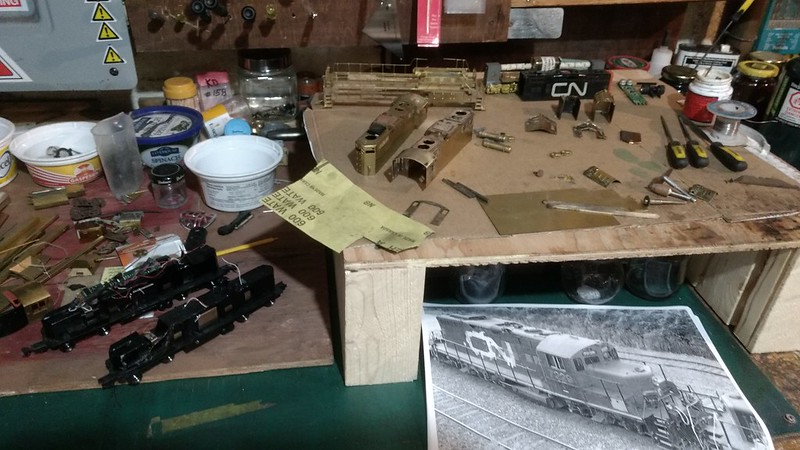 GP9rm 7229 & 7233 GP9rm 7229 & 7233 by Ironstef, sur Flickr 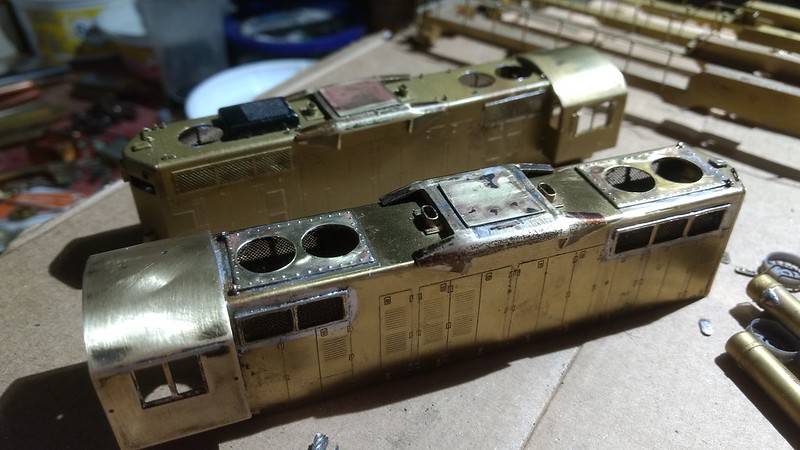 7229 & 7233 shells 7229 & 7233 shells by Ironstef, sur Flickr Stephane |
|
|
|
Post by ironstef70 on Nov 3, 2017 20:43:59 GMT -5
Recent progress was about fitting the shells over the die cast frames, completing some detailing (scratchbuilt winterization hatches, adding brake wheels, preparing strobes base plates, boring fan plates for the Cannon Associates fans,...) then starting up with scratchbuiding the cabs. They still look very rough, but I have only polished one of the roofs for now. A major polishing and cleaning job will be required before I even think about the paint job. I still need to build the noses, and many details such as bells and horns have been ordered. I have plenty to do until I receive those. Now I'll be progressing from top to bottom, less the missing parts. I may re-use the former brass Bloombergs (upper righ first picture) from the Sunset Models trucks in lieue of the resin Proto/Athearn ones, and fit them to the Proto trucks. This way, I will be able to solder more details and they will be much stronger. These older drivetrains allowed me for recuperating nice Canon can motors (very good backups for my other Ajin locos), and handful of screws and parts in various sizes. 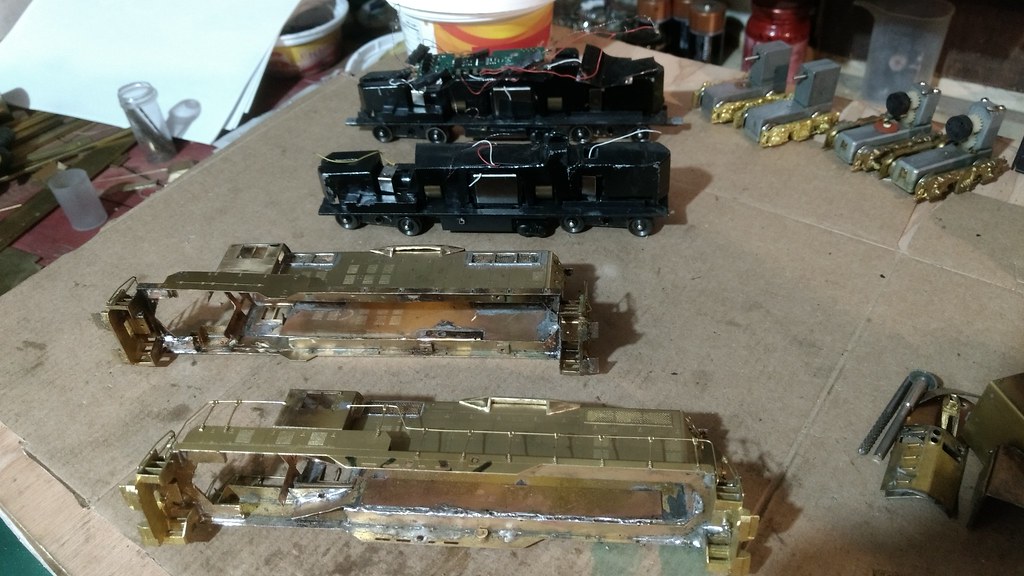 IMG_20171103_211511734 IMG_20171103_211511734 by Ironstef, sur Flickr 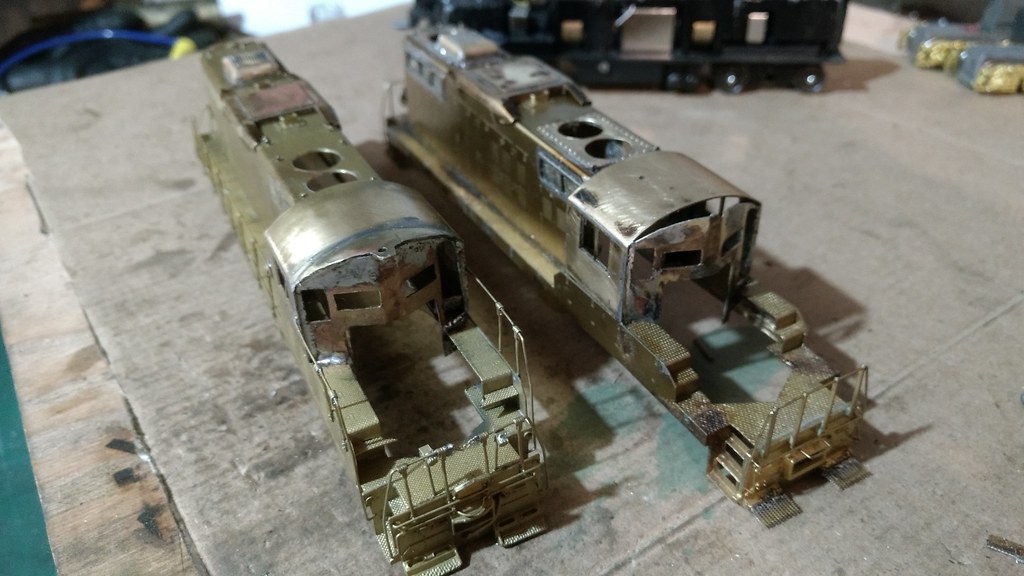 IMG_20171103_211655798 IMG_20171103_211655798 by Ironstef, sur Flickr Stephane |
|
EMDX6043
Chairman
Future ex-modeler
Posts: 837
|
Post by EMDX6043 on Nov 4, 2017 6:31:39 GMT -5
Looks good...are you using a resistance rig for all of that work?
|
|
|
|
Post by ironstef70 on Nov 4, 2017 8:28:07 GMT -5
Nope. Just a soldering pen (but a good one now, with heat adjustment, although I still have smaller ones for layout jobs), then a propane torch, a smaller butane torch, sometimes just a candle, depending of the job. I also make myself different wooden piece tools for holding parts in place. Usually, I would kitbash them according to my needs. Right after this job, I want to start doing tank cars out of copper pipes and brass, and I made myself a wooden support so I can heat these up without damaging my work table. This one might be my first project: www.cvatanks.com/wp-content/uploads/2012/06/cr_x_large_2.jpgAnd I now have a huge assortment of tools for my Dremels, hand saws, files, and such... I no longer have to search online for a specific tool.  I once thought about more "automated" tools as a CNC or miling, but I don't have the room for those, they are pricey, and not as flexible for my current needs. Maybe later if I ever decide to do some stuff like custom parts. But I can pretty much find what I need online, thanks to Miniatures by Eric, Plano, Cannon, K&S and such. Stephane |
|
artur
Chairman
Posts: 580
|
Post by artur on Nov 7, 2017 9:59:10 GMT -5
It’s looking really good, I still have to get back to working on my Kaslo GP9’s. I’ll be watching updates on your project.
|
|
|
|
Post by ironstef70 on Nov 12, 2017 19:38:27 GMT -5
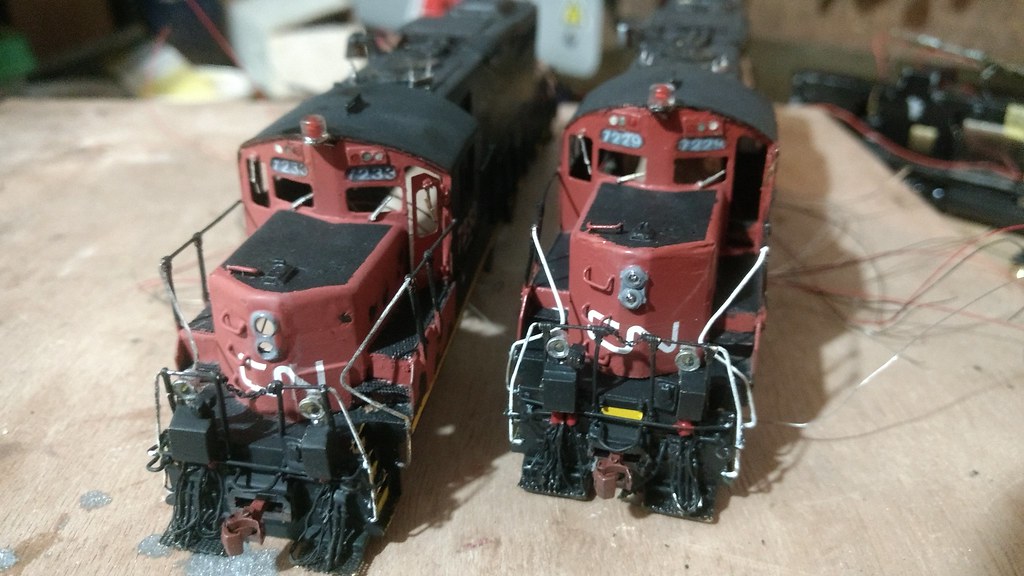
It’s looking really good, I still have to get back to working on my Kaslo GP9’s. I’ll be watching updates on your project. Thanks, so will I if you go ahead with yours too. Here is the latest progress on the shells. I have rebuilt both chop noses, and one of the steps on one unit, using etched walkways over brass plate. The job is still "dirty" but I haven't yet completed the soldering on each shells. Lots of detailing needs to be added, among which functionning front doors on each cabs, then MU hoses electrical packs (needs to be scratchbuilt, and soldered to former decoder cables for realism). In the process, I have modified this wide vision caboose to its prototype state. I had to cut a rectangle so I can flip the window in position. It originally had the 4 windows positioned 2 steel panels away from the ends, which was incorrect. One of three windows is offset that way. This is for a future CP 434957 caboose project: www.rrpicturearchives.net/showPicture.aspx?id=3226517That job also shows about how the GP9 cabs shall look once polished and cleaned prior to painting. 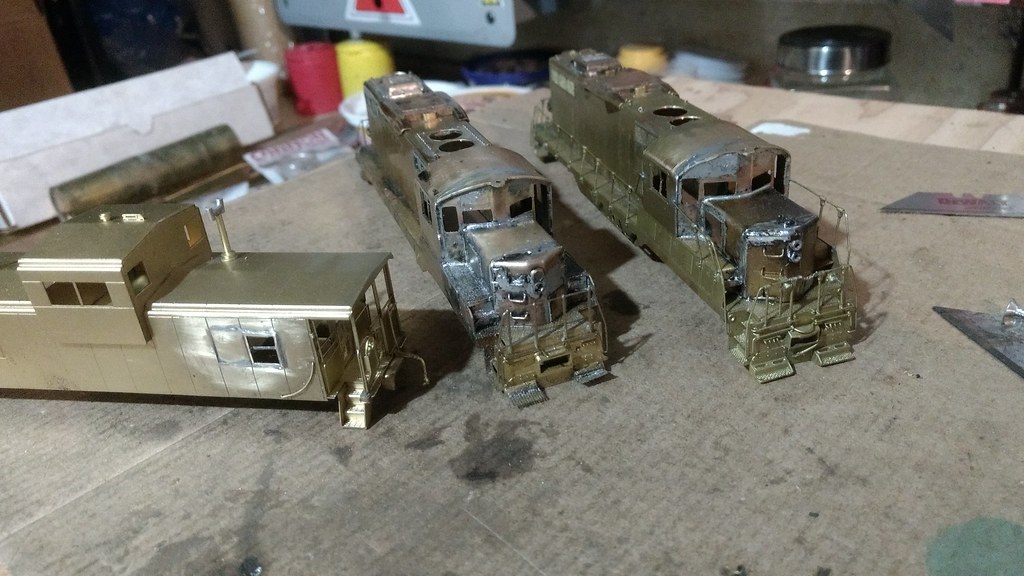 IMG_20171112_124405292 IMG_20171112_124405292 by Ironstef, sur Flickr 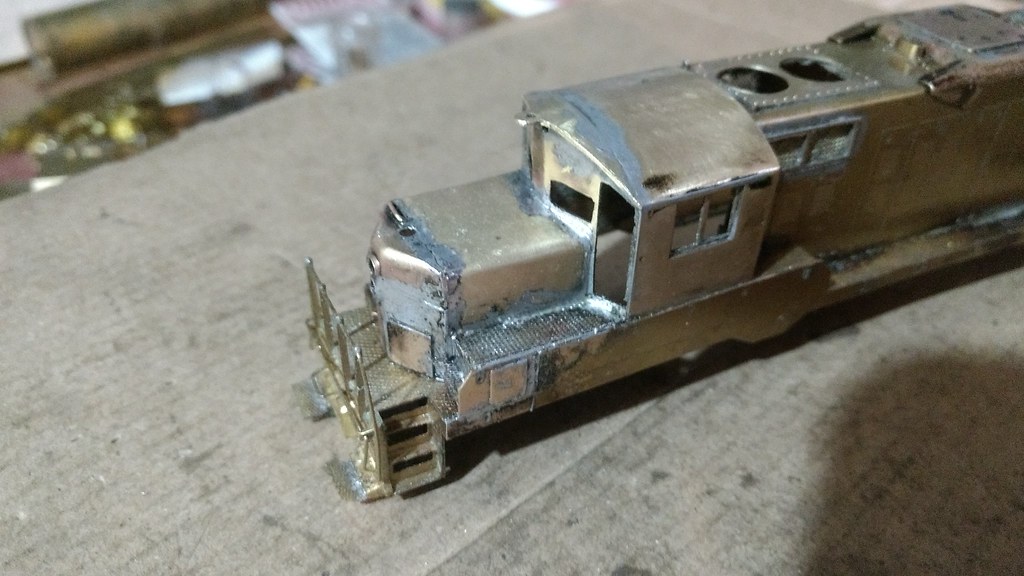 IMG_20171112_124506520 IMG_20171112_124506520 by Ironstef, sur Flickr Then, I'll be moving forward with underframe details, handrails & stanchions addition/modification, and missing parts on the roof. The proto 2000 frames have been modified in order to allow cable wiring and be screwed to the brass shells. All they need is to have the decoders installed, then the pipe job done around the air tanks. Locksound decoders & speakers are on their way home, and the LEDS are ready to be installed on. I originally planned to put them to the end of the Proto diecast frames, but little clearance didn't allow for a deep speaker box installation. So I will rather put the speakers in the cabs, for a deeper and rich sound, and have black tinted windows, since there isn't much to show inside anyways. Stephane |
|
|
|
Post by ironstef70 on Nov 17, 2017 19:56:03 GMT -5
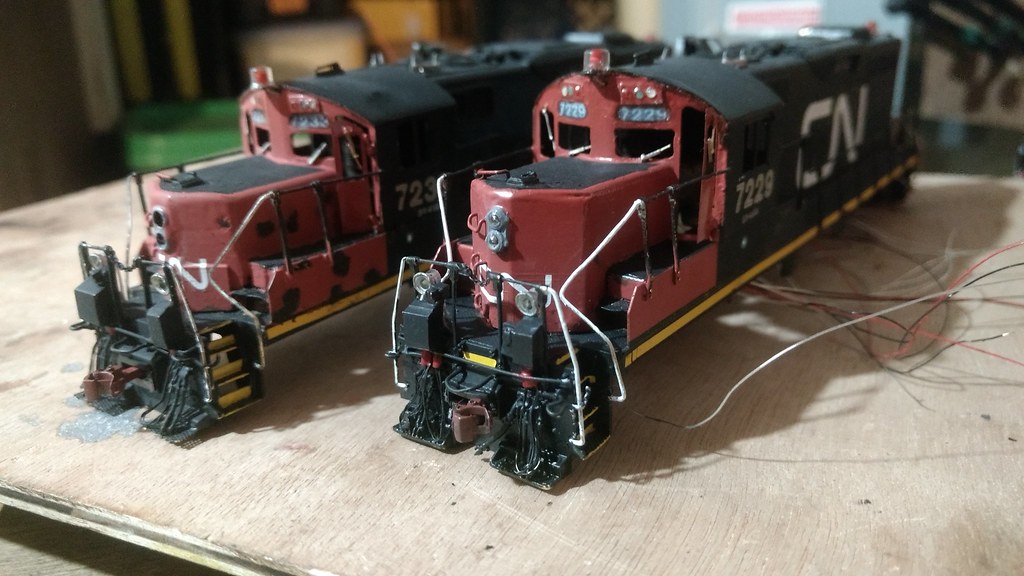
Recent works were about the completion of the noses, then started polishing them and the cabs. 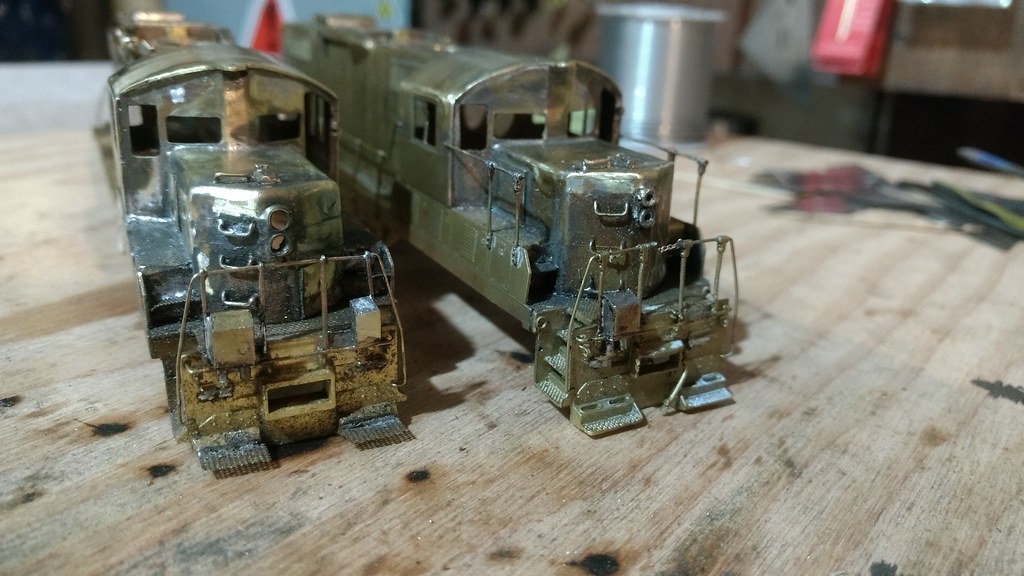 IMG_20171117_193606677 IMG_20171117_193606677 by Ironstef, sur Flickr 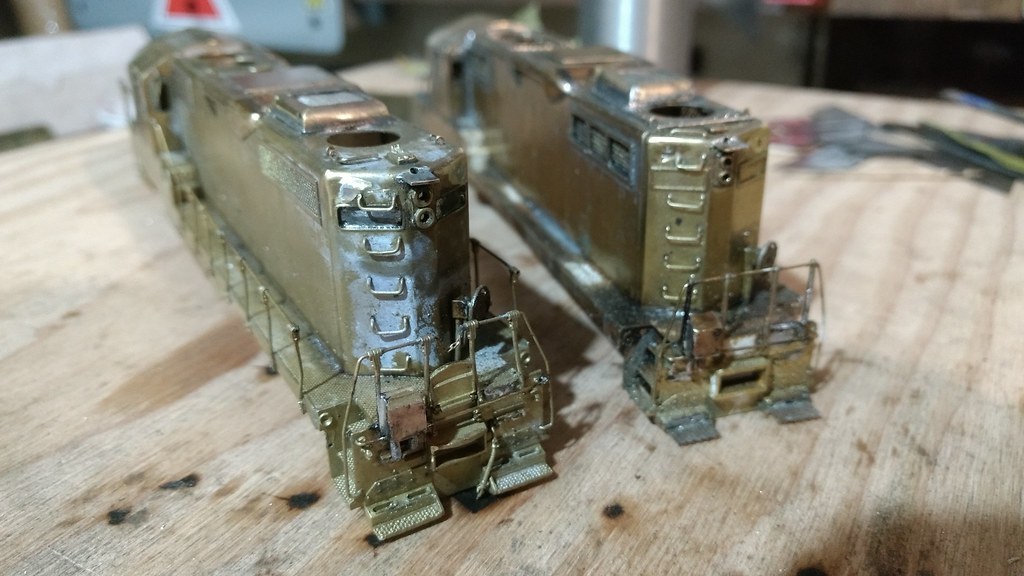 IMG_20171117_193807404 IMG_20171117_193807404 by Ironstef, sur Flickr At this point, I am getting at the MU stands and handrails. The MU boxes are scratchbuilt and I am missing 3 (which are on the work bench awaiting to be cut out of the thick brass plate)out of 8 now. Then I will do the CN style handrails on each corners and install the MU hoses. Oh, I forgot to put the doors in place for the picture. the upper hinges are slightly visible, but the doors will be worth the looks. Designing the hinges and fitting both doors on each cabs alone took me 4 hours. Details are not all completed yet; I will add wipers, custom front number boards, need to replace one headlight, and so on... Still lots to do, but I like the built. It's probably the longest project I've done, and it allows me for picking lots of soldering skills which I will need for future projects. I really like working brass; I only wish I had more hobby time. Stephane |
|
|
|
Post by ironstef70 on Dec 1, 2017 22:42:37 GMT -5
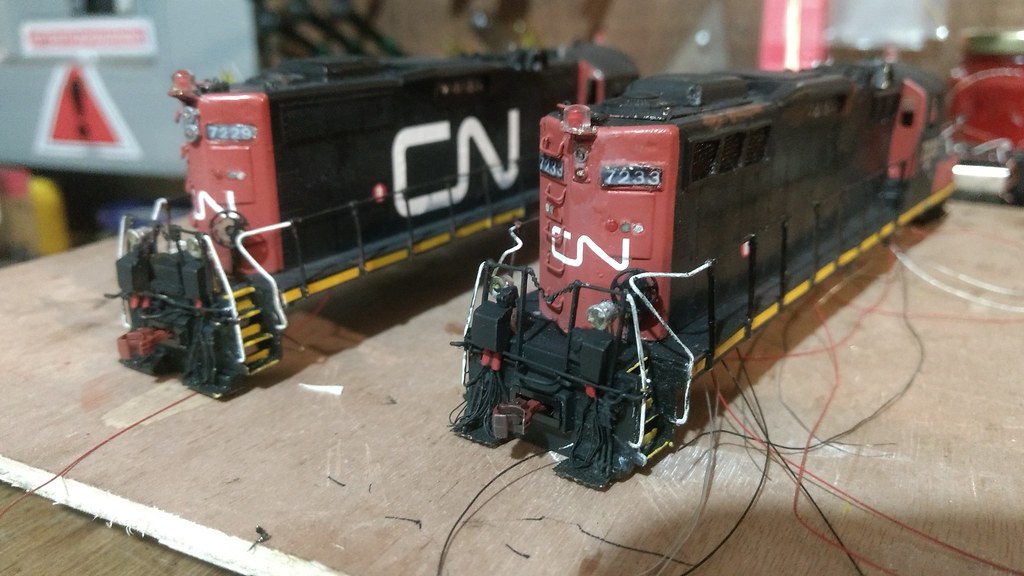
Some of the last works made on the bodies. Almost all details on the bodies are completed now, less a few details whci will be glued once painted, such as the fans. Ditch lights has been wired, and some of the underframe detailing (not shown) has been made. Now there's a lot of sanding and cleaning to do before the first paint layer. But within a week I shall get started. Of course, due to the parts used, both units are not totally identical, but they shall be 95% close to the prototype. 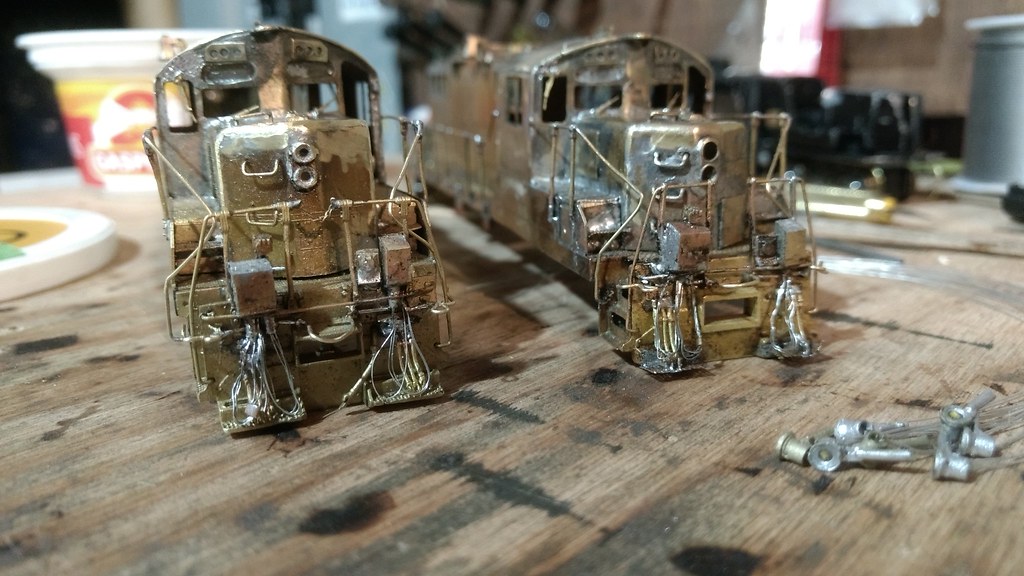 IMG_20171201_220108708 IMG_20171201_220108708 by Ironstef, sur Flickr 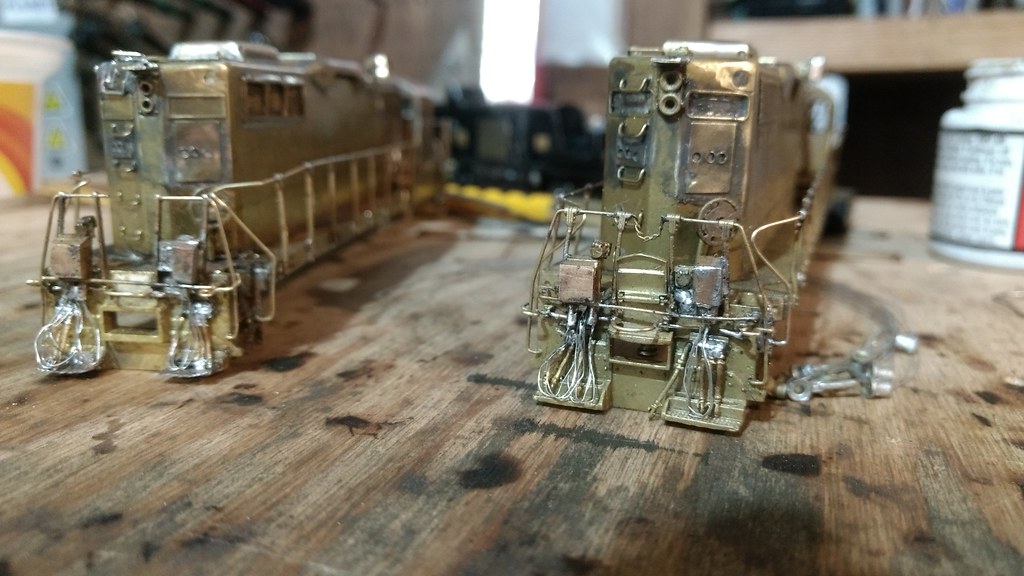 IMG_20171201_220158655 IMG_20171201_220158655 by Ironstef, sur Flickr 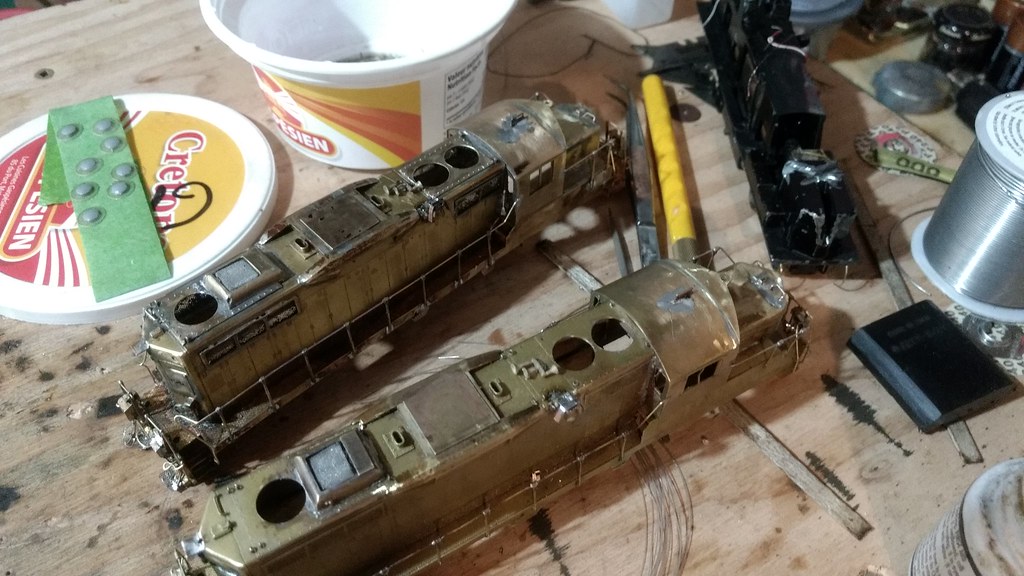 IMG_20171201_220237508 IMG_20171201_220237508 by Ironstef, sur Flickr Without a doubt, those are the most challenging modeling project I've been into until now, and sound training for future ones. Stephane |
|
|
|
Post by ironstef70 on Dec 8, 2017 21:34:27 GMT -5
Still moving on. It's about time, X-mas is at the corner  I'm pleased with the Cannon fans. I first didn't liked the idea of plastic parts over brass, but they really make a difference (double click and zoom the picture once in Flick'r (must double click again); its worth looking at...). I now have to let the paint dry for a couple days before doing the orange and additional decals. Never mind the orange peel finish on the black (last picture shown below); its been corrected with the additional thinned layer since. 7229 (my son's) will remain "fresh out of the paint shop" colors. 7233 (mine) will be weathered to its prototype state, with primer chips on the nose, and fire burn over the right side dynamic brake: www.rrpicturearchives.net/showPicture.aspx?id=4652003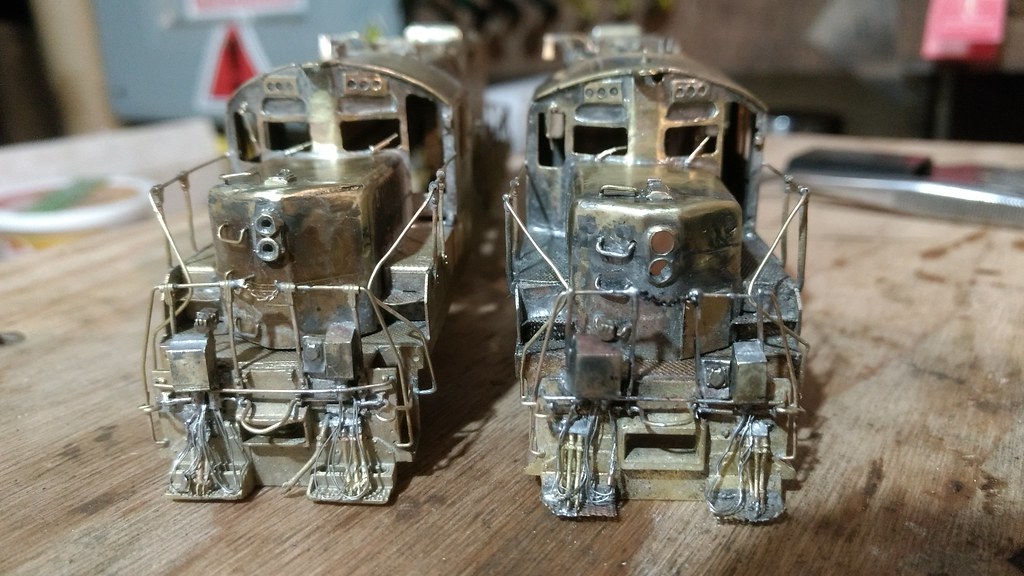 IMG_20171206_182531706 IMG_20171206_182531706 by Ironstef, sur Flickr 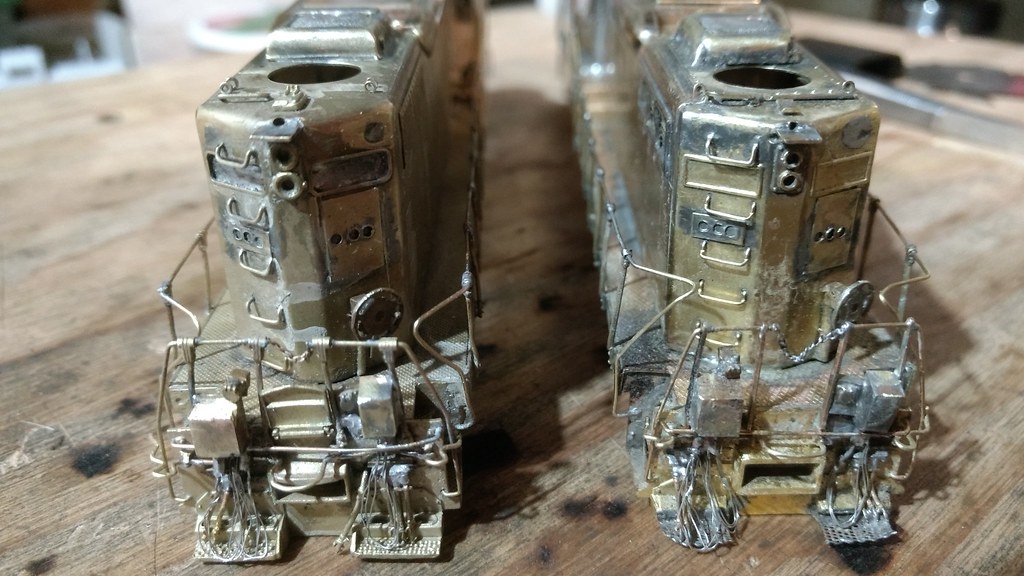 IMG_20171206_191336201 IMG_20171206_191336201 by Ironstef, sur Flickr  IMG_20171208_090129802 IMG_20171208_090129802 by Ironstef, sur Flickr 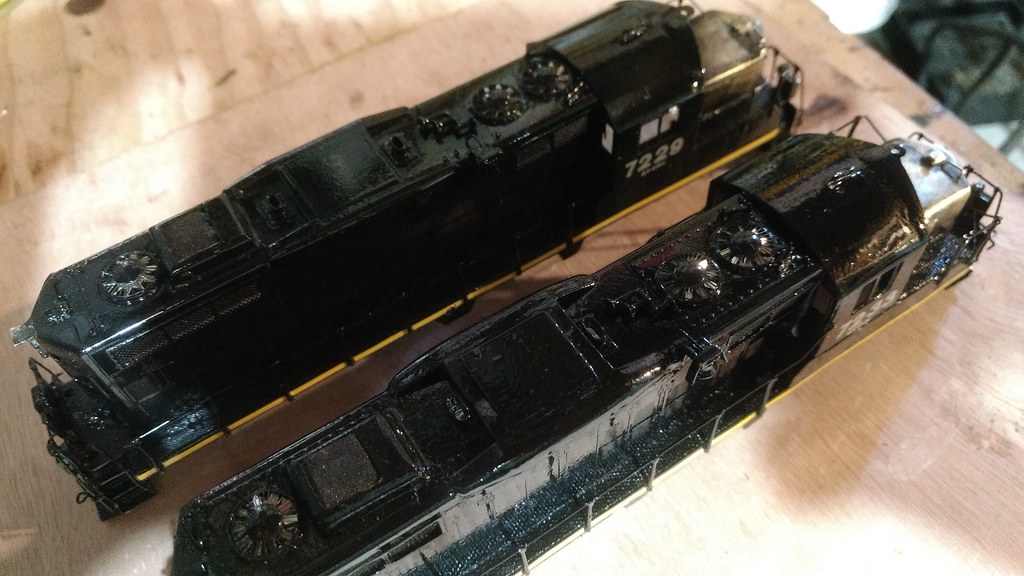 IMG_20171208_085834547 IMG_20171208_085834547 by Ironstef, sur Flickr In the meantime, I am doing the underframe pipe job, then electronics. S. |
|
|
|
Post by ironstef70 on Dec 17, 2017 8:38:22 GMT -5
|
|
artur
Chairman
Posts: 580
|
Post by artur on Dec 17, 2017 16:41:40 GMT -5
Looks good, you’re making good progress I haven’t been to my train room in week.
|
|
|
|
Post by ironstef70 on Dec 28, 2017 20:12:56 GMT -5
When something has to fail, its gotta be the electronics.
I have burned several LEDs due to a short somewhere in the trucks. Those are not brass trucks but the Proto 2000 (aka Athearn since they<re identical).
I must take a break and start something else before getting really pissed off with that project. My plan is to probably buy another cheap GP9 so I can use a different (hopefully healthier) frame, then plug and see how it does, before I start spending more time on the under frame detailing again.
Or maybe try 7133 and see how it does. But not before I cool down and take a good break.
The paint certainly is dry now....
Stephane
|
|
|
|
Post by slowfreight on Dec 28, 2017 20:41:36 GMT -5
Random stupid thought for the afternoon...I used to be able to buy bottles of something called "liquid tape" from the local electronics supply house--back when there was such a best. If you needed to insulate against contact rubbing, it was a bit more robust than paint, but less so than gluing 0.005 styrene over something. It's made by Gardner Bender and available on the 'bay.
Second random thought for the day...Bill Gardner inherited Gardner Bender from his dad, who invented the Gardner Bender to form electrical conduit. He found the business boring, sold it, and plowed the fortune into Wisconsin Southern RR because--as we all know--that's much more exciting.
|
|
|
|
Post by ironstef70 on Dec 31, 2017 15:01:40 GMT -5
There ain't no stupid ideas, and I may as well try one of these eventually. My first thought was basically to Dremel-wear the surfaces of the die cast frame and coat with a thin layer of epoxy glue, where the paint is currently worn due to the numerous open-and-reassemble sessions, and where some LEDs didn't seem to appreciate the treatment. The epoxy, just as the paint, would also insulate from electrical conductivity, but would resist much better against wear over time. But I still need to let that sit on the side of the bench for a while until I made good progress with another project first. That's usually how I handle such turmoils.  And I am still waiting for some decals. Mail is slow during the holidays. But thanks for sharing, and happy 2018, with many SUCCESSFUL projects. Stephane |
|