nemo
Probationary Member
Posts: 15
|
Post by nemo on Aug 27, 2013 14:37:15 GMT -5
Hi everybody!! I want to share with you some images of a project in which I have been for a couple of months. It´s and old Athearn Blue Box SD40T-2 with de colours of the brazilian company ALL (América Latina Logística) who bought a few years ago several of ex UP, Rio Grande, BN locomotives manly SD40-2, SD40T-2 and a lot of GE C30-7. The greatest peculiarity in this units is is that they work in narrow track (1000mm) Some details from de ALL 9511 Owner: America Latina Logistica Model: EMD SD40T-2 Built As: DRGW 5375 (SD40T-2) Serial Number: 766050-2 Order No: 766050 Frame Number: 766050-2 Built: 1/1977 Notes: ex-DRGW 5375 www.rrpicturearchives.net/locoPicture.aspx?id=116458Well let´s go to the pictures Like de original unit my model uses an SD40T2 from Rio Grande  First work was open two doors on the right side of the body for simulate open doors during de travel as if they were not well closed.  The SD with his new anticlimber (not present at the original loco but is a great detail), sunshades, MU plug and the base for the sinclair antenna on the roof.  The base for the GPS dome just behind the cab. The GPS normaly doesn´t go on the roof by the height of the bridges and tunnels that are low  In the rear front i use a piece from a brazilian manufacturer called LFRC who makes frontal pieces for the Frateschi Locomotives. There are for make more easy the installation of the kadee couplers and have the real form of the original loco coupler box  I will continue uploading photos later. Best regards from Buenos Aires |
|
nemo
Probationary Member
Posts: 15
|
Post by nemo on Aug 27, 2013 19:27:41 GMT -5
Hi guys. Continuing with the photos!! This is a close on the open doors section on the long hood. I use two cannon & company doors and i made the electrical cabinet with styrene. Thanks to the width of the Athearn body shells i can made this piece and behind is the original mechanic of the locomotive.  I take the idea to make this cabinet from this picture taken by Milton Ribeiro in Brazil  Another view of the all model with the sinclair antenna installed, the grab irons and the ditch lights  It´s time for apply the primer but not before i install the new brake well.    It´s time to apply the red and black. The red is the modelmaster chrysler red and classic black.     After i finish the main paint work a friend who is the owner of a local model trains shop came to me with a new fitting. This was the grills for SD40T-2 from S&S hobby. I never had worked with photo-etched so this was a great opportunity to test this material. With a very carefully work the original grids were removed and the new ones installed. They were not the way I wanted, but being the first time I did not worry.  More details added in the fuel tank.  All the decals put in place. They are all made in Brazil by Decalques do Carlao except the EMD plate, that is from Microscale.  Almost finish. Time for the handrails, the snowplow (not used in Brazil but that is a piece which leaves very well the fronts) air conection, brake line and little paint repairs.   A little details on the trucks. ALL modified the brake line on the SD´s so i made them with wire from details associates.  This is all for today. Currently i´m working on the weathering of the model with what is going to be a very dirt locomotive just like the ALL Style. Best regards for all. Nico Alexander |
|
nemo
Probationary Member
Posts: 15
|
Post by nemo on Aug 27, 2013 19:30:08 GMT -5
|
|
nemo
Probationary Member
Posts: 15
|
Post by nemo on Sept 4, 2013 18:47:58 GMT -5
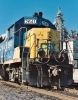
Hi guys!!! It´s time for do some weathering  ALL is known for having some very dirty locomotives, so that the model has been in a state of very high dirt. In this video you can see this at 1:45 For this model i used for the first time the technique of apply oil paints for weathering and the result was more than satisfactory, but first a hand of very light white to remove the shine of new paint.
Starting the weathering Brown oil paint was applied first, and then quickly with dry brush to achieve the effect of dirt on the sides, fronts and roof. After that I did the same but with black oil paint for stronger dirt.   After this thanks to the recommendation of my friend Lucas i apply another new technique that was pass dry brush with just a drop of white paint to highlight every angle of the locomotive. It really changes the appearance of the model.   Finally used some Humbrol paint with a small brush for detail spots on the handrails   With this last step i completed the work on this locomotive. It was a nice job where I applied new techniques and new materials. Later I will add a picture with better definition of the finished model. Time to think about the new projects that will begin soon. Best regards for all. |
|
|
|
Post by CP_8530 on Sept 4, 2013 21:58:24 GMT -5
Impressive loco! It's neat how those things found a second life down there.
|
|
lucas
Trainmaster
Posts: 149
|
Post by lucas on Sept 4, 2013 22:23:09 GMT -5
Hey Nico, you did a great work there!!!! I´m happy that the dry brush technique worked so well.
|
|
|
|
Post by m a y o r 79 on Sept 6, 2013 12:25:35 GMT -5
That is one filthy dirty locomotive! Nicely done.
|
|
nemo
Probationary Member
Posts: 15
|
Post by nemo on Sept 6, 2013 14:11:10 GMT -5
That is one filthy dirty locomotive! Nicely done. Thanks Mike!! |
|
|
|
Post by rscott417 on Sept 21, 2013 9:13:49 GMT -5
You did a great job on this build but there's one picture that has me confused. Looking at the weathering detail on the roof I noticed there wasn't a horn so I just thought ok there's no horn but then in the 4th picture it looks like the roof of the cab is notched out and there's a horn mounted in the cut out...is it just me? Are all the photos of the same locomotive?
|
|
nemo
Probationary Member
Posts: 15
|
Post by nemo on Oct 2, 2013 19:44:48 GMT -5
You did a great job on this build but there's one picture that has me confused. Looking at the weathering detail on the roof I noticed there wasn't a horn so I just thought ok there's no horn but then in the 4th picture it looks like the roof of the cab is notched out and there's a horn mounted in the cut out...is it just me? Are all the photos of the same locomotive? Hi.. all the pictures are of the same loco, but in diferent days and hours. I had not noticed the detail of the horn when choosing images. It is one of the last details that I put before finishing the weathering. |
|

 ALL is known for having some very dirty locomotives, so that the model has been in a state of very high dirt. In this video you can see this at 1:45