Post by CP_8530 on Mar 27, 2013 3:10:59 GMT -5
I kept this one as my ace-up-the-sleeve project that was going on in parallel with my other chop-nose Geep, CP 1684. This one started earlier and finished later for a few reasons, but it's probably my favourite project to date. Usually I post build-shots leading up to the finished project over time, but since it's going to be in the next Canadian Railway Observations, here's a more detailed sneak peek before everyone else sees it...
--------
The Origin:
This model originally started off with a spare Proto 2000 B&O torpedo tube GP7 I had nothing to do with, purchased from Georges' Trains because the price was right. I was thinking of chopping the nose for fun, then started looking around at early CP chop-nose units that would fit my mainly 70's modeling period. I saw a few shots of 8530 after its wreck rebuild in 1975 and noticed it got a modified GP7 long hood that I could use part of mine for. Bonus points were awarded for the pointed short hood, extended sandboxes and full front cab stripes. All those little details made it somewhat of a unique oddball that no manufacturer would probably ever do compared to the dozens of "normal" rebuilt units, so 8530 it was (ironically, I have photographed it as rebuilt 8203 numerous times around the Toronto area, still going after all these years).
The Prototype:
www.mountainrailway.com/Roster%20Archive/CP%208500A/CP%208530-2.htm
Started off as your typical CP phase 1 GP9:
www.mountainrailway.com/Roster%20Archive/CP%208500A/CP%208530-3.jpg
But wait! Tragedy strikes! 8530 was involved in a wreck and severely mangled in the early 1970's. It didn't look good for it:
www.mountainrailway.com/Roster%20Archive/CP%208500A/CP%208530-4.jpg
But, like the six million dollar man, CP Ogden Shops went "we can rebuilt her!" (or something, I'm not sure ) and she was rebuilt using the hood from a retired GP7 (retaining the hood batten strips, with a typical GP7 reversed #1 engine room door that was cut down, and with a GP9 Ph-2 louvre arrangement). 8530 also received a low-nose. Now, the nose wasn't exactly chopped (CP did a number of units early on and just replaced the short hood with a new one, see 8633, 8634, 8635, and 8492) and it wasn't a new stock EMD short hood, even if it looks like one, as it's still about as pointed as a typical GP9 (much more pointed than the subtle pointed hoods GP38 and GP40's of that era had). Thus, I believe CP fabricated its early low short hoods in-house based on contemporary EMD ones. This differs from the large rebuild program a few years later in the 80's where CP just chopped the noses they had. Also interesting to note is it received an extended rear for larger sandboxes (a few early rebuilds and wreck-repairs got this) and the "Ogden Multi" version of the Action red livery with 5" stripes (small multimark, stripes not all the way up the rear of the long hood) along with the typical full front cab and nose striping.
www.cprailphotos.com/gallery2/main.php?g2_itemId=1992&g2_imageViewsIndex=1
8530 went on to serve in road service, and was later renumbered into the road Geep series as 8203 in the 1980's. At some time in the late 80's 8203 seems to have got the more modern Canadian steps and handrails (maybe it was run through the rebuild program to get 645 power assemblies at that time). Today, 8203 is a frequent visitor of the southern Ontario area, and according to the current CP power allocations, currently assigned to yard service in the Toronto (Agincourt) Yard.
The Model:
First step was to remove all the detailed parts and strip the unit of it of its paint in 99% isopropyl alcohol. Various parts went back into the parts box (the early handrails, passenger fuel tank, roof air tanks, etc, all for other projects like the passenger GP9). The nose was chopped and filled in with body putty and styrene to create the pointed edge and fill in the steam generator holes, slots were cut out at the bottom of the nose for the access doors near the frame. The middle front windows and numberboards were cut out of an old Athearn GP38-2 cab and glued in the GP9 cab. I had to extend the numberboards up a bit with a styrene strip or two for the right height. The bell bracket was scratchbuilt and a bell from an old P1K-DX RS18 was used. And I stole the horn off an Athearn RS3 I had.
The fun began: I cut the long hood into 3 pieces, discarded the middle, and replaced it with one from a GP18 shell with dynamic brakes (superglued together and reenforced from the inside with styrene), as well as rearranging some carbody vents on the GP7 parts to the proper GP9 configuration. The rear sandboxes were build out with styrene according to some photos online. I modified some of the vents on the battery boxes under the cab, and the full frame skirts were cut back above the fuel tanks as per photos. As this was going to be a 1970's-era model, no modifications to the steps and handrails were needed (unlike 1684...weeew!). A pair of later-style footboards were installed from the GP18, and a "normal" fuel/air tank assembly replaced the large passenger one under the frame, with the seam patched.
The chassis/frame/drive was difficult as I had cut down the large chassis weight in the nose with a hacksaw to clear the short hood, and had to mill the sides of the weight with a bastard file to clear the styrene strips that reenforced the long hood. A large PITA but inevitable if retaining the hefty weight. I left most of the P2K drive intact, adding additional feeder wires, and of course swapped the sideframes out for Athearn Blomberg B's that I received an order of.
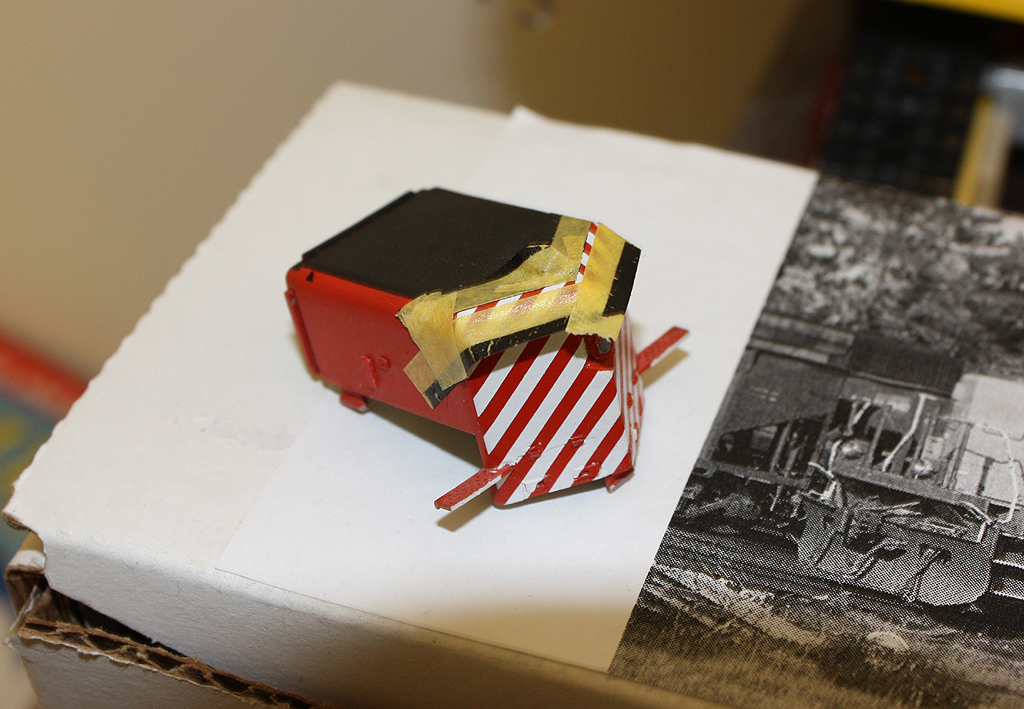
After the major work was done, a lot of the detailed parts were added, some more modifications to the body (some minor hood door work on the #1 engineroom doors), followed by some final sanding and filing to get everything ready for painting. The model was airbrushed with True Line Trains Action Red and Tamiya black (with a coat of CPR Diesel Grey as primer), I actually made an error the first time on the long hood and had to strip and repaint it over again (this destroyed all of the glue bonds and patching on the entire long hood, including the rear sandbox, so I had to build up almost everything again, putty, sand, etc...). The lettering and numbering was done using decals from a few different Microscale sets (there's something like 30 small decals applied on the frame alone for all the lettering). The cab front took the most time to do, as the striping had to be cut to fit on and around the various cab parts. Everything was clear coated after and some final details were added (window glazing, class lights, windshield wipers, grabs & handrails,brake wheels, etc).
Seems easy, but it took quite a lot of work and time (it took about a year of off and on work). But, I'm very happy with the end result.
The Build: (not all photos shown, but here's a bunch)
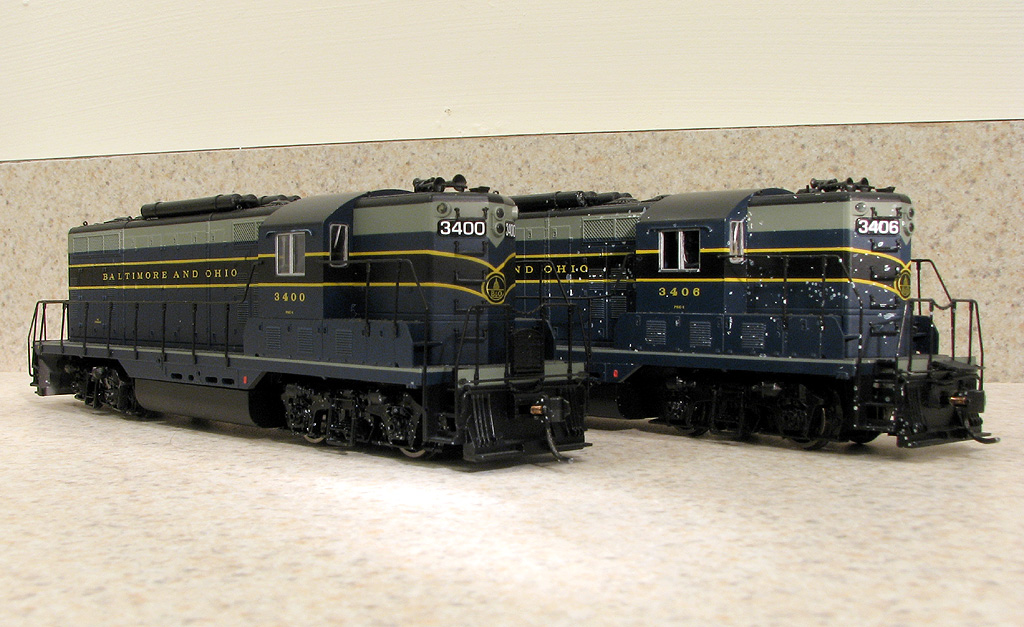
B&O 3406 ("freckles") became CP 8530, B&O 3400 became CP 8523 (passenger GP9 in other thread). They were purchased with some kind of paint on them like that.
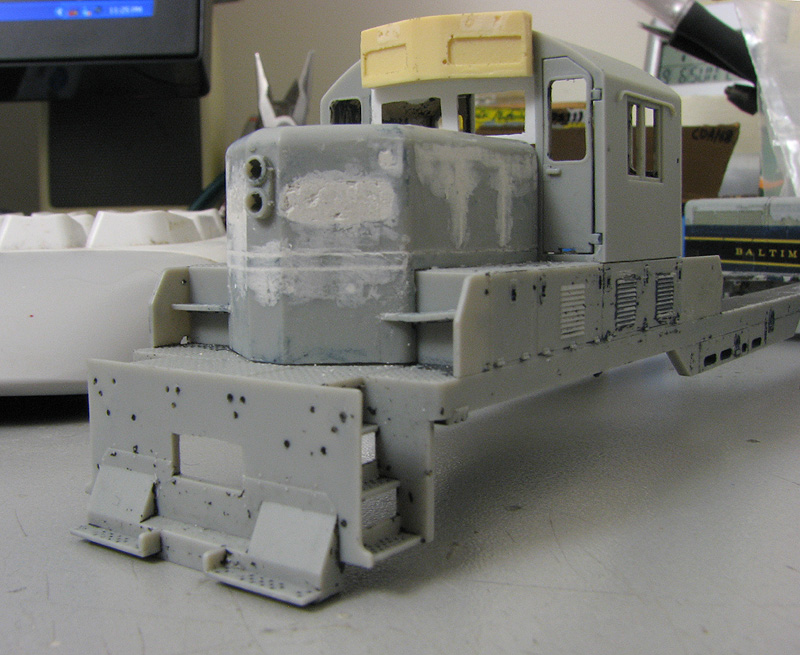
Early chop nose version: before the "srs bsns" and pointed-nose conversion began. I later swapped out the styrene window and Fletchco Scale Products (?) resin numberboards for parts from an Athearn GP38-2 cab. I purchased the FSP chop-nose kit years ago, and the FSP parts were crude at best, so they were a no-go.
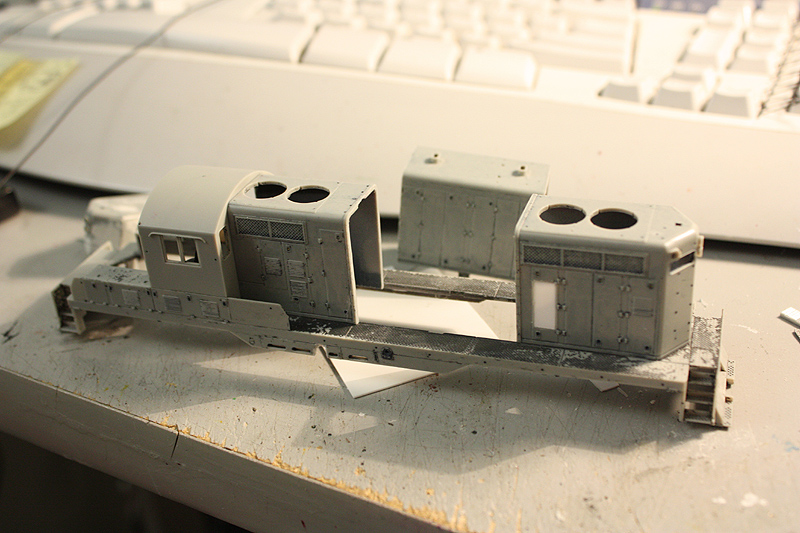
Chop off that non-DB GP7 hood section, keep the two hood ends. I also cut out the water fills for a future project, before cutting off most of the fuel tank skirts.
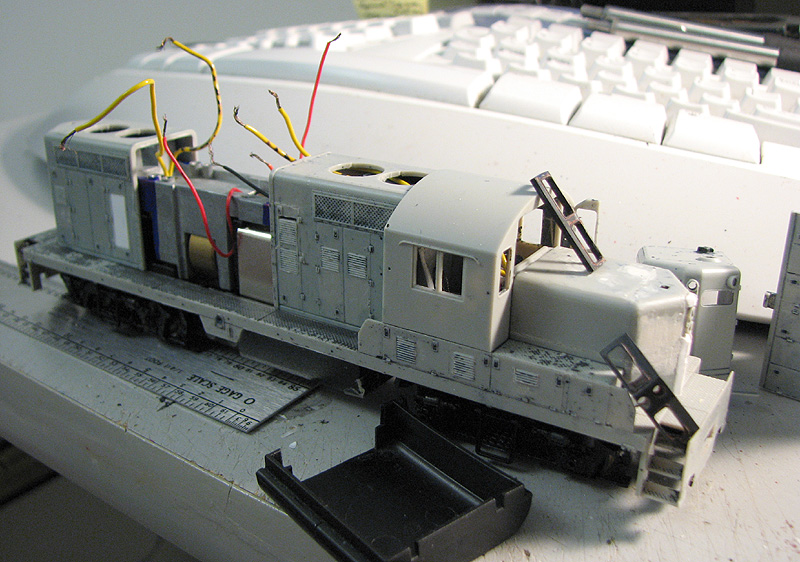
New pointed nose installed (required a few applications of Squadron putty for a good surface). Also note the blue marks on the chassis weight were material will need to be removed to clear the future hood bracing.
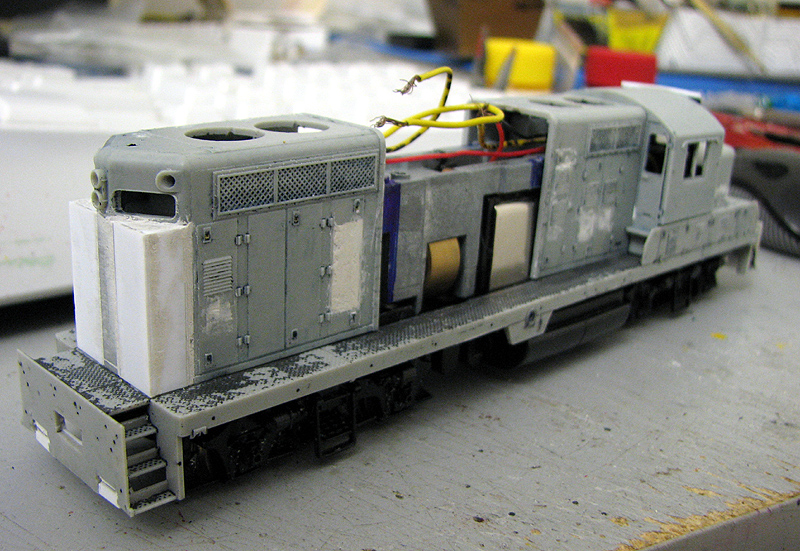
Rear, showing the custom sandboxes fabricated from styrene. I'd later cut access doors into the bottom of them according to photos. Note the cast-on GP7 footboards shaved off the pilot ends.
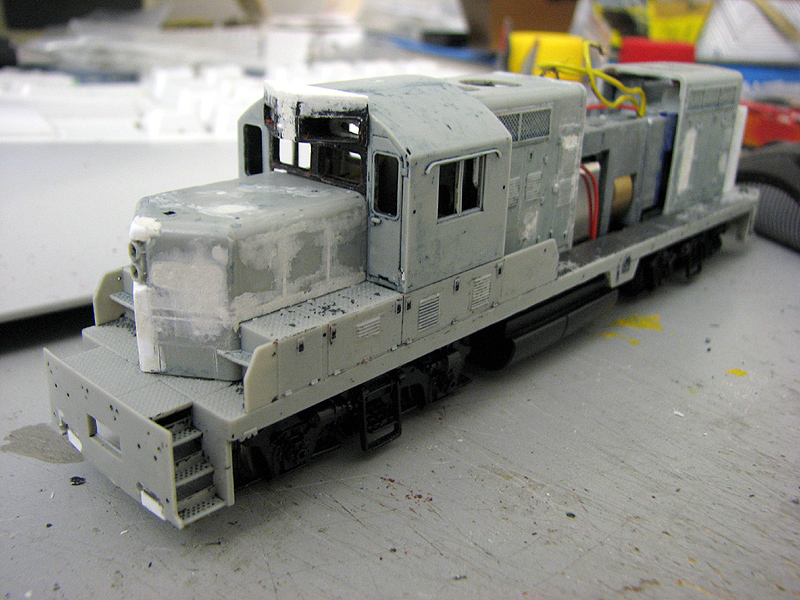
Front, showing the Athearn parts installed and some putty work. Pointed nose was done with styrene.
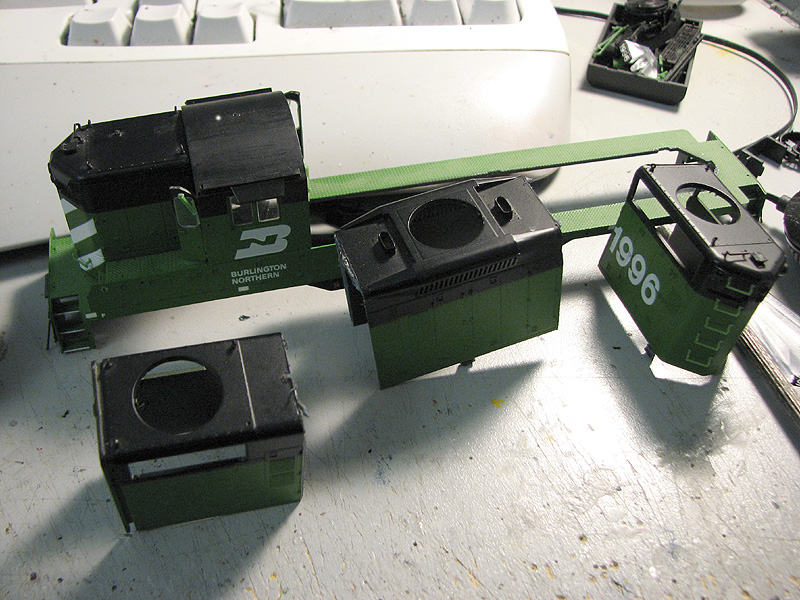
DB section donor. In retrospect the GP9 Ph2 DB section is much nicer than the earlier P2K GP18, but I can always cut out some grills from one and transplant them on the 8530 if it really bothers me in the future. The hood sections were cut up for their doors, latches and hinges, and the short hood, car and frame were what CP 1684 started off as.
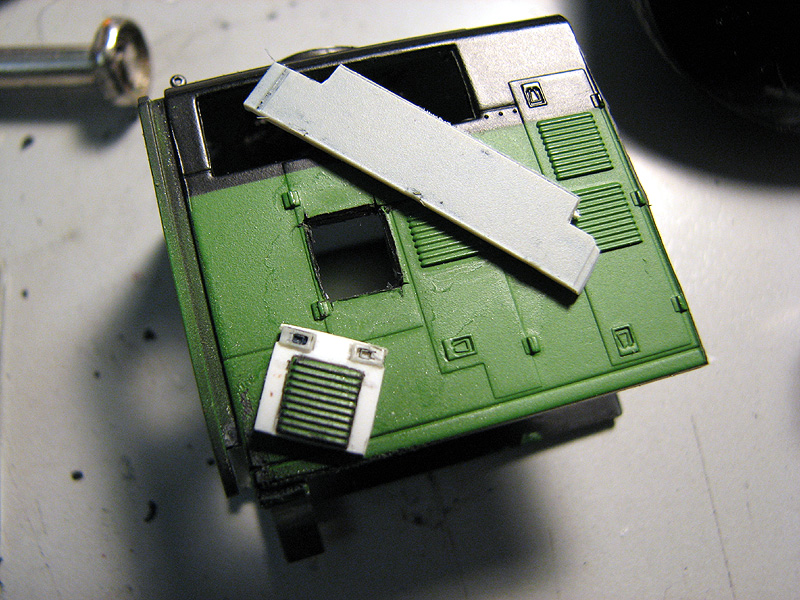
Waste not want not! Louvres and latches sacrificed for a relay box door behind the conductor's side cab on 8530.
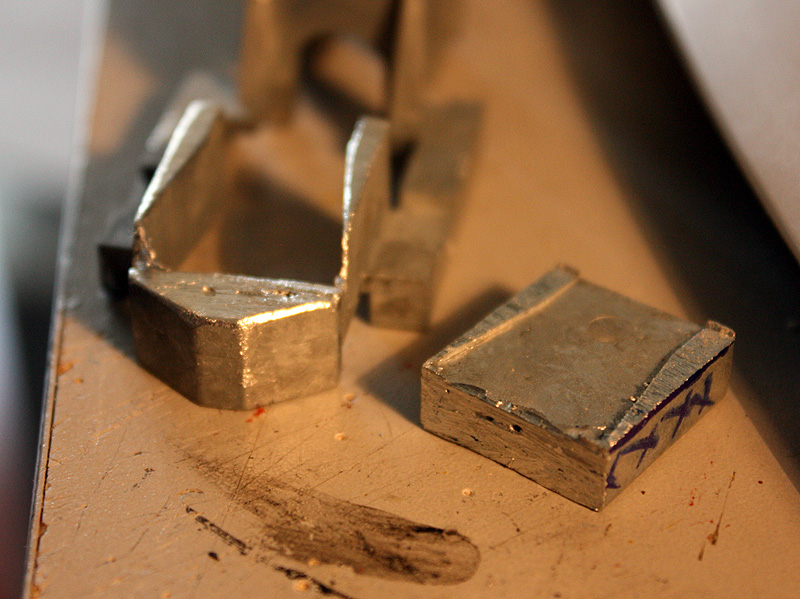
Chopping the weight for the short hood. Unfortunately I didn't take many of milling the sides of the weight for the long hood (it was rather messy and tedious).
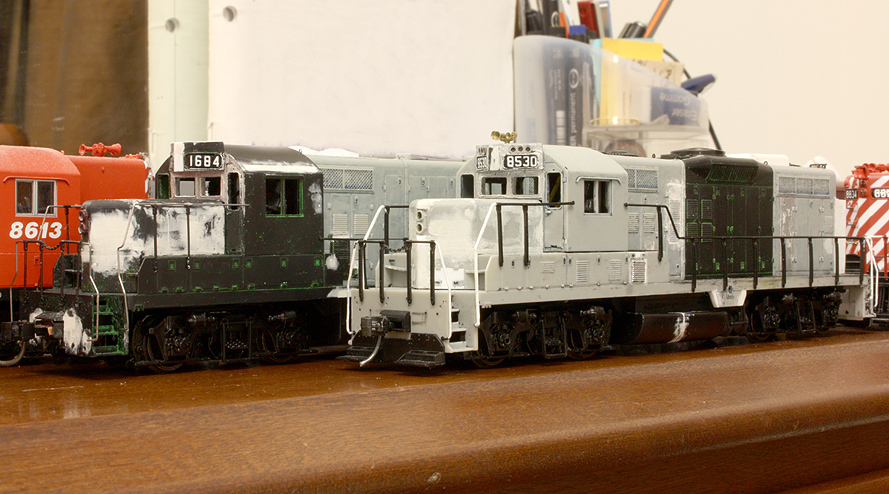
CP 8530 and 1684 built up and awaiting some further details before painting can begin. Note the GP18 long hood spliced between the GP7 hoods. Horn shown is a DW part that eventually went on 1684 (a nicer Athearn RS3 one was borrowed...). Also note access doors in lower part of short hood, and class light housings above numberboards (from a Kaslo GP9RM). Later-style GP18 DB fan cut down and used as per prototype photos.
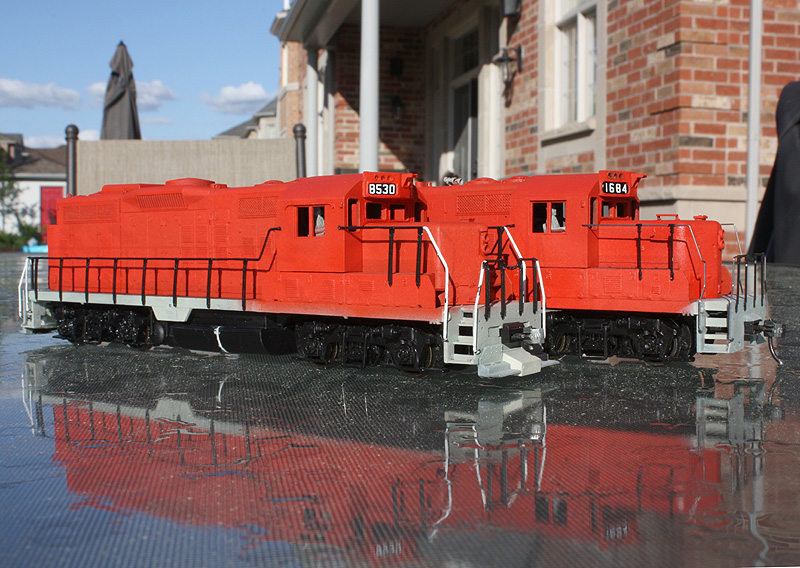
Both painted red! Custom pilot block and bell brackets installed.
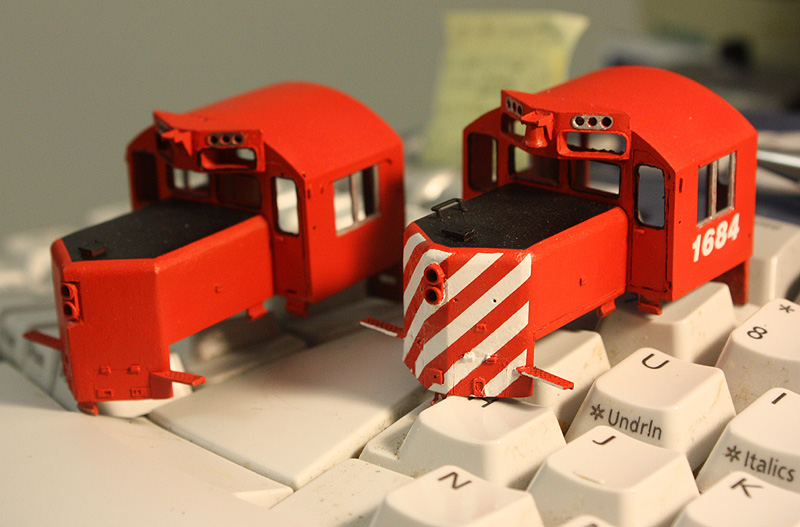
The decaling has begun. 8530 on the left waits as 1684 gets nose stripes.
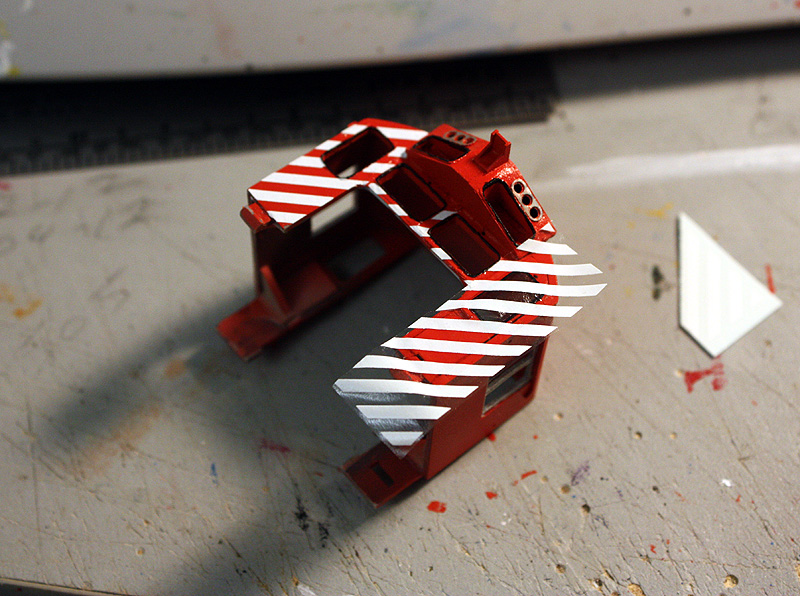
Decaling the cab stripes. Apply, trim, repeat, soak with repeated applications of Microsol, and touch anything up with white paint. Took a while.
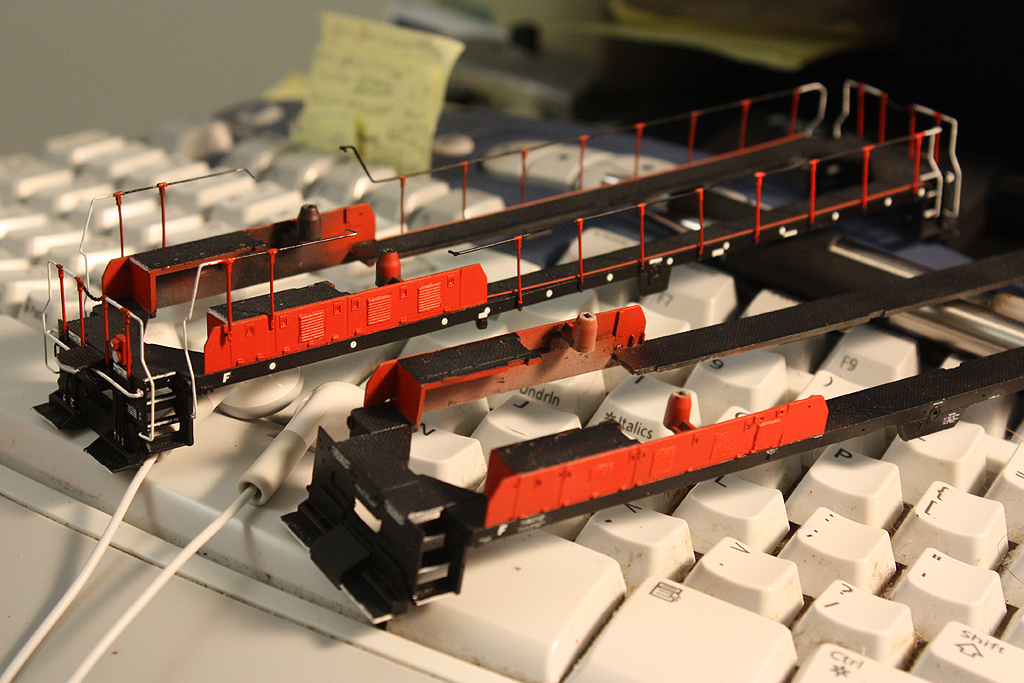
The frames all decaled up (previously used in the 1684 thread) 1684 on left, 8530 on right.
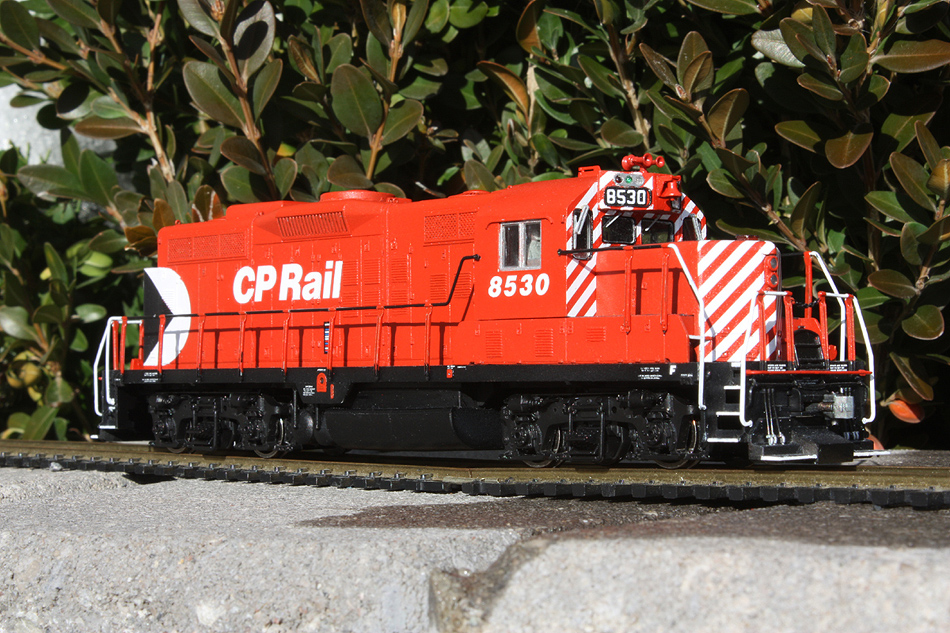
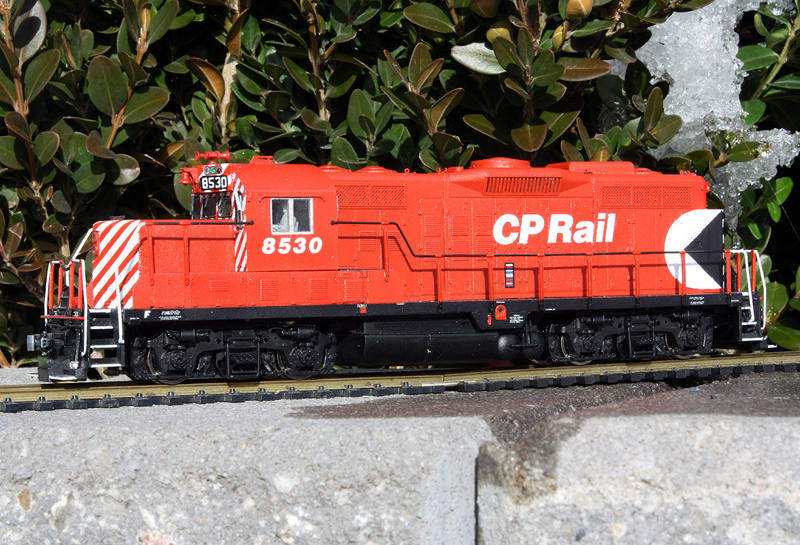
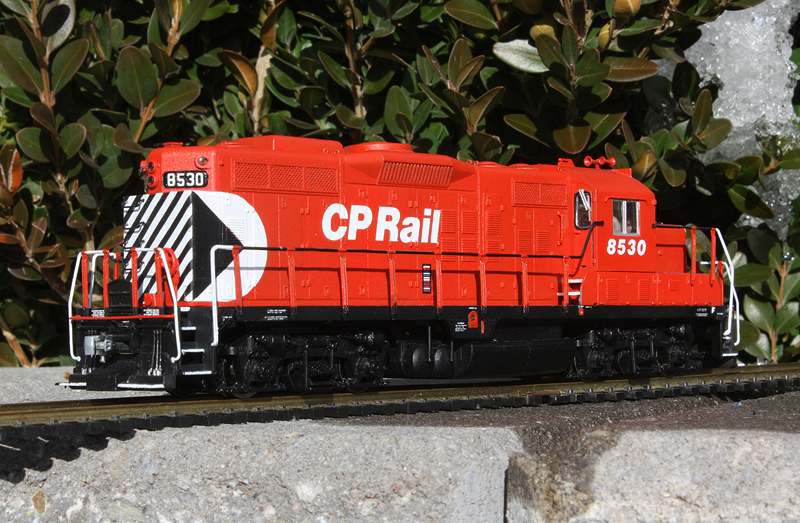
The 8530:
Put it all back together, the grabs etc back on, and...all done and ready to hit the rails!
--------
The Origin:
This model originally started off with a spare Proto 2000 B&O torpedo tube GP7 I had nothing to do with, purchased from Georges' Trains because the price was right. I was thinking of chopping the nose for fun, then started looking around at early CP chop-nose units that would fit my mainly 70's modeling period. I saw a few shots of 8530 after its wreck rebuild in 1975 and noticed it got a modified GP7 long hood that I could use part of mine for. Bonus points were awarded for the pointed short hood, extended sandboxes and full front cab stripes. All those little details made it somewhat of a unique oddball that no manufacturer would probably ever do compared to the dozens of "normal" rebuilt units, so 8530 it was (ironically, I have photographed it as rebuilt 8203 numerous times around the Toronto area, still going after all these years).
The Prototype:
www.mountainrailway.com/Roster%20Archive/CP%208500A/CP%208530-2.htm
Started off as your typical CP phase 1 GP9:
www.mountainrailway.com/Roster%20Archive/CP%208500A/CP%208530-3.jpg
But wait! Tragedy strikes! 8530 was involved in a wreck and severely mangled in the early 1970's. It didn't look good for it:
www.mountainrailway.com/Roster%20Archive/CP%208500A/CP%208530-4.jpg
But, like the six million dollar man, CP Ogden Shops went "we can rebuilt her!" (or something, I'm not sure
 ) and she was rebuilt using the hood from a retired GP7 (retaining the hood batten strips, with a typical GP7 reversed #1 engine room door that was cut down, and with a GP9 Ph-2 louvre arrangement). 8530 also received a low-nose. Now, the nose wasn't exactly chopped (CP did a number of units early on and just replaced the short hood with a new one, see 8633, 8634, 8635, and 8492) and it wasn't a new stock EMD short hood, even if it looks like one, as it's still about as pointed as a typical GP9 (much more pointed than the subtle pointed hoods GP38 and GP40's of that era had). Thus, I believe CP fabricated its early low short hoods in-house based on contemporary EMD ones. This differs from the large rebuild program a few years later in the 80's where CP just chopped the noses they had. Also interesting to note is it received an extended rear for larger sandboxes (a few early rebuilds and wreck-repairs got this) and the "Ogden Multi" version of the Action red livery with 5" stripes (small multimark, stripes not all the way up the rear of the long hood) along with the typical full front cab and nose striping.
www.cprailphotos.com/gallery2/main.php?g2_itemId=1992&g2_imageViewsIndex=1
8530 went on to serve in road service, and was later renumbered into the road Geep series as 8203 in the 1980's. At some time in the late 80's 8203 seems to have got the more modern Canadian steps and handrails (maybe it was run through the rebuild program to get 645 power assemblies at that time). Today, 8203 is a frequent visitor of the southern Ontario area, and according to the current CP power allocations, currently assigned to yard service in the Toronto (Agincourt) Yard.
The Model:
First step was to remove all the detailed parts and strip the unit of it of its paint in 99% isopropyl alcohol. Various parts went back into the parts box (the early handrails, passenger fuel tank, roof air tanks, etc, all for other projects like the passenger GP9). The nose was chopped and filled in with body putty and styrene to create the pointed edge and fill in the steam generator holes, slots were cut out at the bottom of the nose for the access doors near the frame. The middle front windows and numberboards were cut out of an old Athearn GP38-2 cab and glued in the GP9 cab. I had to extend the numberboards up a bit with a styrene strip or two for the right height. The bell bracket was scratchbuilt and a bell from an old P1K-DX RS18 was used. And I stole the horn off an Athearn RS3 I had.
The fun began: I cut the long hood into 3 pieces, discarded the middle, and replaced it with one from a GP18 shell with dynamic brakes (superglued together and reenforced from the inside with styrene), as well as rearranging some carbody vents on the GP7 parts to the proper GP9 configuration. The rear sandboxes were build out with styrene according to some photos online. I modified some of the vents on the battery boxes under the cab, and the full frame skirts were cut back above the fuel tanks as per photos. As this was going to be a 1970's-era model, no modifications to the steps and handrails were needed (unlike 1684...weeew!). A pair of later-style footboards were installed from the GP18, and a "normal" fuel/air tank assembly replaced the large passenger one under the frame, with the seam patched.
The chassis/frame/drive was difficult as I had cut down the large chassis weight in the nose with a hacksaw to clear the short hood, and had to mill the sides of the weight with a bastard file to clear the styrene strips that reenforced the long hood. A large PITA but inevitable if retaining the hefty weight. I left most of the P2K drive intact, adding additional feeder wires, and of course swapped the sideframes out for Athearn Blomberg B's that I received an order of.
After the major work was done, a lot of the detailed parts were added, some more modifications to the body (some minor hood door work on the #1 engineroom doors), followed by some final sanding and filing to get everything ready for painting. The model was airbrushed with True Line Trains Action Red and Tamiya black (with a coat of CPR Diesel Grey as primer), I actually made an error the first time on the long hood and had to strip and repaint it over again (this destroyed all of the glue bonds and patching on the entire long hood, including the rear sandbox, so I had to build up almost everything again, putty, sand, etc...). The lettering and numbering was done using decals from a few different Microscale sets (there's something like 30 small decals applied on the frame alone for all the lettering). The cab front took the most time to do, as the striping had to be cut to fit on and around the various cab parts. Everything was clear coated after and some final details were added (window glazing, class lights, windshield wipers, grabs & handrails,brake wheels, etc).
Seems easy, but it took quite a lot of work and time (it took about a year of off and on work). But, I'm very happy with the end result.
The Build: (not all photos shown, but here's a bunch)

B&O 3406 ("freckles") became CP 8530, B&O 3400 became CP 8523 (passenger GP9 in other thread). They were purchased with some kind of paint on them like that.

Early chop nose version: before the "srs bsns" and pointed-nose conversion began. I later swapped out the styrene window and Fletchco Scale Products (?) resin numberboards for parts from an Athearn GP38-2 cab. I purchased the FSP chop-nose kit years ago, and the FSP parts were crude at best, so they were a no-go.

Chop off that non-DB GP7 hood section, keep the two hood ends. I also cut out the water fills for a future project, before cutting off most of the fuel tank skirts.

New pointed nose installed (required a few applications of Squadron putty for a good surface). Also note the blue marks on the chassis weight were material will need to be removed to clear the future hood bracing.

Rear, showing the custom sandboxes fabricated from styrene. I'd later cut access doors into the bottom of them according to photos. Note the cast-on GP7 footboards shaved off the pilot ends.

Front, showing the Athearn parts installed and some putty work. Pointed nose was done with styrene.

DB section donor. In retrospect the GP9 Ph2 DB section is much nicer than the earlier P2K GP18, but I can always cut out some grills from one and transplant them on the 8530 if it really bothers me in the future. The hood sections were cut up for their doors, latches and hinges, and the short hood, car and frame were what CP 1684 started off as.

Waste not want not! Louvres and latches sacrificed for a relay box door behind the conductor's side cab on 8530.

Chopping the weight for the short hood. Unfortunately I didn't take many of milling the sides of the weight for the long hood (it was rather messy and tedious).

CP 8530 and 1684 built up and awaiting some further details before painting can begin. Note the GP18 long hood spliced between the GP7 hoods. Horn shown is a DW part that eventually went on 1684 (a nicer Athearn RS3 one was borrowed...). Also note access doors in lower part of short hood, and class light housings above numberboards (from a Kaslo GP9RM). Later-style GP18 DB fan cut down and used as per prototype photos.

Both painted red! Custom pilot block and bell brackets installed.

The decaling has begun. 8530 on the left waits as 1684 gets nose stripes.

Decaling the cab stripes. Apply, trim, repeat, soak with repeated applications of Microsol, and touch anything up with white paint. Took a while.

The frames all decaled up (previously used in the 1684 thread) 1684 on left, 8530 on right.
The 8530:
Put it all back together, the grabs etc back on, and...all done and ready to hit the rails!


