|
|
Post by mandealco on Dec 3, 2012 17:04:55 GMT -5
Hi Time to finish a long sideline project: Morristown & Erie 17 in N-scale. The basic shell is relatively straight forward as shown in the photos, an Atlas C-630, with bits removed. The hardest part was lowering the central air intake to match the former NYC units that had a second life on the NYS&W and M&E. 4 of the survivors are now on the Western New York & Pennsylvania. 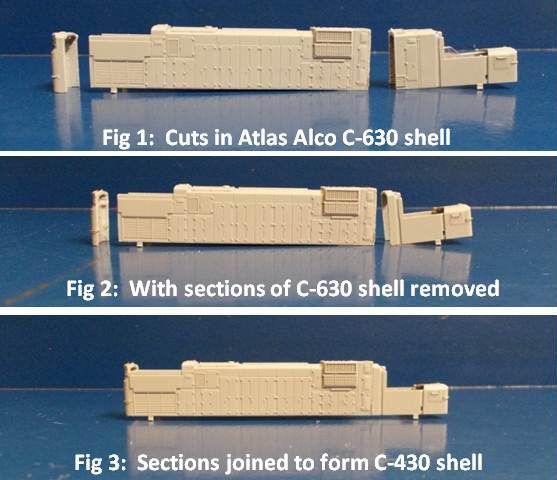 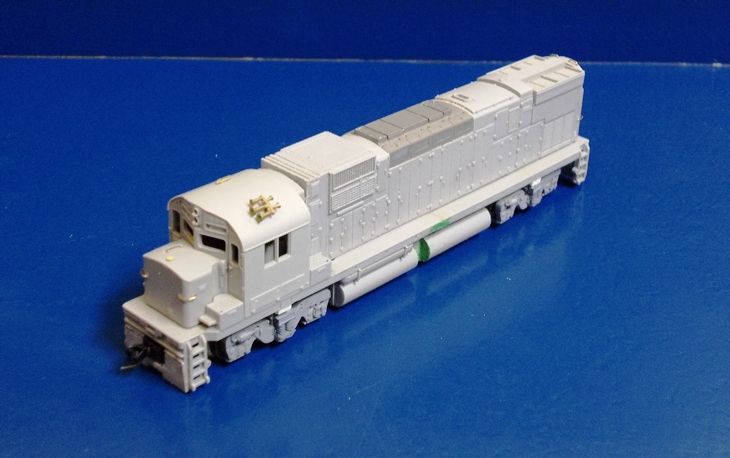 The model is nearly ready for painting, just needs some finishing work, so I threw it together for a photo before it gets pulled apart for painting. Didn't put it together well by the looks of the photos. Will look OK when you see it after my airbrush arrives (Christmas present).  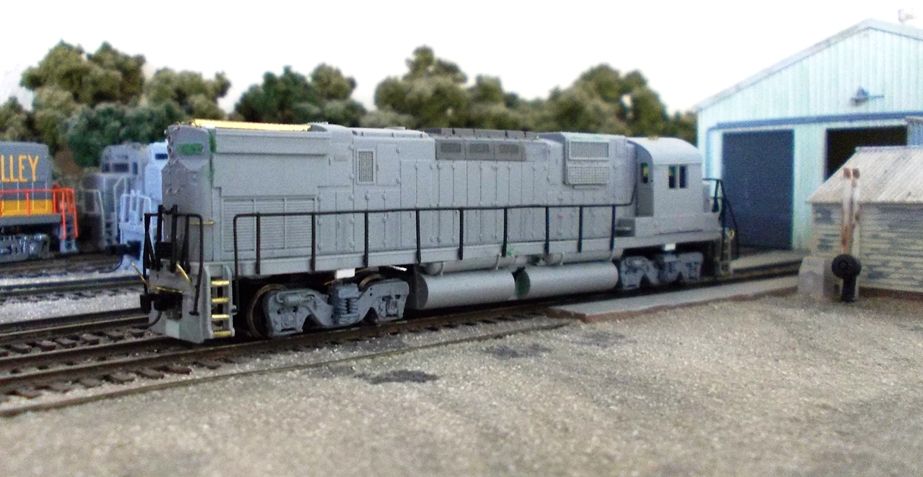 While I'm waiting for my "surprise" Christmas present, I'm trying to finish off my other mothballed project, Alco demonstrator C-636P. Cheers Steve |
|
|
|
Post by icghogger on Dec 3, 2012 17:31:28 GMT -5
Excellent work, Steve, that looks Great!!
|
|
|
|
Post by iomalley on Dec 3, 2012 20:54:05 GMT -5
Wow, never thought to use the FB2 trucks! Well engineered!
|
|
Deleted
Deleted Member
Posts: 0
|
Post by Deleted on Dec 4, 2012 11:38:14 GMT -5
Steve,
Very nice. You make those Alco's look great in N-Scale. Probably the envy of many N-Scalers.
I look forward to seeing this one finished as well.
|
|
|
|
Post by mandealco on Dec 12, 2012 21:07:17 GMT -5
Thanks guys. The use of the GE FB-2 trucks works, as long as you don't compare them directly to the Alco Hi-Ads.
While I'm waiting for my airbrush to arrive, I'm trying to finish off my C-636P, which is in the "Kitbashing of Prototypes not built" section. I have the Alco demo decals, and resolved a couple of annoying issues with it.
Cheers
Steve
|
|
|
|
Post by jmlaboda on Jun 27, 2013 8:39:25 GMT -5
"The hardest part was lowering the central air intake to match the former NYC units that had a second life on the NYS&W and M&E."
Another great ALCO model but I have to ask... how did you lower the air intake?
|
|
|
|
Post by mandealco on Jun 27, 2013 14:19:41 GMT -5
Hi
Vince, the chassis is from an Atlas B23-7. At 36'-2", the truck centre spacing is 10" short, but not too noticeable. The trucks also provided the start for the 2 axle Hi-Ad sideframes.
Jerry, for the air intake I firstly removed the actual screens, just by drilling holes and cutting out the remains. I then used a second shell to provide a new set of intakes, and applied them lower, just to the top of the dust particle outlet (the raised rib that runs across, just below the intakes. That's where the inertial filter spits out the dirt.) I then cut the top edge of the filter box to match the required angle, and added a thin styrene strip to complete the new edge. The new screen was then glued in place at the lower edge of the new styrene strip.
In typical fashion, it's still not finished. It's painted and awaiting some decals to be made, but looking good.
My next project is the C-630M in my avitar, not sure if I'll include a model of my wife Laura on the front. The challenge with this one is again the modified air intake.
Thanks for the nice comments.
Cheers
Steve
|
|
Deleted
Deleted Member
Posts: 0
|
Post by Deleted on Jul 29, 2013 12:15:23 GMT -5
Steve,
What did you do or how did you build the Hi-Ad side frames?
|
|
|
|
Post by mandealco on Jul 29, 2013 20:13:15 GMT -5
Hi Brian
The trucks are just the Atlas FB-2 trucks with some outside springs added. At a glance they look good, when you compare them to the Alco Hi-ads, not so good.
For the springs, I looked through my parts boxes to see what was close to what I needed. I found a set of old (really old) Atlas RSC-2 trucks, that had springs about the right size, and in pairs. I cut the truck round the springs, so I ended up with upper and lower mounting blocks as part of the springs. All I did then was glue the new piece onto the truck frame sides.
To model them better, new brake cylinders could be added, 2 per side, and the ends of the frames could be extended a little. I have a good photo of a real truck at Morristown, minus the springs and brake cylinders. I can send it to you if you want it. That way you may be able to modify the GE sideframe more, before you add the springs.
Cheers
Steve
|
|
Deleted
Deleted Member
Posts: 0
|
Post by Deleted on Jul 29, 2013 20:36:55 GMT -5
That would be great Steve. I would appreciat the photo. Would help a lot.
|
|
|
|
Post by mandealco on Aug 6, 2013 3:17:49 GMT -5
Hi Painted this a while ago, was waiting till I had more of the detail painting done before posting, but time's getting on, so here it is. I plan to paint the class lights and window gaskets before I add the decals. I will also repaint the air intakes. 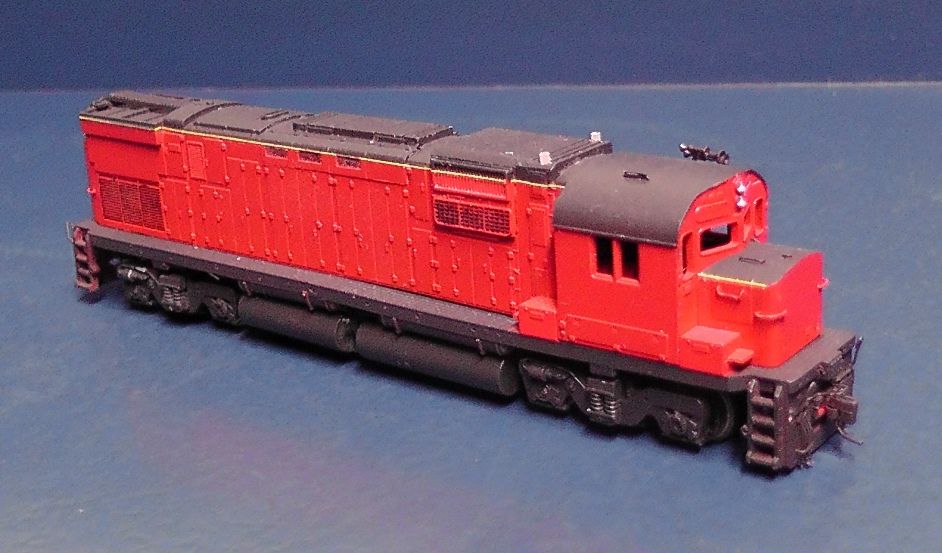 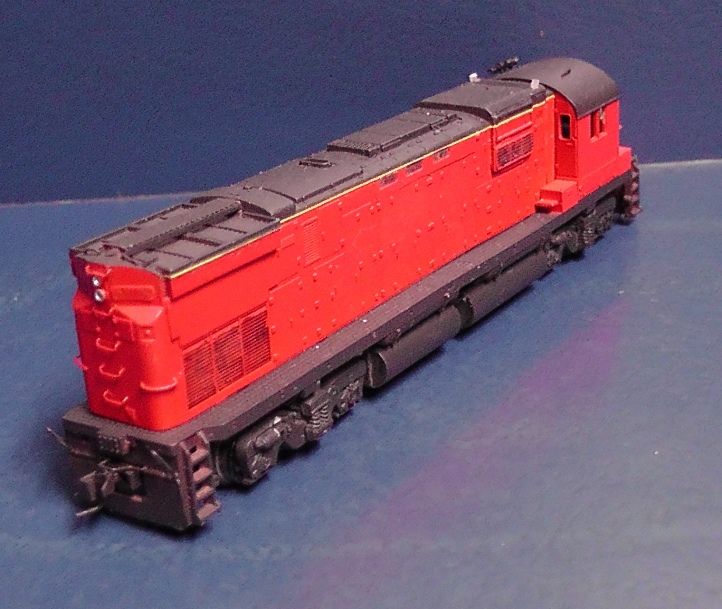 Not great photos, but the model looks good to me. Cheers Steve |
|
Deleted
Deleted Member
Posts: 0
|
Post by Deleted on Aug 6, 2013 7:12:14 GMT -5
Steve,
This model is to painful to look at. There is nothing on it that says it was kitbashed. The fit and finish is great. Time to start accumulating parts. I want three in PC pulling a coal drag.
|
|
andy
Probationary Member
Posts: 2 
|
Post by andy on Jan 29, 2014 21:10:37 GMT -5
Hi Steve,
May i ask what you used to make such clean cuts? They appear to be quite clean and square in the photos. Something I have struggled to do. Any tips would be most appreciated. Nice modeling!
Thanks,
Andy
|
|
|
|
Post by mandealco on Jan 30, 2014 3:44:10 GMT -5
Hi Andy
Thanks for the kind words. The cuts in the shell are made using a razor saw and a small mitre box. By cutting outside of the final length, I can use a NWSL "Tru Sander" to finish the cut for splicing to the next piece. A simple test to ensure the cut is square, is to stand the shell perpendicular on a bench with the cut end down. If it doesn't stand straight, or if it wobbles, it isn't square.
Hope this helps.
Cheers
Steve
|
|
Deleted
Deleted Member
Posts: 0
|
Post by Deleted on Feb 1, 2014 16:15:03 GMT -5
Steve looks good to me it really sucks that I backdated to 1957-59 eliminates a lot of the 2nd gen power but allows a few steamers to remain
|
|
|
|
Post by Bessemer Bob on Nov 10, 2014 23:32:24 GMT -5
Keep em'coming!
|
|
|
|
Post by mandealco on Nov 11, 2014 23:12:15 GMT -5
Hi
The C-430 is still in the same condition. I am looking into some decal options, but the reality is there are no M&E decals out there in N-scale. I have drawn the artwork in MS-PowerPoint, but that wasn't a useful format for any of the custom decal makers.
Cheers
Steve
|
|
|
|
Post by Bessemer Bob on Nov 15, 2014 8:28:30 GMT -5
Steve,
I feel your pain. As an N scale guy I have had to shell out the cash for the set up work on top of the custom decal price. Can turn a locomotive project into a $200 plus loco very quick. I lucked out in all places with a good friend in O scale. He also has done a good bit of custom work for the B&LE. In a few cases he paid for the artwork and I just had to pay for the decals. I guess custom is like everyother hobby... EXPENSIVE!
|
|
Deleted
Deleted Member
Posts: 0
|
Post by Deleted on Nov 26, 2014 11:40:28 GMT -5
Steve,
My apologies. It has been a long time. I do have your window panes. Just have not cut the frets from the sheet. They came out the size you sent me. The look good. I put some solid rectangles on the fret. I think I did that so you can cut window material to fit flush into the panes. PM me your mailing address and when I finally get the frets cut out, I can package them up and send them to you.
|
|
Rudy Garbely
Chairman
Modeling Conrail from 1976-1979 in HO scale.
Posts: 1,073
|
Post by Rudy Garbely on Dec 10, 2014 23:49:38 GMT -5
Hi The C-430 is still in the same condition. I am looking into some decal options, but the reality is there are no M&E decals out there in N-scale. I have drawn the artwork in MS-PowerPoint, but that wasn't a useful format for any of the custom decal makers. Cheers Steve Why don't you talk to Paul at Prime Mover and see if he can just scale his HO ones down? |
|