Post by remhed on May 17, 2012 9:11:50 GMT -5
Hi all,
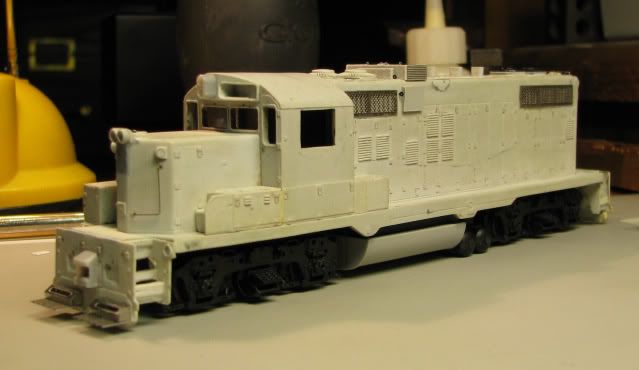
I have been working on a Kaslo Shops GP10 kit for a while now. This is the first real detailed diesel project I have ever tackled. Maybe not the best one to try for my first! It has been a character builder so far.
I have listed out some observations and a bunch of questions that I am hoping some of the more experienced folks out there can comment on. I have posted pics of the shell so far below. Please feel free to give me your candid advice and observations. I am learning and need all the help I can get!
-The etched brass fan grills that are provided are almost impossible to use as has been commented on by several people here in the past. As apparently no-one makes replacement fans that will work, I decided to transfer the fans from the P2K shell to the Kaslo shell. I'm not sure I would try that again as I am not 100% happy with how they turned out. The fans from the P2K shell fit into holes in the shell and are recessed a bit. i did not want to drill those large of holes in the Kaslo shell so I sanded them down a bit so they would sit flush. They look OK, not great.
-I really do not like the stanchions that are provided with the kit. For the ends, the stanchions and hand rails from the P2K kit fit perfectly, so I transferred them to the Kaslo kit. Again, I'm not 100% happy with this decision- they look OK. They are glued on now so they are staying. For the side stanchions I ordered some Cal Scale stanchions but they did not match the prototype so I decided to just use the ones in the kit. They look OK as well but are a pain to work with.
-For the handrail, I am using the prescribed wire size (.15" I think?). I don't know if I got the right "type" of wire as it is very challenging to bend. If you don't bend it exactly right, it does not like to be bent back. It is also difficult to get a "rounded" bend as opposed to a more sharp bend. I am just using small pliers to do this.
-What handrail stanchions would you recommend using? I have not seen the Smokey Valley ones in person but I hear they are nice.
-What is the best way to bend the handrails? Should I be using a specific type of wire? One that is more malleable? Also, the templates they provide in the kit are not 100% accurate.
-I have glued the handrails to the stanchions as opposed to soldering them. I'm afraid that this will make them even more fragile for future handling.
-For the front and rear headlights, I am planning on mounting 1.5w incandescent bulbs. I have some that fit perfectly in the openings and I generally like the looks of them but I don't really have much experience with LED's. Should I use LED's instead?
-I am struggling trying to determine what to do for the signal lights between the number boards. If anyone has worked on one of these kits, there is a lot of material that would have to be drilled through to actually mount a buld here, and because the light housing casting extends slightly beyond the width of the roof in this area, I am afraid there is not enough material to allow this. Right now I am considering putting lenses in for the top two lights and lighting them from behind somehow. The bottom red light will be a dummy lens. Any suggestions?
-I also did not realize that a brass casting was available of this housing. I have mounted the one that comes with the kit. I have since ordered some brass ones off of E-bay for future projects.
-My general gluing skills are not great. In trying to glue some of the more dainty items I am concerned I am going to see a lot of glue residue after it is painted. Are there any general tricks to this that can be shared? I'm using medium viscocity CA applied via a toothpick.
-Regarding the number boards, do you recommend attempting to light these? How would that be done? The kit comes with the "glass" to fit the number board. I'm assuming I'll put white decal film on them, then the black numbers on top to get the effect of the prototype. I expect gluing these in place will be difficult.
-The instructions say to wait to install the window frames and wind sheilds until after the model is painted- why is that? Aren't they the same color as the side of the loco?
-I plan to install the air hoses after painting- good idea or bad?
-I have no idea how you would use the uncoupling levers that come with the Kaslo it. They are in several individual pieces and don't look like they would fit in the small brackets they provide. I got some from DA (I think). Mounting those via the brackets that come with the kit was an exercise in patience. I'm glad they give you a lot of extras as I think I lost about 10 of them trying to do this.
-I am having a hell of a time getting the shell to fit on the P2K frame. First, the ends of the frame are too long and rub up against the pilots. I have grinded these quite a ways back to get the shell to fit. Next the weight is really too wide and results in a way too tight a fit for the shell. I am in the process of grinding that back as well. A piece of advice is to do this before you start adding the details to the loco!
- I am not sure if the fuel tanks that come with the P2K kit are accurate or not. Does anyone know? If now, what should I use.
Sorry for the lengthy post, but I have a lot of questions.
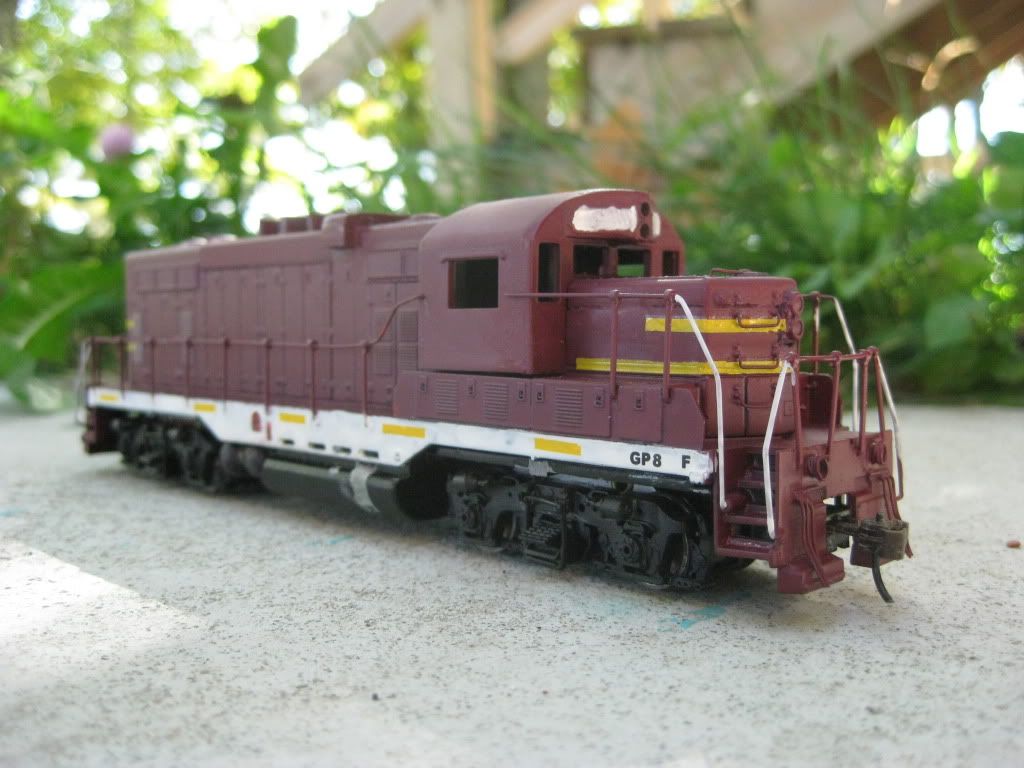
Well I’m getting close to painting this thing. If the end result doesn't turn out to be a disaster, I will attempt a GP8 next. All I can say is that I hope that Athearn does the GP10's as they have said and that they are decent models. I am up for modifying and detailing existing locos after this project!
Thanks,
Steve Johnson
Carmel, In
I have been working on a Kaslo Shops GP10 kit for a while now. This is the first real detailed diesel project I have ever tackled. Maybe not the best one to try for my first! It has been a character builder so far.
I have listed out some observations and a bunch of questions that I am hoping some of the more experienced folks out there can comment on. I have posted pics of the shell so far below. Please feel free to give me your candid advice and observations. I am learning and need all the help I can get!
-The etched brass fan grills that are provided are almost impossible to use as has been commented on by several people here in the past. As apparently no-one makes replacement fans that will work, I decided to transfer the fans from the P2K shell to the Kaslo shell. I'm not sure I would try that again as I am not 100% happy with how they turned out. The fans from the P2K shell fit into holes in the shell and are recessed a bit. i did not want to drill those large of holes in the Kaslo shell so I sanded them down a bit so they would sit flush. They look OK, not great.
-I really do not like the stanchions that are provided with the kit. For the ends, the stanchions and hand rails from the P2K kit fit perfectly, so I transferred them to the Kaslo kit. Again, I'm not 100% happy with this decision- they look OK. They are glued on now so they are staying. For the side stanchions I ordered some Cal Scale stanchions but they did not match the prototype so I decided to just use the ones in the kit. They look OK as well but are a pain to work with.
-For the handrail, I am using the prescribed wire size (.15" I think?). I don't know if I got the right "type" of wire as it is very challenging to bend. If you don't bend it exactly right, it does not like to be bent back. It is also difficult to get a "rounded" bend as opposed to a more sharp bend. I am just using small pliers to do this.
-What handrail stanchions would you recommend using? I have not seen the Smokey Valley ones in person but I hear they are nice.
-What is the best way to bend the handrails? Should I be using a specific type of wire? One that is more malleable? Also, the templates they provide in the kit are not 100% accurate.
-I have glued the handrails to the stanchions as opposed to soldering them. I'm afraid that this will make them even more fragile for future handling.
-For the front and rear headlights, I am planning on mounting 1.5w incandescent bulbs. I have some that fit perfectly in the openings and I generally like the looks of them but I don't really have much experience with LED's. Should I use LED's instead?
-I am struggling trying to determine what to do for the signal lights between the number boards. If anyone has worked on one of these kits, there is a lot of material that would have to be drilled through to actually mount a buld here, and because the light housing casting extends slightly beyond the width of the roof in this area, I am afraid there is not enough material to allow this. Right now I am considering putting lenses in for the top two lights and lighting them from behind somehow. The bottom red light will be a dummy lens. Any suggestions?
-I also did not realize that a brass casting was available of this housing. I have mounted the one that comes with the kit. I have since ordered some brass ones off of E-bay for future projects.
-My general gluing skills are not great. In trying to glue some of the more dainty items I am concerned I am going to see a lot of glue residue after it is painted. Are there any general tricks to this that can be shared? I'm using medium viscocity CA applied via a toothpick.
-Regarding the number boards, do you recommend attempting to light these? How would that be done? The kit comes with the "glass" to fit the number board. I'm assuming I'll put white decal film on them, then the black numbers on top to get the effect of the prototype. I expect gluing these in place will be difficult.
-The instructions say to wait to install the window frames and wind sheilds until after the model is painted- why is that? Aren't they the same color as the side of the loco?
-I plan to install the air hoses after painting- good idea or bad?
-I have no idea how you would use the uncoupling levers that come with the Kaslo it. They are in several individual pieces and don't look like they would fit in the small brackets they provide. I got some from DA (I think). Mounting those via the brackets that come with the kit was an exercise in patience. I'm glad they give you a lot of extras as I think I lost about 10 of them trying to do this.
-I am having a hell of a time getting the shell to fit on the P2K frame. First, the ends of the frame are too long and rub up against the pilots. I have grinded these quite a ways back to get the shell to fit. Next the weight is really too wide and results in a way too tight a fit for the shell. I am in the process of grinding that back as well. A piece of advice is to do this before you start adding the details to the loco!
- I am not sure if the fuel tanks that come with the P2K kit are accurate or not. Does anyone know? If now, what should I use.
Sorry for the lengthy post, but I have a lot of questions.
Well I’m getting close to painting this thing. If the end result doesn't turn out to be a disaster, I will attempt a GP8 next. All I can say is that I hope that Athearn does the GP10's as they have said and that they are decent models. I am up for modifying and detailing existing locos after this project!
Thanks,
Steve Johnson
Carmel, In