elogger
Probationary Member
Posts: 14
|
Post by elogger on Aug 25, 2010 8:52:37 GMT -5
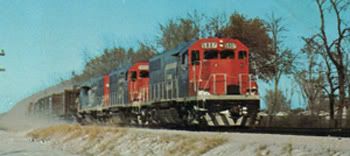
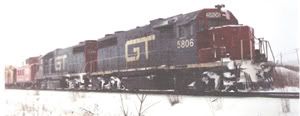
hey all, this is what i've been working on since april... i know, i work painfully slow sometimes but i think the outcome was worth the time spent... 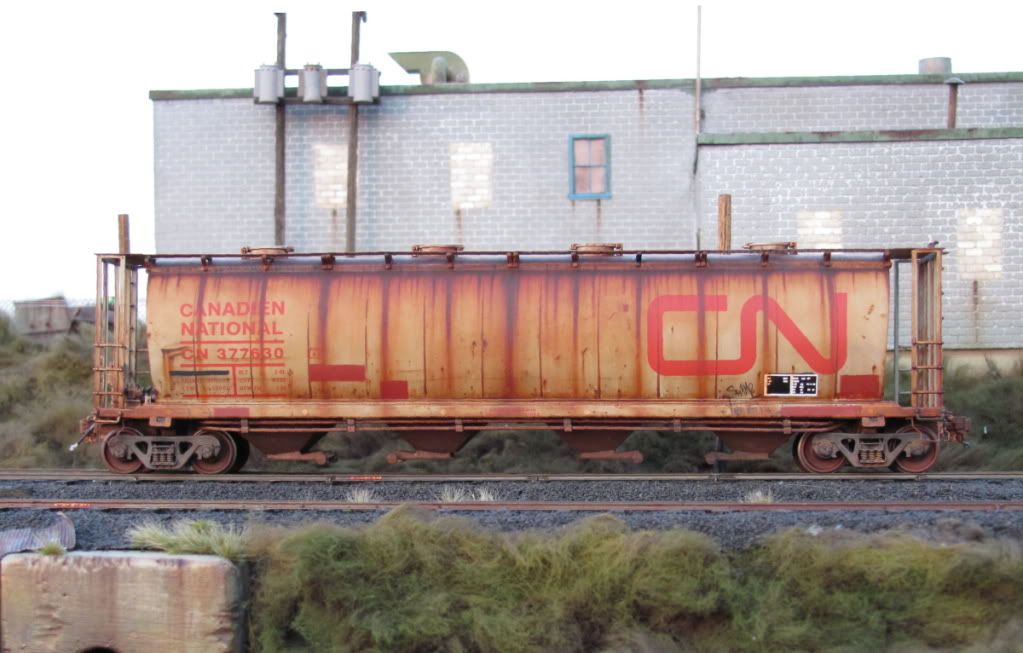  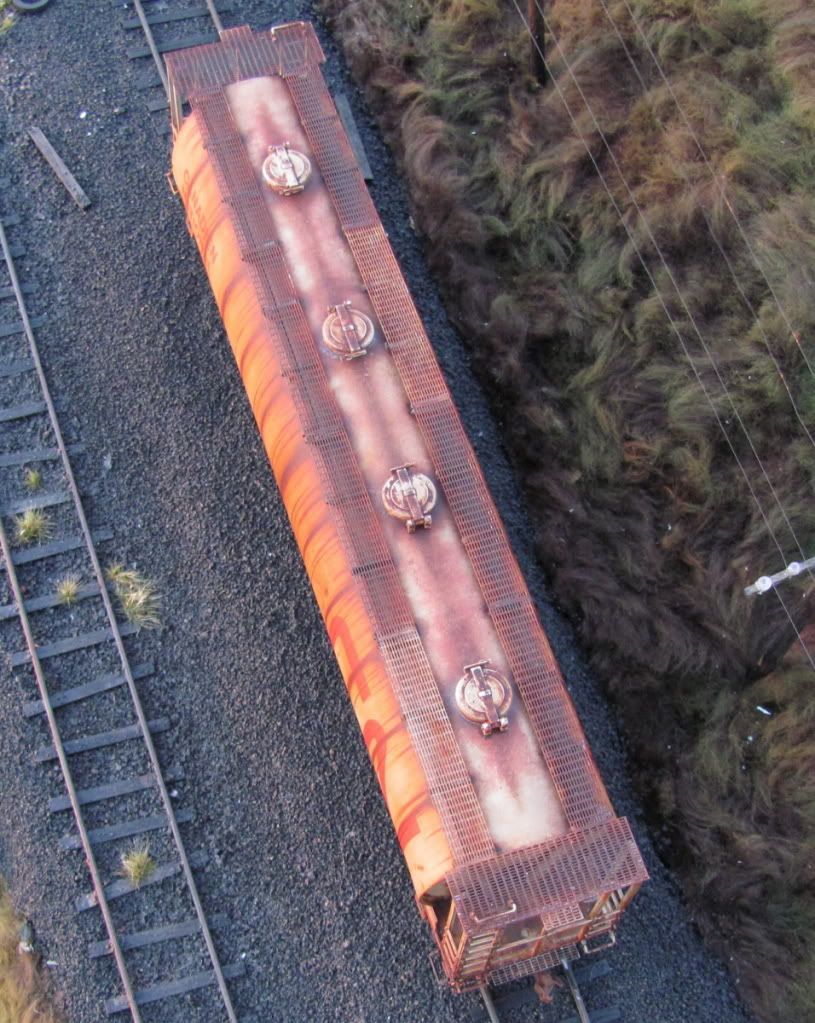  questions and comments are always welcome thanks, jeremy |
|
|
|
Post by icghogger on Aug 25, 2010 9:12:56 GMT -5
WOW, Jeremy, that is a Superb Job, your time was well-spent!! Please share your techniques with us when you can.
|
|
|
|
Post by mosteam3985 on Aug 25, 2010 13:35:51 GMT -5
Dude......I'm utterly speechless. That is AWESOME!!!!!!!!!!
|
|
elogger
Probationary Member
Posts: 14
|
Post by elogger on Aug 25, 2010 18:27:27 GMT -5
thanks, robert and mo...
everything was hand painted with artists oil paint and done in layers... (except the COTS label)... with the coloration on the side i alternated burnt sienna and burnt umber until i got the look i was happy with and the same does for the streaks... the graffiti was done with white and paynes' gray oil paint and a really, really small brush... lol...
i guess it would be easier for me to explain if you all had a specific technique you wanted to know about... i don't want to get too wordy here... lol
thanks again,
jeremy
|
|
|
|
Post by gabby on Aug 25, 2010 20:00:16 GMT -5
Jeremy it might have been painfully slow but the end results are terrific. Well done.
|
|
sarge
Chairman
Posts: 1,132
|
Post by sarge on Aug 25, 2010 20:11:08 GMT -5
I just showed my wife the pic and she thought it was real  |
|
|
|
Post by gnsteve on Aug 25, 2010 22:52:33 GMT -5
That rust is almost coming out of the monitor. You've really hit this one out of the park. Excellent work.
|
|
elogger
Probationary Member
Posts: 14
|
Post by elogger on Aug 25, 2010 23:21:47 GMT -5
thanks guys, i truly appreciate the compliments...
jeremy
|
|
bcrail
Superintendent
Posts: 162
|
Post by bcrail on Aug 26, 2010 23:04:39 GMT -5
can you all my grain cars up foe me ? That would be just swell  |
|
|
|
Post by lindsaya99 on Aug 27, 2010 6:03:13 GMT -5
Ha ha! Very funny. Taking prototype photos and passing them off as models. You almost fooled me.
Seriously, that is one of the most realistic weathering jobs I have ever seen. Job well done!
|
|
|
|
Post by samoa switcher on Aug 27, 2010 14:14:31 GMT -5
Jeremy, Great looking car. I don't mind the wordy explanations.
Cyrus
|
|
Tank
Superintendent
Posts: 150
|
Post by Tank on Aug 27, 2010 18:07:27 GMT -5
That weathering and graffiti is absolutely amazing. It's rare to see rust like that done so well. Congratulations on a truly excellent job
|
|
|
|
Post by sd45longhoodfoward on Aug 28, 2010 7:02:10 GMT -5
That is is a masterpiece Fantastic!!!!!!!!!!!!!!!!!!!!!Mother Nature couldnt have done it better Your new nick name will be RUSTY!!!!!!!
|
|
|
|
Post by Raeder on Aug 28, 2010 10:38:33 GMT -5
Hmmm...now all you have to do is do about a dozen more, mix in some Soo Line hoppers of equally battered vintage, and you'll have a typical CN grain train. I see stuff like that come through town all the time. You can tell they don't paint any of this stuff...you just hope it doesn't fall apart before it gets where it is going!
You made that graffiti look really good, that's one technique I'd be interested in hearing more about how you did that.
Kevin
|
|
|
|
Post by stewarttrains98 on Aug 28, 2010 23:26:21 GMT -5
wow, what a great looking model. great work there.
|
|
kcs1967
Chairman
SWLA-SETX PINE SCENTED
Posts: 1,726
|
Post by kcs1967 on Aug 28, 2010 23:42:13 GMT -5
I have looked at this twice a day since you posted this, and I have to admit my envy and jealousy!!! I just have one suggestion, send it to 5650 Harvest Rd, I just need to examine it for a few years, 35 of them should do it, then my estate will return it. lol.
|
|
elogger
Probationary Member
Posts: 14
|
Post by elogger on Aug 30, 2010 0:48:12 GMT -5
haha! thanks so much guys! i just checked in here after a few days and WOW! thanks for all the compliments...
i'm off to bed but i'll go a little more in depth on the rust and tags soon...
jeremy
|
|
|
|
Post by atsf90 on Aug 30, 2010 21:47:59 GMT -5
That is an awesome job you did there. I would also be interested in hearing about your techniques.
|
|
elogger
Probationary Member
Posts: 14
|
Post by elogger on Aug 31, 2010 13:40:47 GMT -5
thanks again guys... ok, the rust is all dry brushed oil paint... well most of it anyway... i used burnt sienna for the reddish color and burnt umber and a tad bit of raw umber for the brownish color... i would start with the lighter red color and with just any old brush kind of throw some on the car... i'd usually go panel by panel... next i'd switch to another wider softer brush and try to even the paint out... i liken this process to polishing a car... you throw the polish on the side of the car and then work it in with your buffer... but instead of using polish, we're using paint here and we are making vertical passes with our brush instead of going in circles... after i was satisfied that the color of the car was where i wanted, i'd go back with yet a larger softer brush and repeat the same vertical motion on the car side... panel by panel... after this color had sufficient chance to dry, usually overnight, i'd come back with my darker color and repeat the same process... sometimes i wouldn't wait as long simply because with that much working of the paint, you usually have gotten the paint to a state of relative dryness and you can add more layers... plus it's nice to see what you can do with mixing the colors together a bit... the biggest ordeal i had with this technique is that when you hold the car in your hand and look at one side and then move your head to the other side, the car looks slightly different in color... if you just flip the car over, it looks the same... btw, i call this technique color graduation... gradually changing the color of the car by using layers of paint... the streaks were also dry brushed... i would just paint a line of burnt sienna, work it from bottom to top with number 2 flat shader to get it in line and make it gradually fade out from bottom to top... then i would add the darker colors in the same fashion after the streaks had dried... the pits were pooled with mineral spirits... i detailed this technique in an article i wrote for RMC back in October of 09... you can check it out online here: theweatheringshop.com/gtarticle.htmlthe graffiti was also hand painted oils... for the fine lines i cut down a 20/0 liner and basically free handed the tag from one i saw online on a different CN hopper car... the tags on the left and right came from that car... the one in the middle i kind of made up since the middle of the car kinda looked naked... lol... the patches were also handpainted with indian red oils... i don't see that many patches that are exactly perfect as far as squareness goes, so i just free handed them... i think that should about cover it... thanks, jeremy |
|