Post by SP_Modeler on Aug 15, 2010 1:44:53 GMT -5
Hi Guys..
This is my first post of a build here and my first build after a 10 year break, so please be kind ;D
Well, here is how far I am so far on the SP B30-7 number " 7777"
This started life as an Atlas Silver Series Cotton Belt unit numbered “7770” Ummm Atlas.. that would be a B36-7...
It didn’t matter as I was stripping, detailing and repainting anyway..so... Into the 91% alcohol she went..Ummm not the electrical bits.. DOH that would suck.. but all the plastic parts that needed new paint.. 24 hours later I gave it all a light scrubbing with an old toothbrush and it was clean, and oil free!
I started with the truck side frames. They were drilled out to their proper dimensions and details added. I used Detail Associates separate brake cylinders to replace the molded on ones, and made brake air lines from .012 wire. I also made the spare knuckle box (engineer’s side fwd.) by modifying a Details West part with .010 styrene. I also added the G.E. style speed recorder on the fireman’s side. I added Details West air filters to their positions on the engineer’s side of the fuel tank and more .012 wire, then shot everything SP Gray.
Once the Gray was dry I dullcoated with about 4 airbrushed coats and let it dry for 48 hours. The last step for me is the most fun.
I always rust out my wheels while I have the side frames off, and I used floquil rail brown as it's not so bright it stands out but contrasts nicely with the weathered side frames.
I weathered the truck side frames and fuel tank and filters with various artists’ oils and then several washes until they looked sufficiently grungy and rusted, then did various translucent coats of home brewed "grime" until it looked right, then sealed with 4 more coats of dullcoat. The chain for the brake and speed recorder cable will be added just before its all done, I am leaving it off until last so I don’t snag it on something and tear it and the tiny hooks I fabricated out while working.
The next pics when I get to them will be the walkways and steps and front and rear pilot areas..
So far I have bent all the wire and installed the lift bars. Atlas has them wrong as well, they should be a Shallow V shape not straight across for the SSW units mine are correct. I also added the two MU boxes at each end of the pilot and new drop steps from Details West as well.
I also raised the engineer’s front window to match the two main ones in height, blanked out the lights between the number boards and class lights and added BLMA parts to make all the blanking plates. Lastly, the SSW units have a big flat spot with mounting plates for the Prime air conditioner.. I carefully cut out the rectangular spot and added a flat plate and mounting brackets and put on the mushroom vent and whip antenna mount.
Then I made myself an antenna mounting box to go behind the AC unit. I also used .010 styrene rod to make the 6 louvers below each of the battery box knuckle busters on the engineers side, and made the box that goes on the walkway behind the fireman’s rear window More pics of all that stuff later when its not all shiny gray Scalecoat II.
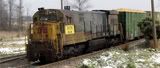
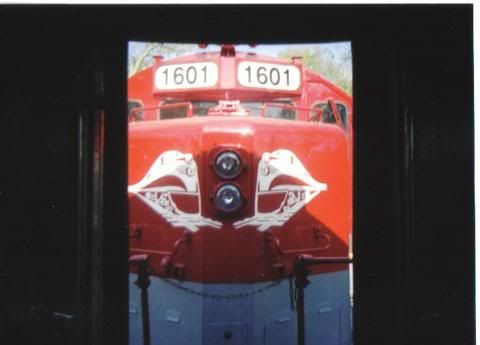
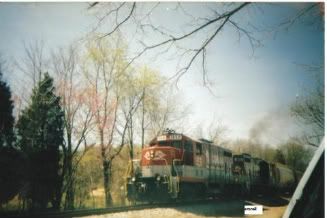
The real 7777 was built and delivered in March 1980 to SSW and was overhauled and repainted in June 1994. This particular unit got really good care when they repainted it none of the vestiges of her former light package’s were left above the cab lights(mars, then rotary beacon) or on the rear of the body ( full SP style light package), and somebody did a nice job filling in the body work and smoothing it all out as well!
Here is the prototype unit 7777 and a pic of each side of the model so far.
Hope you enjoy it


This is my first post of a build here and my first build after a 10 year break, so please be kind ;D
Well, here is how far I am so far on the SP B30-7 number " 7777"
This started life as an Atlas Silver Series Cotton Belt unit numbered “7770” Ummm Atlas.. that would be a B36-7...

It didn’t matter as I was stripping, detailing and repainting anyway..so... Into the 91% alcohol she went..Ummm not the electrical bits.. DOH that would suck.. but all the plastic parts that needed new paint.. 24 hours later I gave it all a light scrubbing with an old toothbrush and it was clean, and oil free!
I started with the truck side frames. They were drilled out to their proper dimensions and details added. I used Detail Associates separate brake cylinders to replace the molded on ones, and made brake air lines from .012 wire. I also made the spare knuckle box (engineer’s side fwd.) by modifying a Details West part with .010 styrene. I also added the G.E. style speed recorder on the fireman’s side. I added Details West air filters to their positions on the engineer’s side of the fuel tank and more .012 wire, then shot everything SP Gray.
Once the Gray was dry I dullcoated with about 4 airbrushed coats and let it dry for 48 hours. The last step for me is the most fun.
I always rust out my wheels while I have the side frames off, and I used floquil rail brown as it's not so bright it stands out but contrasts nicely with the weathered side frames.
I weathered the truck side frames and fuel tank and filters with various artists’ oils and then several washes until they looked sufficiently grungy and rusted, then did various translucent coats of home brewed "grime" until it looked right, then sealed with 4 more coats of dullcoat. The chain for the brake and speed recorder cable will be added just before its all done, I am leaving it off until last so I don’t snag it on something and tear it and the tiny hooks I fabricated out while working.
The next pics when I get to them will be the walkways and steps and front and rear pilot areas..
So far I have bent all the wire and installed the lift bars. Atlas has them wrong as well, they should be a Shallow V shape not straight across for the SSW units mine are correct. I also added the two MU boxes at each end of the pilot and new drop steps from Details West as well.
I also raised the engineer’s front window to match the two main ones in height, blanked out the lights between the number boards and class lights and added BLMA parts to make all the blanking plates. Lastly, the SSW units have a big flat spot with mounting plates for the Prime air conditioner.. I carefully cut out the rectangular spot and added a flat plate and mounting brackets and put on the mushroom vent and whip antenna mount.
Then I made myself an antenna mounting box to go behind the AC unit. I also used .010 styrene rod to make the 6 louvers below each of the battery box knuckle busters on the engineers side, and made the box that goes on the walkway behind the fireman’s rear window More pics of all that stuff later when its not all shiny gray Scalecoat II.
The real 7777 was built and delivered in March 1980 to SSW and was overhauled and repainted in June 1994. This particular unit got really good care when they repainted it none of the vestiges of her former light package’s were left above the cab lights(mars, then rotary beacon) or on the rear of the body ( full SP style light package), and somebody did a nice job filling in the body work and smoothing it all out as well!
Here is the prototype unit 7777 and a pic of each side of the model so far.
Hope you enjoy it