|
|
Post by icheymon on Sept 2, 2008 22:29:31 GMT -5
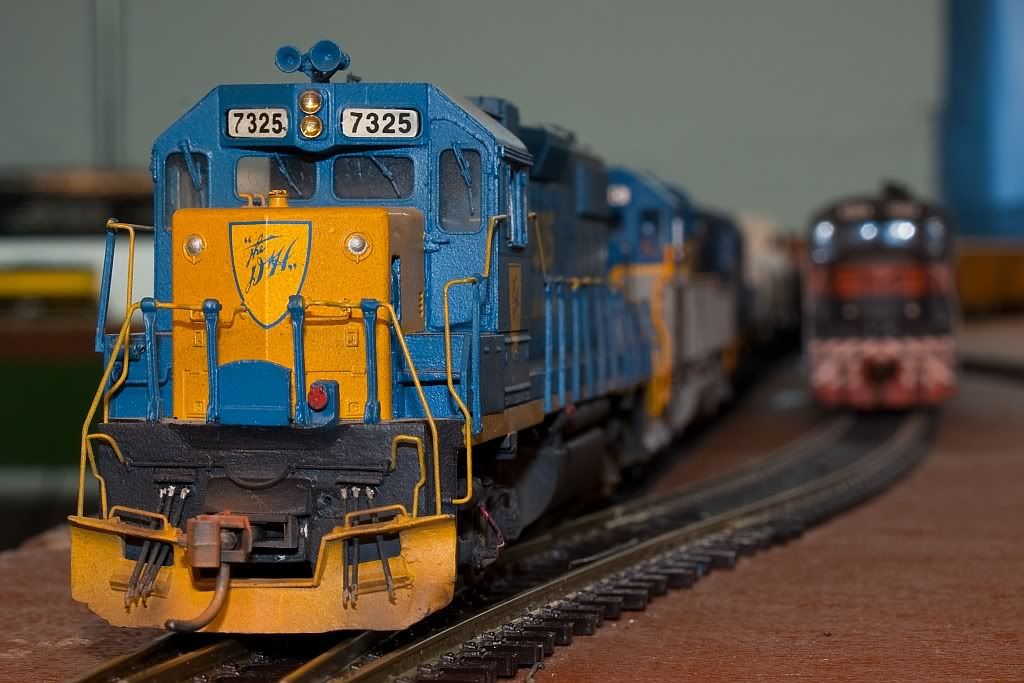
First and foremost I want to apologize for the first time I posted this thread. I uploaded the pictures to Photobucket, thought I resized them and without checking I posted REALLY BIG pictures. The forum administrator firmly but politely explained that it caused a problem and for that I am sorry. It was obviously a software problem....that soft stuff between my ears. So here we go again. This is my version of a rail grinder. It is loosely (key word) based on the Pandrol-Jackson grinders. The lead unit HRGX 101 is a Walthers Trainline Trainline model I bought at a train show for $20. I added an extended platform on the front similar to the ones seen on the Pandrol Jackson / Harsco units. I added a hose reel under the front of the platform and made two deck guns out of paperclips. I added a front entry door and relocated the headlight. Plumbing was added up the rear, across the top and down to the two deck guns and the remote monitor beside the head light. I added an air conditioner unit and relocated the horns. The next step is to add headlight/ditchlights to it but that will require soldering and I still have scars from the last attempt. Slug HRGX 190 I bought a beat up Model Power ALCO at a train show for a dollar and built this slug out of it. The trucks are old metal side frame Athearn’s from an old GP 9 that also became a slug. I realize the rail grinders in use now don’t have slugs but I found a photo of an old orange Pandrol Jackson unit and figured I needed one also. It has a dynamic brake on it as it was originally destined to work coal trains and I thought it looked cool so I left it on. HRGX 126 is a Walthers Trainline F40 somethin'or another I bought at a show for $20 also. I wanted to build a B-unit so I used an old Bachmann shell for the end. I realized I needed a second powered unit for when I have the pads in the down position. One constant theme here is cheap. I wanted to not try and spend a fortune and that pleased the finance committee (wife). I took these pictures on a friend's railroad and when we were done Randy showed me his version of a rail grinder. I will post those pics at the end....  |
|
|
|
Post by icheymon on Sept 2, 2008 22:33:39 GMT -5
Water Tender Cars 901 & 907 - These are fire cars made by I think Model Power that my wife bought at a yard sale for a dollar each. I expanded the pump platforms and covered the pumps. I added fuel tanks to the top to supply the pump motors. I built cabinets under the running boards and added new roller bearing trucks. I added some piping and spray heads on the sides. Control Car 321 – This is an Athearn unit that was given to me by a friend. I painted it silver as opposed to blue like the rest of the train. I added three air conditioners to the roof and will probably add more later along with side detail to represent sensors. A Walthers cleaning pad is mounted underneath and is able to be pinned in an up position for travel and dropped for grinding…er…cleaning. This will change shortly..... Rail Grinder Cars 500 & 501 – These two cars are originally LBF Skybox kits and at the price of about $26 each are the most expensive units on the entire train. I cut off the angled tops and added flat roofs with two fans on each end. I added large mesh grills at each end of the units on the sides. I built a box out of styrene under the frame area and added castings to represent the assemblies that raise and lower the grinder heads on the outside. After seeing how Randy is mounting the cleaning pads on his grinder train, I will soon use the dremel on these and build a similar system......  |
|
|
|
Post by icheymon on Sept 2, 2008 22:38:31 GMT -5
Power Car 951 – I bought this B unit at a train show for $5. It was painted in a couple of hues of orange for the Milwaukee Road so it went to the paint stripper. I added a raised roof section and put on a couple of fans and added grills on the body below. Two exhausts in the center of the roof for the generators and new bolsters and roller bearing trucks replaced the power trucks. A coat of blue for the body and black for the under body finished it up. Supply Car 400 – This is an Athearn box car that was given to me by a friend. It had a poor paint job on it and I figured I could make use of it somehow. I had seen a cut down boxcar in a book of MOW units with a roll up door and built this one along the same lines. I added a crane because I thought it needed one and would look cool. The skids of barrels and other items represent lubricants and packaged grinder wheels. I have not seen one in use on a grinder train in any photos I have come across but it’s my train and I like it. Caboose 201 – This is a freebie from a junk box at a train show. I used photos of LORAM units as reference and added odds ‘n’ ends to the roof from my junk box. I added a flashing red light and later more lights to the rear for safety. A Walthers cleaning pad has been added but will more than likely be removed and placed in one of the grinders...... I must admit I thought I would never get this far on this project but overall have had a blast in the process. I plan on adding weathering to the train after each appearance on a layout. At this rate it should be fairly grimy shortly, kind of like the real ones. I will add some more close up photos also. I hope I did it right this time..... Rich   |
|
|
|
Post by icheymon on Sept 2, 2008 22:41:31 GMT -5
|
|
|
|
Post by icheymon on Sept 2, 2008 22:44:01 GMT -5
|
|
|
|
Post by icheymon on Sept 2, 2008 22:48:05 GMT -5
And these are Randy's start to a LORAM unit....    Yepper, it looks like it is going to be a long gritty winter here in South Central PA....Ya'll have a good night and watch for that hot spatter as the train goes by..... |
|
|
|
Post by Randy Earle on Sept 2, 2008 22:53:17 GMT -5
Very nice, thank you Rich.
|
|
nysw240
Chairman
Modeling the Delaware Valley
Posts: 297
|
Post by nysw240 on Sept 3, 2008 6:37:54 GMT -5
I thought i would never see a railgrinder made in HO . the train looks great . thanks Mike T
|
|
|
|
Post by icheymon on Sept 19, 2008 21:21:41 GMT -5
Randy sent me this shot of his first run of his nearly completed LORAM units. He should be getting the two tank cars and the caboose done shortly. Once he finishes I will shoot some photos and post his entire grinder...  |
|
nysw240
Chairman
Modeling the Delaware Valley
Posts: 297
|
Post by nysw240 on Sept 20, 2008 10:49:39 GMT -5
cant wait to see the finished train . my dad has pictures of the loram railgrinder and ballest cleaner on the riverline back in the conrail days . i will get them up here someday
|
|
|
|
Post by montyvox on Aug 19, 2009 8:35:53 GMT -5
Wow-That is something you don't see everyday.
Very nicely done!
Thanks
Matt
|
|
|
|
Post by icghogger on Aug 19, 2009 9:32:15 GMT -5
Really Impressive Work on an interesting prototype! Rich and Randy, Thanks for sharing!
|
|
DRLOCO
Chairman
We can Railroad, Yes we can!
Posts: 237
|
Post by DRLOCO on Aug 20, 2009 23:46:08 GMT -5
this may have been covered, who made this resin model? is that a kit?
Back in 2004, one of the Loram RG trains had a catastrophic hydraulic line fire that cooked the entire system. The yard I was working at became their impromptu rebuild center--they had it parked out of the way on the MW service tracks anyway. The machine was parked for about 30 days, and two 12 man crews worked 12-on, 12-off schedules to completely rebuild the whole hydraulic system...
It was an amazing process, and whatever those guys get paid, it's not enough--they work HARD!
|
|
irw98
Probationary Member
Posts: 7
|
Post by irw98 on Aug 21, 2009 12:01:53 GMT -5
This is a scratch built unit, sort of proto-lanced. I built mine, the yellow one, out of styrene. Each unit has a Walthers track cleaning pad under the grinding "shield". I use an Atlas Loram GP38 to pull it. The caboose is ready to kitbash and the tank cars are ready to be painted but the project has been stagnant for a couple months.
As soon as I get some more work done I'll take better pictures. Rich's blue unit is a kitbash of several different items -- it is quite neat and runs great.
I recently joined and will have to learn to upload photos, when I do I'll get them posted.
I also did a Conrail camp train using kits I found on this site; I'll have to post those pictures some day as well.
|
|
|
|
Post by MONONC420 on Aug 28, 2009 23:38:06 GMT -5
Ryan, was that South Anderson? For some reason, I recall seeing a photo of a rail grinder that had caught fire at South Anderson on Roger's "Railroads of Madison County" site.
Christian
|
|
kcs1967
Chairman
SWLA-SETX PINE SCENTED
Posts: 1,726
|
Post by kcs1967 on Feb 11, 2010 15:32:11 GMT -5
Very interesting project, and very well done!!
|
|
|
|
Post by stewarttrains98 on Feb 12, 2010 15:18:17 GMT -5
WOW, both of these are really awesome. I thought that the tan painted units where resin as well. Sure would be neat if these where available. Awesome work.
|
|