|
|
Post by Randy Earle on Aug 19, 2008 16:05:07 GMT -5
These are the ones Christopher had me post.
|
|
Smoke
Chairman
The Ski Train!!!!
Posts: 753
|
Post by Smoke on Aug 19, 2008 17:45:49 GMT -5
These are the ones Christopher had me post. I know that's why I said you had probably seen these beofre. And besides, if you join in a month or two you wouldn't think to look inthe Railflyer thread to see pics of my unit. -Smoke |
|
CIOR
Chairman
Posts: 2,046
|
Post by CIOR on Aug 19, 2008 18:22:21 GMT -5
Andrew, so tell us how it was to build the complete ditchlight. Was it worth it? Your opinion please.
I've got several engines to do this with, and I am looking at Mark's method too.
|
|
Smoke
Chairman
The Ski Train!!!!
Posts: 753
|
Post by Smoke on Aug 19, 2008 21:46:39 GMT -5
Andrew, so tell us how it was to build the complete ditchlight. Was it worth it? Your opinion please. I've got several engines to do this with, and I am looking at Mark's method too. Matt, The ditchlights are a breeze to assemble. The front top and back of the ditchlight are one piece. The two sides are seperate. I like to glue the sides on and then fold the top and front down. If you are putting LED's in the ditchlight wiring the ditchlight is a little more time consuming. Chris Slemp has written up a very detailed description of how to wire up the LED's. It's the same as all the others just in a way smaller size. here are the instructions written by Chris Slemp. sites.google.com/a/railflyermodelprototypes.com/building-resources/detail-parts/dp-6631/DP6631-DitchLightInstructions.pdf?attredirects=0-Andrew |
|
Smoke
Chairman
The Ski Train!!!!
Posts: 753
|
Post by Smoke on Sept 3, 2008 23:24:25 GMT -5
OK guys this model is almost complete. I have the safety chain installed and the MU cable on the front and rear installed as well. I am going to add lift rings as well. Pictures to come as soon as I get a chance.
|
|
|
|
Post by wmfan3798 on Sept 4, 2008 8:42:15 GMT -5
Looks great, outstanding job
|
|
Smoke
Chairman
The Ski Train!!!!
Posts: 753
|
Post by Smoke on Sept 4, 2008 19:01:34 GMT -5
|
|
|
|
Post by Randy Earle on Sept 4, 2008 19:58:13 GMT -5
Very nice Andrew!
|
|
KCSRailfan
Chairman
Kansas City Southern Fan
Posts: 609
|
Post by KCSRailfan on Sept 4, 2008 21:02:16 GMT -5
One word, AWESOME.
|
|
Smoke
Chairman
The Ski Train!!!!
Posts: 753
|
Post by Smoke on Sept 11, 2008 23:25:27 GMT -5
Smoke, that's VERY realistic, looks awesome! The only thing that screams HO scale to me is the Atlas plow. It's too narrow for the unit. That's actually a plow that I had on hand that was really close to the prototype. The Atlas plow wasn't even close. The coupler screams HO scale as well. |
|
Smoke
Chairman
The Ski Train!!!!
Posts: 753
|
Post by Smoke on Sept 12, 2008 12:44:24 GMT -5
|
|
Smoke
Chairman
The Ski Train!!!!
Posts: 753
|
Post by Smoke on Sept 12, 2008 14:37:06 GMT -5
That's interesting Andy? The pic I posted of 7535 in the tri-color scheme has a plow used commonly on the CSX (like a 1:1 DW256 ;D), while your pic of it in the new scheme has a different plow. I haven't seen an HO equivilant to that. Hmmmm....... I guess the old plow had seen it's fair share of service. LOL |
|
Smoke
Chairman
The Ski Train!!!!
Posts: 753
|
Post by Smoke on Oct 4, 2008 12:06:28 GMT -5
New camera, and this picture shows the weathering much better that the other picture I posted. 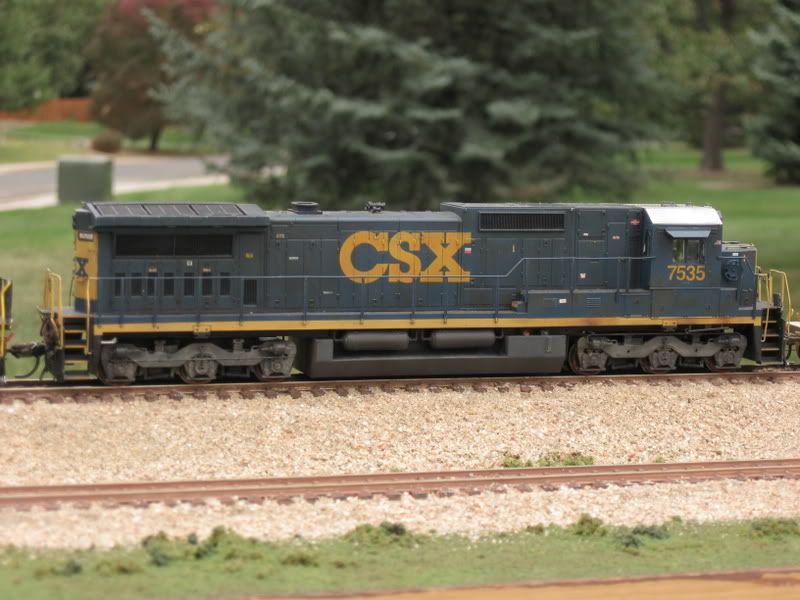 |
|
Smoke
Chairman
The Ski Train!!!!
Posts: 753
|
Post by Smoke on Oct 14, 2008 17:22:59 GMT -5
I added safety striping and fuel spills to finish off the model.   |
|
|
|
Post by antlorch on Oct 14, 2008 19:32:52 GMT -5
Now that is a really good looking engine you have there.I like that alot......
|
|
|
|
Post by stewarttrains98 on Nov 4, 2008 14:03:11 GMT -5
Very nice work that you did. Thanks for the photos and explanations as well.
|
|
nssd70m2
Superintendent
Norfolk Southern Piedmont Division
Posts: 159
|
Post by nssd70m2 on Jan 25, 2009 11:47:25 GMT -5
It has a K5LAR24. CSX and NS use them. I believe details west makes something similar a K5LA 23.
|
|
|
|
Post by icghogger on Jan 26, 2009 12:36:13 GMT -5
If it was any better, Andrew, I couldn't stand it! Very Good Work!
|
|
|
|
Post by stillbre on Jan 26, 2009 16:38:44 GMT -5
Would have to agree with the general consensus here. Very nice looking model Andrew. Those RFM ditch lights are really neat. Too bad I've decided to back date my modeling to pre-ditch light days.
You need more soot on the roof around the exhaust stack though. Those things didn't stay clean for long.
|
|
|
|
Post by mrogden on May 9, 2009 15:55:25 GMT -5
Very Nice model. . . All around !
MrOGDEN
|
|