|
|
Post by emd16645 on Oct 27, 2015 19:20:25 GMT -5
The SD45 has a 81" nose, while early GP38-2s also have the 81" nose. Later GP38-2s have 88" noses. I'm not sure if Proto offered both early and late versions. I do know they offered the 88" nose.
Besides the length, I don't think there is much different between the two noses.
|
|
deez
Chairman
Midland Belt Railway
Posts: 949
|
Post by deez on Oct 27, 2015 19:31:51 GMT -5
Yeah that's true. An Atlas one can probably be trimmed to fit. I have several Atlas noses with lights also. The thing that might also come into play is the dimensions of the p2k front goodies. The nose cab and sub base are all off dimensionally with their 38-2. At least that's what I hear as I don't own one lol. It's an older GP38-2 with an 81" inch nose right?
|
|
|
|
Post by rscott417 on Oct 27, 2015 20:29:52 GMT -5
I just bought a seaboard system p2k 38-2 which has the nose light and the dynamic brake hatch so ill be putting the clitchfield 38-2 back on ebay.
|
|
|
|
Post by rscott417 on Oct 30, 2015 13:27:35 GMT -5
Well I got the Seaboard System engine in the mail and the idea of swapping the noses unfortunately will not work. The undecorated nose is 81" and the seaboard has an 88" nose. I think I will go back to the original plan of looking passed the plated headlight.
|
|
|
|
Post by emd16645 on Oct 30, 2015 19:44:01 GMT -5
If you have the 81" nose on your undec you can swap it with the SD45 nose mentioned earlier in this thread. That would have the 81" nose as well.
|
|
|
|
Post by iomalley on Oct 30, 2015 20:44:11 GMT -5
Just file out the nose light depression. Its not that hard. just use a small square file. Worst case is it doesn't work and you have to search out the right nose. You have to fill in the class lights anyway, so you'll need to do a nose job.  |
|
|
|
Post by rscott417 on Oct 31, 2015 7:01:23 GMT -5
I'm sure it is pretty simple and I could probably figure it but I'm more worried about not being able to buy an extra nose incase I do mess it up without having to buy a complete engine.
|
|
|
|
Post by iomalley on Nov 1, 2015 11:11:42 GMT -5
Here you go, you can have this Atlas nose if you pay for shipping...  |
|
Deleted
Deleted Member
Posts: 0
|
Post by Deleted on Nov 1, 2015 18:41:40 GMT -5
Here you go, you can have this Atlas nose if you pay for shipping... It's a bloody nose job hehehehehe |
|
deez
Chairman
Midland Belt Railway
Posts: 949
|
Post by deez on Nov 1, 2015 20:54:26 GMT -5
That's the one you need right there Bob. 81" -2 nose with light! Just trim it up to fit and pop a cover plate over the lights then you're good to go. Easy peasy lemon squeezy.
|
|
|
|
Post by rscott417 on Nov 2, 2015 7:38:26 GMT -5
I worked it out with Sean yesterday and should receive the nose soon, thanks again Sean.
|
|
pacbelt
Chairman
Building Layout #11!! ;)
Posts: 682 
|
Post by pacbelt on Nov 2, 2015 9:07:10 GMT -5
That's why this is a Great Hobby.....
The People!!
~ Carmine
|
|
deez
Chairman
Midland Belt Railway
Posts: 949
|
Post by deez on Nov 2, 2015 22:09:49 GMT -5
From cool detail project to 3 P2K's later and an Atlas nose. Now it's a kitbash! I love it.
|
|
|
|
Post by rscott417 on Nov 13, 2015 10:14:08 GMT -5
|
|
|
|
Post by rscott417 on Nov 18, 2015 12:55:10 GMT -5
|
|
deez
Chairman
Midland Belt Railway
Posts: 949
|
Post by deez on Nov 18, 2015 19:53:14 GMT -5
You gotta notch the corners of the pilots for the crew to have access to the new coupler lift bars |
|
|
|
Post by rscott417 on Nov 18, 2015 20:21:56 GMT -5
You gotta notch the corners of the pilots for the crew to have access to the new coupler lift bars Damn you're right, wish I realized that before I glued the lift bars in place. I might just have to live with it, those plastic brackets that hold the wire cut bar are really fragile and think I'll be more annoyed if I break one trying to work around it. I do have a pair of nippers though that might work with some sanding, I could give that a try. |
|
deez
Chairman
Midland Belt Railway
Posts: 949
|
Post by deez on Nov 18, 2015 20:42:10 GMT -5
The nippers should work. I would trace out your corners and nip away. You can use a flat blade also to cut and carve straight into the corner. Just take your time. You can do it |
|
|
|
Post by rscott417 on Nov 21, 2015 10:46:53 GMT -5
I got some painting done and added a couple decals. None of the parts are pressed in place, quick assembly for a progress shot. 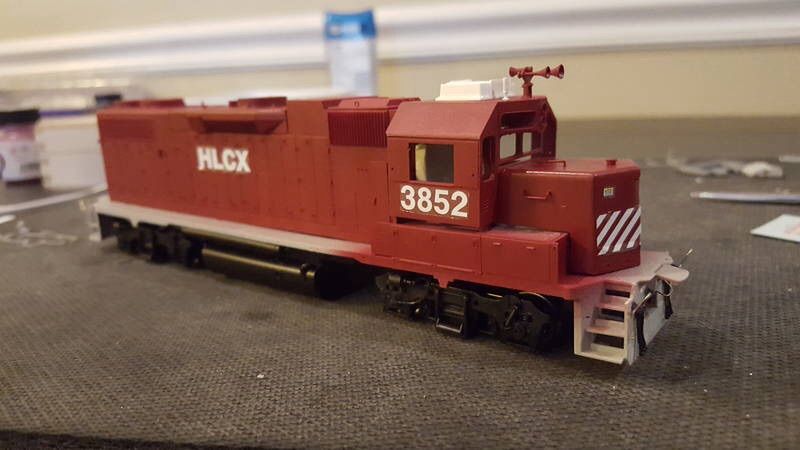 |
|
pacbelt
Chairman
Building Layout #11!! ;)
Posts: 682
|
Post by pacbelt on Nov 22, 2015 3:44:06 GMT -5
Looks GOOD! Also looks like the cut bar notches worked out well TOO. ~ Carmine |
|