|
|
Post by ironstef70 on Sept 17, 2015 16:12:28 GMT -5
I swear I am not trying to duplicate all of Artur's projects (wish I had that SD60F though!) but after a GP9 slug (will post pictures of the almost completed project soon) the logical progression is to build a cow for it. Two is even better for yard operation fun. Still, the initial project was supposed to be a cheap build based on an old Athearn blue box GP9 frame and drivetrain, then doing a dummy one as second of the pair. In the meantime (6 months ago) I found a DC CN GP18 for 60$ on the Bay. I started doing the modifications and was so pleased by the massive die cast frame and the quality-for-the-bucks that I ended up buying a second GP18. But I still wanted to use the remaining Tenshodo GP9 high nose brass shells (one complete, remains for the second as I used the ends for the slug). I started the project back in May, being conscient that it would be progressing slowly, summer coming up, but also because I really want to make it the way I thought it should be (I was first inspired by those from M636: CN GP9RM Then came Artur's Kaslo GP9rm last summer as I was half ways doing mines. Well, enough words, here's last months progress: ![]() Fuel tanks mods:  Die cast frames alterations, then repaint+ electronics. Proto 2000 upper shell modifications to CN prototype: 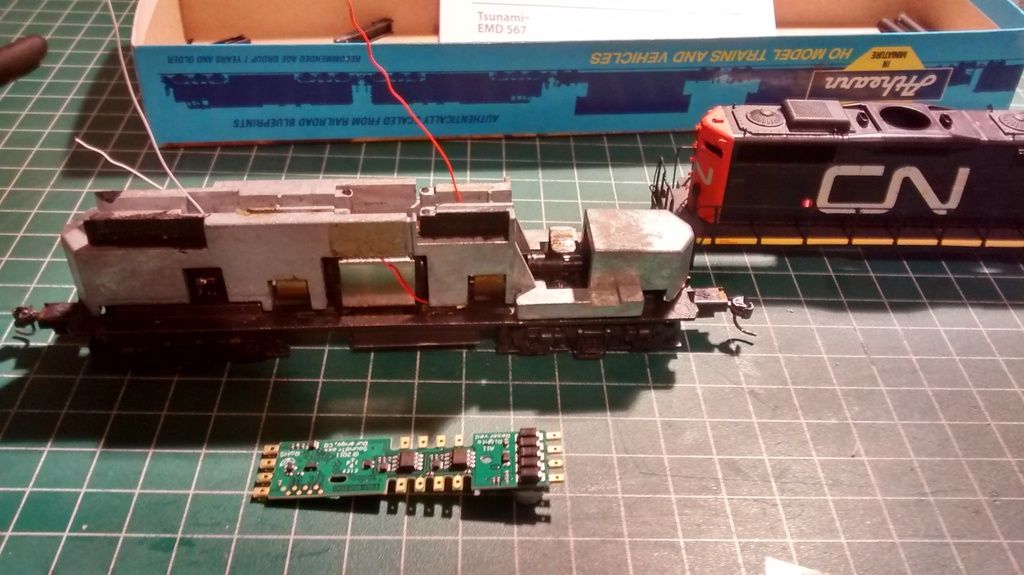 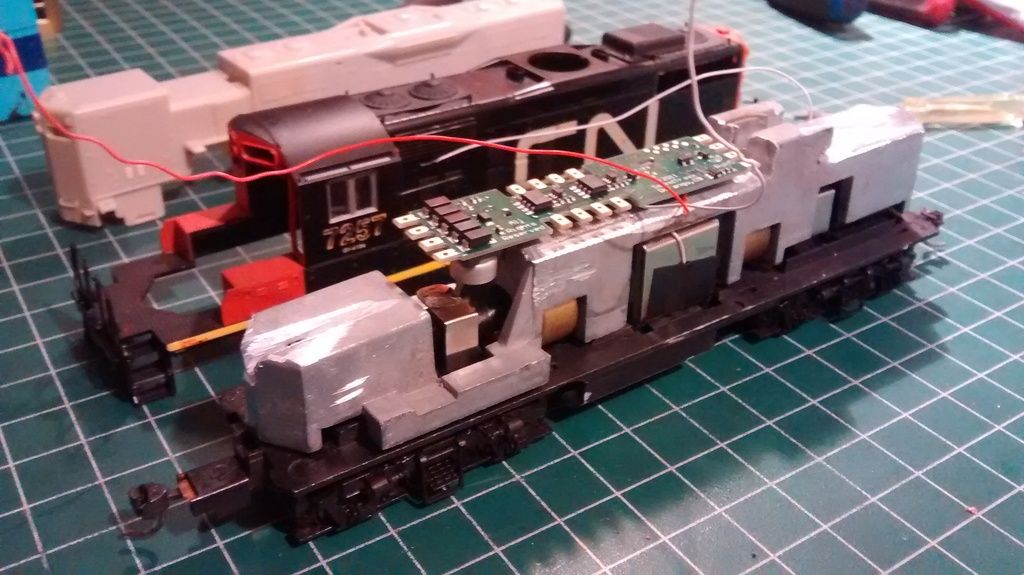 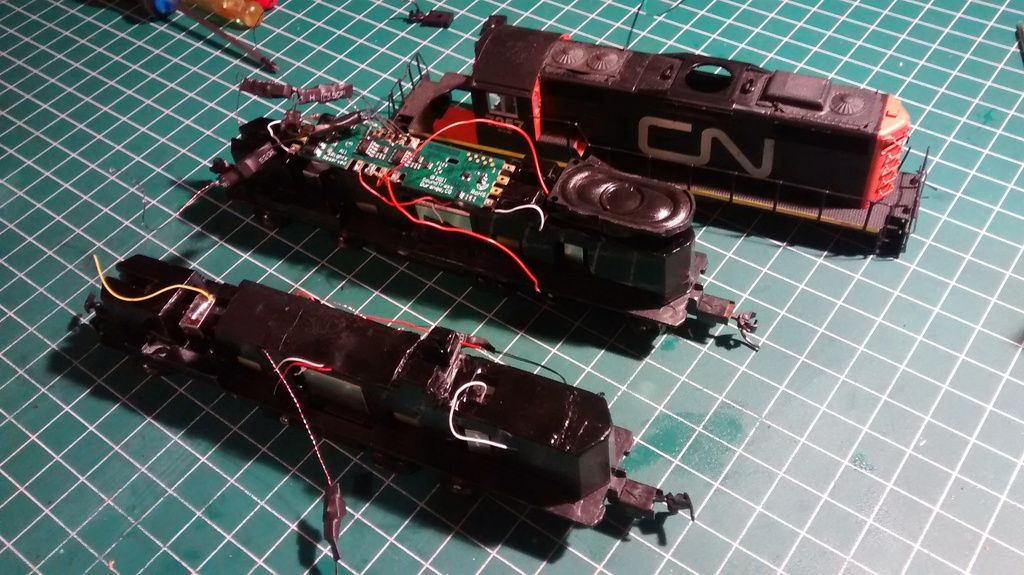 Brass works: my favorite part. Building one of the noses: 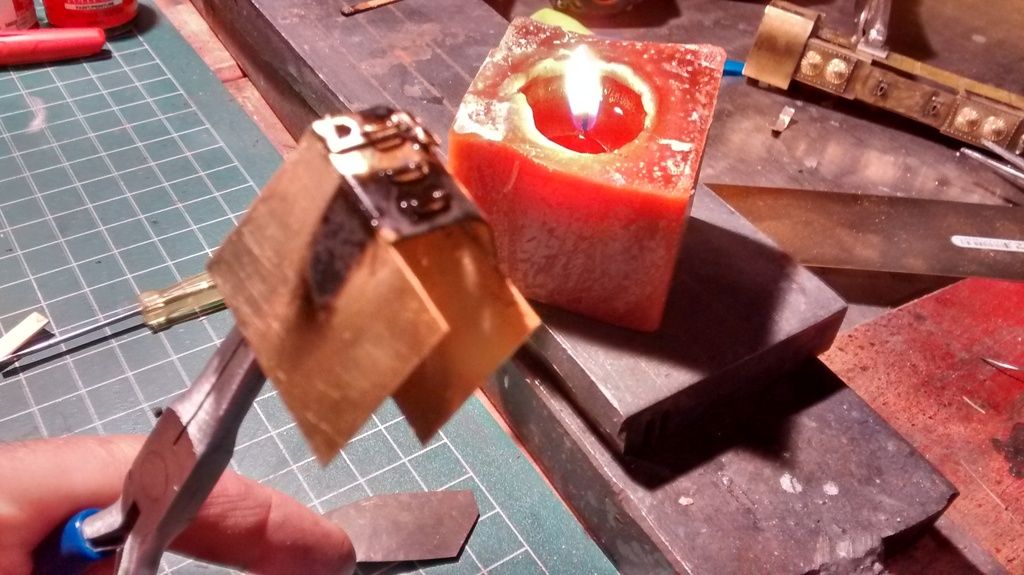 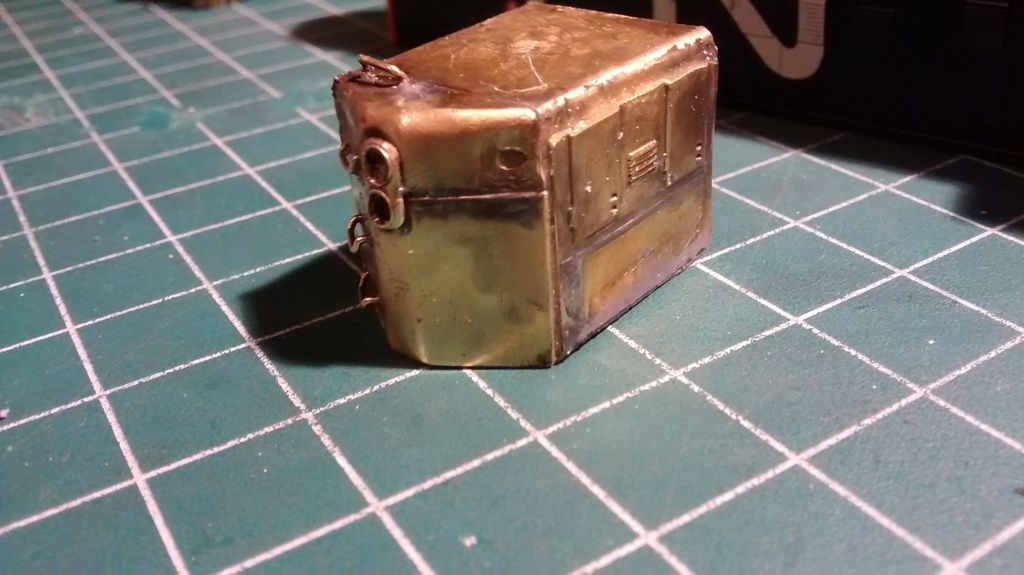 Enhancements to the Proto 2000 plastic shell: 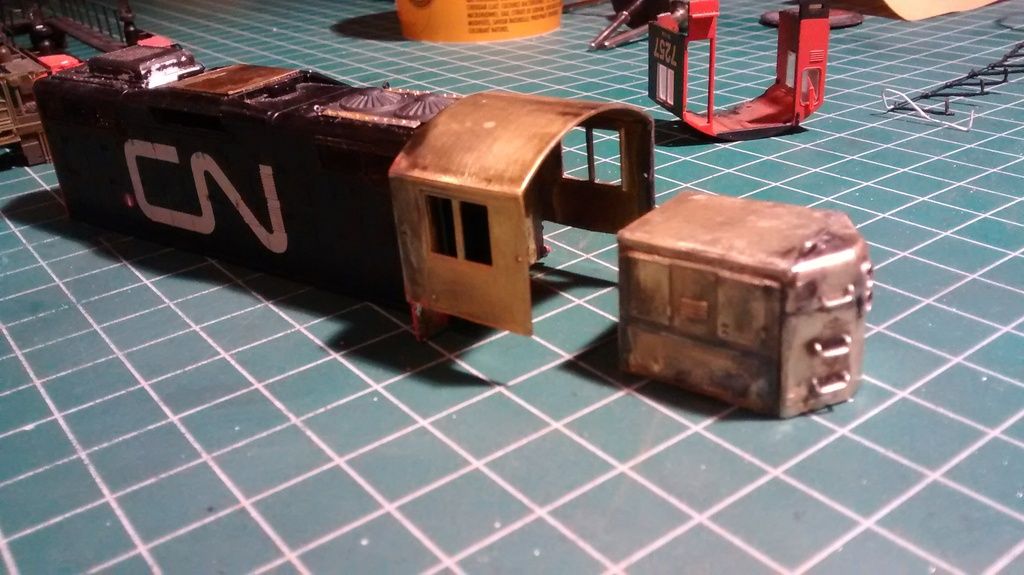 Now the Tenshodo brass shell: Parts and upper shell modifications: 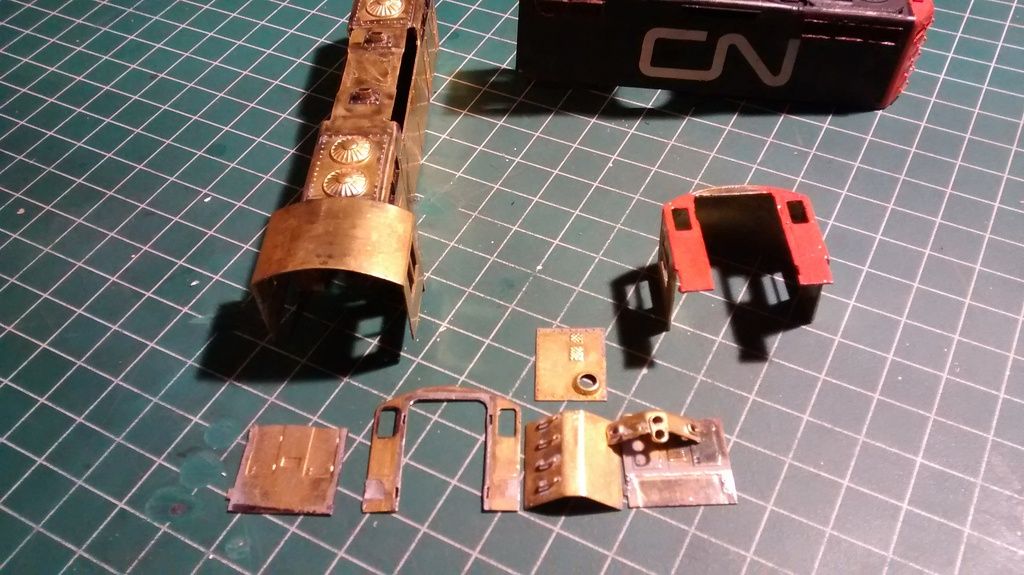 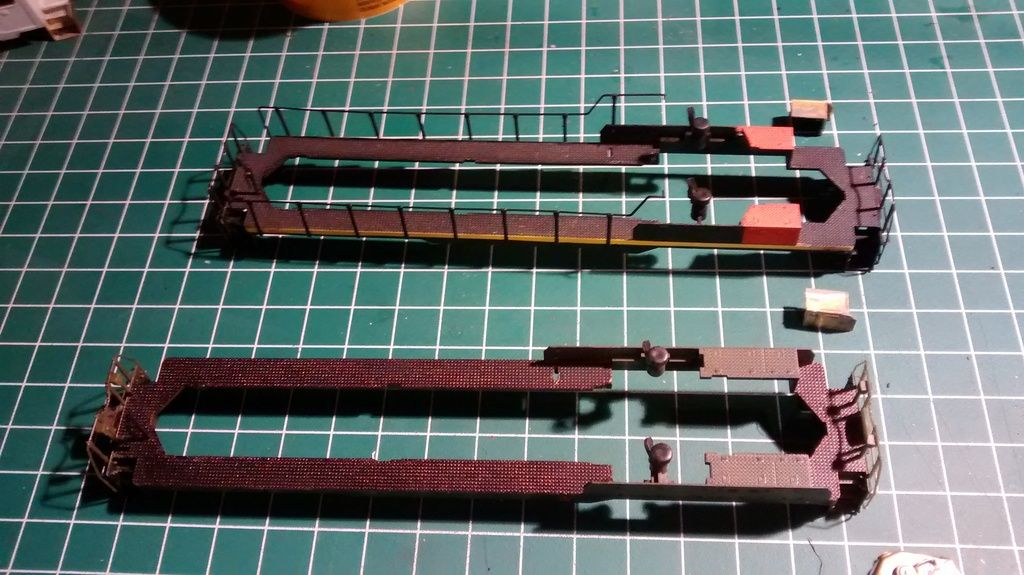 Partial assembly: just fitting parts in place: 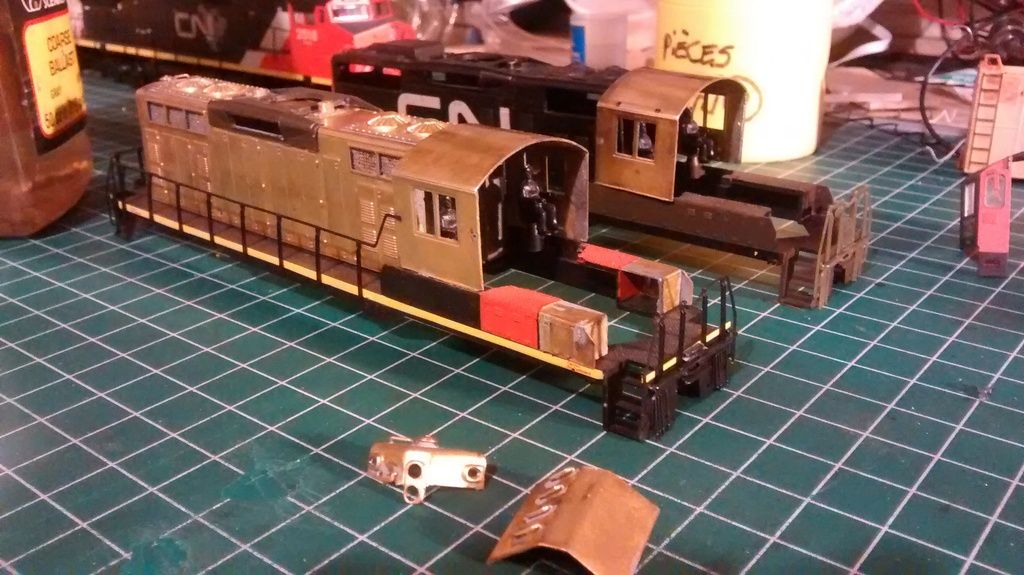 ...adding louvres, casting epoxy resin: 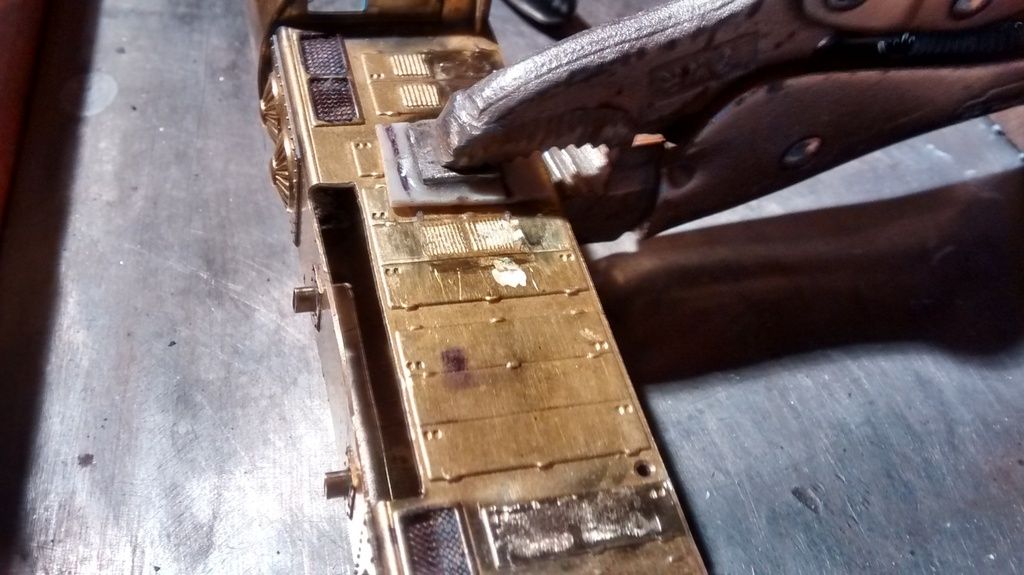 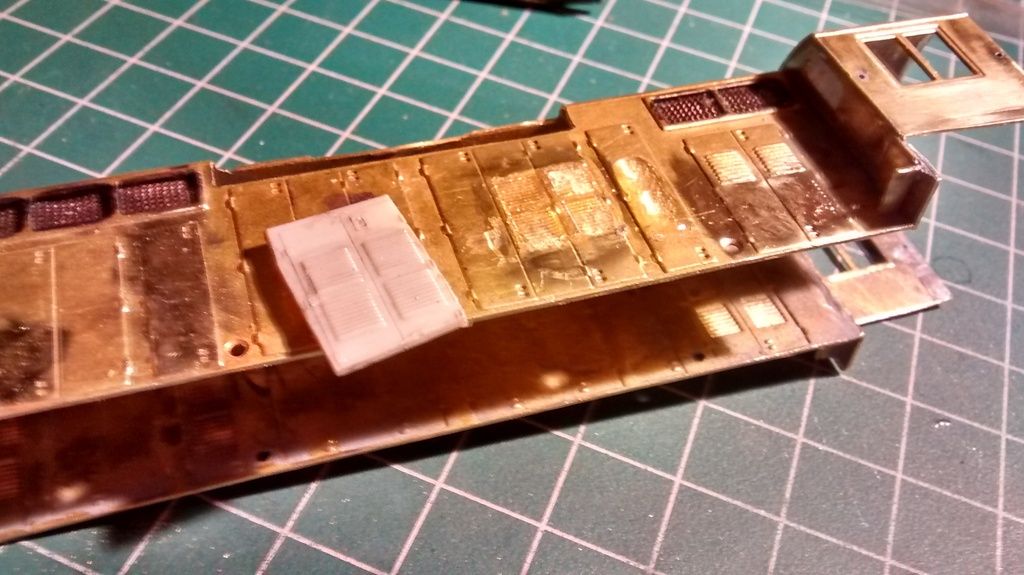 Tenshodo shell first paint layer: 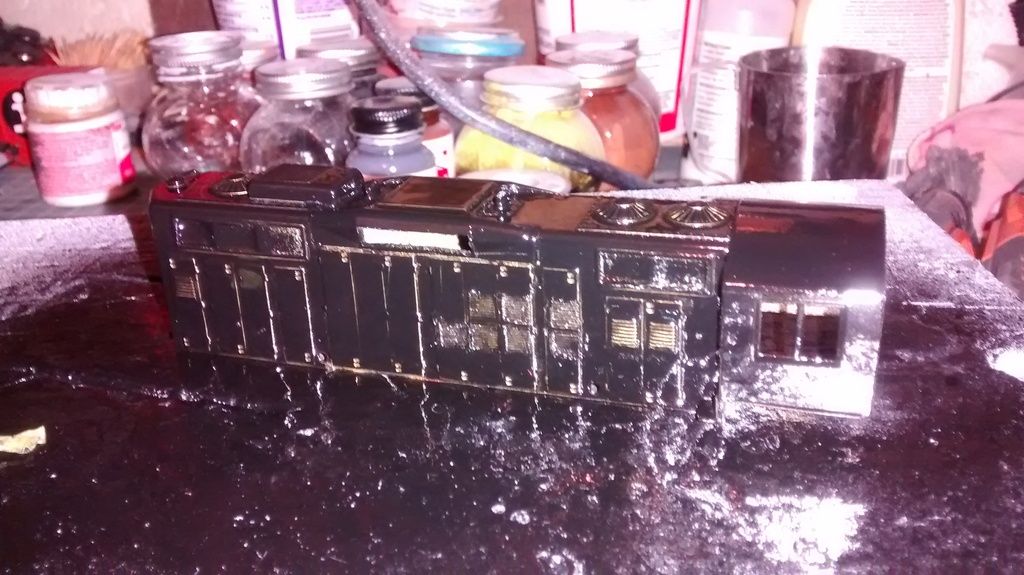 Custom cab works: windows measurements & machining 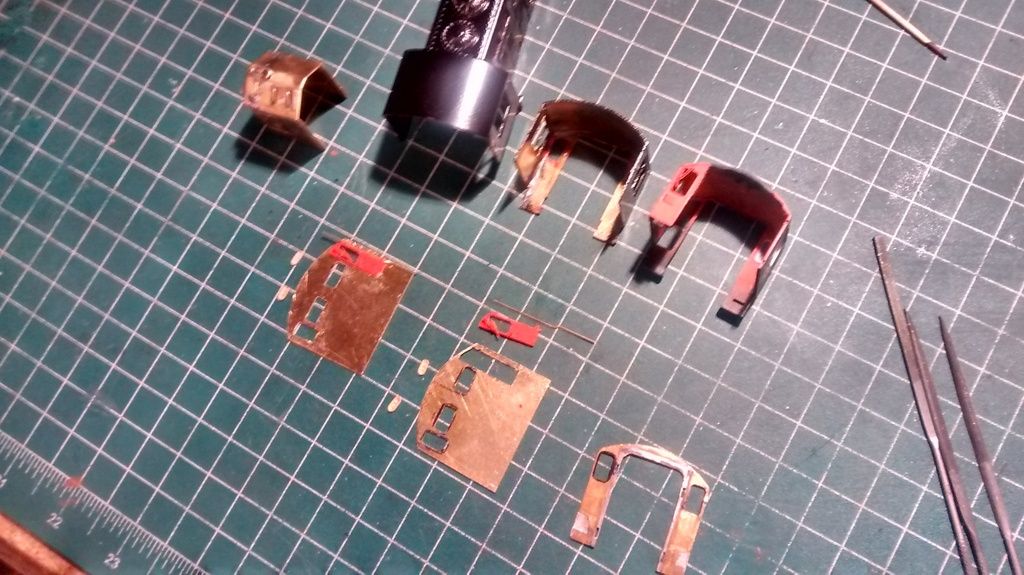 Operational doors (front of cab only): .020" brass rod happens to fit right in the door hinges: 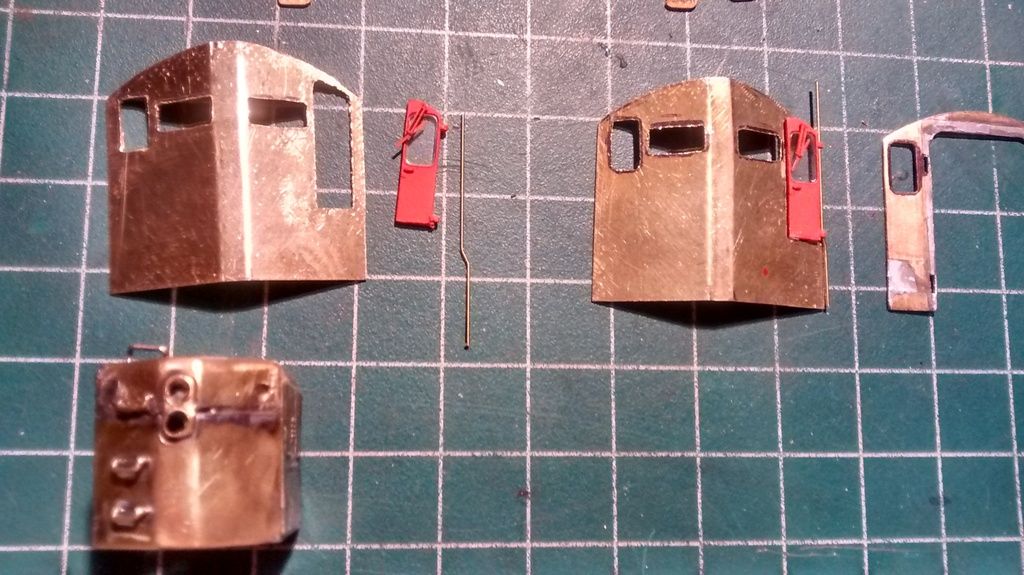 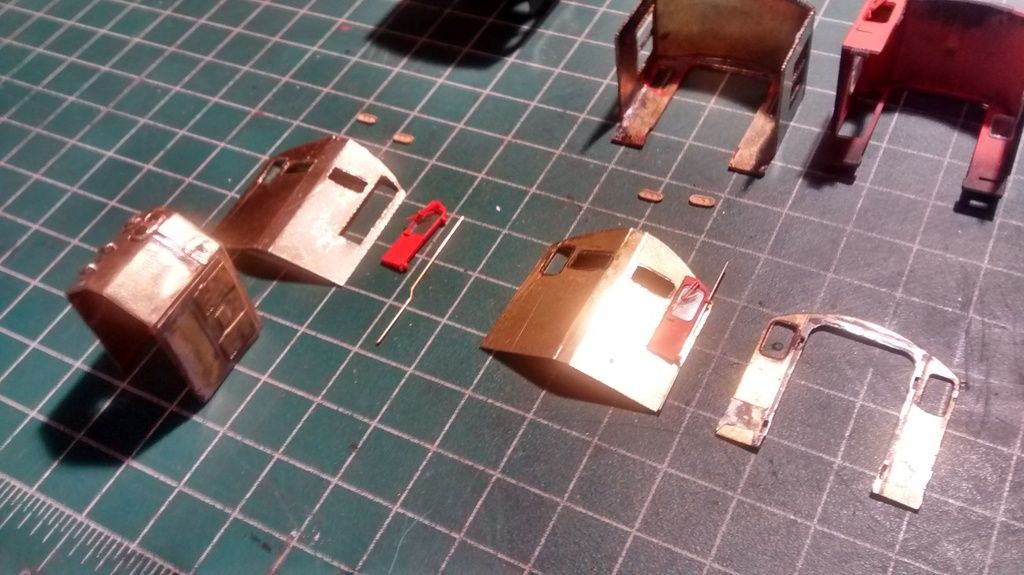 Next will be cabs assembly.... Stephane |
|
artur
Chairman
Posts: 580
|
Post by artur on Sept 17, 2015 16:57:02 GMT -5
looking good, I like how you're using both brass and plastic to build the units.
|
|
|
|
Post by analogbeatmaker on Oct 13, 2015 7:35:15 GMT -5
Looking good Stephane! I admire the brass work you're doing. I always dread scratching using brass because I find it very difficult to cut and work with. I must be doing something wrong or not have the right tools. If you can, would you show or list the types of tools you use and maybe drop a few helpful hints to working with brass? I look forward to seeing more progress!
|
|
|
|
Post by ironstef70 on Oct 13, 2015 19:07:59 GMT -5
Looking good Stephane! I admire the brass work you're doing. I always dread scratching using brass because I find it very difficult to cut and work with. I must be doing something wrong or not have the right tools. If you can, would you show or list the types of tools you use and maybe drop a few helpful hints to working with brass? I look forward to seeing more progress! OK, I'll take a snapshot of my tools on the workbench; it'll be easier to show than enumerate here. I guess it would be much easier to make organise a workshop and demostrate with other guys next to me rather than trying to word it. I sure use the Dremel with micro discs, some being as thin as one milimeter. Then special drill bits that I got at ModeleBT in Drummondville. The rest is a couple of different files (all even the tiniest are from Canadian Tire). for heating, I can either use a torch, a soldering pen, or even a candle (the latter is nasty due to smoke and carbon stains but you gotta brush afterwards). I use two parts epoxy for connecting brass to steel, then for brass-plastic, I usually heat the brass rods with a pen and pliers and melt the brass rods in. I love brass and work with metals. I sure appreciate the efforts made by different compagnies like Intermountain and Athearn to make awesome details on locomotives and rolling stock nowadays, but I just cannot appreciate them as much as my brass cars and locos. Even with my nicest plastic cars, I end up gluing or melting broken steps (using bent paper staples) or replacing walkways with Plano detailing parts. To me, it's woth spending three or four times the price for a brass car if it keeps a resale value with time, and since I can rework brass in case of accident, or make a modification, that's another benefit to brass. I'll post a picture of my tools and another ongoing brass project later this week. As future, long term project, I am planning to built copper & brass tank cars (thin gauge 34.5mm copper pipes detailed with brass parts), but that's another story; so many projects, so little time. Stephane |
|
pacbelt
Chairman
Building Layout #11!! ;)
Posts: 682 
|
Post by pacbelt on Oct 14, 2015 11:40:32 GMT -5
Modeling with brass is indeed a lost ART! You do seem to have a lot of skill. I appreciate your thoughts on plastic. The details we have now, are just short of incredible. - but also very fragile. Your Geep is coming along nicely, and I will be following with great interest!!  Carmine |
|
|
|
Post by ironstef70 on Oct 15, 2015 20:27:27 GMT -5
Looking good Stephane! I admire the brass work you're doing. I always dread scratching using brass because I find it very difficult to cut and work with. I must be doing something wrong or not have the right tools. If you can, would you show or list the types of tools you use and maybe drop a few helpful hints to working with brass? I look forward to seeing more progress! Here are some pictures of my favorite weapons, but let me introduce the war room first: 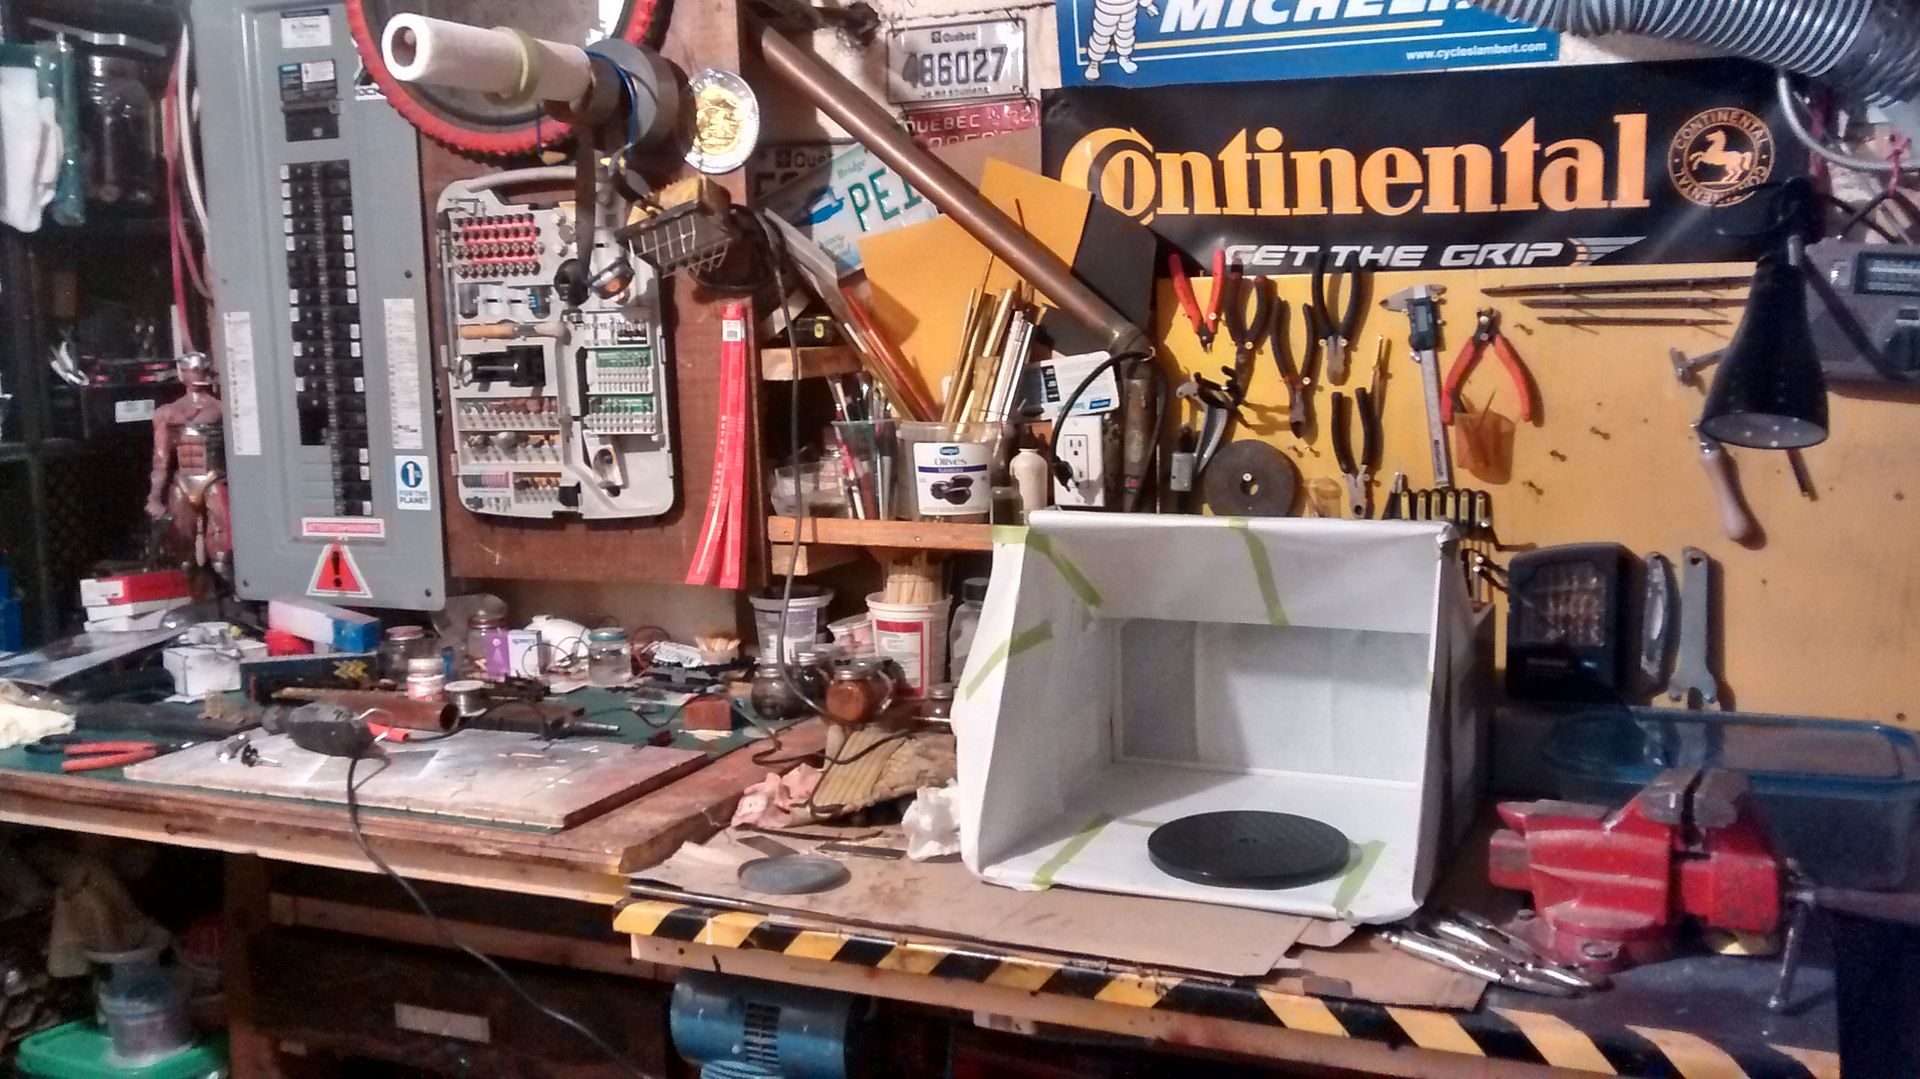 It's tight, but everything is handy and I am close to a window for the paint booth exhaust. 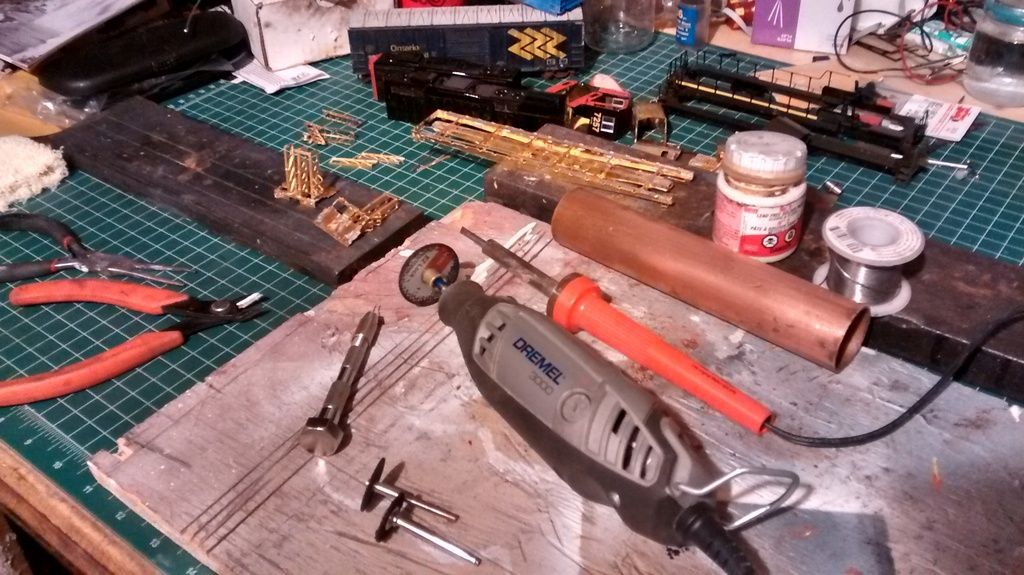 Here are the Dremel 3000 (cord, but variable speed; a must) , and a few more of my favorite instruments. The copper pipe section is a future 33000 gals tank car. Speaking of brass , the dismantled bulkhead flat car car above is the one pictured below in it's boxed state. I was not satisfied with the wood imitation with textured brass plates. In a way to remove the three textured plates, I had to put them under severe heat treatment and the pillars could not hold, which I anticipated. I have already soldered everything together, and the next step will be a airbrush layer of a faded yellow paint, and customizing the decals. I may also scratchbuilt the metal cage so it looks as this one: 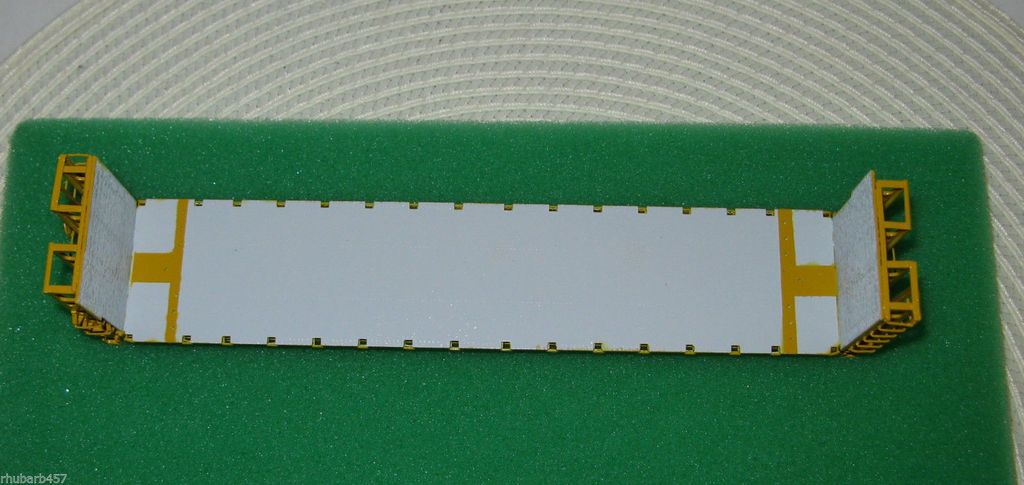 I then machined the bottom plate so I can replace the "false" brass-wooden sections by real wood that I will shape out of coffee sticks, so it can finally looks as it's prototype. The project is ongoing as I was waiting for parts for the GP9rms, but I wish it looks as close as can be to this: 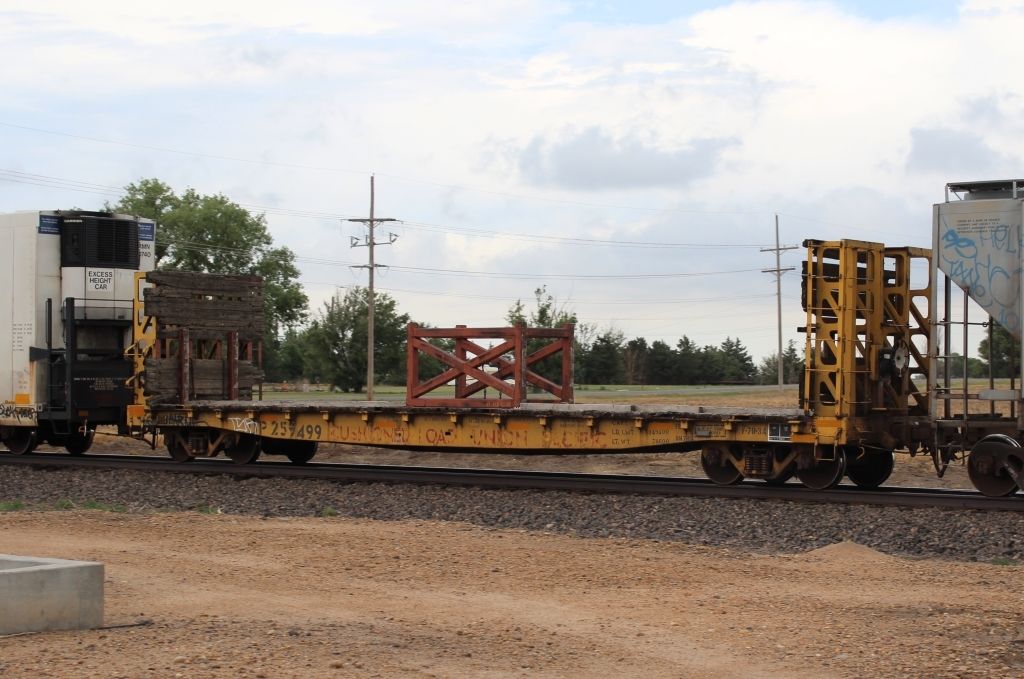 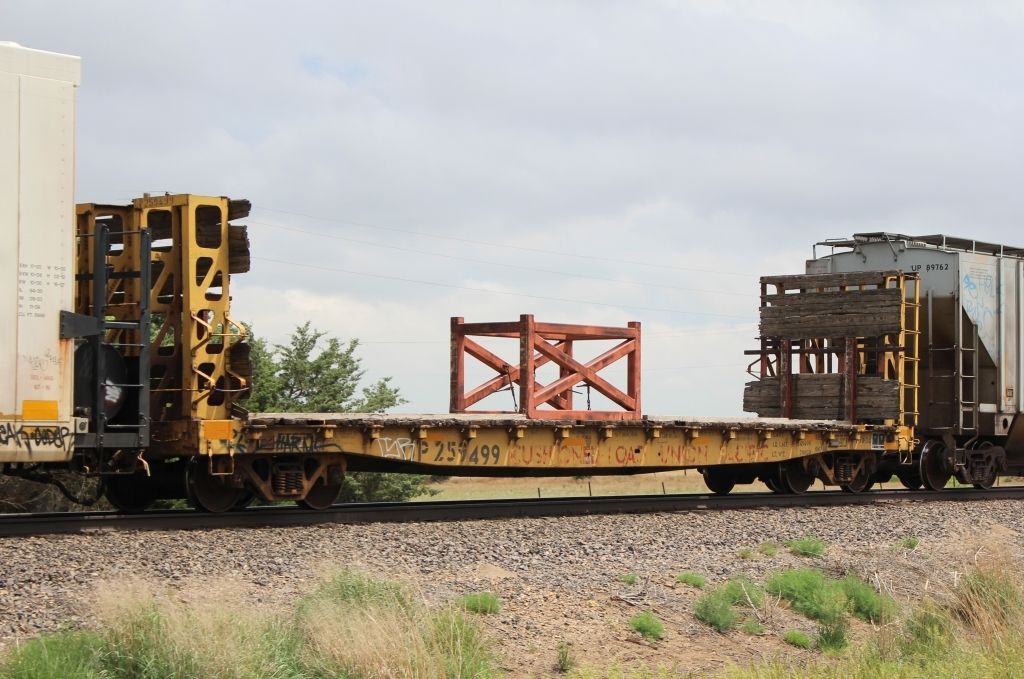 And here are more tools, organized in a way that I can have easy access. 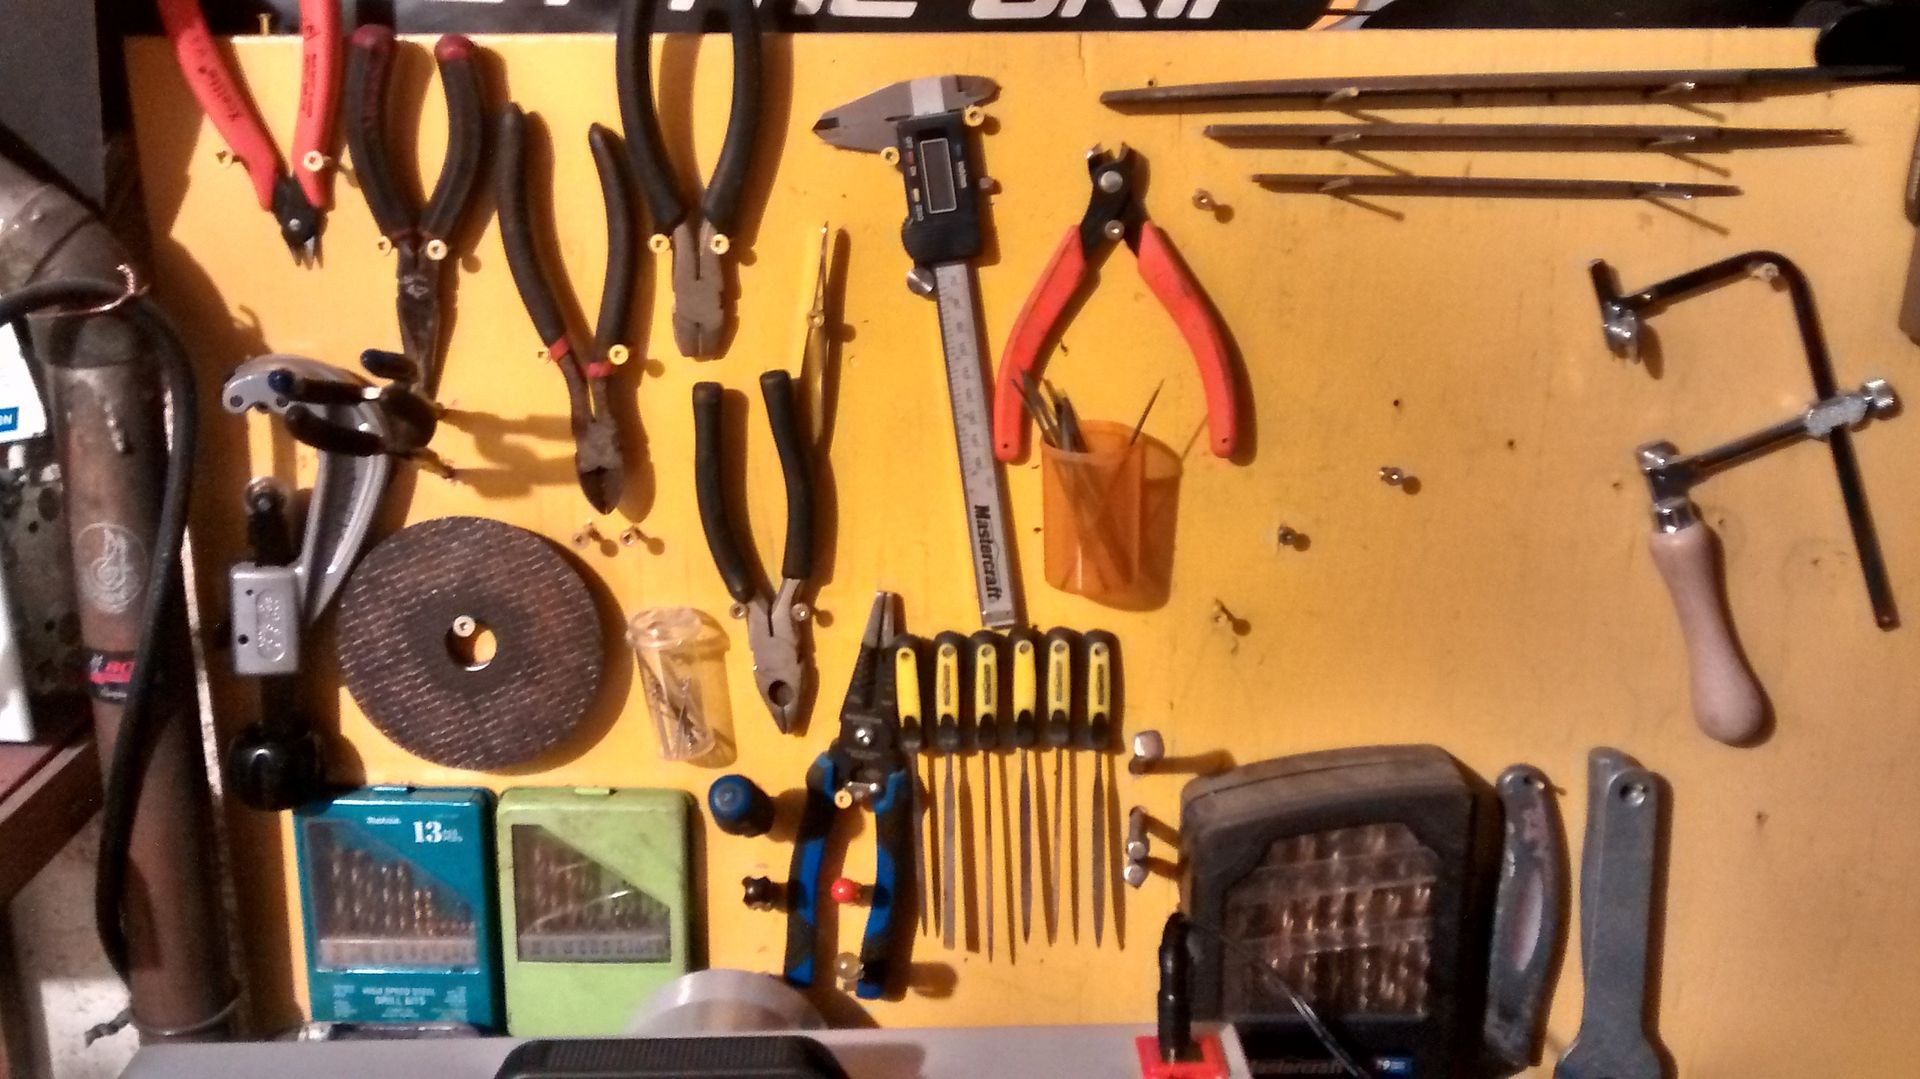 Cheers! Stephane |
|
|
|
Post by analogbeatmaker on Oct 15, 2015 21:19:20 GMT -5
Thanks for posting those pics Stephane. That flat is gonna be a beast! I always wondered why a manufacturer of brass trains would use brass to replicate wood? Brass manufacturers seem to be going for high fidelity replicas so it would make sense to use real wood where needed...plastic manufacturers do it like Exactrail. Anyway, I look forward to seeing that flat completed!  |
|
|
|
Post by ironstef70 on Oct 16, 2015 20:09:10 GMT -5
Sure, the brass car may be finished before the GP9s depending on how things go, and when I get the airbrush started (wife must not be home). Still, I finished to put that flat car back together (showing with a few wooded sticks) and also completed the trickiest soldering part of the GP9rm s: the cabs. I also machined the fans so they get replaced by those fine Cannon ones which are really worth the replacement: 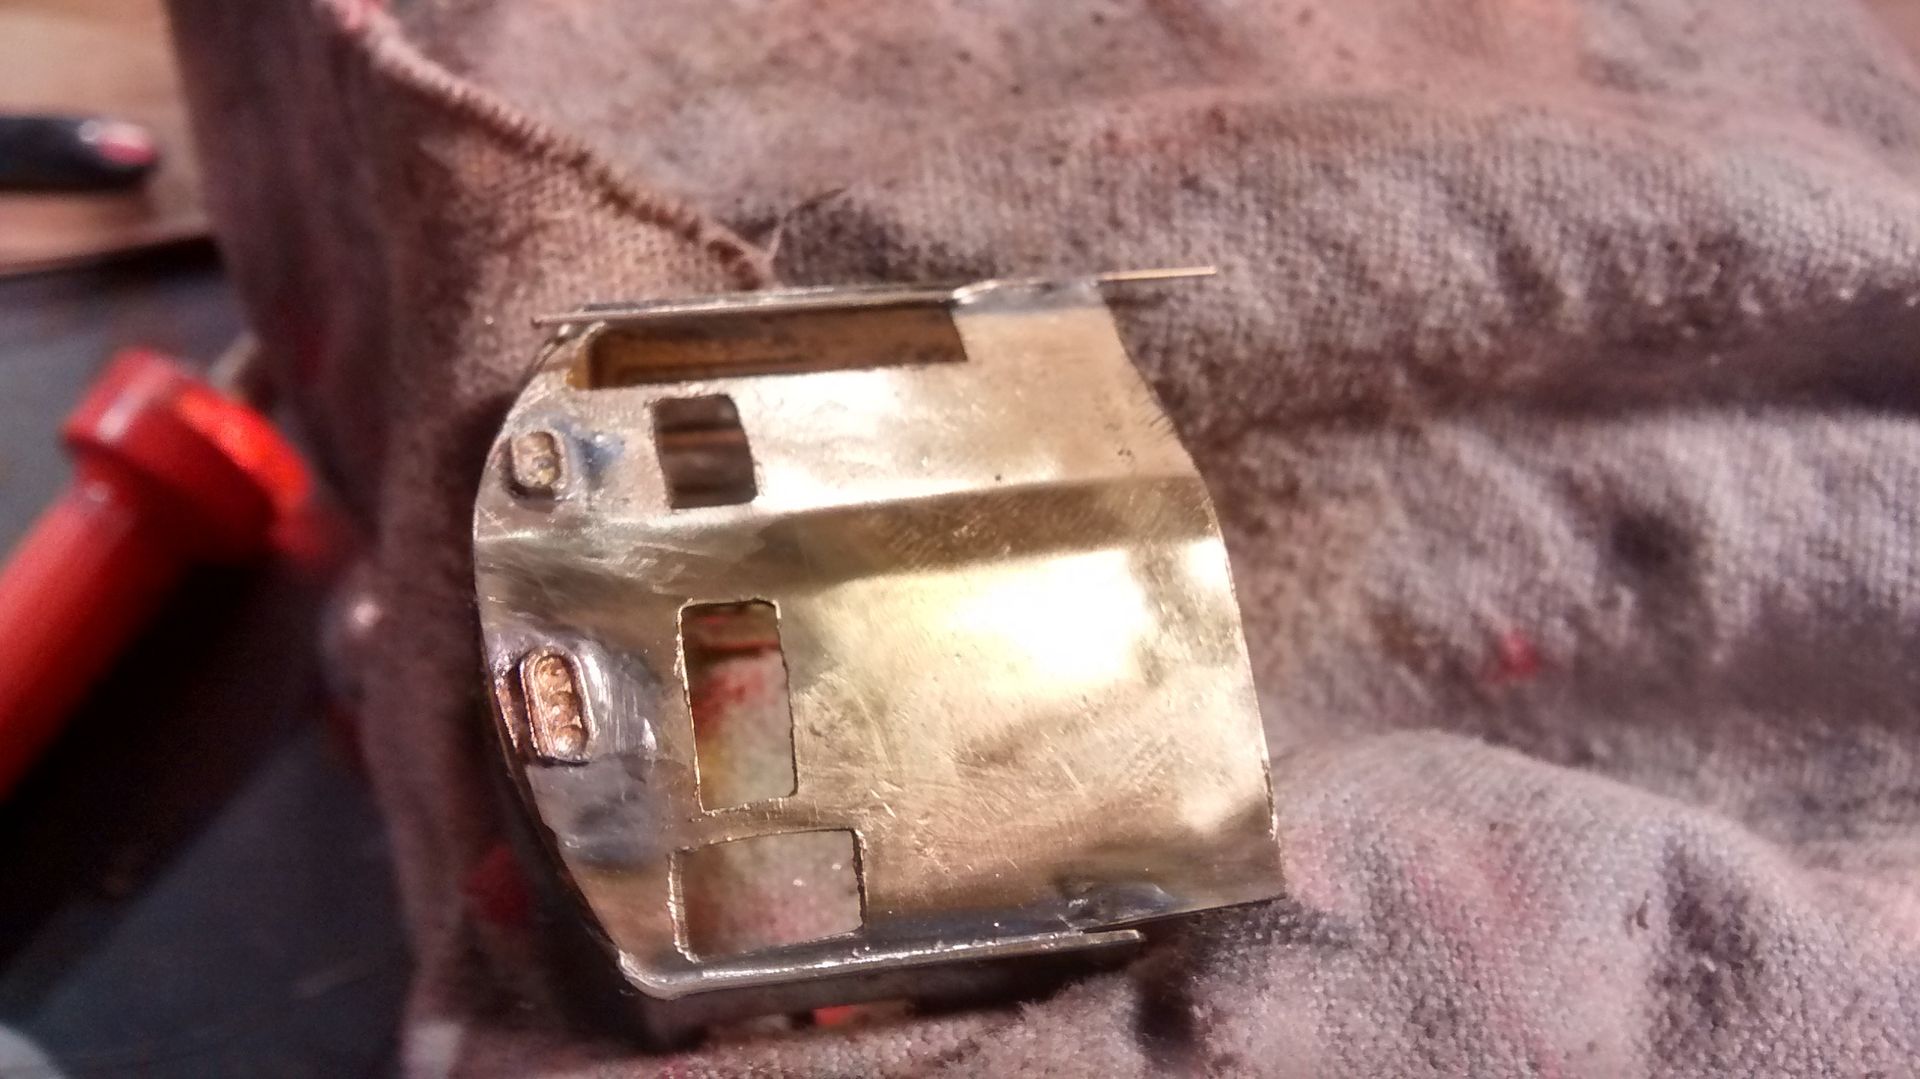 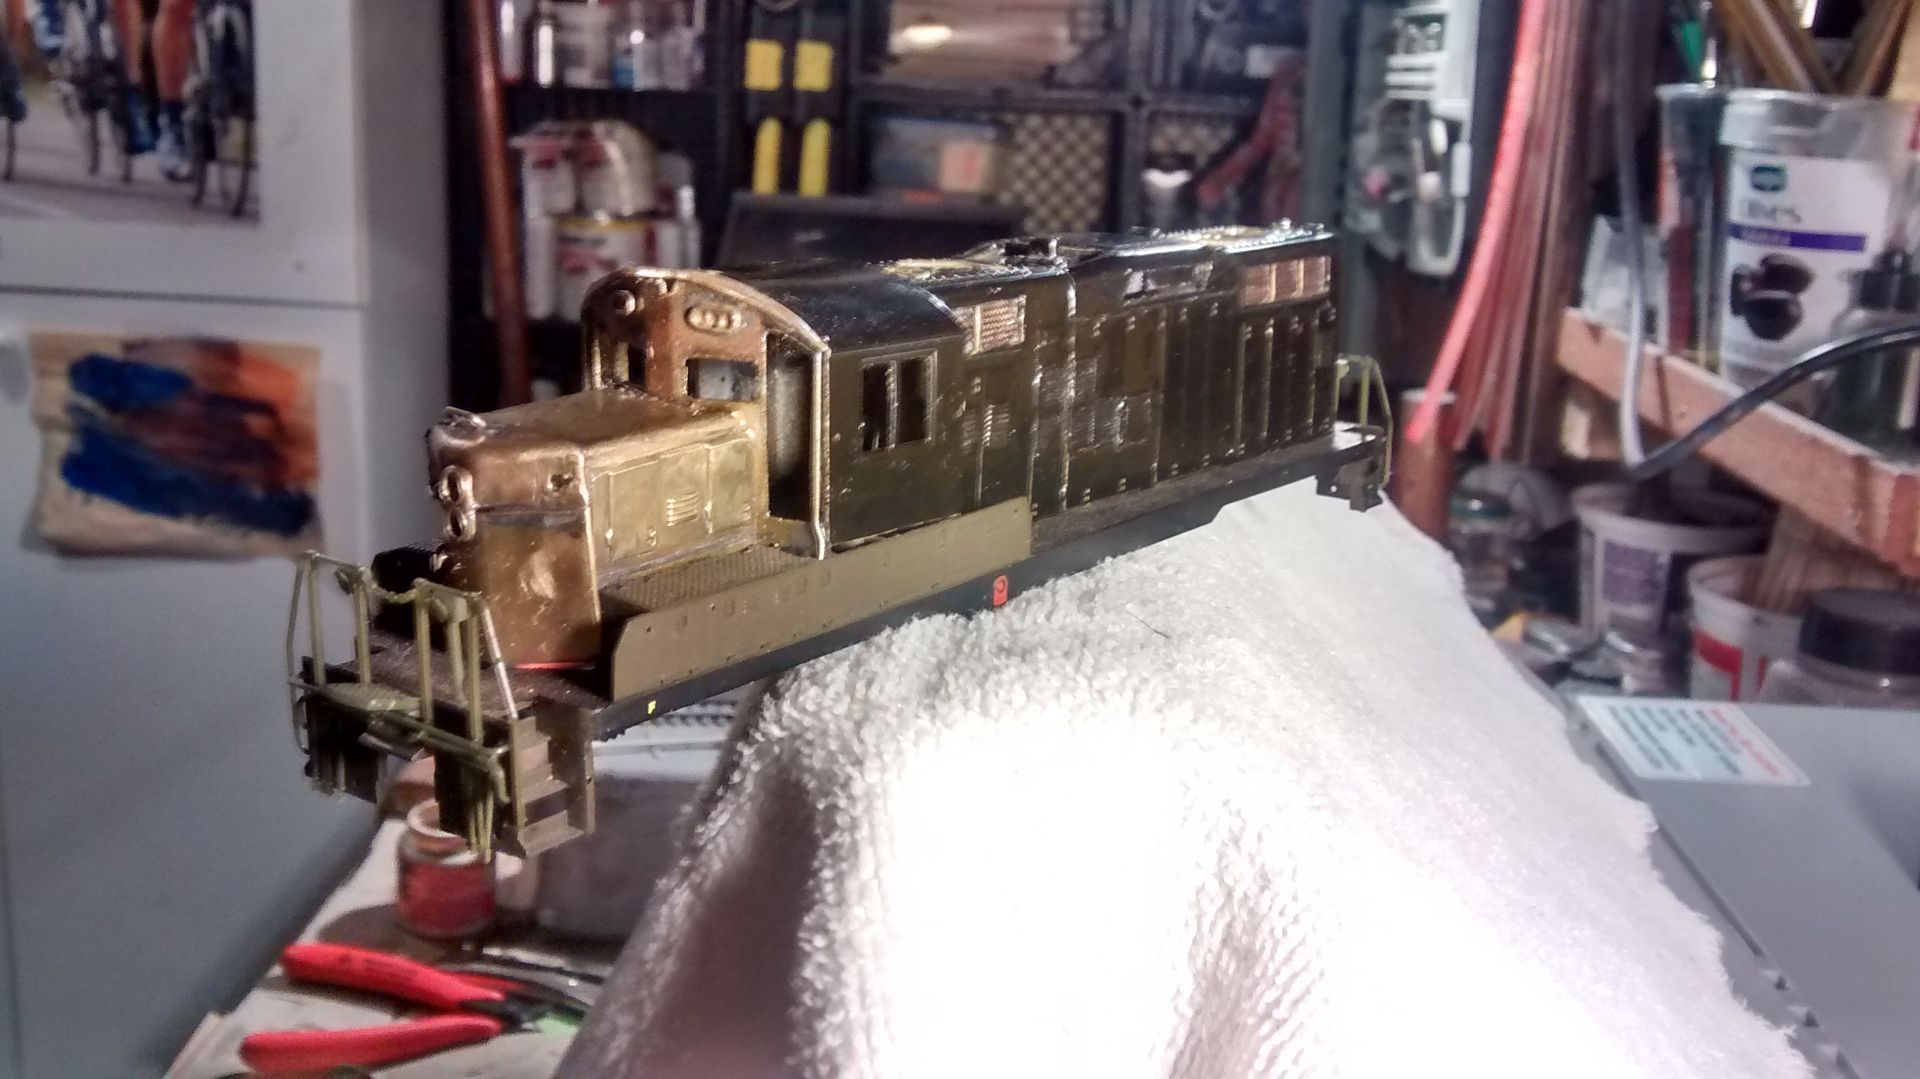 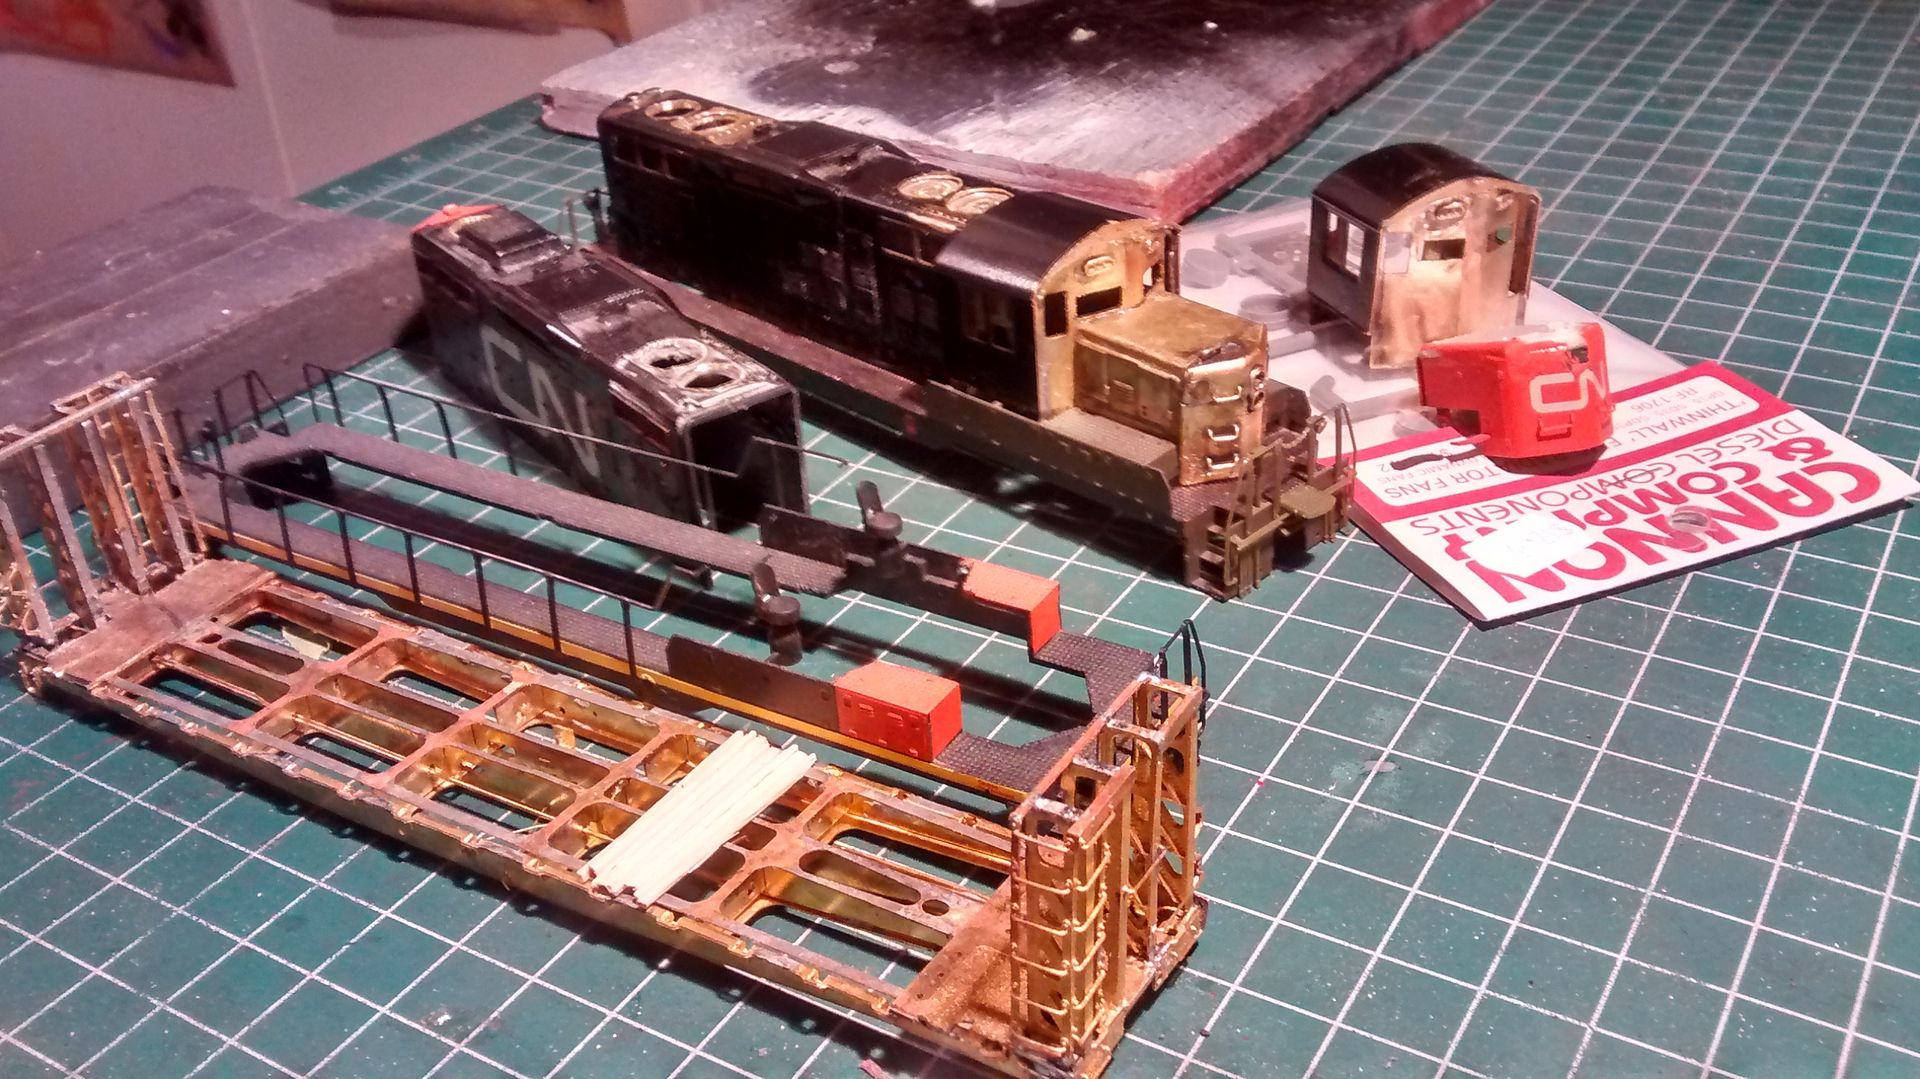 Now, since the brass GP9 is almost full brass (except the dynamic brakes and the upcoming fans), I thought about machining the walkways in brass or steel rather than using the Proto2000 plastic board as shown. No wonder why my projects are taking so long. I just can't stop making improvements. I usually never have a plan from the start: I go by the best options I can find (or do) and just keep going! But I can stay awake at night just thinking about ways to solve an issue or figuring out what's to come. Stephane |
|
|
|
Post by ironstef70 on Nov 2, 2015 5:00:57 GMT -5
I finally went for the full brass option for the two GP9 RMs. SO I am building the walkways and frames, and waiting for a second Tenshodo brass shell. The pilots are die cast blocks, and I will detail the steps with some Plano parts. Lots of soldering here, but it's easier to work on fully brass components that projects that are half plastic/half brass. Soldering requires high temperatures that plastic dislikes. And unpainting gets tricky if you need to redo some painting issues. I will have to redo the paint on shell #1 since I have soldered the bottob of it to the floor. Also in the meantime I am still finding relevant parts like this brass winterizarion hatch:  In the meantime, here is how the UP flat car came out:    Stephane |
|
pacbelt
Chairman
Building Layout #11!! ;)
Posts: 682
|
Post by pacbelt on Nov 2, 2015 6:02:27 GMT -5
WOW - is all I can say at this point!!
This is enjoyable to watch.
~ Carmine
|
|
|
|
Post by ironstef70 on Nov 2, 2015 7:46:45 GMT -5
Thanks Carmine. By the way, the Ajin SD60 NS behind is DCC no sound, but I intend to try one of the two TCS decoders I recently purchased from your advice in it. I'll let you know once I completed a test run in the nastiest known areas of our layout ....  Just another project again (just like the Dash8-40CW shell behind; a future CN blue devil as shown in my profile picture, which I just totally lubrificated the casings and redesigned the driving shafts with stronger axels)... slowing down this major one. Oh still, I have to wait for parts anyways. I really want these GP9s be my favorites once completed, and the brass option just felt like the best way to me. Go big or go home as they say... S. |
|
pacbelt
Chairman
Building Layout #11!! ;)
Posts: 682
|
Post by pacbelt on Nov 2, 2015 9:01:49 GMT -5
Well Sir, you're certainly going big!
I think you will become a fan of Keep-Alive decoders, especially with "trouble spots"...
~ Carmine
|
|
|
|
Post by analogbeatmaker on Nov 2, 2015 21:55:57 GMT -5
Stephane...that flat came out KILLER!! I would love to see if flicked under some natural sunlight. Awesome work!  |
|
|
|
Post by ironstef70 on Nov 4, 2015 18:40:05 GMT -5
Indeed it is certainly in the plans. There's just nothing as a sunny day's light to enhance all those long hours worth of details and weathering artwork.
I do have a couple weathering projects going on along with this one, including a nice brass centerbeam car. Once I have half a dozen cars ready, it'll be time for an outdoors pictures session. I also must improve my mobile diorama a bit. The better we get, then comes another weakest link to be improved.
Still, I am not planning to invest on a high end camera. I'd rather be spending the big bucks on a nice brass diesel, isn't it?
Thanks for your interest and the kind words. I can't wait to put that decoder in the GP60, then take my young son at the club's layout so we can have it for a test ride.
Stephane
|
|
|
|
Post by ironstef70 on Dec 9, 2015 16:13:15 GMT -5
Stephane...that flat came out KILLER!! I would love to see if flicked under some natural sunlight. Awesome work! Since you were asking : tws-rustbucket.com/thread/8019/259-499-bulkhead-flat-carNow I will resume with those GP9 soon. I had issues with a Tenshodo GP9 purchsed on Ebay that never showed up. Then I recently found a GP18 which will be the donator for the second brass shell. I am expecting it home by the end of this week. Still, next step will be adding the cannon fans to both shells and do the same kitbash work on that second GP18 shell. In the meantime, I've been doing CN IC 2465 (just like my avatar, that I will update with outdoor picture of this one eventually) from a Overland Dash-8 40CW I had in bare brass for two years. I had to add minor details, insulate the motor, wire the decoder and lights, then paint and add decals. I also opened all transfer cases and greased, secured some pickup wires and straightened the shafts for a smoohter ride. Oh, of couse, I added a custom double speaker box and used a Tsunami decoder (with the "keep alive" transistor) for that specific engine. Preliminary test run was great: that thing sounds like thunder! It's at the weathering stage now. I will post pictures soon in another post. Stephane |
|
pacbelt
Chairman
Building Layout #11!! ;)
Posts: 682
|
Post by pacbelt on Dec 10, 2015 12:10:34 GMT -5
Looking forward to that build, Stef! It should be just as impressive. Hey, I've been making progress myself...  ~ Carmine |
|
|
|
Post by ironstef70 on Mar 8, 2016 20:38:25 GMT -5
Here are videos of CN IC 2465, a custom brass modified and repainted Overland Dash 8-40CW. Tsunami sound. I will post pictures of the GP9 project soon... CN IC 2465CN IC OverlandSorry for the shaky streaming and back vocals. Club videos  Stephane |
|
|
|
Post by ironstef70 on Mar 8, 2016 20:46:50 GMT -5
These GP9 will be progressing along with two more projects: CP GP38 (ex GP40x)#4524, and Ontario Northland SD40-2 #1733, from which I will be trading parts or using similar components in the making.
I will upload pictures soon.
|
|
|
|
Post by ironstef70 on Mar 17, 2016 18:35:30 GMT -5
Here are the few next projects which I will be doing together. 1) CN 7229 & 7233 (GP9 RM): Tenshodo or KMT brass shells with Ptoto2000 drivetrains + Tsunami sound. 2) CP 4524 (GP38, exGP40x): Athearn Genesis GP38-2 with Overland Ajin brass shell 3) Ontario Northland 1733 (SD40-2): Athearn Blue Box and Alco Models brass shell, TCS 100 Wowsound decoder (now my favorite decoders!). All of the above will, of course, be severely detailed with OMI, Cannon, Detail West, or Miniatures from Eric parts. I will finally custom paint them with oil paint (all custom color mix). Progress might be slow due to high workload, and also doing layout work, depending of my moods. Still, here are the prototypes:   And here are the projects. I removed the cheap fans (maybe should I keep them as sleeve buttons ) and will swap parts during progress.   Stephane |
|
|
|
Post by Randy Earle on Mar 18, 2016 2:26:27 GMT -5
I haven't had much experience with brass diesels, but I have painted a lot of brass steam locomotives. I know you had to tinker a lot with the old drives to get them to run well. I worked on an Alco Models C-630 for over a week to get it to even go around a curve without binding.
|
|