|
|
Post by CP_8530 on Jan 29, 2015 2:35:29 GMT -5
Project CP minibox is a go: Built in 1929-early '30's featuring some improvements over the 1923 ARA boxcars, they were CP's first mass-produced all-steel boxcars in the fleet (they had a few other steel ones here n' there), totalling around 7500 cars. Built by 3 builders (Eastern Car, National Steel Car and Canadan Car and Foundry), they featured unique bolster sills, a 5' door and a much shorter height compared to later cars: only an 8'7" interior height 9'6" or something exterior height. Many lasted into the 70's in revenue service (used primarily for grain hauling in later years) and a few in the early 80's, with many converted to MofW/OCS cars by then, lasting in that capacity into the 90's. Prototype pix:As built:freight.railfan.ca/cgi-bin/image.pl?i=cp240586&o=cprailfreight.railfan.ca/cgi-bin/image.pl?i=cp243306&o=cprailfreight.railfan.ca/cgi-bin/image.pl?i=cp242857&o=cprailMany went into MofW service:freight.railfan.ca/cgi-bin/image.pl?i=cp404380&o=cprailfreight.railfan.ca/cgi-bin/image.pl?i=cp404352&o=cprailfreight.railfan.ca/cgi-bin/image.pl?i=cp401353detail&o=cprail (**lumber door end, only present on some cars) Some became icicle breaker cars:freight.railfan.ca/cgi-bin/image.pl?i=cp404544&o=cprailThe only two offerings for these cars I'm aware of are the Funaro and Carmelengo flat resin kit, and the True Line Trains RTR car, both of which are kind of pricy. I was buying something off eBay from someone, and saw they had a CP minibox with AB brakes for sale unassembled NIB, so went ahead and scooped it for $14. Compare that with a new TLT one for $44. The kit comes with all the required body parts (including the optional lumber door end), a full set of decals for the earlier "Spans the World" scheme, Tichy ladders and brake gear, bent brass grabs, and some wire for the brake lines. I threw in some spare Proto 2000 trucks and Kadee coupler boxes, tapped everything for 2-56 screws, and put the box away to assemble at a later date. ...until now*. (*Now meaning recently) 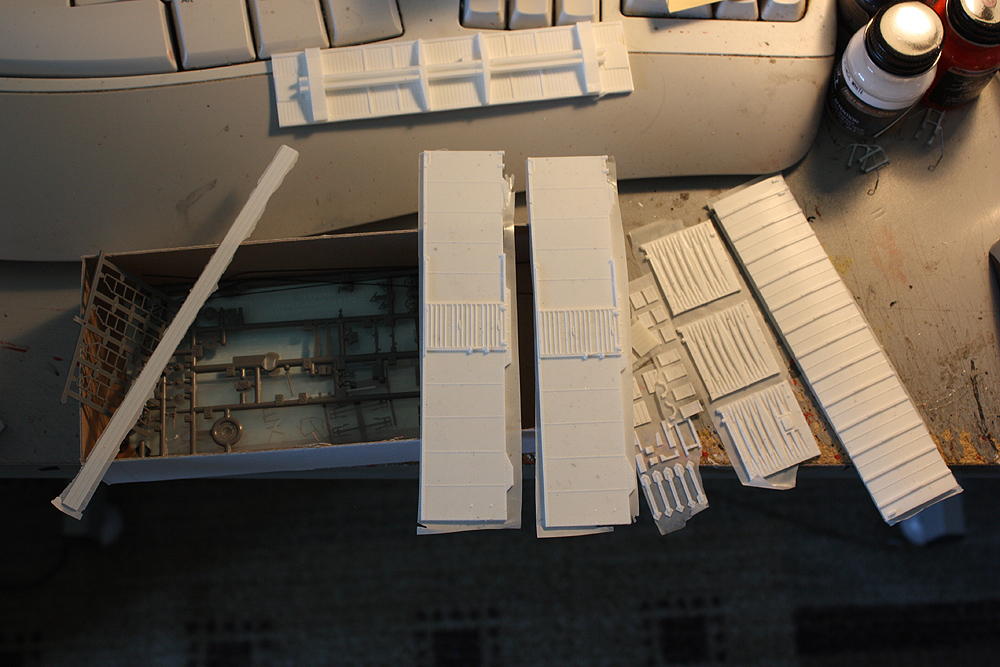 I followed the instruction in the kit for flash cleanup, it wasn't too bad and there was minimal resin warpage or other issues, just a small hole that needed filling on a body panel and some filing to square off some parts for assembly. I used the Sylvan resin prep (Zep cleaner) to wash off all the parts. I decided to make this one into a standard non-lumber door boxcar, in the "stacked lettering" circa 1954 scheme but with lowered tack boards circa 1960's-1970's, and set about digging up some data and photos. There were two slightly different bolster side designs I noticed on the prototypes: one that was slightly tapered (NSC built cars) than the others (CC&F and ECC) that had straight angles. The F&C car is the more tapered one. A specimen to my liking was found (CP 245959): www.flickr.com/photos/37908073@N04/3757463881 |
|
|
|
Post by iomalley on Jan 29, 2015 8:53:54 GMT -5
Bravo Dan! Keep the building alive! I just bought a F&C plug door 8 hatch reefer on Sunday, mostly because it too was only $15 and had NSC1 ends, compared to TLTs NSC2 plug vers. One of the problems with the TLT cars is that they moulded the tack board right where the CN noodle goes, so building a complex kit to match your prototype is sometimes the EASIER route.  |
|
|
|
Post by CP_8530 on Jan 29, 2015 10:39:37 GMT -5
Urge to build rising, I need to post my other boxcar projects sometime. Anyway, the body was built following the instructions using CA glue. I lightly roughened up most of the mounting surfaces to get stronger glue joints. Frequent checking with a square was needed to ensure everything lined up properly and was nice and square. Some interior bracing made up of various styrene pieces was CA'ed in place. 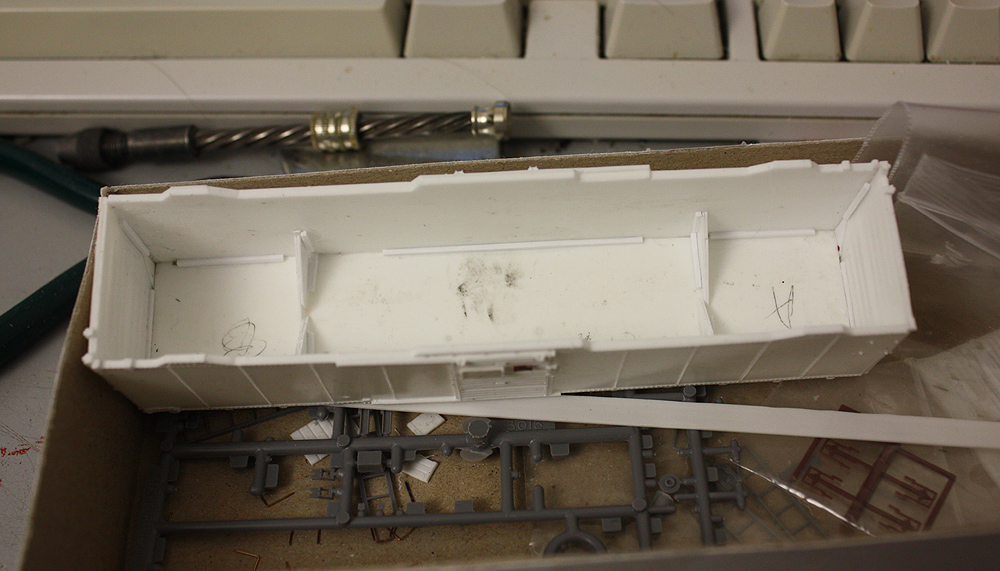 The underframe was built up next. Other than a minibox underframe drawing, the instructions, diagrams and parts included are a bit vague when it comes to a few things underneath, including the triple valve and air reservoir mounts which I had to wing from photos using styrene. The holes were drilled and piping and rigging was installed according to the underframe diagram, using the supplied wire and Tichy brake rigging. I had to drill a few tricky horizontal holes to run the piping through the frame. 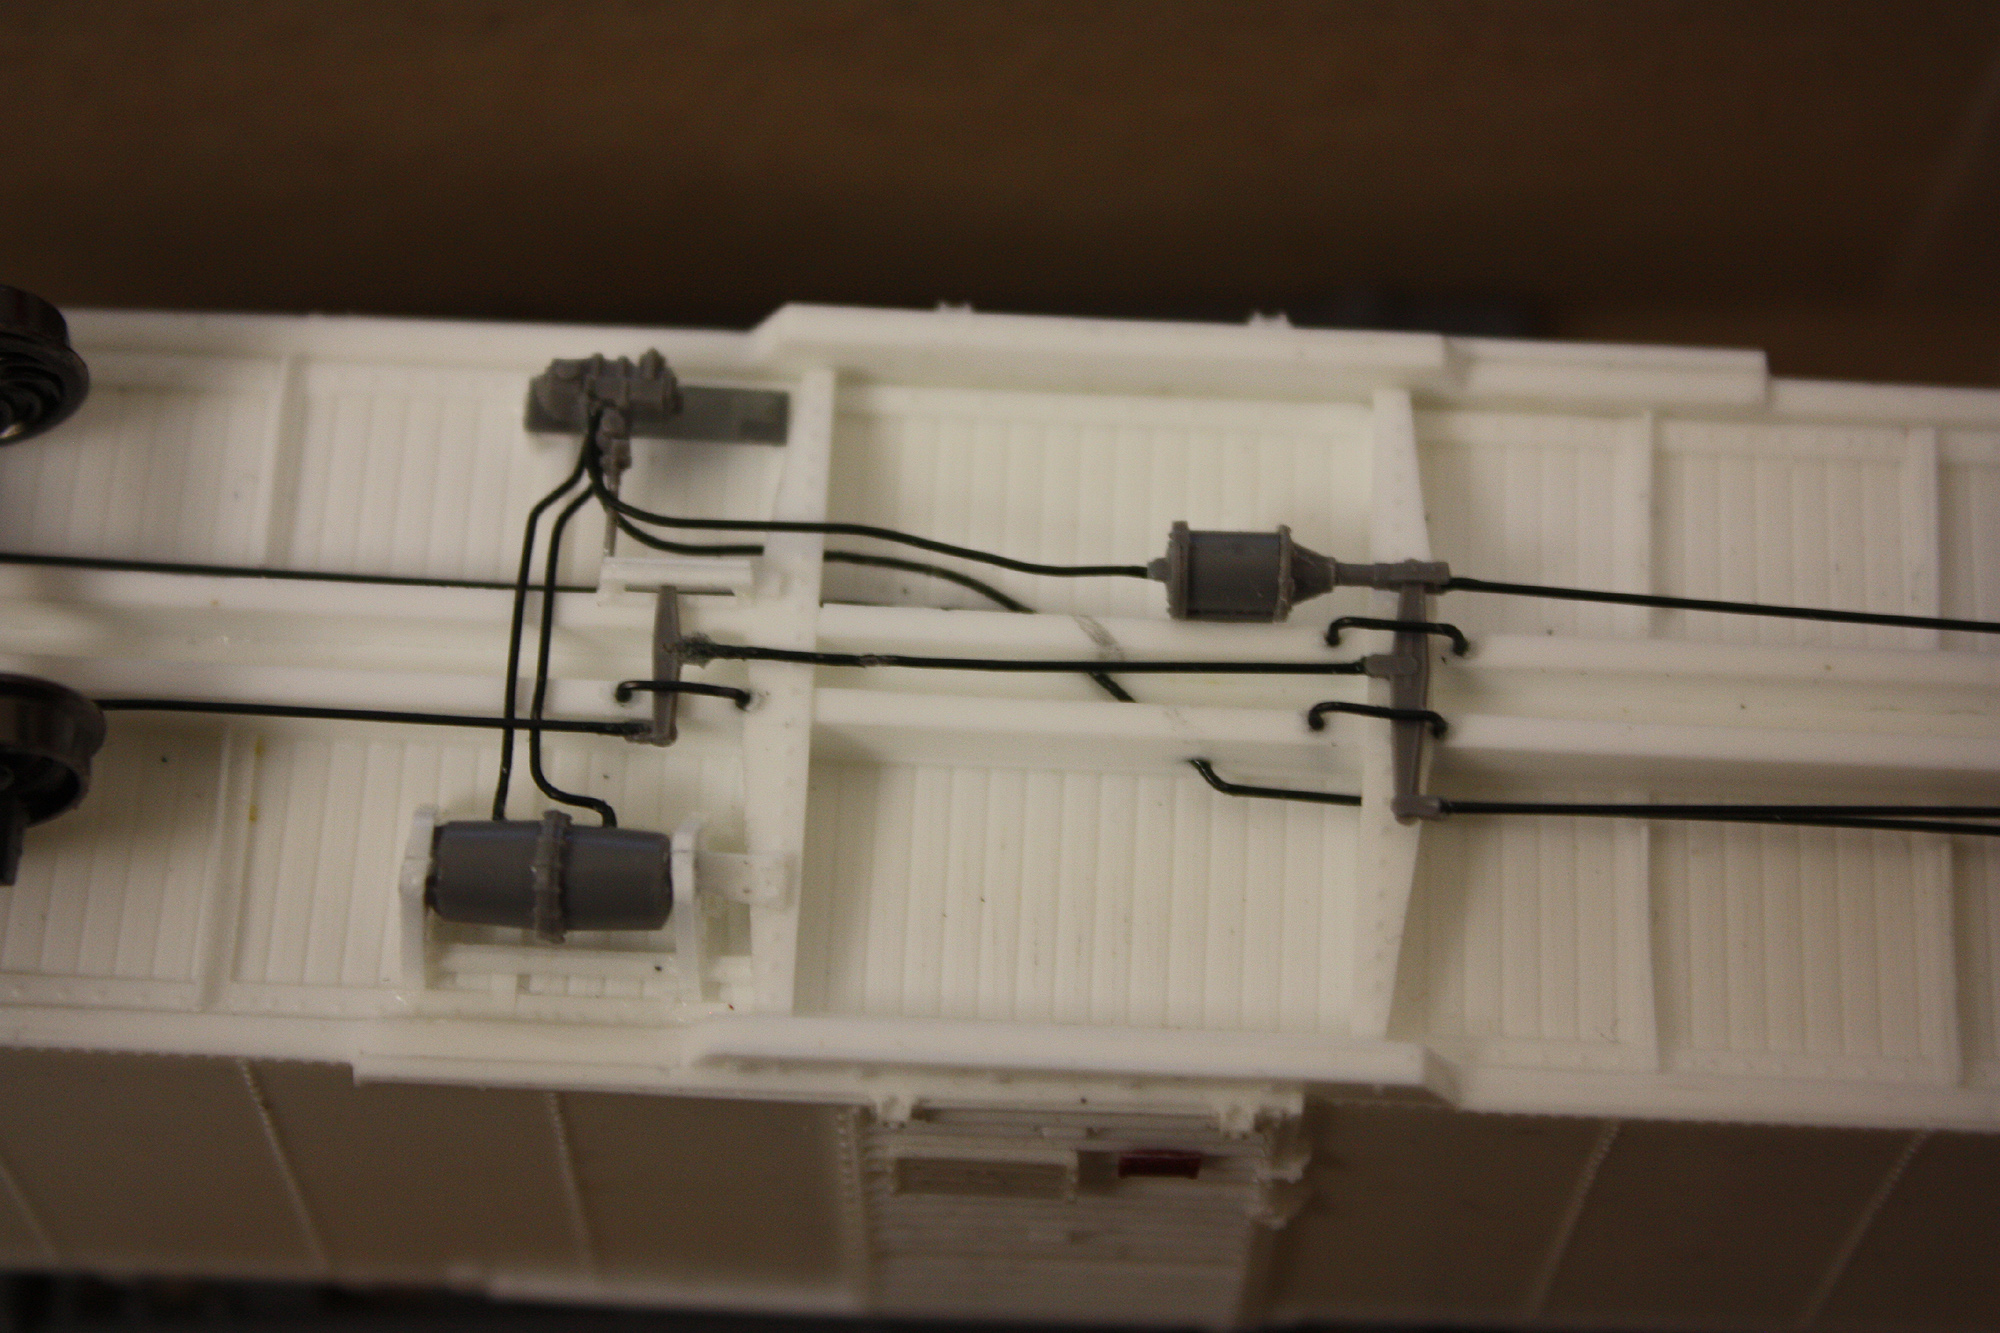 There's a metal coupler shortage on this railway, and the shop foreman came during the night and stole the two Kadee 58's that were set aside here for another car, so some cheap McHenrys were sub'ed. Again, everything was 2-56'ed and Kadee coupler boxes and P2K trucks installed. 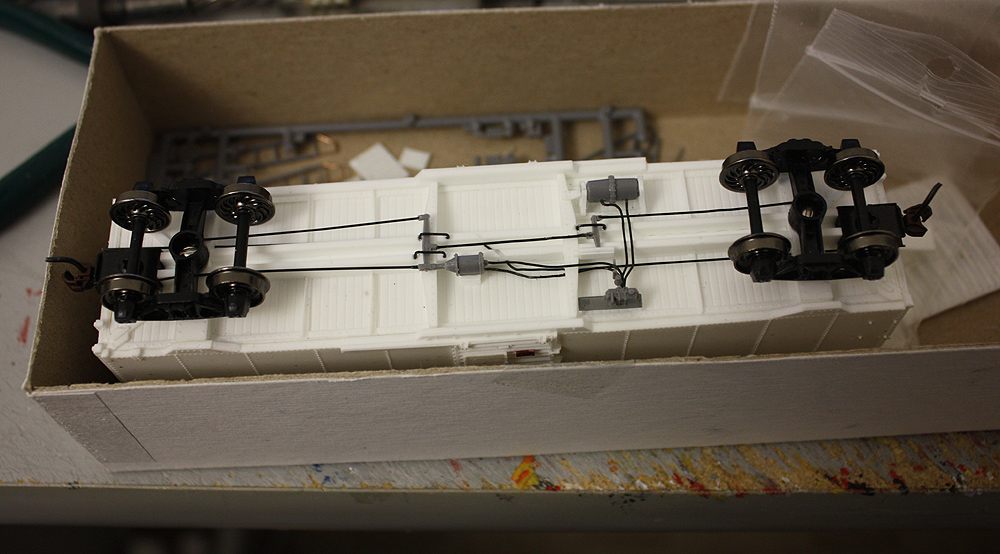 And here we have the shell built up on the frame. I filed the tack boards thinner and glued them into the lower positions according to photos, and used some of the smaller tack boards from a Branchline kit as well. Also done was shaving off all the smaller middle ribs on the roof, those were thin and very nearly invisible on the prototype, as opposed to being noticeable ribs on the kit and TLT models. Now is a good time to drill all the grab holes out too... 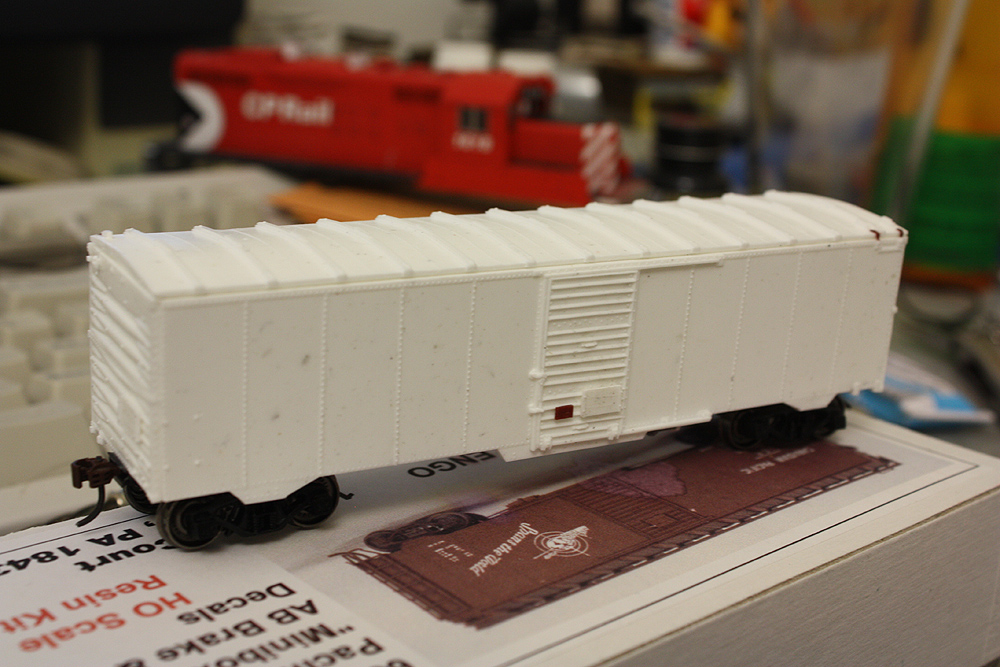 |
|
|
|
Post by icghogger on Jan 29, 2015 11:26:39 GMT -5
Looking Good, Dan, Looking Real Good!!
|
|
|
|
Post by sbhunterca on Jan 29, 2015 13:26:42 GMT -5
Heck, Dan, you've gone and done it now.
It looks like I'll have to build the kit I've had sitting on my shelf for forever. I was blissfully ignoring it, as I gazed at my TLT cars, but now you're shaming me into building it...
Nice looking car!
:-)
Steve Hunter
|
|
|
|
Post by enginseer on Jan 29, 2015 17:29:53 GMT -5
Really nice work!
Is the kit that nice or are you skipping some prep shots.
No warpage of any kind?
Every resin kit I build has issues. Some of them severe.
|
|
|
|
Post by iomalley on Jan 29, 2015 17:39:41 GMT -5
Holy crap! You don't waste any time do you Dan!
|
|
|
|
Post by CP_8530 on Jan 29, 2015 20:09:20 GMT -5
Holy crap! You don't waste any time do you Dan! Like I said, it was sitting in the box since I got it back in June until I recently pulled it out sometime in November to build.  Then it sat to the side a bit longer when I had to paint something else not posted yet for someone, then back out it came for more work! Really nice work! Is the kit that nice or are you skipping some prep shots. No warpage of any kind? Every resin kit I build has issues. Some of them severe. I think one of the sides was a bit bowed, but I ran it under hot water and carefully straightened it out. Roof might have had a very slight bow at the ends, but, also straightened that out. Nothing serious, and the casting detail is pretty nice (specifically looking at the cast-on doors). |
|
|
|
Post by CP_8530 on Jan 30, 2015 9:44:19 GMT -5
Time to add some detailed parts! The holes were all drilled with a #80 or $79 bit (The pre-bend gravs with the kit were all around 0.010" brass wire) and grabs added. I had to move some of the rivets and rebend the wire to make the side grabs wider because I thought they looked a bit small. #72 holes were drilled for the Tichy stirrup steps at those ends. The top grab on each end was added later on by CP, and on that one specific photo of my prototype it had one that wasn't exactly lined up with the other (inset from the end by an inch or two). No idea if it's like that on both sides, so I just moved the grab in on that one side (you can sorta pick it out in the photo below). The end ladders involved an interesting switch: the kit comes with the proper ladders with stirrup steps attached at the bottom, and they're typical 8-rug Canadian ladders. But, the miniboxes had earlier shorter 7-rug ones so you need to cut the kit's 8-rug ones down and use them. It seemed like a waste of good 8-rugs to me, so I put them aside for another project. I used a set of Tichy 7-rug ladders with the same identical rug spacing, and drilled holes into the bottom of the ladders to attach some brass 0.015" stirrups. I drilled some holes for the small lugs and glued the ladders in place, but you could probably skip that step, shave them off and glue. You can see it posed here, on a recently acquired 1974 CN Toronto area ETT in the classic pea soup green colour. Ohhh yeeeah: 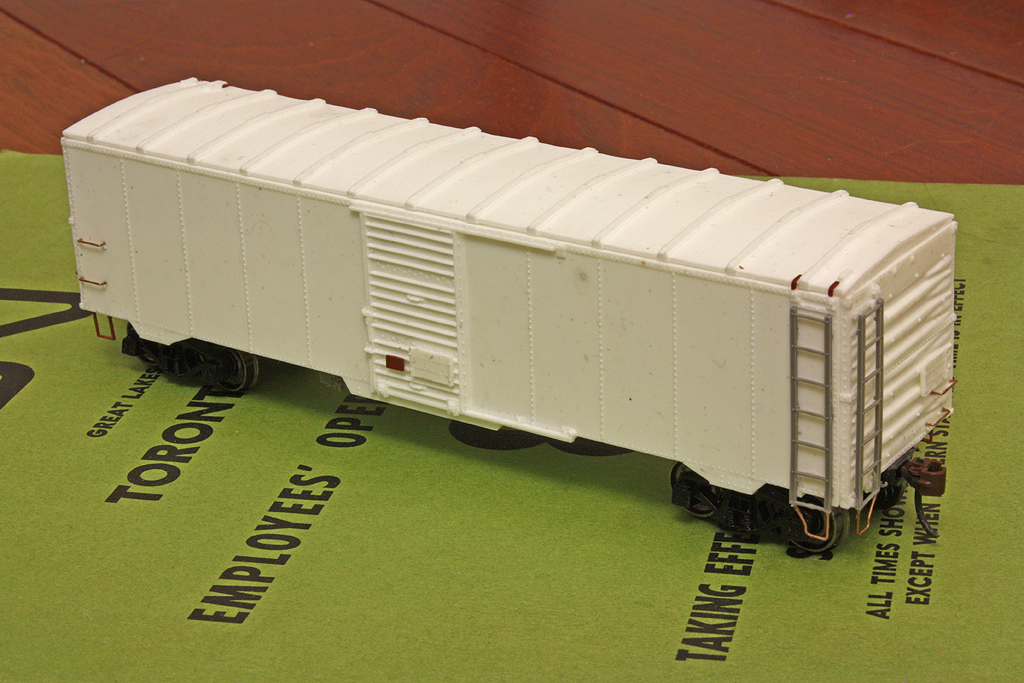 Next, roofwalks, end brake rigging and a few other miscellaneous things before painting. |
|
|
|
Post by iomalley on Jan 30, 2015 10:51:09 GMT -5
$79 bits! Yikes! |
|
|
|
Post by tjmfishing on Jan 30, 2015 16:55:54 GMT -5
Nice looking car Dan. Keep up the good work.
|
|
dekon
Staff Member
Posts: 634
|
Post by dekon on Jan 30, 2015 19:04:41 GMT -5
Great looking build!
|
|
|
|
Post by m a y o r 79 on Jan 30, 2015 21:19:51 GMT -5
Very nice. Where could these cars be found? You mentioned grain service in later years so Im guessing they mostly stayed in Canada?
|
|
|
|
Post by CP_8530 on Jan 31, 2015 9:07:46 GMT -5
Very nice. Where could these cars be found? You mentioned grain service in later years so Im guessing they mostly stayed in Canada? Yep. Mostly used in grains service in Canada, likely in the west-prairie region. There were probably some that got used in general freight and roamed though. In MofW/OCS service they could be found all across Canada, and even on CP operations in the US (Vermont, Maine). There's even one down there today: www.rrpicturearchives.net/rspicture.aspx?id=675387Update time:The minibox fleet was never repainted into action red (probably because of age) so very few got shopped and had their roofwalks removed (some MofW/OCS converts did though), so this car will have full end ladders on both ends and roofwalks. I cut the roofwalk strip to size and glued in on the roof with CA, roughening up the roof rib areas and roofwalk underside with a file beforehand. The end supports were scratchbuilt from styrene like the instructions recommend (but, backing them with a hidden upside-down U-shaped piece of brass wire for extra end support and durability). The roofwalk side walkway panels were drilled for the pre-bent wire and glued into place on the roof and onto the side of the main roofwalk according to photos. The Tichy brake rigging gear was assembled according to instructions and photos, and for the rigging down to the underbody 0.015" brass wire was used for the brake rigging. I drilled a hole into the body end right behind where the walkway would go and where the chain ended, and ran the wire into the hole so it would look like it was joined to the chain there yet hold up to handling. The bottom of the wire was carefully looped back into the bottom edge where the rigging on the underframe is. Add brakewheel walkway from Tichy parts. Some smaller 0.010" brass wire was used for that other air line thingy next to it (not sure of its name). I shaved the top valve thing off the body, drilled a hole through it, glued the wire in and glued it all back on, using another piece of wire to make a loop to join it to one of the ribs according to the instructions.  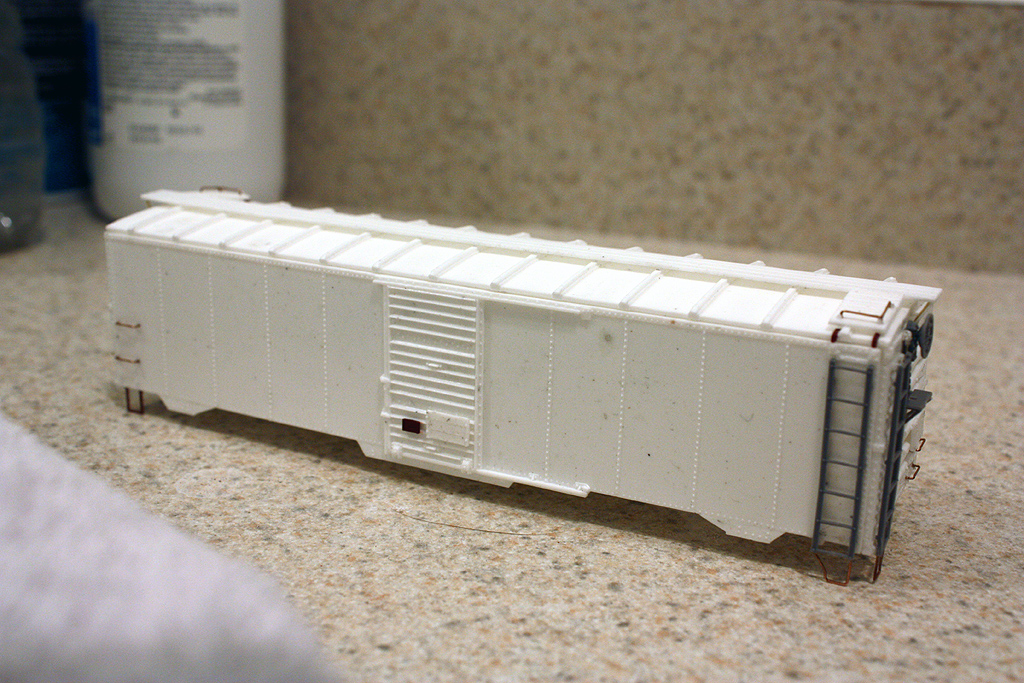 A quick cleaning, and it's about time to start painting the sucker. I had some Tamiya Fine Surface Primer in a rattlecan I bought for another (die cast metal) project and decided to give the minibox a quick coat of it. It gives quite a nice smooth finish. I went ahead and sanded and filled any remaining imperfections, as it's hard to spot some of the smaller ones on the kit's bright white resin. My only issue with it is the fumes from the stuff reeks, and you probably don't want to use it inside even with good ventilation. It dries up after a day or three. 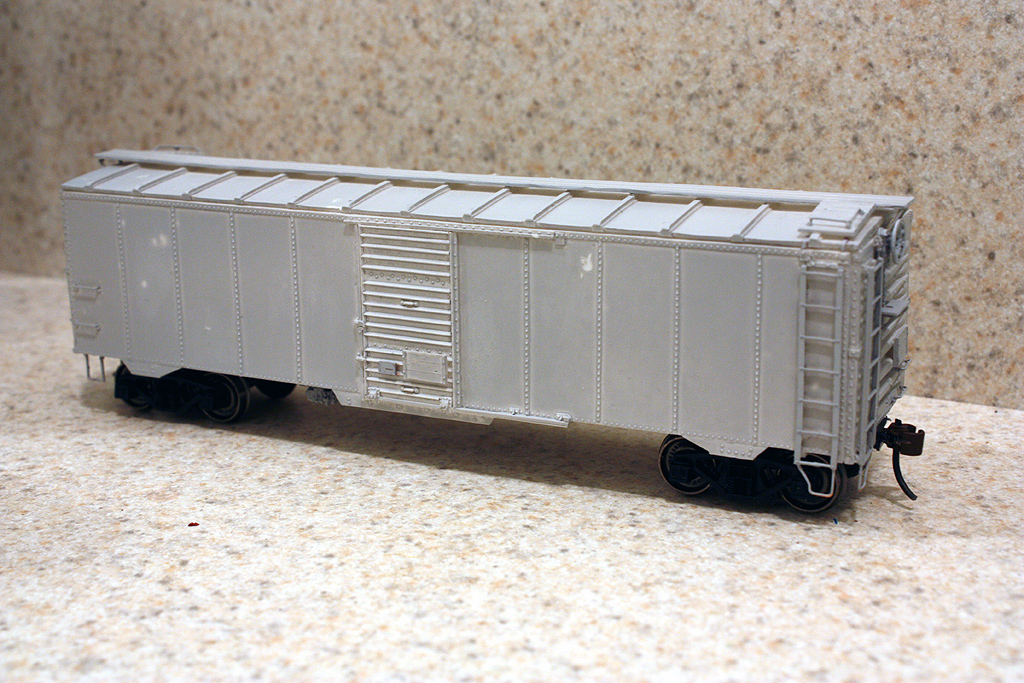 I tried TLT's Freight Car Red on another test subject and found it too red for my liking. Perfect for a just-repainted car fresh from the paint shop, but usually CP's 40' boxes in FCR tended to either get dark and dirty, or sometimes fade and lighten up. I just want a darker FCR, so time to mix a batch up! The lighting's not the best for this snapshot, but:  It's actually less red and a bit more brown in better lighting. The initial coat I gave it I had too much black in it so the car looked a bit too dark, so I mixed another batch of paint with less red for a bit more of a red look. |
|
|
|
Post by iomalley on Jan 31, 2015 10:26:48 GMT -5
Looks fantastic Dan! You HAVE to come to Humber this year! Somebody told me (can't remember who) to paint CN and CP 40 footers with black paint, and weather the brown on, then decal. The reversal of logic, haven't tried it, but would like to... |
|
|
|
Post by CP_8530 on Feb 7, 2015 23:06:58 GMT -5
One of these days I'll have to make it down there. Application of decals commenced. The set that comes with the model is doing the spartian delivery livery, and for the later early "Spans The World" livery. I wanted to do the 1954 stacked lettering livery, so kept most of the data from the F&C decal sheet but used the lettering from a Black Cat CP Autobox set. The F&C decals went on a bit more white than the BC ones, but good 'nuff. Also. the "Canadian Pacific Railway" decals were originally one big decal, but started to fall apart once they were sitting in the Microset (I'm guessing because of the thin film, or it was an old set), so I ended up positioning a lot of the lettering by letter or pair of letters. Some of the smaller data had to be applied according to "common placement" observations, as I don't have a really good photo of this particular car to work from. The ends were also done with Black Cat decals, including the draft gear inspection data (Angus Feb '67). I pulled the L & R on the sides by the doors from a BC CP MofW set. The trucks are Proto 2000's with the wheel faces and backs blackened with some flat black paint (according to some, this area liked to accumulate grease from the solid bearing journals, and road gunk). Some McHenrys or whatever they are are in place until the shop get some more Kadee 58's in stock. I salvaged the end air hoses from an IMRC tank car kit, cut them off at the angle cocks, drilled a hole and glued them onto the wire I had already installed for the air lines and brake gear. Weights were some Bachmann hopper weights I installed inside. Still debating gluing the car shut, or running a few longer screws through the coupler boxes and into styrene blocks on the ends. But for now, time to haul some grain! A-end, note the height difference compared to some other standard and extended height boxcars: 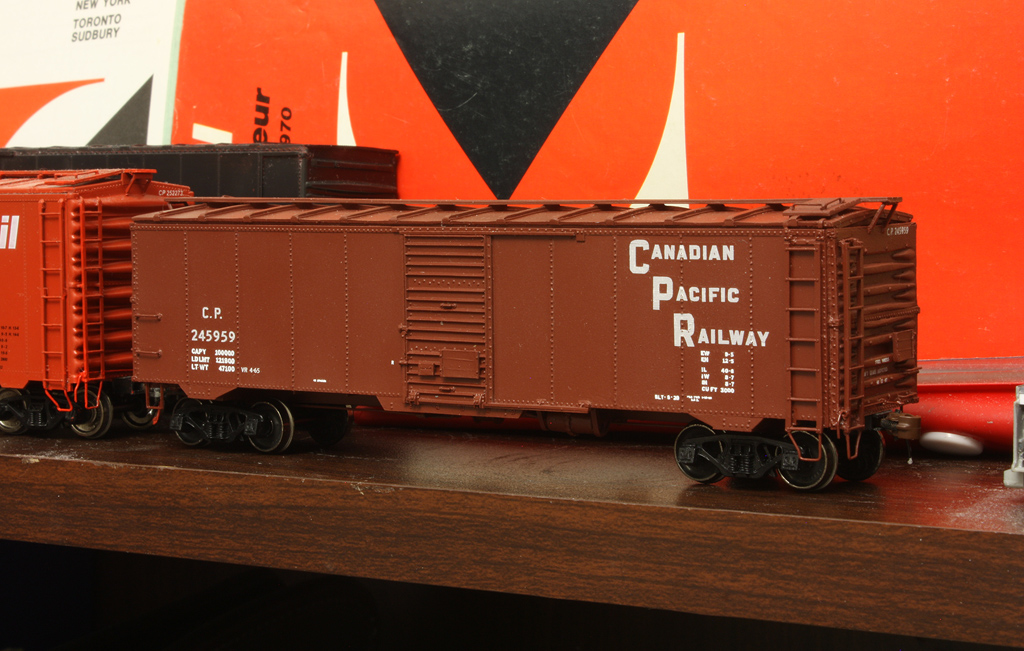 B-end: 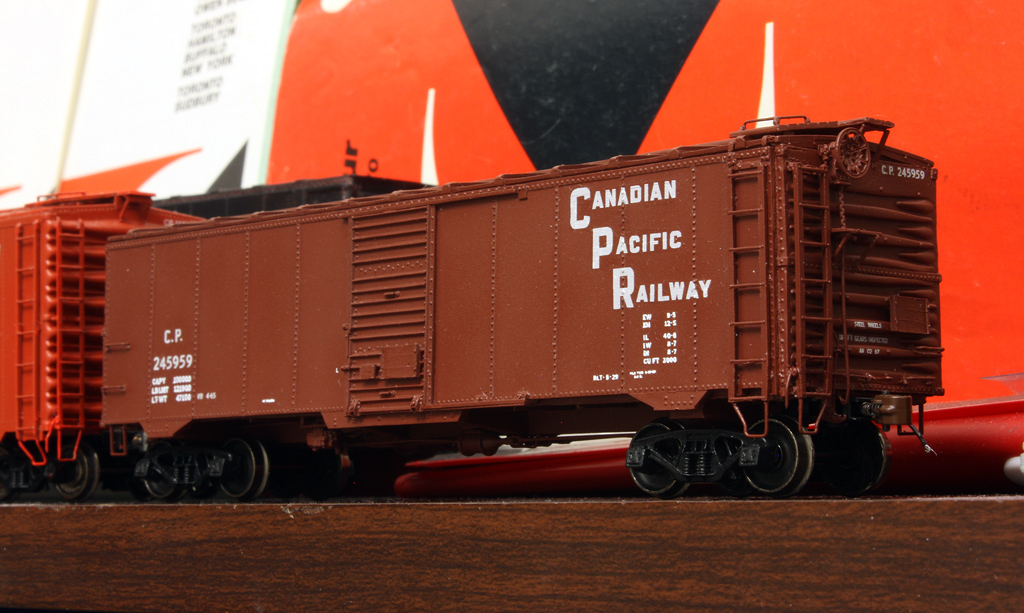 Closer view of the B-end with brake gear: 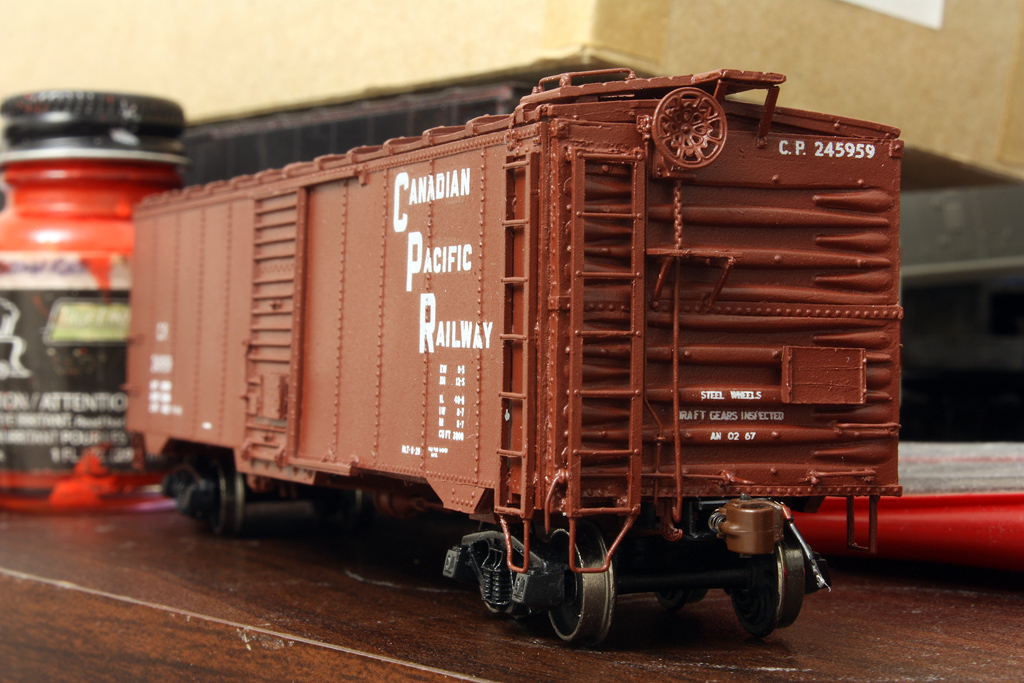 This is one resin kit that will not be doomed to the fate of hundreds of other resin kits (that is, sitting unassembled in its box for eternity ) |
|
|
|
Post by icghogger on Feb 8, 2015 8:45:08 GMT -5
Sweet Build, Dan, that is one bee-u-tee-ful box!!
|
|


 Then it sat to the side a bit longer when I had to paint something else not posted yet for someone, then back out it came for more work!

