Post by CP_8530 on Mar 27, 2014 20:42:05 GMT -5
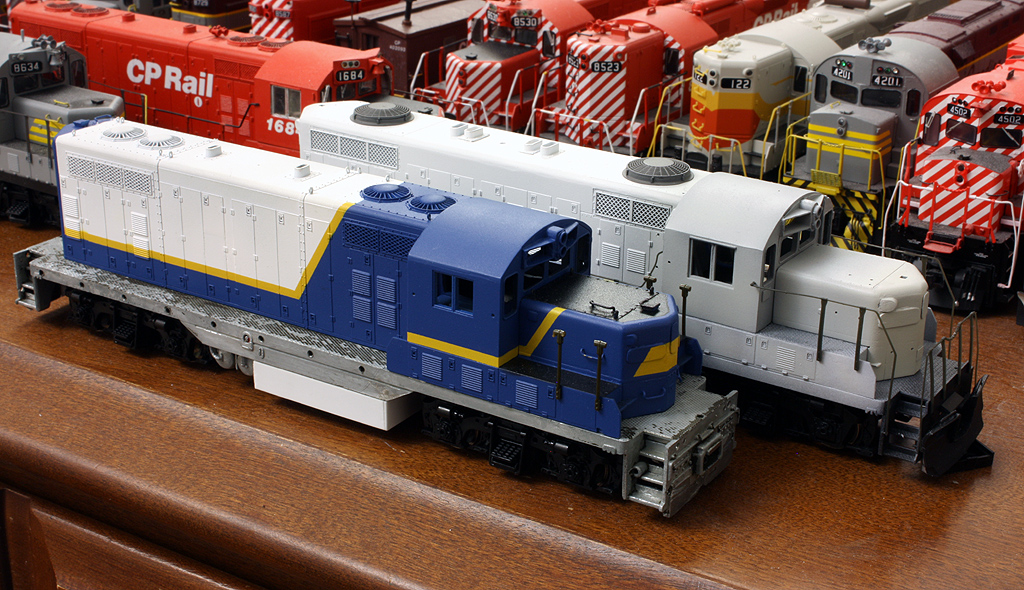
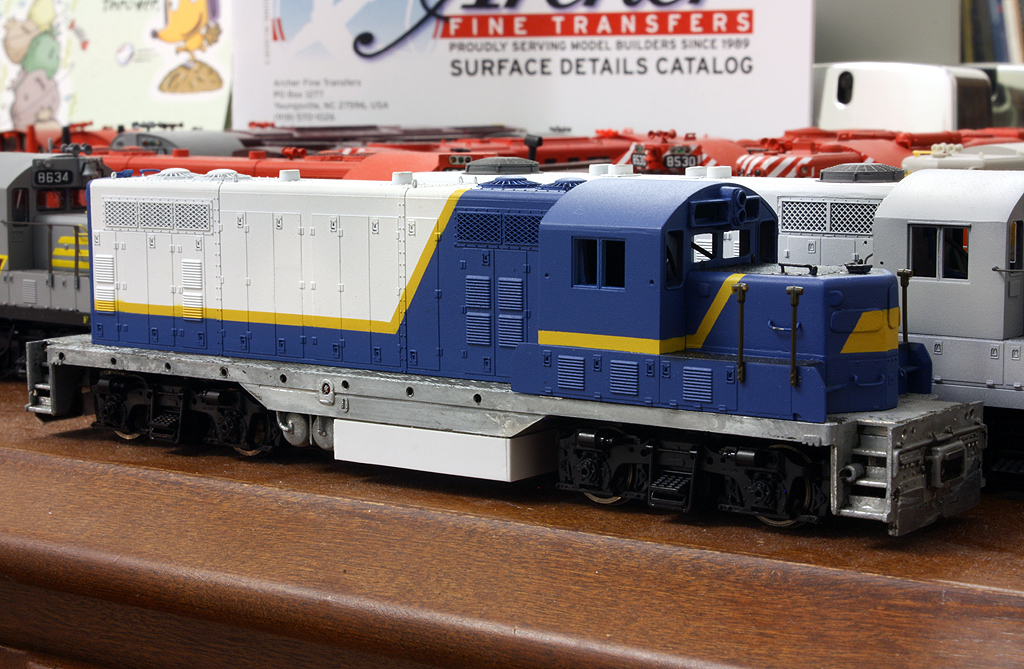
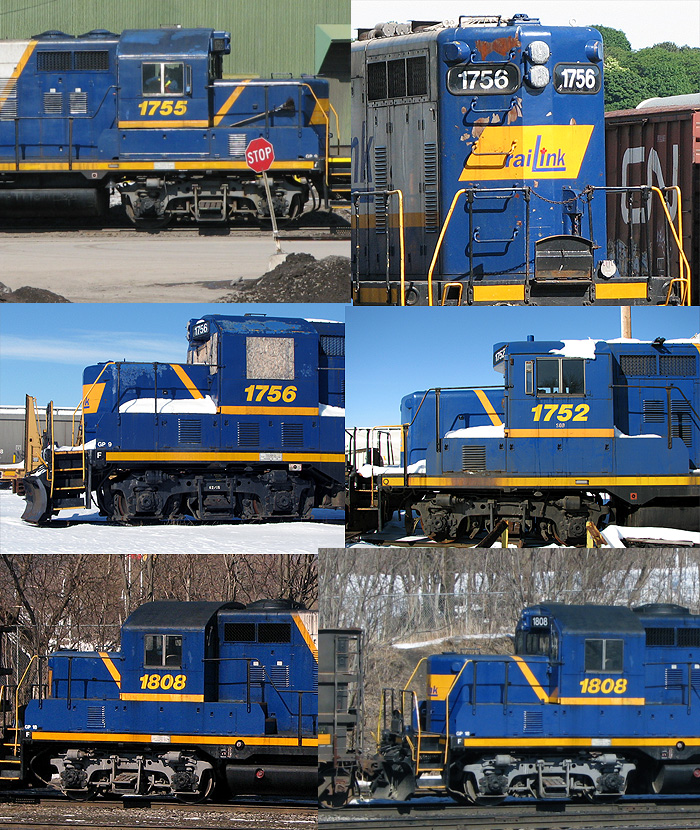
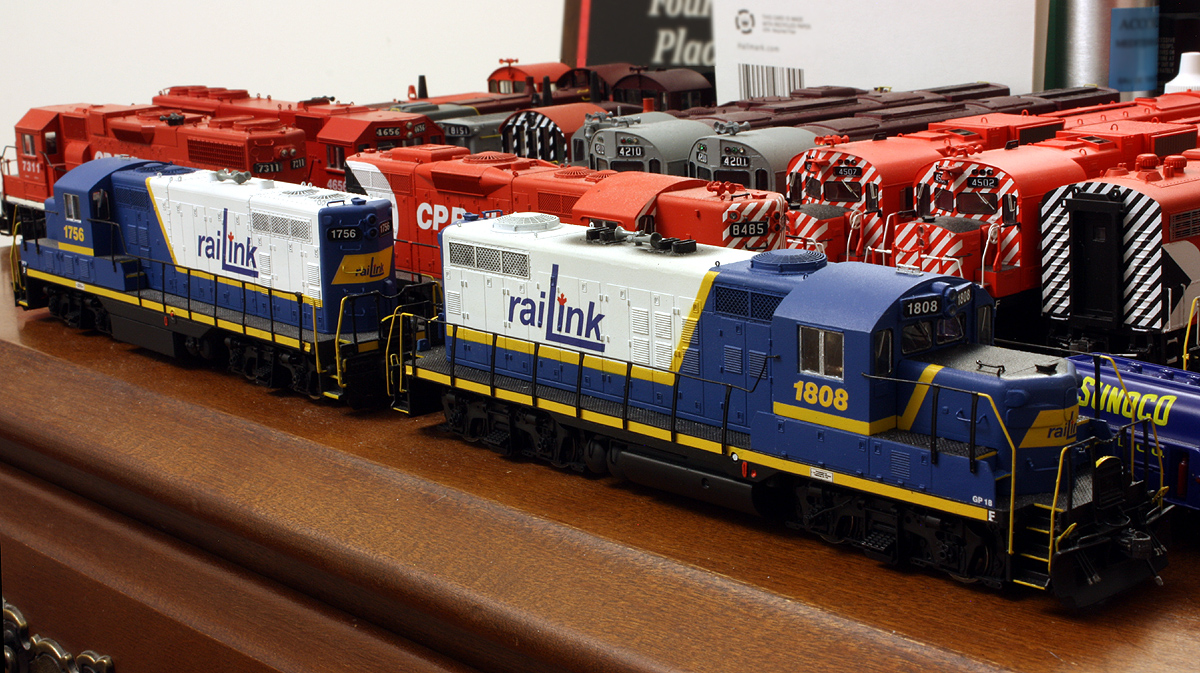
This one's been a bit of a slow boat project, mixed in with a few others, but it's progressing to the painting stage. Southern Ontario Railink (RLK or SOR) operated a small fleet of Geeps from various vintages until recently (when CEFX GP20D's ousted a lot of the older Geeps). 1808 was built as a Rock Island GP18, and eventually made its way to the SOR in Hamilton ON.
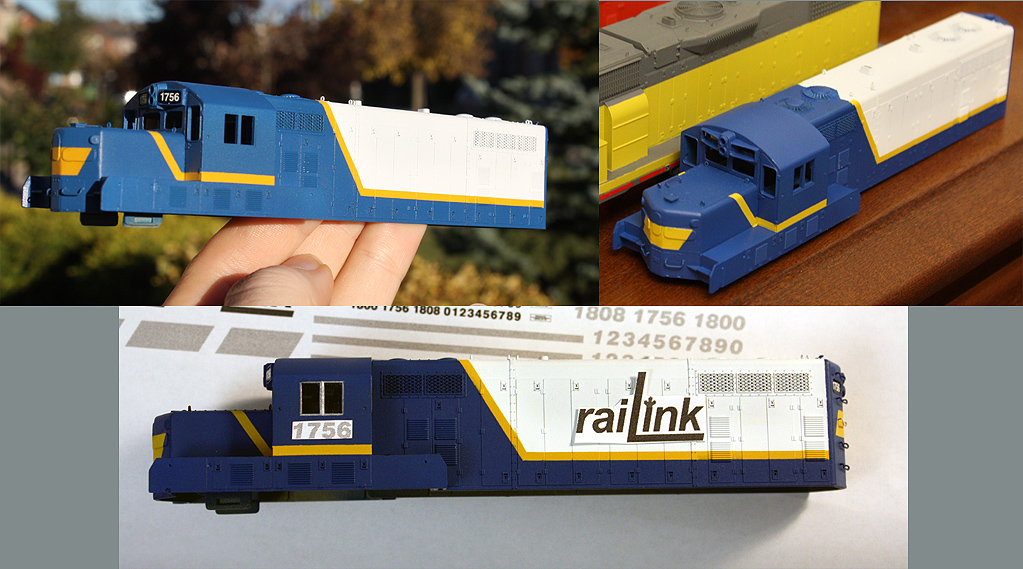
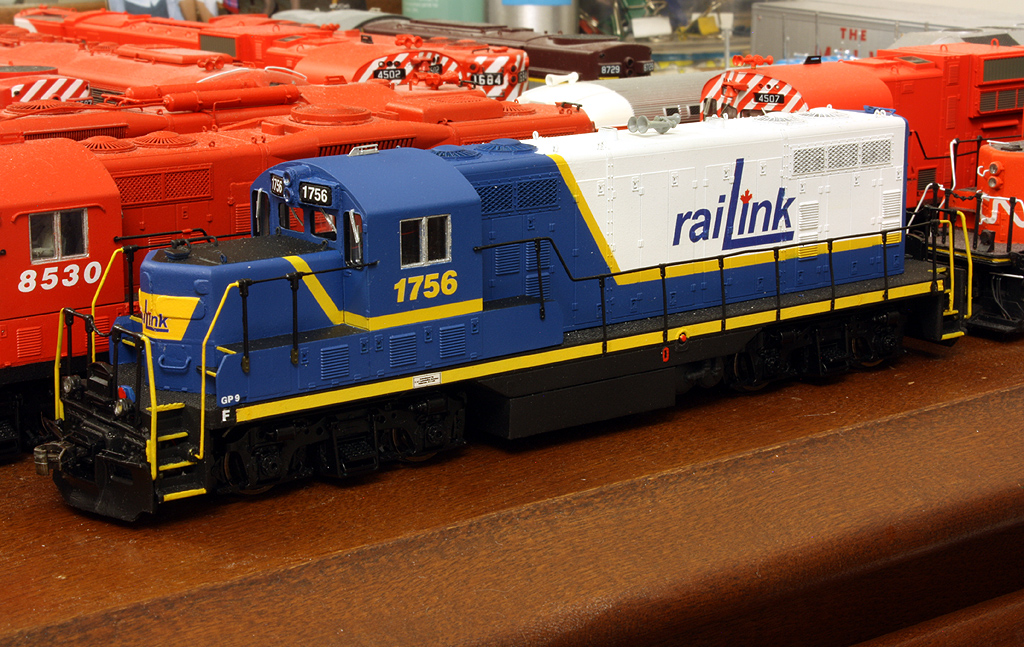
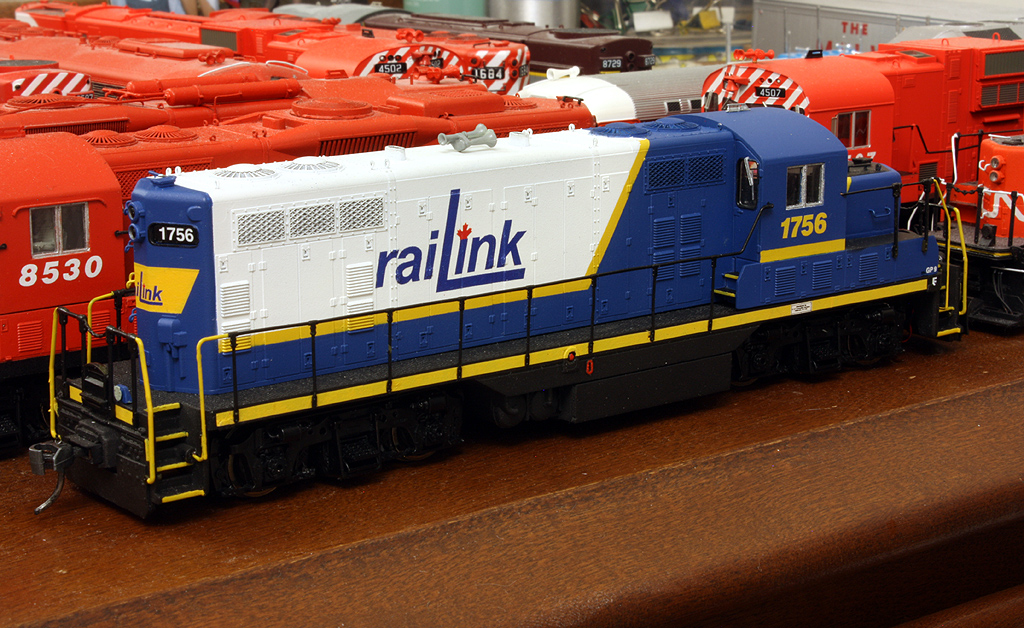
RLK 1808 with "sister" RLK 1756:
www.railpictures.ca/?attachment_id=11847
Later, 1808 along with 1755 were sold to Cando Contracting (and are currently stored at the BCRY shops in Utopia)
www.railpictures.ca/?attachment_id=9190
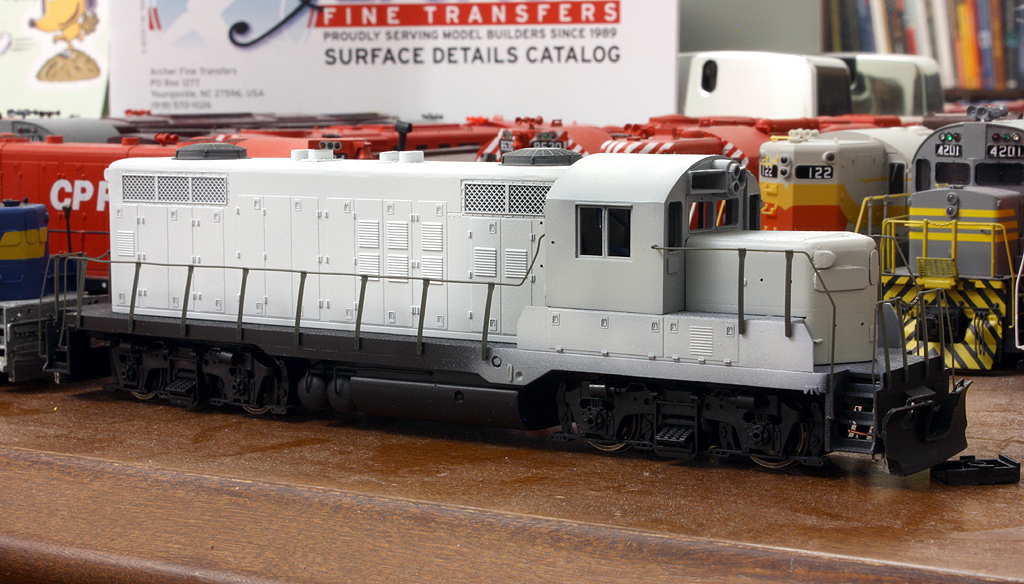
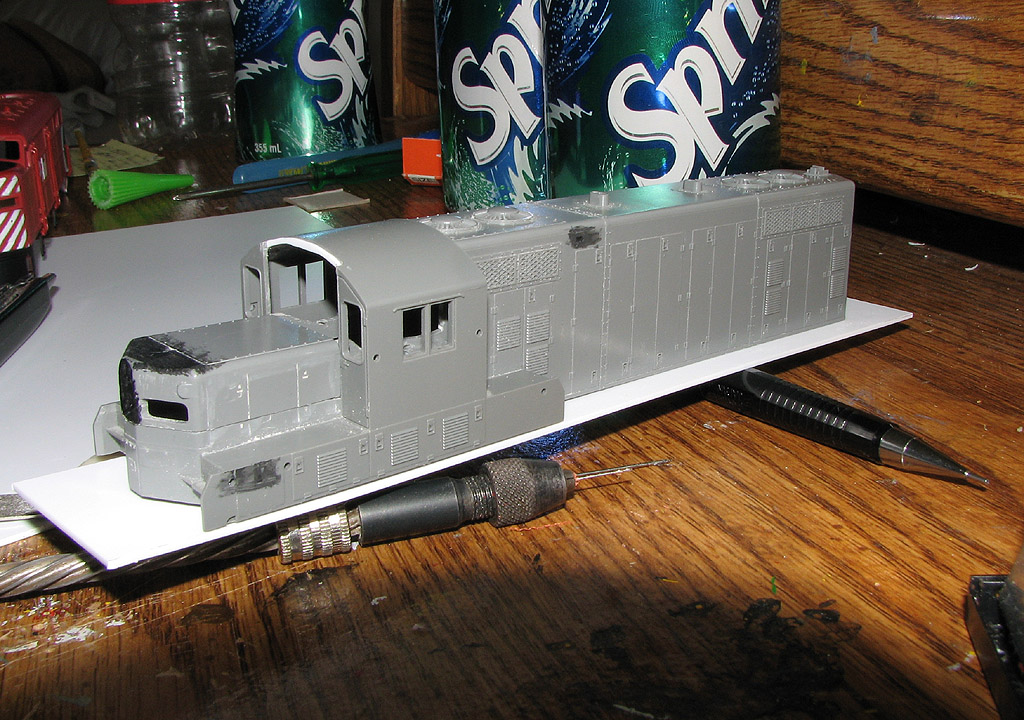
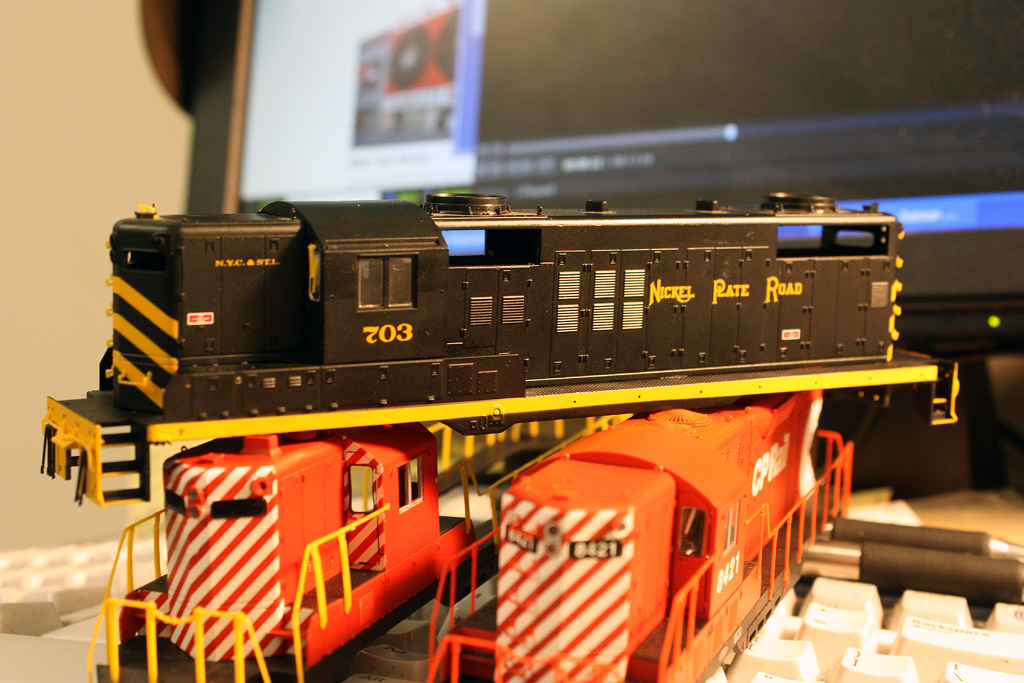
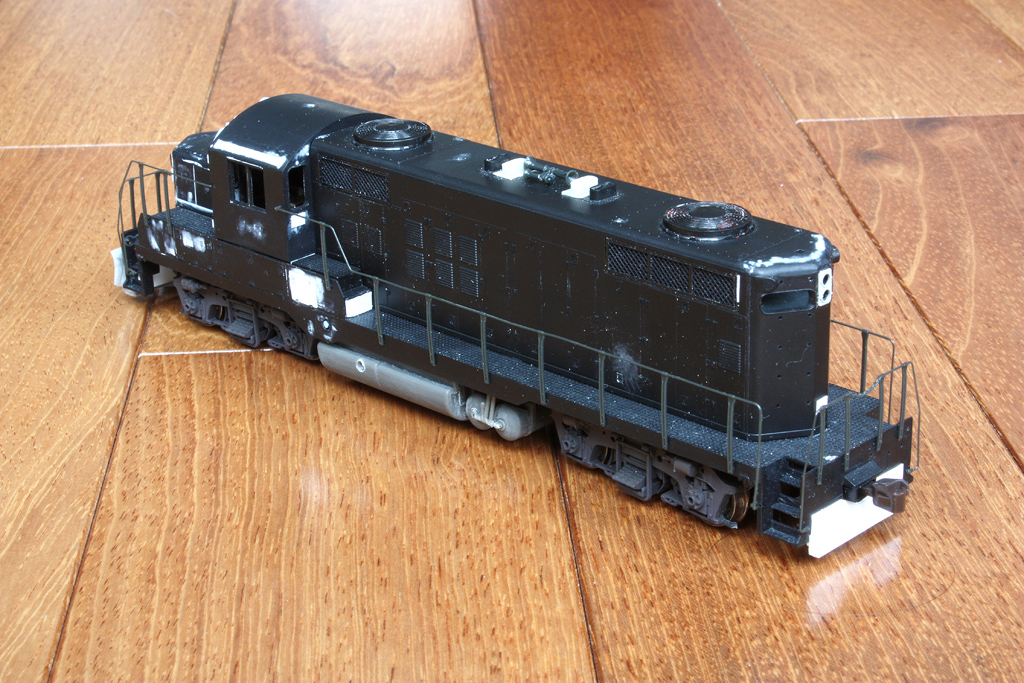
This one began as a Nickel Plate Road Proto 2000 GP18 shell, acquired for use of some parts. I had nothing to do with it, and my CP in the 70's era didn't have anything that it could be made into, so I decided to turn it into one of the local modern units. Shown here with a few parts removed, prior to its eventual alcohol bath:
Since it was getting the chop, it would need a new cab front face. It was mentioned on another thread they might have had GE cab front faces either cut off directly, or copied and new ones fabricated, so I decided to cut up the Lionel U18B shell I had lying around (it had been acquired on the cheap for its P2K shoe-horned drive for another project).
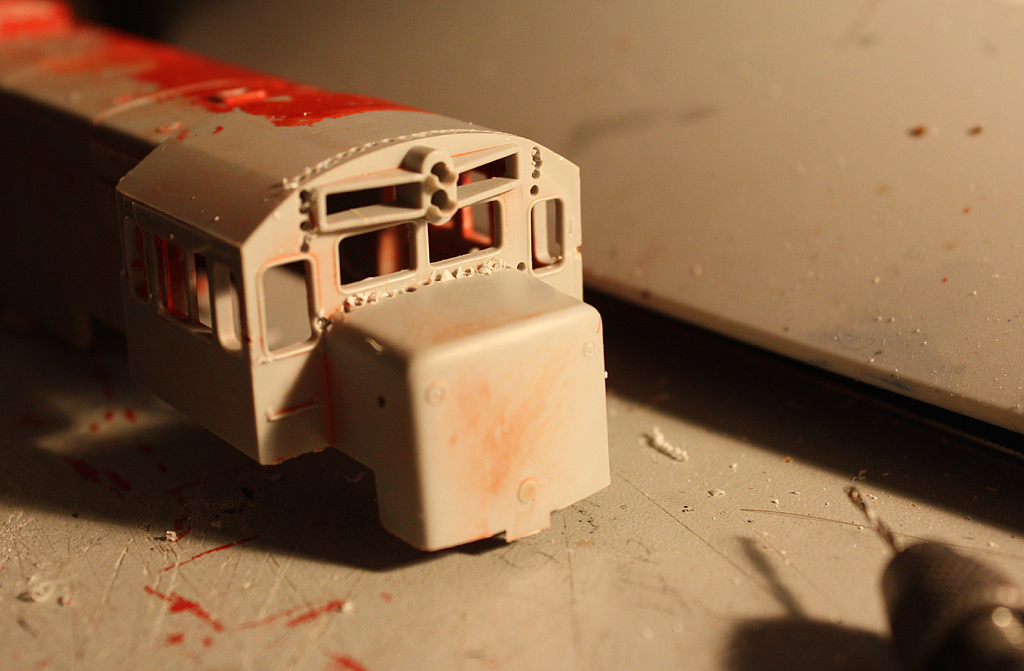
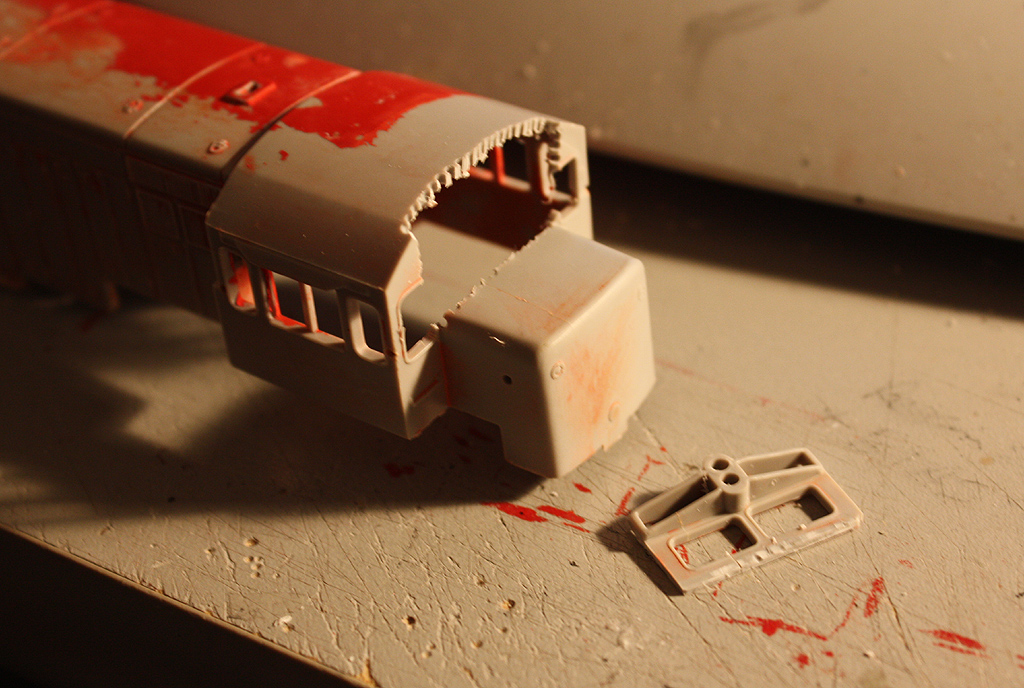
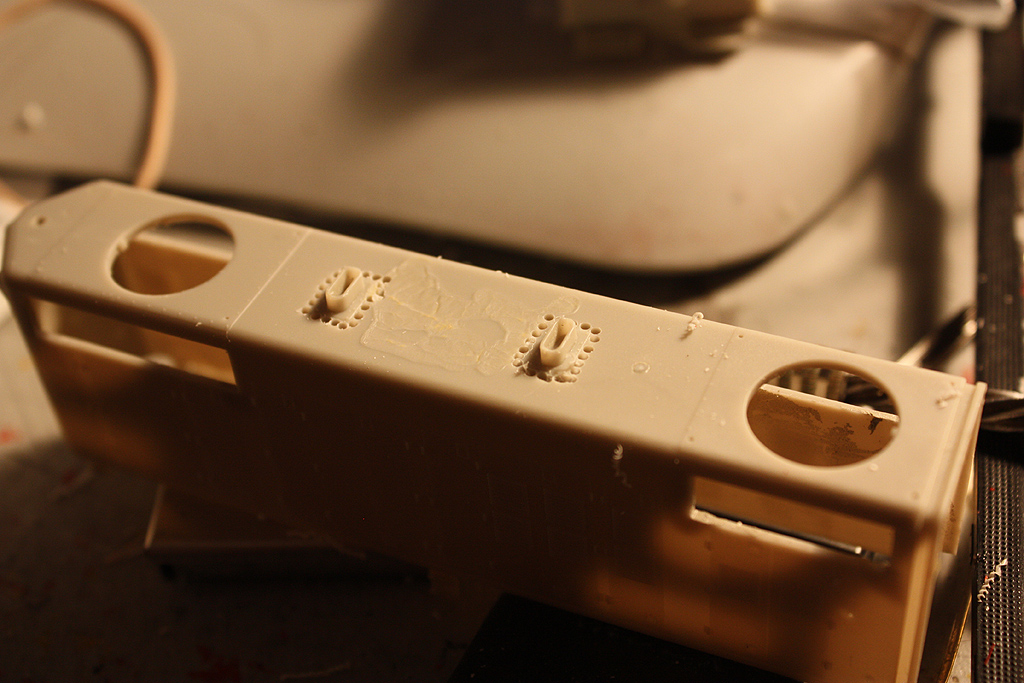
I eventually wound up cutting the window section off, rotating it 180 degrees, and splicing some more styrene between it and the numberboards to get a bit more space between them. The upper part of the numberboards were filed thin so they would fit on the outside of the P2K cab, giving a bit of a ridge at the top like the prototype.
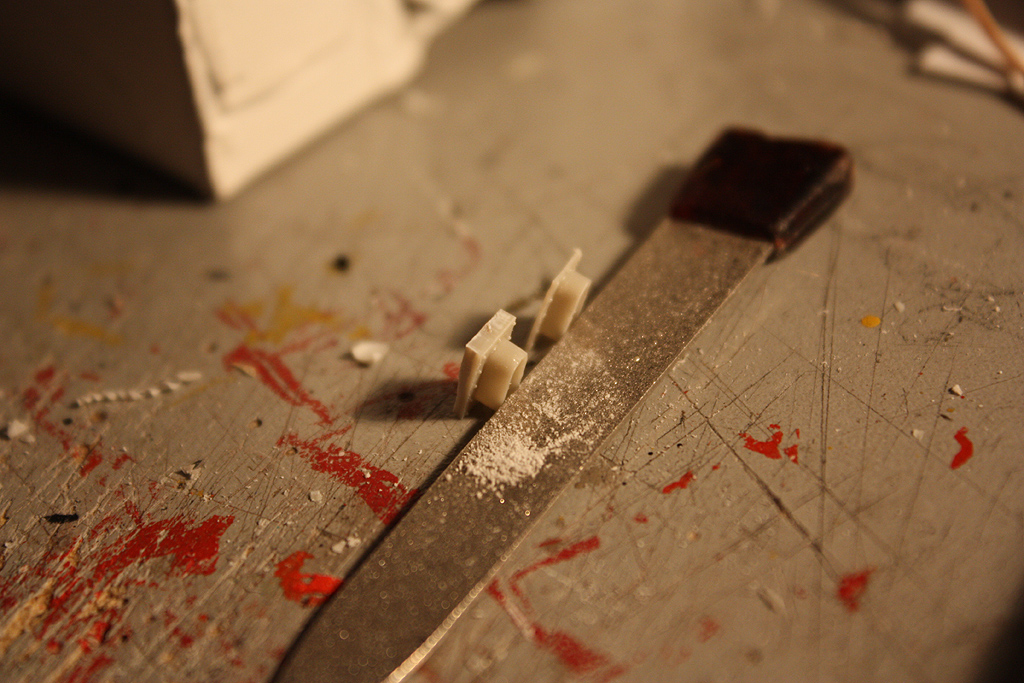
The 1808 had quad exhaust stacks on the roof, so I needed two more. I cut the extra exhaust stacks out of another spare P2K GP18 shell serving as a parts donor, and filed them smooth at the bottom:
A number of other mods followed, including:
-Substituting some Smokey Valley/TSP GP9 rad grills on the long hood (even though 1808 was a GP18, it had acquired some 9 ones at some point)
-Chopping the short hood. I actually chopped the top section off, lowered the roof, and glued the class lights back on. Then glued numberboard plating made from thin styrene on the nose. It was all patched up after.
-Cleaning up and patching any body seams (especially at the top rear).
-Cutting a new access panel in the relay box behind the cab on the conductor's side (scratchbuilt from styrene and some spare latch/hinges).
-Cutting down the P2K GP18 fan shrouds (although I might replace them with Atlas SD24 fans which are nicer, but add more to the final cost).
-Cab mods including installing the front cab face, as well as the cab vent plates, patching the roof sunshade track depressions, installing new "winterized" cab doors that don't sit flush.
-Sanding off the forward most square doors on the subbase battery boxes, and sanding the louvres off both battery box doors to install some Archer louvres later.
-Headlights added as per prototype, earlier Pyle headlight at the front, later one at the back (rear one was removed when it was still a parts shell, so had to be replaced).
-New handrails came from a later P2K GP9 donor that had the thinner ones.
-A later P2K GP9 chassis was acquired to power this unit (one of three purchased as a lot - more on any chassis and electrical mods later), and the weight was chopped down.
-I might just leave the later style P2K sideframes on for this one, so cut off some of the outside brake rigging to better represent the prototype. The 1808 has single clasp Blomberg B's with a modified rigging setup, but given all the gluing, slippery plastic and questionable long-term durability of fabricating new rigging, a good-enough approach is probably best here.
-New pilot plates were installed at rear, fabricated according to prototype photos. Extra styrene "plating" was glued on the insides of the pilots to allow the shell to be retained by the coupler pockets.
-I also modified a stock P2K horn to be closer to the prototype by rearranging the bells. Quick and easy by drilling them out, cutting them off and putting them back together using steel wire.
-Some work done on the fuel tank and piping. Sanded the entire slippery-plastic tank with 400 grit sandpaper to give it a rougher finish for paint to adhere to.
-The plow is a modified Kaslo CN GP9RM one, again spliced wider (not fully complete yet).
-Temporary couplers installed for now, in Kadee boxes.
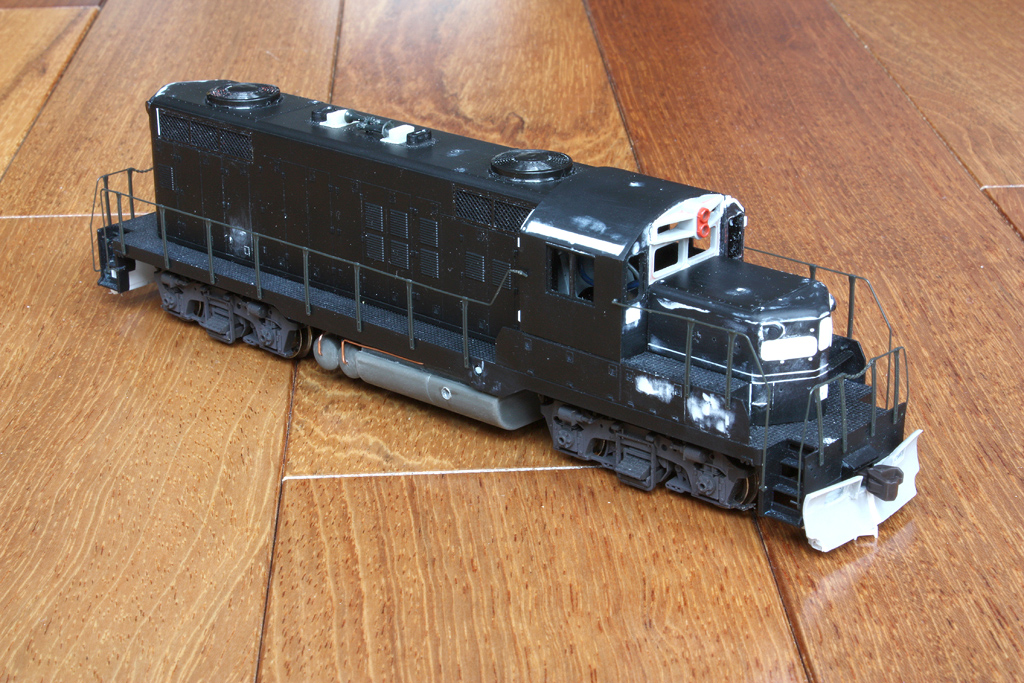
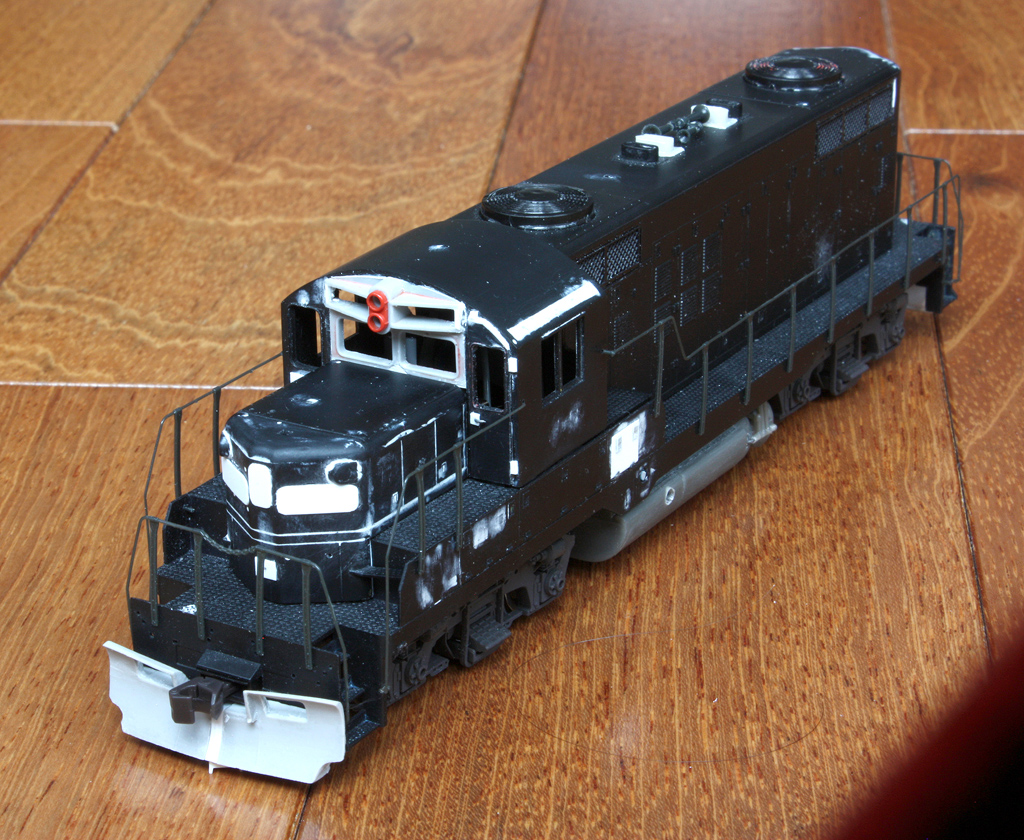
A bit more work to follow, and it may be ready for the paint booth (when it warms up a bit outdoors...)
RLK 1808 with "sister" RLK 1756:
www.railpictures.ca/?attachment_id=11847
Later, 1808 along with 1755 were sold to Cando Contracting (and are currently stored at the BCRY shops in Utopia)
www.railpictures.ca/?attachment_id=9190
This one began as a Nickel Plate Road Proto 2000 GP18 shell, acquired for use of some parts. I had nothing to do with it, and my CP in the 70's era didn't have anything that it could be made into, so I decided to turn it into one of the local modern units. Shown here with a few parts removed, prior to its eventual alcohol bath:
Since it was getting the chop, it would need a new cab front face. It was mentioned on another thread they might have had GE cab front faces either cut off directly, or copied and new ones fabricated, so I decided to cut up the Lionel U18B shell I had lying around (it had been acquired on the cheap for its P2K shoe-horned drive for another project).
I eventually wound up cutting the window section off, rotating it 180 degrees, and splicing some more styrene between it and the numberboards to get a bit more space between them. The upper part of the numberboards were filed thin so they would fit on the outside of the P2K cab, giving a bit of a ridge at the top like the prototype.
The 1808 had quad exhaust stacks on the roof, so I needed two more. I cut the extra exhaust stacks out of another spare P2K GP18 shell serving as a parts donor, and filed them smooth at the bottom:
A number of other mods followed, including:
-Substituting some Smokey Valley/TSP GP9 rad grills on the long hood (even though 1808 was a GP18, it had acquired some 9 ones at some point)
-Chopping the short hood. I actually chopped the top section off, lowered the roof, and glued the class lights back on. Then glued numberboard plating made from thin styrene on the nose. It was all patched up after.
-Cleaning up and patching any body seams (especially at the top rear).
-Cutting a new access panel in the relay box behind the cab on the conductor's side (scratchbuilt from styrene and some spare latch/hinges).
-Cutting down the P2K GP18 fan shrouds (although I might replace them with Atlas SD24 fans which are nicer, but add more to the final cost).
-Cab mods including installing the front cab face, as well as the cab vent plates, patching the roof sunshade track depressions, installing new "winterized" cab doors that don't sit flush.
-Sanding off the forward most square doors on the subbase battery boxes, and sanding the louvres off both battery box doors to install some Archer louvres later.
-Headlights added as per prototype, earlier Pyle headlight at the front, later one at the back (rear one was removed when it was still a parts shell, so had to be replaced).
-New handrails came from a later P2K GP9 donor that had the thinner ones.
-A later P2K GP9 chassis was acquired to power this unit (one of three purchased as a lot - more on any chassis and electrical mods later), and the weight was chopped down.
-I might just leave the later style P2K sideframes on for this one, so cut off some of the outside brake rigging to better represent the prototype. The 1808 has single clasp Blomberg B's with a modified rigging setup, but given all the gluing, slippery plastic and questionable long-term durability of fabricating new rigging, a good-enough approach is probably best here.
-New pilot plates were installed at rear, fabricated according to prototype photos. Extra styrene "plating" was glued on the insides of the pilots to allow the shell to be retained by the coupler pockets.
-I also modified a stock P2K horn to be closer to the prototype by rearranging the bells. Quick and easy by drilling them out, cutting them off and putting them back together using steel wire.
-Some work done on the fuel tank and piping. Sanded the entire slippery-plastic tank with 400 grit sandpaper to give it a rougher finish for paint to adhere to.
-The plow is a modified Kaslo CN GP9RM one, again spliced wider (not fully complete yet).
-Temporary couplers installed for now, in Kadee boxes.
A bit more work to follow, and it may be ready for the paint booth (when it warms up a bit outdoors...)