|
|
Post by John on Oct 6, 2013 14:02:21 GMT -5
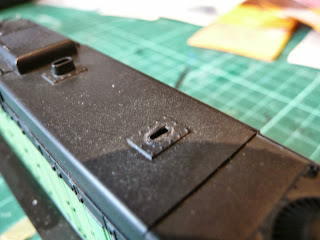
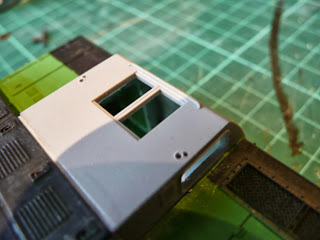
 I finally started work on the first Rock Island locomotive for my Godinez roster. The model is a vintage 1990's Front Range GP7 kit which I will be superdetailing and painting in the late sixties Rock Island maroon and yellow paint scheme.  I started with a non-dynamic front range shell which was partially painted for Burlington Northern by the previous owner but never finished.  The Front Range kit is the same tooling that formed the basis for the new Athearn Genesis geeps, so I knew that the cab roof was the wrong angle. I decided to try and address that by replacing the original kit cab with an Atlas one.  The Atlas cab is slightly longer than the front range one so I had the do some trimming and filing to get it to fit, I also needed to shim the cab with styrene to raise it slightly as there is clearly a difference between the hood heights on the front range and Atlas bodies.  I also separated the nose from the long hood to make it easier to add the longer cab in between, otherwise I would have needed to file away the rivet detail on the roof.  I've added grab irons and prepared the shell for further detailing. I've got several bags of Details West parts ready to add to the locomotive and will be giving it MU stands, air hoses and drop steps as well as adding brass horns.  Next step will be filling the gaps with milliput and sanding to give a smooth surface ready for priming. |
|
|
|
Post by m a y o r 79 on Oct 7, 2013 7:03:48 GMT -5
Looking good so far. Definately a build ill need to follow more.
|
|
|
|
Post by acollins on Oct 7, 2013 22:06:31 GMT -5
Looking good, so thats what a Front Range shell looks like up close. I'll have to watch this closely and see how it turns out, I may try to find some for a couple future builds.
|
|
|
|
Post by m a y o r 79 on Oct 8, 2013 12:56:37 GMT -5
I thought the Genesis tooling was all new from the ground up? They actually started with the Front Range shell?
|
|
|
|
Post by CP_8530 on Oct 8, 2013 16:49:26 GMT -5
I thought the Genesis tooling was all new from the ground up? They actually started with the Front Range shell? The tooling is new, but they apparently copied some of the errors from the same plans Front Range used, or the old Front Range tooling they acquired. Hence some of the same errors popped up on the new Genesis model. |
|
|
|
Post by John on Oct 12, 2013 11:38:36 GMT -5
Looking good, so thats what a Front Range shell looks like up close. They are pretty decent shells, especially given how long ago they were released. The window glazing is a bit odd on the original cabs (uneven thickness so they have a frosted/lens appearance) and the Front Range trucks are really bad quality (the frame is designed for Athearn trucks so I would recommend using those instead). The kit goes together very nicely and they look good on the rails, much cheaper than a Genesis. I have a box full of them that I have picked up on ebay at very keen prices, they usually go for about £10 - £15 for a complete kit. Make sure you get the handrails and the numberboard lenses otherwise the build will jump up in complexity!  If anyone wants one I'd be happy to part with one of my spares cheaply (I have six of them and I only plan to build three). Probably not economical if you're outside the UK though as the postage will be high for overseas. |
|
|
|
Post by John on Oct 19, 2013 12:23:05 GMT -5
 The final detail parts for my Rock Island Geep project arrived in the post this week so I was able to finish the body shell and begin the painting process.  As per the prototype this GP7 is fitted with tall MU cable stands and spark arrestors, as well as the usual handrails and other details.  I had to trim the exhaust stacks from the shell in order to fit the spark arrestors.  The Atlas cab has slightly different positions for the handrails so I drilled new holes and filled the old ones with squadron putty.  I hit a few snags with the painting, it took me three attempts to get the primer onto the shell, the paint kept clogging the airbrush and I was getting really uneven coverage. I use Vallejo acrylic primer which I have always got good results with in the past but this was a new bottle and I'm not convinced it has not been affected by something in storage. I will need to order a new one.  For the maroon I'm using Scalecoat acrylic Rock Island Maroon, but I'm not entirely happy with the colour, it's probably a closer match to the earlier units, I think I needed more of a scarlet shade for the unit I'm modelling.   I also ran into a lot of problems getting even coverage on the shell, especially in the corners of the hood and cab, where I just couldn't seem to get a decent even coat. I do plan to heavily distress and weather this engine so the maroon colour and patchy coverage probably won't matter too much but I definitely need to work on my airbrush technique for next time! Does anybody have some tips for airbrushing the corners of a shell? |
|
|
|
Post by jakeloyst on Oct 19, 2013 18:49:29 GMT -5
now sure how you do your painting, but I usually use 4-5 coats, applied almost at the same time,. I do light coats and don't worry about coverage , and keep turning the unit, sides, top, ends, shooting up, shooting down, and far enough away the paint is almost dry when it hits.. I have never had a problem with coverage this way
|
|
|
|
Post by m a y o r 79 on Oct 20, 2013 9:29:39 GMT -5
Definately multiple coats. If tou start working your way around the shell by the time you get back to the startingbpoint the "first coat" is usually dry. Itll probably take a good 3 coats to get full coverage, maybe more.
|
|
|
|
Post by icghogger on Oct 20, 2013 17:14:37 GMT -5
Also, it helps to decrease air pressure slightly when working in corners.
|
|
|
|
Post by John on Oct 26, 2013 18:28:45 GMT -5
Thanks guys, I will try those suggestions  |
|
|
|
Post by tjmfishing on Oct 26, 2013 20:51:05 GMT -5
Also remove everything you can when painting. Separating the cab, body and sill makes painting a lot easier, especially when masking (which doesn't seem to apply here)
|
|
|
|
Post by lourjr33 on Dec 10, 2013 20:02:41 GMT -5
I Just left A-line/Proto Power West internet site. Normally I do not check the New Item section but I did today. I was blown away, there must be a railroad god out there! A-line has Athearn Genesis Chassis for the Front Range shell. The Chassis is $59.95. Check it out The frame,trucks and detail parts look great. I have a bunch of the Front Range shells and plan to upgrade the fans with cannon fans and other goodies.
Lou
|
|
rock
Superintendent
Posts: 197
|
Post by rock on Dec 22, 2013 17:36:12 GMT -5
This is looking good so far, I can't wait to see how this one comes out! I think the Front Range shells are really fun to detail and upgrade.
Anyone know why the GP7/9 chassis parts are so expensive on Proto Power West/A-Line/Rail Power Products? I wouldn't expect a hunk of metal to be that high, especially when you compare some of their other chassis parts...
|
|
|
|
Post by John on Oct 6, 2015 16:06:12 GMT -5
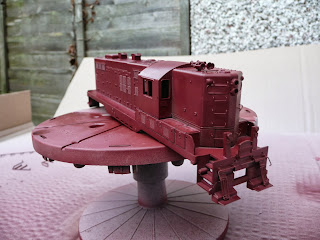
Time for a long overdue update on this build. With only a couple of weeks before the NMRA convention in Derby I have finally got back to the workbench to continue work on the Rock Island GP project. This has been on the shelf for almost two years while I moved house, changed jobs and generally kept too busy to model! BUT I finally got time to do some work, and after digging out all the bits and bobs for it I am now back on the case. The shell was already airbrushed in Polly Scale Rock Island maroon and the next step was the yellow warning panel for each end. I opted to brush paint the ends rather than set up the airbrush for such a small job. I masked off the ends with Tamiya masking tape and used light coats (almost drybrushing) to add several thin coats of custom mixed yellow to the model. It looks really rough in the pictures but actually the finish turned out very smooth. In fact the masking lines from the original BN paint are more noticeable than the brush strokes for the yellow. For the colour I used Revell yellow with a few drops of red to create a suitably orange tint to the paint. The Microscale decals went on fairly easily, the stripes are a bit of a job to straighten and I realised too late that the nose heralds needed to be cut to fit around the grab irons. I also realised too late that the nose shouldn't have upper grab-irons on the right side. Not sure how I missed that one! I must have been having one of those days when I applied them. Still plenty of work to do on the model, but I feel pretty confident about getting it done before the deadline. Next step will be the rest of the decals, large roadnames on the side and numberboards etc. Then comes the weathering. |
|
pacbelt
Chairman
Building Layout #11!! ;)
Posts: 682 
|
Post by pacbelt on Oct 7, 2015 21:39:43 GMT -5
This clinches it for me!! I've been lurking your thread for a couple of years, and have been very impressed with your skill, and ingenuity in your build. <niceties out of the way>  I really like how the hood ends turned out. Most modellers tend to shy away from brush painting... I brush paint with Vallejo exclusively. It tends to "flatten out" better than the others. Vallejo is also the ONLY acrylic paint I'll use. For future reference, Testors makes a very fine pigment, white or gray primer, that goes on extremely thin, and covers completely, even in corners!! You have absolutely convinced me to try a Front Range Geep! I've been thinking about it for a long time. Between the fix you've come up with for the cab, and the clear photos you've posted of the body detail.... I'm finally convinced. Thank you Sir!  Not sure I want to try the $60 PPW chassis, nice or not... I'll NEVER have that kind of budget anymore.  Fantastic build, looking forward to more! Carmine |
|
|
|
Post by John on Oct 10, 2015 13:38:11 GMT -5
Thanks for the compliments Carmine, I definitely recommend these Front Range shells, they are nicely detailed and usually pretty cheap. I had some time today to continue the project and I finished applying the decals and tidied up a few loose ends on the main shell, fitting the steps on the nose and cab walkway. I always find the numberboards tricky to decal as each of them needs four individual numbers and the decals are so small it can be a real challenge to get them straight and even. For this model I decided to try printing my own numberboard decals, I had already fitted a set of Microscale EMD blank decals so all I needed were the numbers. There is a windows compatible truetype font on the B&O historical society website for free downloaded. I typeset the numbers in Photoshop and printed on laser printer compatible waterslide paper. They went on really easily and were certiainly a breeze compared to lining up tiny individual numbers. I'd forgotten the chassis and sideframes were in primer so I needed to break out the airbrush to shoot them with Revell 'Tar Black' as I don't have any grimy black in stock. As I had the airbrush out, I gave the roof a quick blast of black to get the weathering started. I will do the rest of the weathering with a regular brush. Next stage will be the detail weathering and reassembly of the model. |
|
gevo
Trainmaster
Posts: 142
|
Post by gevo on Oct 10, 2015 23:40:57 GMT -5
Thanks for the update looking good
|
|
pacbelt
Chairman
Building Layout #11!! ;)
Posts: 682 
|
Post by pacbelt on Oct 11, 2015 0:10:32 GMT -5
Looks GREAT!
I really have to remember that number board printing idea. That appeared to work well.
And.... I've got to figure out what I can sell, to get some Front Range Geep shells! Already have a few frames.
Inspiring work!
|
|
|
|
Post by Eccentric_Crank on Oct 11, 2015 13:32:24 GMT -5
" always find the numberboards tricky to decal as each of them needs four individual numbers and the decals are so small it can be a real challenge to get them straight and even. For this model I decided to try printing my own numberboard decals, I had already fitted a set of Microscale EMD blank decals so all I needed were the numbers. There is a windows compatible truetype font on the B&O historical society website for free downloaded. I typeset the numbers in Photoshop and printed on laser printer compatible waterslide paper. They went on really easily and were certiainly a breeze compared to lining up tiny individual numbers." I do my number boards the similar way, on plain paper with an extra step. Get a piece of stiff clear plastic from a discarded blister package and mix a few drops of epoxy on it. Cut your printed numbers oversize so you can wrap a section of the print around a dowel, X-acto handle or similar. Work quickly while the epoxy is wet, and roll the printed numbers onto the epoxy like you're rolling bread dough. This will prevent most bubbles and saturate the paper. Check the other side of the clear plastic for trapped air bubbles and work them out with a popsicle stick or similar. Set them aside until thoroughly cured, then flex the clear plastic, the print should release cleanly and look like frosted glass. Trim to size and apply to number board opening with clear glue and add LEDs. Dan M. |
|