Kurt
Road Foreman
Posts: 56
|
Post by Kurt on Sept 8, 2013 20:02:48 GMT -5
So before I say anything I have to apologize for not taking any before photos. I was excited to get right to work and as soon as I arrived home I started ripping this model apart.
The background of this model is that it was abandoned down at the club and after several years of attempting to locate the owner who had moved out of the area failed we held an auction of the items he left. I won this "diamond in the rough" for $5.00. I was the only bidder.
It was just a regular older Athearn factory painted SP unit that the previous owner had "weathered", added DCC and a Details West 140 plow. The dynamic brake hatch was missing as was the decoder. This thing had been sitting for years and was filthy! Wires from the DCC install were spouting out of the top where the dynamic brake hatch had been. There was good reason I was the only one to bid on it because no one in their right mind wanted to tackle this thing!
Anyway, I stripped it down completely and cleaned all the old grease out of the gear boxes. The frame got sprayed with paint stripper, and the shell got dunked. New motor mount pads were in order as well as new 42" nickel silver wheels from Athearn. The old DCC wiring harness was ditched and a new one was wired in.
I sanded the tank down and removed the coupler pads. I debated on fuel tank detail but decided in the end to keep the Athearn detailing on the tank. This is a decision I regret and may go back and strip the frame a second time and add a Cannon fuel tank detailing set. The tank just looks naked without all the fillers and gauges and I think I can get away with an addition $5.00 expenditure and keep in the spirit of the budget build.
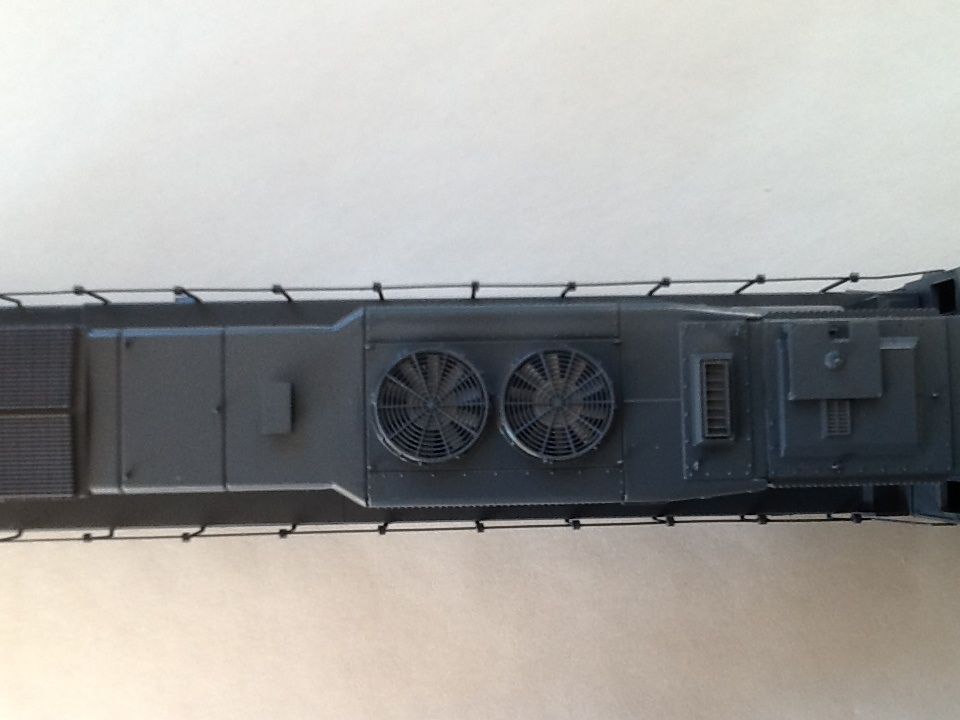
I tried so hard not to go nuts with detailing this thing. I want Cannon stuff on all my models and this thing tested my restraint constantly! One night I even broke out Cannon fans, cab, nose, and sub base. I made myself put it all back the next day as it wasn't in the spirit of a budget build. I did add a Cannon brake wheel and front anti climber as the originals looked awful. Other items I added were coupler pads from Warren's Custom Services (looong out of business), new DW 206 plow, MU hoses, nose light, antenna stand, A/C, horn, see through grills and new radiator fans. I fixed the area immediately behind the dynamic brake housing by filling with styrene rod glued into the seam and smoothing out when dry. I moved the dynamic vent back to its proper spot while I was at it. New vents on the nose and cab side and sand filler housings were installed. Wire grab irons and eye bolts were installed after shaving the old ones off. I kept the stantions and bent new handrails from .015 brass wire. I made the remote control antenna from styrene and added new DA whip type antennas. I didn't do the antenna conduits on the cab roof.
Anyway, that's about it. I painted the model with Scalecoat and decaled it just last night with Microscale decals. I used the new numbering set from Microscale but the numbers look too fat on the cab sides. The number board numbers and rear number look good though. I assembled the model this morning but it still needs weathering, cab glass and MV lenses. Like I said earlier I may redo the fuel tank.
In all I spent 67.75 which includes a new decoder. I hope you guys like it! Feedback is always appreciated so feel free to let me know what I need to improve on.
Kurt
|
|
Kurt
Road Foreman
Posts: 56
|
Post by Kurt on Sept 8, 2013 20:22:20 GMT -5
|
|
|
|
Post by Randy Earle on Sept 9, 2013 10:38:13 GMT -5
I gotta tell ya, it looks pretty good to me.  |
|
Deleted
Deleted Member
Posts: 0
|
Post by Deleted on Sept 9, 2013 15:07:34 GMT -5
Wow, great work!
|
|
Deleted
Deleted Member
Posts: 0
|
Post by Deleted on Sept 9, 2013 18:46:32 GMT -5
Kurt,
Have to commend you for your restraint. Good job on a budget build. I have yet to even attempt a budget build because they snowball into major projects. But one day I would really like to try one. Totally limit myself to $100.00 and no more.
Your model looks really good.
|
|
deez
Chairman
Midland Belt Railway
Posts: 949
|
Post by deez on Sept 9, 2013 20:07:11 GMT -5
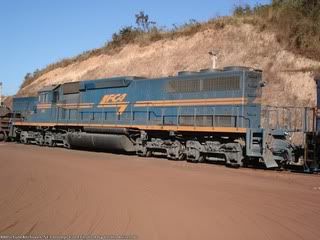
That's one good lookin tunnel motor Kurt. Nice job!
|
|
Kurt
Road Foreman
Posts: 56
|
Post by Kurt on Sept 10, 2013 23:12:40 GMT -5
Thanks for the kind words guys! I definately appreciate the feedback. And yes, having restraint was the hardest part of this build. But I was thinking tonight about the budget and what I could have done better. Take the cab for example- I bought laser cut windows for the Stock Athearn cab. Sounds like a good investment right? Who doesn't like the look of flush fitting windows? But then I thought I spent $4.50 on windows but could have spent an additional $3.50 and bought a new Cannon cab complete with laser cut windows. So for an extra few dollars I could have put a Cannon cab on this model! Oh well next time I'll do better. So as I said in the initial post I was not happy with the un detailed fuel tank. All I had done was strip the heavy black paint off with the spray can paint stripper (awesome tip from Mr. Banna!) and then smoothed out the casting lines on the tank sides. (Can I just say what he heck was Athearn using for paint on those old blue box frames?! That stuff is thick and super hard to get off completely even with paint stripper!). After smoothing the sides I primed and then painted Lark Dark Grey using Scalecoat paint. So here is the frame as it stands tonight. I stripped the Scalecoat back off and removed the crude fuel filler and gauges off the top of the tank. I smoothed everything out wet sanding with 400 and then 600 grit paper. More updates as I add the Cannon fuel tank detailing set! 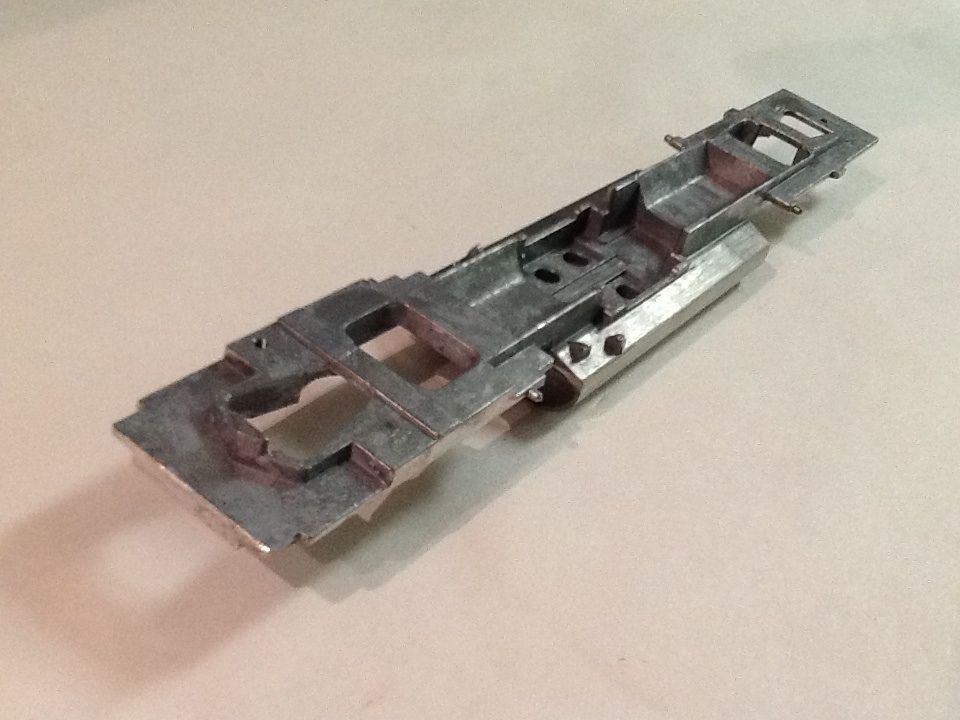 After stripping but before detail removal. 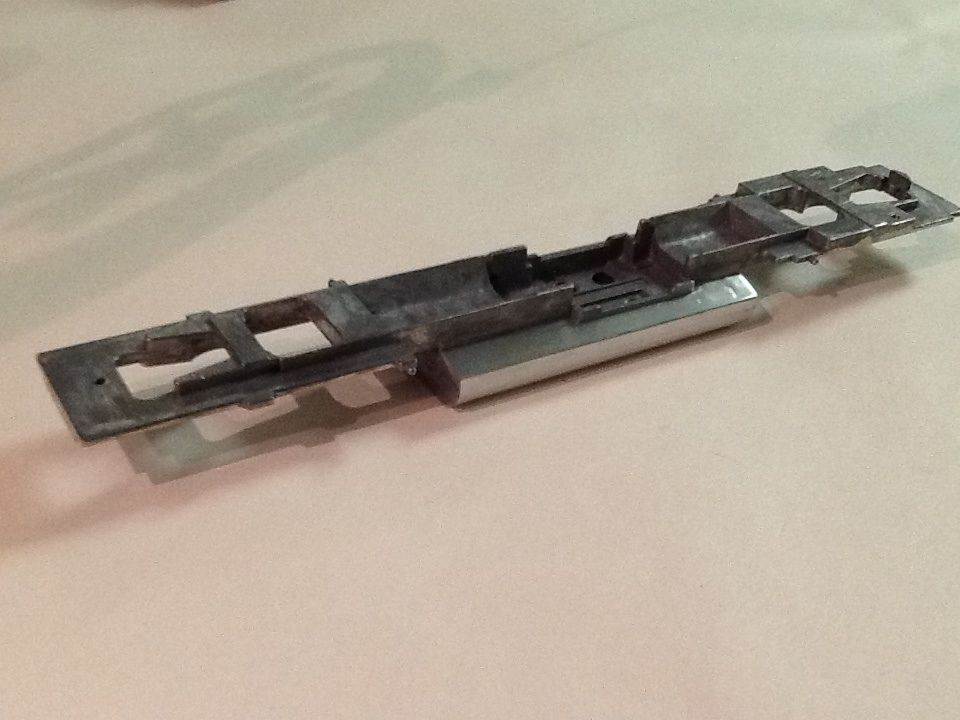 After detail removal and initial sanding. Cannon details to be added soon! |
|
Deleted
Deleted Member
Posts: 0
|
Post by Deleted on Sept 11, 2013 7:55:20 GMT -5
Add the top sheet. Use 0.005" sheet styrene. I believe in my tunnel motor videos, I show how I did it. If you need additional help, let me know.
|
|
Kurt
Road Foreman
Posts: 56
|
Post by Kurt on Sept 16, 2013 20:00:40 GMT -5
So I finally got the top sheets installed and the Cannon and Co. fuel tank detail parts installed on the tank this afternoon. I used the blue Barge cement diluted with MEK and brushed on the tank and the styrene separately and when they were dry pressed the styrene onto the slope of the tank. I used CA to attach the Cannon parts. The only thing that bugs me about these older Athearn tanks is the draft angle on the tank ends. I did my best to try to get them to look right but in reality I think it's time to invest in a mill and start squaring them up. I didn't add the end sheets for this reason as I didn't want to fight the off angle. So next stop is another coat of Scalecoat Lark Dark Grey. 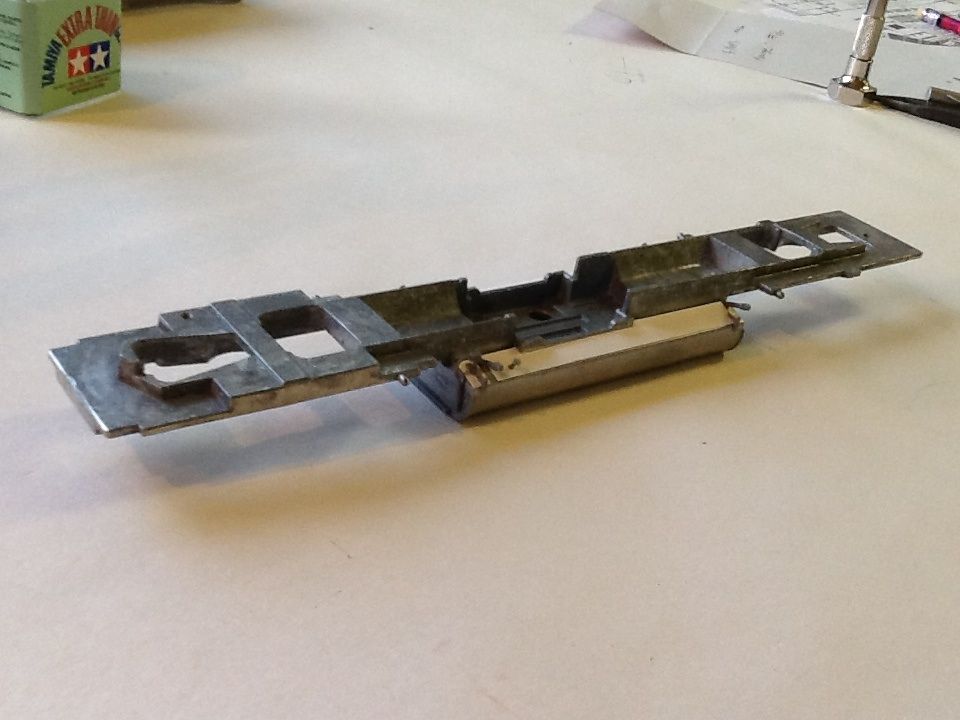 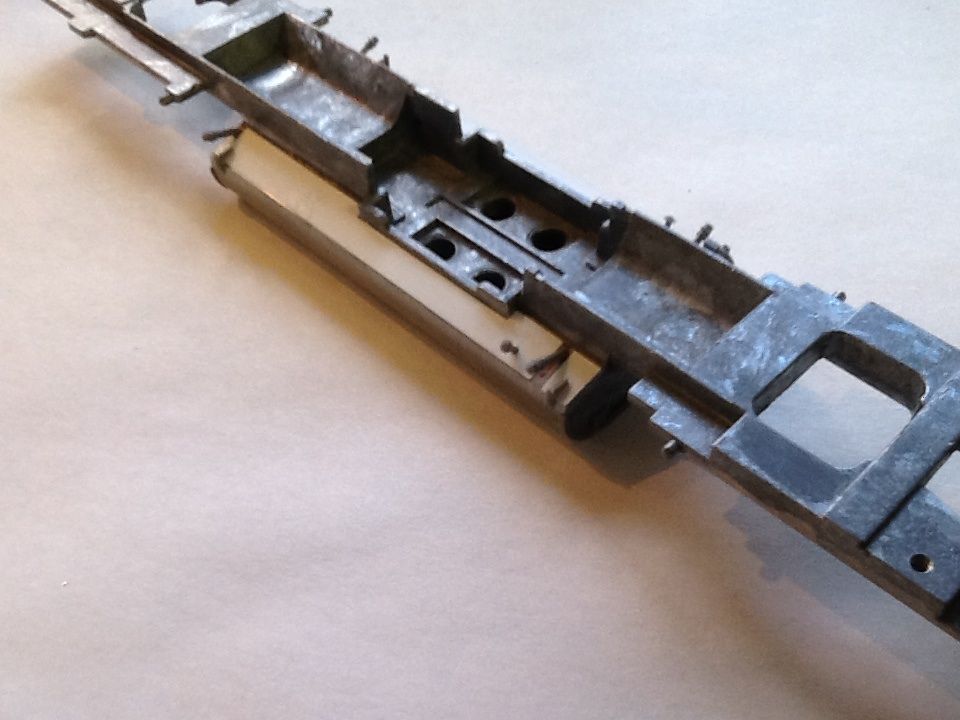 |
|
Deleted
Deleted Member
Posts: 0
|
Post by Deleted on Sept 17, 2013 7:10:39 GMT -5
Kurt,
So far it is looking great. Top sheet looks great.
You will not regret getting the mill.
|
|
Kurt
Road Foreman
Posts: 56
|
Post by Kurt on Sept 19, 2013 22:20:20 GMT -5
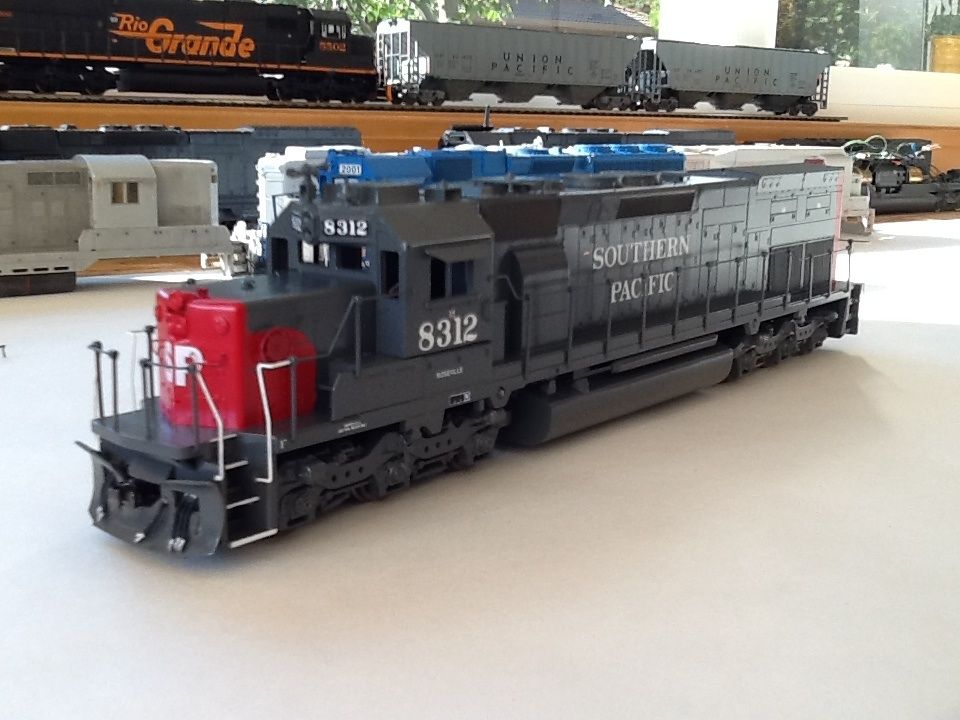
So here is a quick photo of the finished frame on the model tonight. 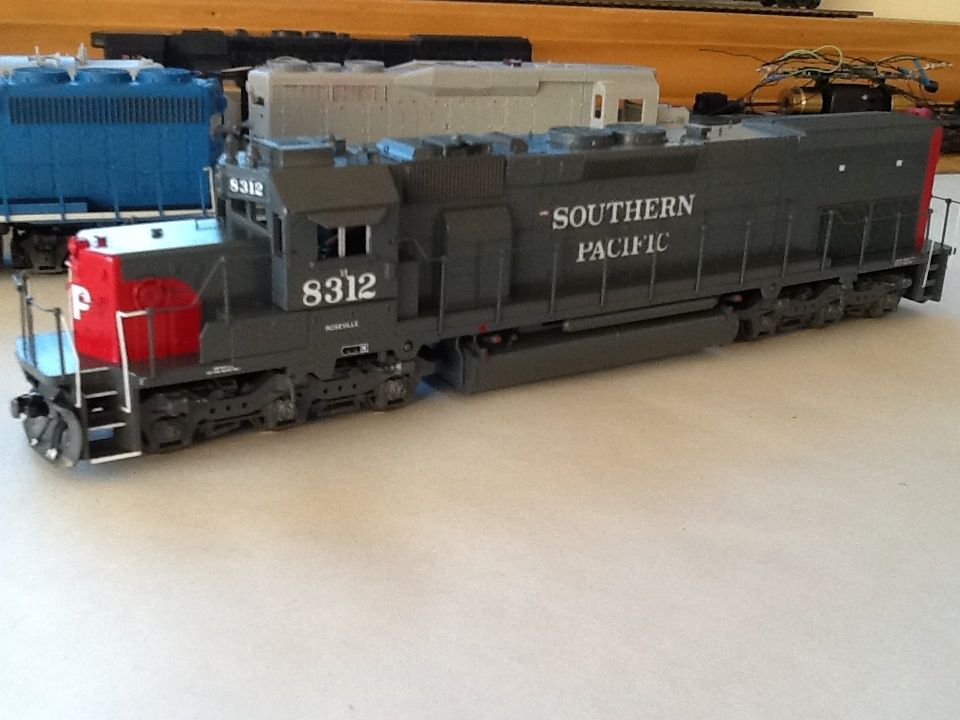 I can see myself slipping down the same ol' slippery slope as now I want to do the air reservoirs! At this point I don't think I will ever be satisfied with this locomotive as each time I turn around I see something else I want to improve on. I wanted to rescue this model because it was such a piece of junk but in honesty without the royal Cannon treatment it just isn't going to cut it for me. I think I am going to weather it and just try to pass it on to someone who digs it more than me. But I may try this again. My friend and fellow club member saw what I had done to this model and offered up 2 more blue box tunnel motors that were included in huge estate he just bought. They were the right price- free. He thought I might be able to use them. So with a free model as the starting point and careful budgeting I think I might be able to stay within a $100 budget and be satisfied with the ending result. Stay tuned! |
|
|
|
Post by bbrunell on Sept 19, 2013 22:26:58 GMT -5
Sounds like you have enough to keep you busy for a while, Kurt. I see a GP40 and GP30 lurking on the workbench as well...
|
|
|
|
Post by railfansd40t2 on Feb 6, 2014 19:14:41 GMT -5
I guess I am one of the ones that dig it more than you because I personally think it is fantastic.
Paulie
|
|
|
|
Post by m a y o r 79 on Feb 7, 2014 6:56:16 GMT -5
I think it turned out great, the fuel tank details made a huge difference. I wouldnt worry about the air resivors personally, for a budget build its probably not worth it. Get some weathering on that sucker though, way to clean for an SP!
|
|
|
|
Post by CP_8530 on Feb 8, 2014 5:15:14 GMT -5
Hmm, I must have missed this thread initially. Looks good, a lot of fun can be had with old BB units, but it's easy to go overboard ("scope creep" in the business world) and before you know it, you end up with basically a Cannon shell on an Athearn chassis  |
|
|
|
Post by slowfreight on Feb 9, 2014 12:59:47 GMT -5
Ya kno...that thing looks outSTANDING. I might suggest that cutting off the body mounting lugs would give you more benefit than replacing the air tanks...or indeed anything else. They just bug me and scream "blue box" despite the other cool mods. That I think of it, adding diamond tread would be more visible than air tanks, too.
Also, if you spend as much time weathering it as you did building it, I think you'll find that the details you didn't update will just slip into the background because so much of the major stuff was done.
Maybe it's just me, but we spend so much more time looking at the prototype from the ground up and the model from the top down that it's easy to detail the parts that you can't see on the layout. That's where the weathering will be key.
|
|
spike
Chairman
They say I can't be Spike anymore, so Mr. Burns it is!
Posts: 561
|
Post by spike on Feb 21, 2014 12:37:06 GMT -5
I think it is great too. The question is how much is enough? You got it looking good. Its nice to have some show pieces, but it is nice to have something suitable for regular heavy service. If it derails, who cares! A new shell can be found easily.
|
|
Kurt
Road Foreman
Posts: 56
|
Post by Kurt on Mar 2, 2014 19:51:02 GMT -5
I just saw that this post come back to life again! I appreciate everyone's comments concerning the build and the ensuing discussion about how much is enough when it comes to super detailing our models.
To update the build I have done nothing to the model since my last post. I clear coated the decals, test ran everything down at the club, and put it away in my display cabinet. I have enough on my plate with other projects and to me this model is a success. When I first started working on this tunnel motor it didn't run, was missing the dynamic brake hatch and generally looked like it was only going to be good for parts. The ending result is actually quite satisfying once I stepped backed and took in the process from beginning to end. It was saved from the junk box, I had a great time working on it, the resulting model looks great and in the end how could I not be satisfied!
|
|
|
|
Post by blues90 on Apr 5, 2014 18:11:35 GMT -5
It looks GREAT to me . You did a fine job.
I still have quite a few old BB athearns and rail power shells and frames .
I have gone as far as adding cannon high hoods to GP38-2's and one older SD40-2 . In fact the farthest I have gone with detail parts is wire grabs and some fans and lift rings , drop steps and coupler lift bars . I never added MU stands or hoses or did the tank details . I made new brass handrails on some . Maybe a horn or two .
That was as far as I went simply because by the time you get a BB athearn with everything applied you are very near the cost of a RTR highly detailed unit .
I do enjoy doing the detail parts and painting and decals that to me is the fun part . I do consider cost and leave off the hoses and MU stands not only for cost reasons but I tend to break small parts just handling the loco . On top of that I am not that picky.
I had a few detailed models Life like and the detail was nice no doubt yet I was always fixing a handrail since they are so fragile or some plastic lift ring or grab would break off.
The only thing I never liked on the BB were the horrid pegs holding the shell on and those large blocks for the pins to fit in. I changed on old SD40-2 to coupler mount and 2 SD40T2 and a few GP38-2's . The SD40T2 is easy same with the GP38-2 . Just remover the pins , file the headlamp nub off and file the frame ends flat on top of the frame . drill the 2 ft and 2 rear flat areas of the frame at the thickest point where it fits inside the hood . add fairly thick styrene cross bars across the inside of the hood both ends rear is slightly different that the front. use the frame to set them at the proper height and glue in place. . Fit the frame drill through into the cross bars . Then tap the styrene cross bars 1-72 drill the frame hole for the 1-72 screw OD and counter sink . Then plug the holes on the shell and file the pin holder boxes off , paint to match.
I think it makes all the difference in the world.
I got a PK2 GP30 un-dec and half the details were broken on delivery from Life Like . Year ago I made a GP30 out of a Lionel HO shell and used a athearn GP35 modified frame and I had the new brass fans so I replaced them and did the grabs and lifts and drop step and I liked it better even though it was missing the roof rivets before Bachmann bought the shell for their spectrum series and added the rivets . I then got one bachmann GP30 with a broken pilot face so I filed the both pilots flat and thin as possible ,grafted new pilots one from another athearn GP-2 and made brass handrails and was happy as a free flying bird.
I do with what I have got or I would have nothing at all.
|
|
|
|
Post by railtrax on Apr 17, 2014 1:41:04 GMT -5
HI Kurt. Great build on your Athearn "Bluebox" SP tunnel motor loco.
She looks real swell. A great modeling job all round. Great photo's too.
I'm yet to tackle an SP tunnel motor but i will also use an older Athearn Bluebox model.
I still love these old bluebox loco's. They are still great value, sure they run a bit noisy with the std. Ath motor but you can't killem & repairs are as easy as ever.
Thanks heaps.Hope to see more of your builds in the future.
Pete.
SP 4 ever
|
|


 Sorry for the poor quality of the photos. I'm a better modeler than photographer I guess.