|
|
Post by pjd on Jul 6, 2010 8:29:29 GMT -5
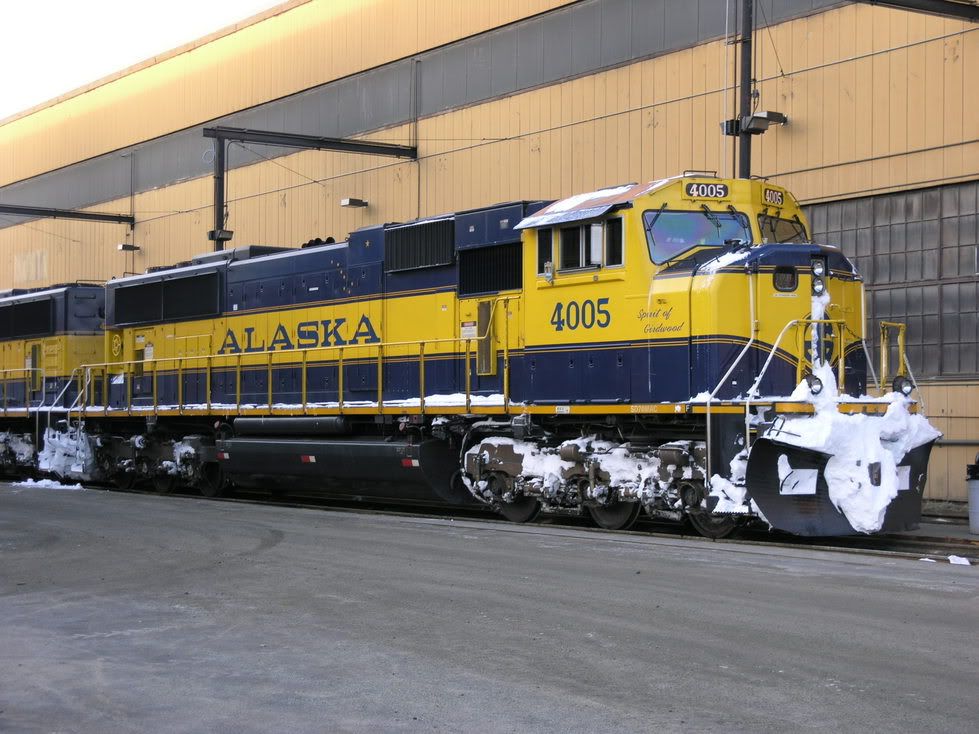
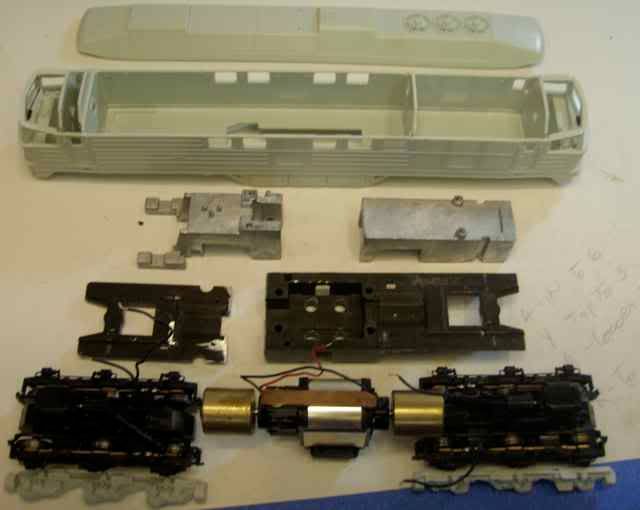
SPD is the man behind the Alaska Rail Link. Back in 1996 while attending Rail Fair in Sacramento with his dad they meet a representative from Polish State Railways who was there trying to sell reconditioned Steam Locomotives. Lets call him Nicola Pioskowski or Nick for short. Not in the market for a steam loco at the time we expressed passing interest in high horsepower diesel electrics suitable for arctic conditions. Six years later Nick calls with one of those offers. His rebuild facilities in Poland are setting on several former GDR (East German) BR 142 class 4000 HP variants of the very popular BR 131/231 Heavy Goods Diesel Locomotive. Seems there was some dispute about paying for the upgrades, Nick was pitching a demonstration deal that included delivery to Anchorage Alaska on their very own Heavy Lift Vessel. In addition a spare Type S D 49 v16 turbo charged diesel, 6 traction motors and electrical cabinets were included in the final deal struck. 1251 of these locomotives were built for the GDR at the Soviet Locomotive Works in Lugansk in various configurations based on the BR 231 starting in 1972, and many are still in service as of 2010. Dubbed Czarina Ludmilla by the ANRy crews the locomotive was made compliant with some American appliances that will be obvious in future photos. The ANRy Czarina Ludmilla started life as an 1:87 scale Revell plastic static kit from Gemany. Kit #02185 was obtained at a moving sale for $5.00. As of July 4, 2010 she is on the bench as depicted below with the roof section left detached. The chassis and power plant started as a Life-Like p2K SD9 which needed to be stretched by 4 ft to match the bolster pins with the plastic model. Over the next few days she will come together for trial runs by the weekend. Then we will start the Diesel Detailing. Pat Durand  |
|
|
|
Post by Randy Earle on Jul 6, 2010 9:27:59 GMT -5
You are not using the correct URL from your photo host, that's why it's not showing up. It needs to end in JPG. Click on the link for instructions. www.diecastdeluxe.com/ubbcode.html |
|
spd
Engineer
Alaska Rail Link
Posts: 34
|
Post by spd on Jul 6, 2010 18:10:44 GMT -5
 Here is your picture of the russian beast. |
|
|
|
Post by m a y o r 79 on Jul 6, 2010 18:38:19 GMT -5
Wow looks interesting. Cant wait to see more progress.
Your back story is realistic too, Russian locomotives dont take that much to convert to our gauge. The Milwaukee Little Joes were built for Russia, just needed some modifications to the trucks (and new english labels, and electrical modifications) to work on standard gauge tracks.
How many of these does your railroad have?
|
|
|
|
Post by Randy Earle on Jul 6, 2010 23:39:24 GMT -5
Doggone it Pat! I took one look at that project of yours and I had to buy one! Looks like the River Run was in on that purchase also. Mine will be blue and gray with a white stripe and my Ohio Logo on it. ;D Attachments:
|
|
|
|
Post by pjd on Jul 7, 2010 0:58:56 GMT -5
Mike,
The gauge in Germany and Poland is standard, while in Russia it is still 5 foot. The ARL only obtained one unit at a giveaway price delivered. It was declared as a development test and Czarina Ludmilla was used on a number of charters with the ARL business train on evening entertainment runs for charity fund raising events and to remote fishing and hunting locations for MIPs. Personally I think that SPD just wanted one for his collection that will eventually go to the World Accumulation of Rail Transport (WART). That is another story.
Randy, Did you obtain yours via Nickola Pioskowski also? If so, Dewey, Cheatem and Howe will be calling on him as the ARL contracted to be the exclusive distributor in North America for Ludmillas. This kind of broken deal is all to familiar to us here in Alaska when dealing with the "East".
Glad you found this an interesting project. I'll post more photos tomorrow and plan to have her at the Northern Lights Club on Friday night for a shake down run.
Maybe we have started a run on these old girls.
Pat Durand
|
|
|
|
Post by Randy Earle on Jul 7, 2010 4:21:17 GMT -5
No, I bought it on Evilbay. If Jerry from the old Ohio Central can do it, we can too.
|
|
|
|
Post by pjd on Jul 7, 2010 10:31:23 GMT -5
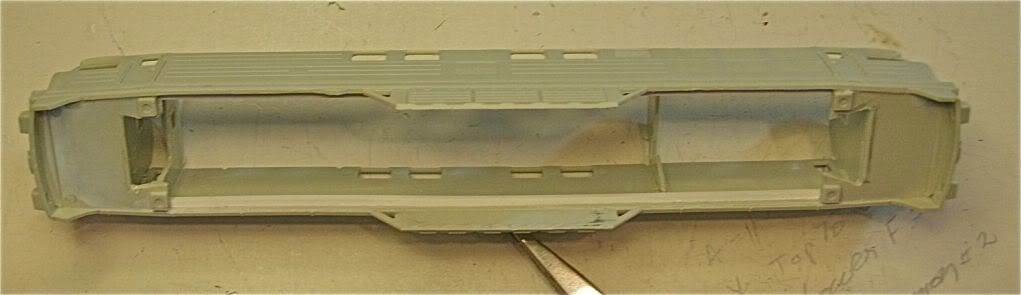 Building the Revell model into a powered unit is like assembling a jig/saw puzzle. I settled on a sacrificial p2K SD24 chassis which is easy to work with because of its thin cross section. I used a hack saw to do heavy cutting, abrasive cut off wheel to trim the ends off the frame and a belt sander to finish the rough parts seen in the first photo. I lined up the bolster pins on the plastic model with those of the frame pieces and then traced around the pieces to determine where the cuts would come in the bottom of the assembled body. Next came the abrasive cut off wheel again to rough out the plastic opening in the body. This was then finished by filing and scraping with a #11 blade until the individual chassis componets would slip into the bottom of the body. Depending on the depth of the chassis you use, locate a stop on the inside of the body so the chassis and trucks align properly with the body skirt and provide just enough clearance for operation. As seen in the photo here the white strip of styrene glued to the interior is recessed 15 scale inches above the skirt for the pK2 frame. Adhesives used in this project so far are MEK for welding plastics and IC-2000 cyanoacrlate commonly called Tire Glue for welding dissimilar materials and the metal components. Pat Durand |
|
|
|
Post by Randy Earle on Jul 7, 2010 11:18:26 GMT -5
Are you going to do away with the bumpers and mount american style couplers? What is the HO Scale measurement from Bolster Center to Bolster Center? I was thinking of using an Atlas U30-C drive on mine.
I just found out the locomotive is 67 ' feet 7.81 inches long. Of all locomotive makes, the GE U30-C comes the closest at 67 feet 3 inches.
|
|
|
|
Post by pjd on Jul 7, 2010 12:37:59 GMT -5
Preserving the control cabs on both ends of Ludmilla was a priority. Another benefit would be body mounted couplers. Fitting the chassis would become a jig saw puzzle of trial and fit. the two frame pieces from the p2K were lined up with the proper bolster positions. The frames were terminated outside the bolster on each end just short of the side bearing cast into the plastic body just behind the cab bulkheads. 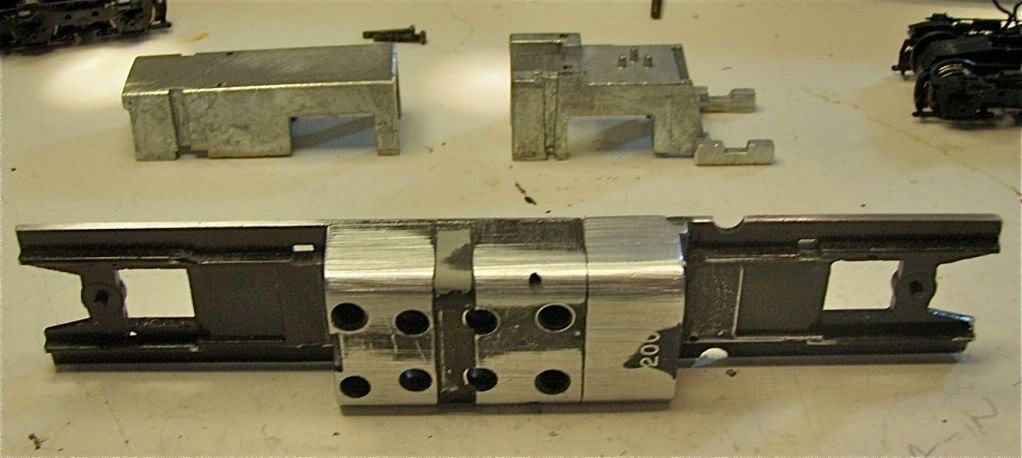 With the two frame halves in position there was a four foot gap at the end of the fuel tank to be extended. An old Athern F7 frame gave up the four foot section to the hack saw and rough shaping on the belt sander. The pieces were trial fit until ready to be tacked together with IC-2000 cyanocrylate tire glue and a spray of accelerator. The cut down body weights were then screwed to the frame for final alignment. Blocks of .040 styrene were used on the inside of the tanks to reinforce the joints with tire glue. After fifteen minutes to cure the tire glue the final finish of the tank was done on the belt sander. 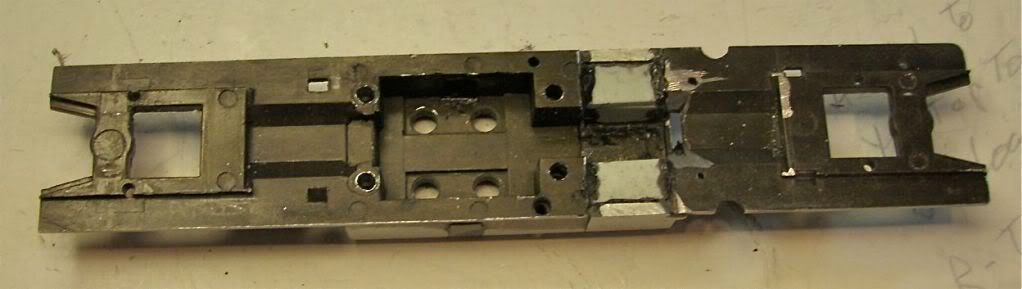 The frame is now quite rigid and the final touch will be angle braces between the end of the tank and the frame rails. The braces will be the brackets for air tanks at each end of the fuel tank mounted across the frame members. The spaces behind the tank and brackets will be filled with styrene and Tire Glue. If you have never used IC=2000 Tire Glue, you are missing out. It is black so you can see where it is. It is viscous so it does not migrate where it is not wanted. It does not gas off and destroy windows etc. It will glue anything that is not oil covered. It will fill gaps and weld up holes. It can be machined just like plastic. It is infused with rubber so it resists shock breakage. It has good working time until you hit it with accelerator. Use it to replace epoxey (NO MIXING). Use it to replace solder unless you want conductivity. Pat Durand |
|
|
|
Post by pjd on Jul 7, 2010 12:50:17 GMT -5
Randy,
The center to center on the bolsters is 38' 3"" on the model. I chose the SD chassis because the truck wheel centers at 13'6"come close to the 12' centers of the prototype. I already have a plan rebuild the model side frames with some little extensions so they match. They will become an overlay on the modified SD trucks.
I wanted to preserve the control cabs and the SD drive just fits as will be seen in subsequent build photos.
|
|
|
|
Post by pjd on Jul 7, 2010 13:03:41 GMT -5
Assembly of the chassis and modified weights into the body required some plastic removal on the two interior bulkhead walls as seen here. 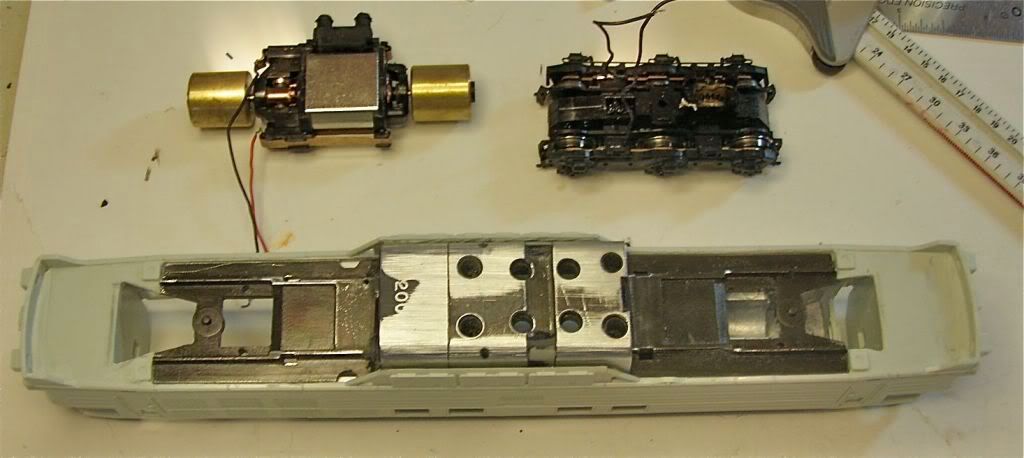 The remaining bulkheads behind the control cabs keep the body square through all of these operations. Do a trial fit with the weights to ensure they do not interfere with the mounting of the body. 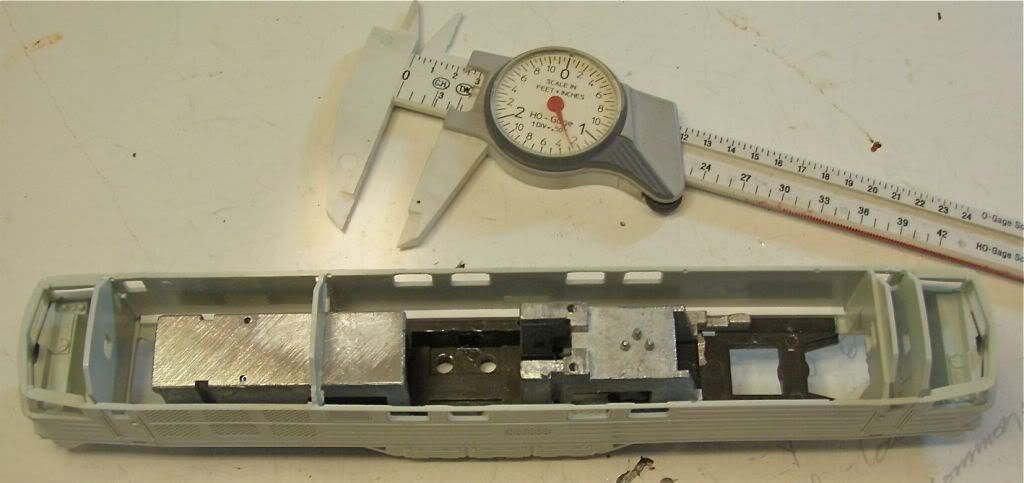 The pie shaped opening beyond the frame is clearance for the truck gear tower. Pat Durand |
|
|
|
Post by pjd on Jul 7, 2010 13:16:30 GMT -5
The power train and modified frame have been assembled. 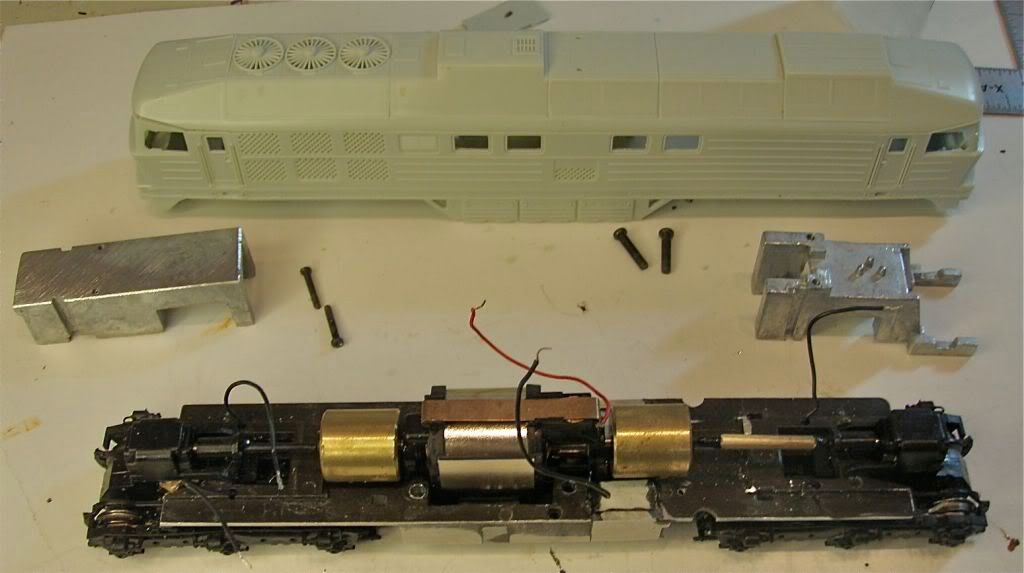 The only modification to the power train is extending the drive line by four feet on one end. A piece of oversized brass tube about 8 feet long accepted the two halves of the original drive shaft after it was cut. This is a great place to use Tire Glue because of its working time and gap filling features. When you have everything alined hit the joints with accelerator. 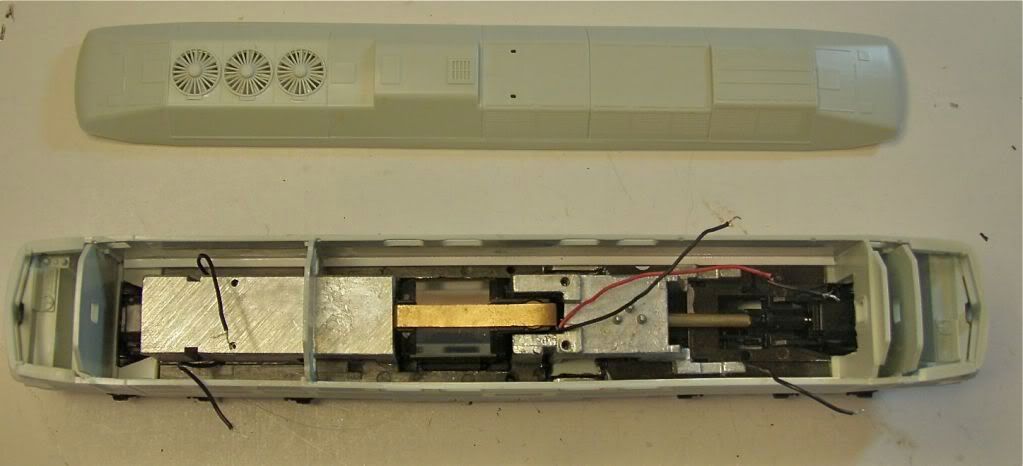 As Ludmilla goes through the shop I'll keep posting images. Here she is ready for the electricians. If you screw up with Tire Glue, just a dab of UN Glue will release it! Sort of like having your own scale cutting torch. Be careful because UN Glue is very thin and migrates. It will attack most adhesives and dissolve some plastics into a puddle. Pat Durand |
|
|
|
Post by Randy Earle on Jul 7, 2010 15:49:13 GMT -5
Randy, where did you get yours, are they still available somewhere? Having grown up in Europe, I have always loved double-ended cabs. The Russian version would have had knuckle couplers and no buffers. Evilbay. |
|
|
|
Post by pjd on Jul 7, 2010 18:00:02 GMT -5
Randy, Thanks for the video, I now have some idea what they sound like. Lots of high RPM scream with the turbo and that V16 maybe turning 550 RPM. I'll probably install an old Soundtraxx LC decoder I have to start and see if I can tune it up. Ludmilla is now running on DC on the test track.
Pat Durand
|
|
bas
Engineer
Port Nicole RR
Posts: 27
|
Post by bas on Jul 9, 2010 5:46:07 GMT -5
Hi pat Looks great...take a look here: This is how they looked in the russian version, so without buffers, but with knuckle couplers Those locomotives were also available with only one cabine on one side, coupled with another same locomotive Regards from Switzerland Bas |
|
|
|
Post by Randy Earle on Jul 9, 2010 5:52:43 GMT -5
Bas, that photo will come in handy, thanks.  |
|
|
|
Post by pjd on Jul 9, 2010 11:13:55 GMT -5
Bas,
Thanks for the scrap line view of Russian Ludmilla's. I now know how far back I can cut the old buffer boxes. I am going to mount ditch lights in these. Photo also confirms my guess that some portions of the truck side frames had been boxed in just as I plan to do on my model.
Shape of the fuel tank also shows it low hung and angled inside the rails. This wont happen on my model which has (extended range) larger fuel tanks.
Some questions for European modelers who may have access to a Ludmilla:
What is inside the the drop down access door mounted over the fuel tank under the frame rail?
When equipped with dynamic brakes, (thats what I asume is over the first set of air intakes on the roof in the photo) what kind of fans were used?
Windshield wipers appear to have been mounted at bottom of windshild about 1/3 of the way in from the outer corner of each window. Is that right?
On the cab roof, is that some sort of round vent under a canvas cover? If so it appears to be about 4 inches in diameter and extends about 6 Inches.
Thanks for your photo and any help we can get.
Pat Durand
|
|
bedstadt
Road Foreman
Canadian Railroads in HO
Posts: 58
|
Post by bedstadt on Jul 10, 2010 11:11:10 GMT -5
Hi Pat! batteries Yes, You are right. Two small fans (don't ask me about size) were used, but!!! The picture shows a TE109. The TE109 is similar to german class 232/242 (DR132/142). These locos are slightly longer than the 231 to provide room for the HEP generator installation. Main spotting feature is the 5th engine room window (231 had only 4). To make it more complicated?: 1. Class 230 (130) were the first that were delivered max speed 140 km/h, 3000hp, dynamic brakes 2. Class 231 (131) max speed 100 km/h, 3000hp, no! dynamic brakes some 230 were rebuilt to 231 specifications and some kept their dynamic brake installations 3. Class 232 (132) max speed 120 km/h (prototypes 140 km/h, but classified as 754/DR 130), 3000hp, dynamic brakes, Head End Power equipped 4. Class 242 (142) max speed 120 km/h, 4000hp, dynamic brakes, Head End Power Later plenty modifications were done, such as re-gearing 232s with parts from 230s to 140Km/h top speed (class234), re-powering 232 with new Kolomna V12 (after also testing MAK and CAT) (new class 233), silencing the original 232 (turbo and fans). These modifications altered the outward appearance too. Yes. where? can you mark it? Cab ventilation on DR locomotives was often done with simple sliding roofs/sunshine roofs (sorry, don't know if it's the correct translation), with windows, and than some sort of cab vents (If you look at the picture, you see on the right side of the locomotives front above the running board the air intake. And last bu not least, a link to a (sorry) german side. Go to "Bildergalerie" and you will find lots of pictures: www.dr-bahn.de/v300/v300.htmThat's all I can do for now, because my reference books are buried deeply in some boxes (I'm building my train room now!  ) |
|
|
|
Post by pjd on Jul 10, 2010 21:14:17 GMT -5
Michael,
Thanks for the link to more photos and the clarification of features on various models. The photo of the Russian Ludmilla in the scrap line features what may be a tubular stack at the front right corner of the Dynamic Brake module. Maybe that is a stack for the HEP unit? Did they use a dedicated diesel engine in the compartment for HEP? This is all very interesting info.
The kit included four different roofs depending on which options you wanted in the model. The roof with the two small fans over the dynamic bay was marked on the instructions DO NOT USE. This sprue of parts must have been used for modeling another version.
There must be European model manufacturers that produce these locomotive variants in HO scale. If so who are they?
My Czarina Ludmilla will cost about US$80.00 with most everything beyond the kit coming out of my junk box including the old Soundtraxx generic diesel DCC decoder. I programed it for manual sound control using function 5 for increase and function 6 for decrease. This way the diesel noise is independent of the throttle setting and I can make her run sound at about notch 6 most of the time even when setting preparing for departure. Will include more photos tomorrow.
Pat Durand
|
|