bas
Engineer
Port Nicole RR
Posts: 27
|
Post by bas on Jul 11, 2010 2:13:22 GMT -5
Hello Pat
Roco builds a lot of 232 in different looks, also Brawa made them
Regards
Bas
|
|
bedstadt
Road Foreman
Canadian Railroads in HO
Posts: 58
|
Post by bedstadt on Jul 11, 2010 12:45:11 GMT -5
Hello Pat! No. The HEP generator is driven by the prime mover. To provide the power, the engine operates at about half throttle. So no idea about the stack right now, but I will visit a friend tomorrow. Maybe we will find the answer. much less than the price you have to pay for Roco or Brawa sound loco (230 - 250! €!). Roco used ESU Decoders, so on the ESU website you can find sound files and samples. What I remember the prime mover sound was good, especially the start up sequence. The prime mover is started by an electrical starter, not by air. After the engine comes to life it goes back to idle. At idle only 8 of the engines 16 cylinders are working, which makes for an interesting bubbling? sound. What was missed badly was the distinct sound of the DC traction motors. www.esu.eu/en/downloads/sounds/generation-3/loksound-v35/diesel/ ;)Can you program it for 15 notches? But throttle at notch 1 means only engaging the traction motors, no increasing in rpm. If you are interested I can post some more technical details later. |
|
|
|
Post by pjd on Jul 12, 2010 10:10:40 GMT -5
Michael, Just a search for Ludmilla Locomotive on Google turned up lots of info and tech data. Many runby video clips at speed and a few start up sound clips. These were all recorded with video gear or cell phones and do not provide very good sound. I'll look up the ESU sounds. May have to put one of those decoders in as an upgrade. The LC (low cost) Soundtrax decoder discontinued older technology and is a generic 567 EMD with transition simulation. By program manual notching using function 5, with the loco standing still I can notch the sound up to 5 and then open the throttle to move a big load while advancing the sound up to notch 8. Setting the exhaust volume up and the dynamic fan noise down to represent the traction motors, the resulting noise sort of replicates what I hear in the videos. The EMD of course is 16 cyl two cycle so when it goes to idle by pressing Function 6 it sort of rattles possibly like the fuel saver 8 cyl mode on the 16 cyl 4 cycle in the Ludmilla. All fun and time consuming. The modified trucks and p2K mechanisim works well and the loco has lots of room for extra weight. Point of order in assembly: Paint the inside of the nose section at each end black before you assemble it to block out light from the headlights. I used three millimeter LEDs behind the lense that came with the kit. Separate the cab windows from the lenses or they will transfer light as well. Leave the roof off until all the assembly and painting is done. I found the following listing for RTR models of Ludmilla and the Revel Kit. www.ajckids.com/products/Marklin/36420Marklin advert www.dailytrader.com/wholesalers_products/br130230_ludmilla_locomotive-111745.htmlRevell Kit 22.00 More photos later. Pat Durand |
|
|
|
Post by pjd on Jul 19, 2010 18:47:57 GMT -5
Czarina Ludmilla is moving through the Alaska Rail Link shops after doing some initial road tests this past weekend. The trucks are being rebuilt and the wheels turned to the ARL profile as this is written. 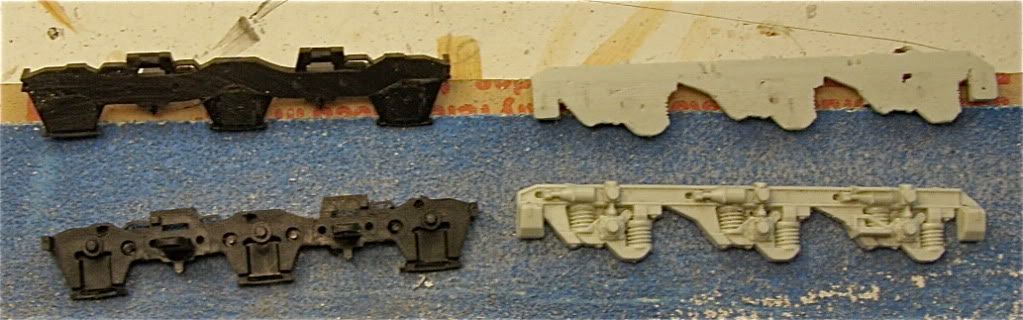 The donor side frames and the Ludmilla kit side frames were both sanded to half their original thickness first on a belt sander and finally on my sanding block. 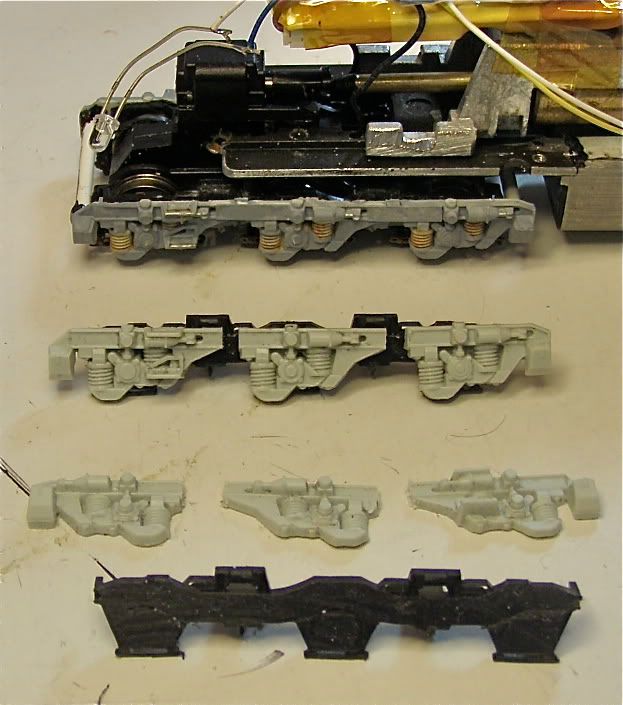 The general configuration is indicated by the photo here. To match the donor truck wheel base, the kit side frame was cut at two locations. Use IC2000 tire glue to mate the plastic side frame parts to the derlin donor truck parts. This adhesive gives working time to carefully line the journals with the axel ends. Note those boxes on the ends of the Ludmilla side frames are the Sand Boxes. The resulting gaps in the side frame are boxed in just like some of the prototype Ludmilla photos. While you have the donor trucks apart, take time to solder the pickup wires to the truck frames. Whatever you use for donor trucks, make sure the side frames are reassembled so the steps line up with the cab doors. 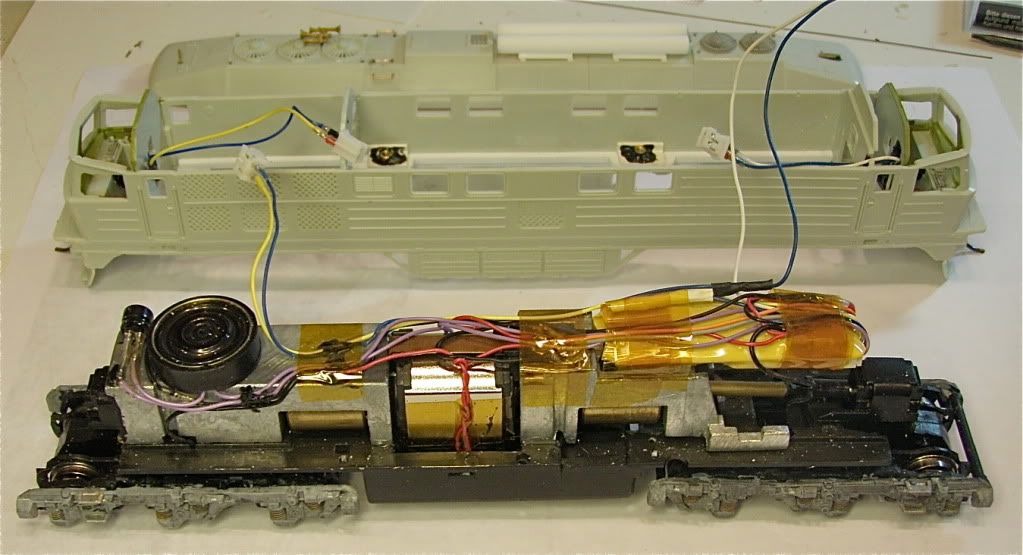 Electricians have installed the hand down LC Soundtraxx diesel decoder. I used LEDs for the two headlights inserted through holes drilled in the bulkheads behind the headlight positions. I used the long leads on the LED to position them and then glued the leads to the back of the bulkhead. Plugs on each headlight allow removal of the body from the powered chassis. ( Note: Instructions advise against LED use with this out of production decoder but I guess I lucked out. After installing a single 1000 OHM resistor on the blue common lead, I found two out of five LEDs that did not produce the glow and flashing effect when the direction was changed.) 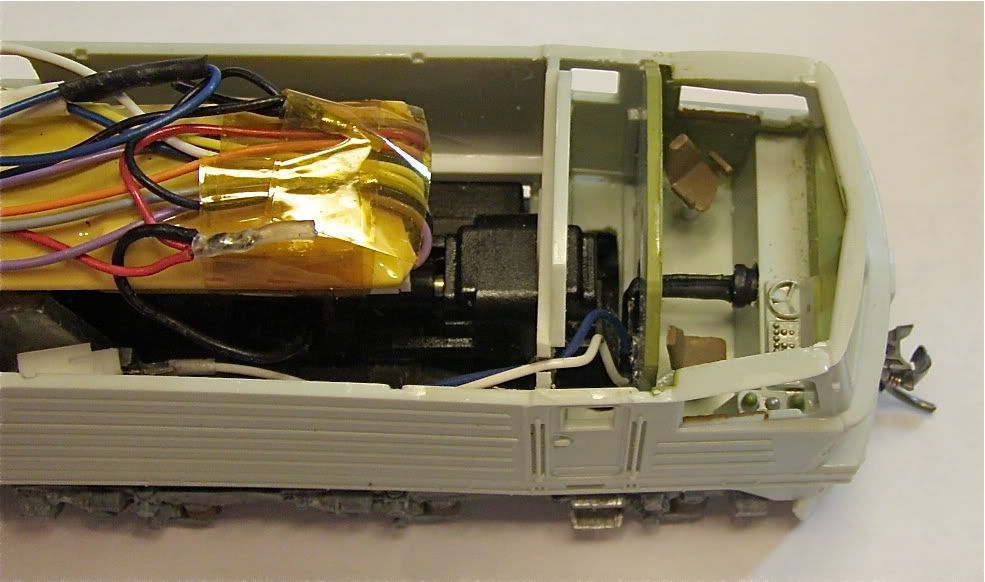 Several applications of black paint on the LED body leaving only the end lens open reduced the light pollution in the plastic body. (NOTE: paint the interior of the nose components with several layers of black before assembly to avoid this problem) 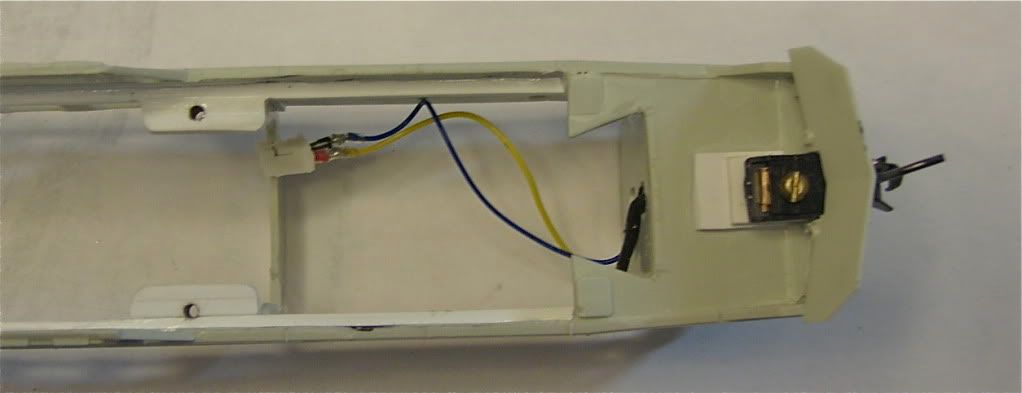 Bottom view reveals the two .040 styrene pads used to support the Kadee coupler draft gear at each end. The assembled coupler is inserted through the plow and held in place with a 2-56 screw into the floor of the cab. The chassis mounting pads shown mate with 2-56 screws that come up through the frame as described earlier. 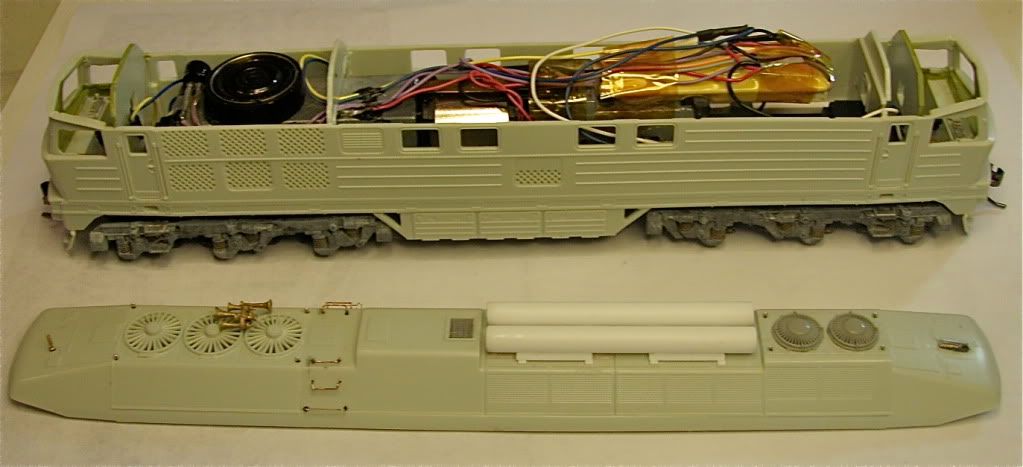 Unencumbered by European tunnel clearances, 18" air reservoirs were mounted on the roof to make room for the extended range fuel tanks. (That was dictated by the donor chassis.) A new free flow turbo exhaust was installed. A Sinclair Antenna is mounted on one cab while the opposite end sports a firecracker. Two 36" fans were added to the Dynamic brake housing. To facilitate service inspections at remote locations a pair of ladder rests and grab irons have been added to the roof. A liberal smathering of lift rings on obvious assemblies toped off the top which will be glued on after the painting and glazing are complete. Final fit and finish will follow a trip through the paint shop soon. Glazing will then complete the job and she will spend some time in the sun getting her picture taken. She will be wearing # 1867 in commemoration of the year Alaska was purchased from Russia. This has been a fun job so far, turning some junk into Czarina Ludmilla for the Alaska Rail Link. Considering her humble beginnings, applying the free lance cutting torch carried no guilt. I certainly would not have considered doing such a job on a $200 to $400 Roco or Marklin product. Builders photos will follow soon. Pat Durand |
|
|
|
Post by Randy Earle on Jul 19, 2010 22:22:17 GMT -5
Looks fantastic to me.
|
|
|
|
Post by icghogger on Jul 20, 2010 10:36:34 GMT -5
That is coming together nicely, Pat, especially your truck mods! Very well done!
|
|
Tank
Superintendent
Posts: 150
|
Post by Tank on Jul 21, 2010 2:33:52 GMT -5
This thing is too cool. Like the european steering wheel, though for a North American unit it should receive the proper controls... ;D
|
|
kcs1967
Chairman
SWLA-SETX PINE SCENTED
Posts: 1,726
|
Post by kcs1967 on Jul 21, 2010 8:43:23 GMT -5
she is coming along nicely!
|
|
|
|
Post by pjd on Aug 1, 2010 1:58:58 GMT -5
Ludmilla has gone to the paint shop where Shane added the basic Alaska Rail Link blue with a medium gray on the roof. Here is a photo in the raw paint. 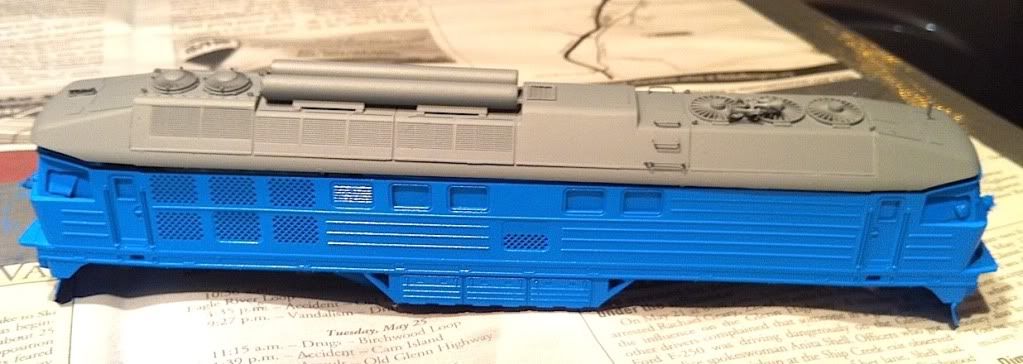 Not much to look at at this point. Note that all the windows are masked out to protect the details in the end cabs. Pat Durand |
|
|
|
Post by pjd on Aug 1, 2010 2:03:07 GMT -5
After a few days to cure the paint, decals and some touch up paint finished the job leading to final assembly. Here is a view of the top detail after some minor detailing with exhaust chalk and a spray of semi gloss top coat. 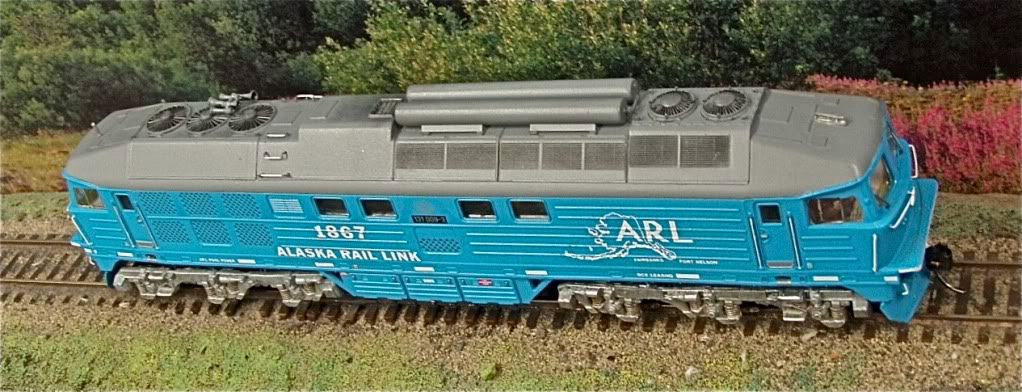 Decals came from several sets including the ARL custom supply. Pat Durand |
|
|
|
Post by pjd on Aug 1, 2010 2:20:51 GMT -5
Finally got a sunny day for the builders photos of Czarina Ludmilla. 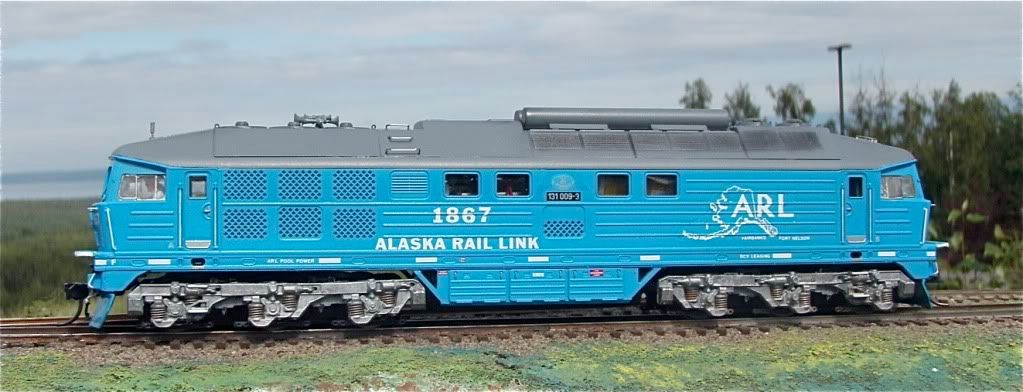 Now that she is officially Off the Bench this photo and an update of her back story is posted in the Freelance Locomotive section as well. Thanks for the encouraging comments on this project. Pat Durand |
|
|
|
Post by Randy Earle on Aug 1, 2010 10:57:19 GMT -5
Pat, this was a very nice conversion. Thanks for posting this.
|
|