|
|
Post by mandealco on Jan 4, 2011 1:02:46 GMT -5
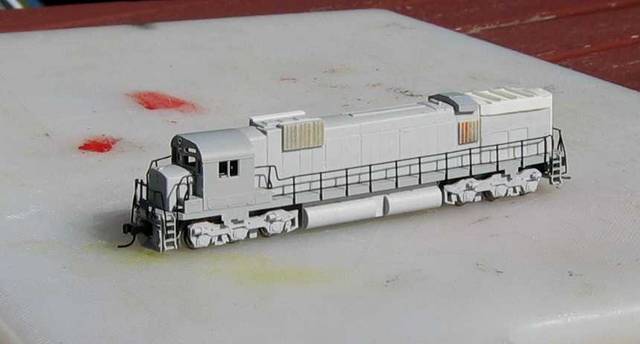
Hi My New Year's resolution didn't last long. "Don't start anything new, till some of the old projects are done"! Had some issues fitting correct Alco fuel tanks to my C-430 and C-636P, so, not wanting to waste the last 2 days before going back to work, thought I'd tackle one of the Briggs M-630's. Before modelling a CP Rail M-liner from the Briggs kit, check photos. Most Action Red M-630/636's have prominent radiator water expansion tanks, not modelled by Briggs. The M-630's mostly resemble an Alco C-636 with the large square hood top section which includes the exhaust stack. Not wanting to do that one yet I chose the "easier" M-636 which has an "after market" roof top tank with wings. The only other noticeable difference between the M-630 and 636 models is the radiator. The 630 has a 3 core radiator while the 636 has a larger 4 core one. I chose to build 4743 which is now on the Delaware-Lackawanna. This has a rebuilt air intake system replacing the normal central air intake. I believe these mods were made by Bombardier in an effort to win back CPR as a customer. After looking at lots of options to model the new intakes (mostly expensive), I cut up an old Bachmann F-9A to get the Farr air grills. After some cutting and sanding I was very happy with the result.  Overall the Briggs kit is a great starting point. There are lots of etched parts which will look great on the finished model. Still have to sort the radiator which is still the standard M-630 unit. The Dofasco trucks were a mission to get right, and the fit is still very tight, but I'm not sure what, if anything I've done wrong. Cheers (Work tomorrow ) Steve |
|
|
|
Post by mandealco on Jan 5, 2011 0:51:22 GMT -5
Hi Jay That's because you're in the wrong scale   ;D ;D Briggs make several N-scale conversion kits: C-425, and the M-630 shown here plus the Dofasco trucks under the M-630/636. Their kits are based on BR Rail versions, but are a great start for other models as well. They are made to fit the Life-Like C-424 and Atlas C-630. Hopefully more will come. Nice to discover I'm not the only one who can't see past Alcos. Love your work, it's just soooo big! Cheers Steve |
|
|
|
Post by Randy Earle on Jan 5, 2011 1:30:22 GMT -5
I've asked people to put N scale in the subject line, but it doesn't click I guess.
|
|
|
|
Post by mandealco on Jan 5, 2011 3:55:03 GMT -5
My bad. I'll make sure to add "n-scale" to my future topics.
Cheers
Steve
|
|
|
|
Post by mandealco on Mar 27, 2011 3:43:07 GMT -5
Hi A little more progress on my CP Rail M-636. Hope it's not another 2 months before I get more done.   Cheers Steve |
|
|
|
Post by ranchwagon on Mar 27, 2011 16:30:58 GMT -5
Looks great, Steve!
|
|
|
|
Post by mandealco on Apr 3, 2011 0:23:18 GMT -5
Hi I replaced the cast on ribs on the radiator with metal ones. Slow progress, but progress never the less.   Cheers Steve |
|
|
|
Post by steve4 on Apr 3, 2011 0:44:12 GMT -5
looking good Steve, what did you use for the walkway on the radiator ? I have two Cartier I have to finish (and now will copy this on them as well...  ) cheers... |
|
|
|
Post by mandealco on Apr 3, 2011 22:25:15 GMT -5
Hi Steve
The radiator is made up from 2 Briggs M-630 radiators. M-630s have a 3 core radiator while the 636's have a 4 core one.
The Briggs moldings have very fine ribs that I removed to make see through ones. These are simply fine office staples! I straightened one end, bent it at the right length, cut the verticle ends shorter, then position them in predrilled holes in the radiator. The walkway itself is from an etched detailing kit, either Plano or JnJ. I had a couple to detail some cylindical hoppers a few years ago.
The Briggs kit comes with a single walkway which is almost identical to the JnJ one (I think), but the unit I'm modelling has a second walkway over the dynamic brake outlets, So I'm using the JnJ one over the radiator. It is simply CA'd to the new metal ribs.
I think it sits a little high at the moment, but I will lower it a fraction.
Cheers
Other Steve
|
|
|
|
Post by greasemonkey on Apr 4, 2011 14:34:32 GMT -5
That's beautiful Other Steve! Sorry, couldn't help myself.
|
|
|
|
Post by lock4244 on Apr 8, 2011 0:21:17 GMT -5
Looks fantastic, Steve! I've a few Briggs kits and some are destined to become CN & CP M636's, so this thread is most helpful. FWIW, CP 4710 seems to have been moded the same way as 4743, which was not the typical mod (most seem to have kept the original central intake).
Photographic evidence would indicate that the mods were carried out between the mid 1970's to the early 80's (moded shot of 4720 and 4739 in 1976, unmoded shot of 4704 in 1982, no unmoded units by the mid 80's)
|
|
|
|
Post by mandealco on Apr 14, 2011 23:26:14 GMT -5
Hi
The modifications, at least the external ones, started with the water expansion tank, likely very early in their careers according to photographic evidence. Looks like all the M-636's built without the squared top round the exhaust area (like a C-636), were later fitted with the new tank. Yet M-630's built the same way, didn't get this change.
I think the air intake changes were made in the late 80's.
Another puzzling variation, at least on the M-636's, is the number of air tanks. Alco/MLW Centuries built with DC generators, have 2 air tanks. As with other builders, the generator was used to start the prime mover. Those built with alternators have 3 air tanks. While other builders used electrical starting systems on their AC models, Alco/MLW chose to use an air starter, an awesome sounding device. Some CP Rail C-424's were later rebuilt with alternators from retired M-630's. These can be spotted by the extra tank on the fireman's side, a sign they too have the air starter.
Now, the M-636 I'm building, # 4743, the last one made for CP Rail, only has 2 tanks. I have no idea why, unless MLW went away from the air start.
These are some of the reasons I think CP Rail's Alco/MLW fleet is absolutely perfect for modelling and studying.
Cheers
Steve
Incurable Alco modeller
|
|
|
|
Post by mandealco on Apr 26, 2011 4:24:01 GMT -5
Hi Haven't had a lot of spare time in the past few weeks, but I've managed to replace the roof walk and exhaust stack with scratchbuilt parts. Also added door handles and lift rings. More soon I hope.   Cheers Steve |
|
|
|
Post by icghogger on Apr 26, 2011 9:16:27 GMT -5
That is some Excellent Work, Steve, Thanks for sharing!!
|
|
|
|
Post by mandealco on May 1, 2011 4:38:48 GMT -5
A little more progress and it's nearly ready for a coat of action red. Added the Briggs bell, front # boards and the walkway over the dynamic brakes.   Cheers Steve |
|
|
|
Post by mandealco on May 3, 2011 3:50:07 GMT -5
Hi I've deleted the photos from the previous post and replaced them with these. A few more details added as well.   Cheers Steve |
|
|
|
Post by mandealco on May 15, 2011 3:30:07 GMT -5
Hi Back from my visit to Auckland, so managed a little time to get some painting done. Hope to get the final coat done next weekend.   Sitting behind is a future project, a C&NW C-628 that'll probably take me till Christmas at this rate. I have a few too many half finished Alcos. Behind that is the donor for my second Briggs kit, which will one day be CP Rail 4573. Cheers Steve |
|
|
|
Post by mandealco on May 22, 2011 4:43:44 GMT -5
Hi Tried to end up with a slightly faded action red colour. FAIL, looks a little dark in the flesh. Here she is, now I'm trying to decide whether to lighten it or just add the decals and details.   There are a few things I'm not happy about, but it's starting to look OK, just not sure about that colour. Cheers Steve |
|
|
|
Post by mandealco on May 29, 2011 3:57:25 GMT -5
Hi Starting to look half reasonable, even fixed the colour. Still a large list of decals, details and hand painting to do. Does anyone know where I can get dry transfer decals for the frame dots? I used to use letraset, but I can't buy it any more.  Cheers Steve |
|
|
|
Post by m a y o r 79 on May 29, 2011 12:33:20 GMT -5
Looking good Steve.
|
|


 )
)

