|
|
Post by bnsf6892 on Dec 14, 2018 20:32:23 GMT -5
At this point I have made a few threads about possible builds and have not started them but I have to try in order to learn. So my first project will be a big one. I'm planning on making a bnsf dash 9 #4897 as it appeared in spring 2018: www.flickr.com/photos/145448023@N08/41396538144/in/dateposted/ The model I would like to start with is an athearn blue box dash 9. This appears to be a blue box dash 9 based on the age of the photo detailswest.com/c44-9w_info.htm
If that can be achieved with blue box there isn't much limitation given my lack of skill. Anyway, I've never custom painted or detailed anything so it is likely I will screw up the paint but I intend to still try to detail it, this unit will be sort of a learning tool (it's not going to turn out well)
Could you guys give me a list (and links if possible) of all the items I will need, recommended paint, primer or no primer?What I know I need: DS232 MU-236 MU Cable Set DL-243 Ditch Light Set W/Platform & Lenses NB-249 GE Number Board Set AH-253 Air Horn, K-3 (not sure what horn 4897 has) FF-258 GE Dash 8,9 & AC4400CW Fuel Filler Set PB-259 Piping & Bracket Details for Right Side Underframe AT-261 Detailed Air Tank Set MU-266 MU Hose, 3 Cluster DS-273 Etched Bronze Rear Radiator Detail Set RA-274, 275, 277 Antenna Sets (don't think I need these If I will be making it PTC era) AH-302 Air Hose, Drop Elbow Type Things I am uncertain about: Painting, what to use and how The 4 window cab What order everything will be done in Decals What tools I need Anything missing??? |
|
Deleted
Deleted Member
Posts: 0
|
Post by Deleted on Dec 14, 2018 22:32:37 GMT -5
Sounds like a plan following this one as curious myself
|
|
|
|
Post by icghogger on Dec 15, 2018 9:47:02 GMT -5
As for painting tools, an airbrush and regulated air supply is a good investment.
|
|
|
|
Post by bnsf6892 on Dec 15, 2018 19:01:43 GMT -5
Is it possible to do it without an airbrush? And how do I acquire the 4 window cab piece and how is it installed?
Edit: found part number BN-358
|
|
|
|
Post by bnsf6892 on Dec 15, 2018 19:37:22 GMT -5
|
|
fr8kar
Chairman
Little man raise the cotton, beer joints get the money
Posts: 309
|
Post by fr8kar on Dec 15, 2018 23:08:27 GMT -5
Is it possible to do it without an airbrush? And how do I acquire the 4 window cab piece and how is it installed? Edit: found part number BN-358 Sure, you can paint without an airbrush. But you can get a dual action airbrush from Harbor Freight for $20. Pick up a compressor with a storage tank and a moisture trap and you're good to go. Here's the thing: you're going to go to the trouble to add all these details and then brush coat after coat of paint on them until the details disappear. Better to shoot them with thin coats of paint from an airbrush, maybe priming them first, so you can get them to match the body colors. As far as the four window cab piece is concerned, you might look for the plastic part from the Athearn SD70M/SD75M cab. It may be easier to install than the etched windows. I would expect the etched part to have some instructions on how it's installed. Typically Details West includes the instructions on a piece of paper stapled to the package or prints them directly on the package. |
|
|
|
Post by bnsf6892 on Dec 16, 2018 1:02:10 GMT -5
Is it possible to do it without an airbrush? And how do I acquire the 4 window cab piece and how is it installed? Edit: found part number BN-358 Sure, you can paint without an airbrush. But you can get a dual action airbrush from Harbor Freight for $20. Pick up a compressor with a storage tank and a moisture trap and you're good to go. Here's the thing: you're going to go to the trouble to add all these details and then brush coat after coat of paint on them until the details disappear. Better to shoot them with thin coats of paint from an airbrush, maybe priming them first, so you can get them to match the body colors. As far as the four window cab piece is concerned, you might look for the plastic part from the Athearn SD70M/SD75M cab. It may be easier to install than the etched windows. I would expect the etched part to have some instructions on how it's installed. Typically Details West includes the instructions on a piece of paper stapled to the package or prints them directly on the package. Thanks for the tip! How much does the compressor, storage tank and moisture trap cost? Should I use this same setup for painting of the overall shell of the loco? |
|
fr8kar
Chairman
Little man raise the cotton, beer joints get the money
Posts: 309
|
Post by fr8kar on Dec 16, 2018 17:46:16 GMT -5
Sure, you can paint without an airbrush. But you can get a dual action airbrush from Harbor Freight for $20. Pick up a compressor with a storage tank and a moisture trap and you're good to go. Here's the thing: you're going to go to the trouble to add all these details and then brush coat after coat of paint on them until the details disappear. Better to shoot them with thin coats of paint from an airbrush, maybe priming them first, so you can get them to match the body colors. As far as the four window cab piece is concerned, you might look for the plastic part from the Athearn SD70M/SD75M cab. It may be easier to install than the etched windows. I would expect the etched part to have some instructions on how it's installed. Typically Details West includes the instructions on a piece of paper stapled to the package or prints them directly on the package. Thanks for the tip! How much does the compressor, storage tank and moisture trap cost? Should I use this same setup for painting of the overall shell of the loco? You can get a Campbell Hausfeld three gallon compressor for $70+tax at Walmart. I'm not sure about the moisture trap, but they aren't expensive. You get some accessories with the compressor that help out with basketballs, car and bike tires and other things that come up around the house, if it helps to not just think of it as a hobby purchase.  If you want to preserve the paint on the shell, that's probably the easier way to do it. To avoid trying to match the factory paint you could just paint the whole thing if you don't mind decals. The yellow stripes on BNSF locomotives are decals that don't wrap around the doors, so you'll have a lot of cutting to do if you paint the shell yourself. |
|
|
|
Post by bnsf6892 on Dec 16, 2018 21:51:51 GMT -5
Doors? the prime mover access doors? which doors? If it is going to be that hard to repaint an athearn bb dash 9 I may try detailing a kato dash 9 in santa fe (and patch for BNSF of course) I'm going to run to my LHS on Tuesday to see if they have any of the detail parts (particularly the traction motor cables because I have a kato ac4400 I kind of want to install them on)
|
|
fr8kar
Chairman
Little man raise the cotton, beer joints get the money
Posts: 309
|
Post by fr8kar on Dec 17, 2018 16:00:39 GMT -5
Yes, all the doors and access panels. The underlying paint is pretty simple, but it's the decals that give it such a distinct look. I don't have a detail photo showing it, but I can show you the full resolution photo of this Dash 9 rebuilt to AC traction: www.pbase.com/mecrharris/image/161443416/originalIf you follow the stripes around the locomotive, there is a vertical black bar between segments of the yellow stripes at each removable panel, door and batten between carbody sections. That is the underlying black paint showing from behind where the yellow decals break at each door/panel/segment. This effect is not as exaggerated on the earlier green and orange scheme (H2), especially where removable panels are located, but there are distinct breaks in the yellow striping. If you would rather just ignore the breaks in the yellow striping and lay the stripes down continuously, I don't think anyone would fault you for that. You might even be able to go back with a fine brush and using the base green color (or black, I don't know if this locomotive was repainted by your modeling date) paint over the stripes at each panel/door/segment. |
|
fr8kar
Chairman
Little man raise the cotton, beer joints get the money
Posts: 309
|
Post by fr8kar on Dec 17, 2018 16:09:09 GMT -5
|
|
|
|
Post by bnsf6892 on Dec 17, 2018 19:33:31 GMT -5
I will definitely not be able to achieve that. If this locomotive is not a failure and turns out well, at some point I would weather it with a black wash of weathering powders, which should sink into those cracks and make it less obvious that there are not breaks in the yellow stripe. Lets remember this will be my first project, it will be an achievement if it looks half acceptable.... Anyways, the intermountain dash 9's are coming out soon so I might be better off detailing one of the old kato d9's (in santa fe or BNSF h1) Idk, Im kinda concerned about that 4 window cab, How difficult is it to do the 4 window cab modification? |
|
fr8kar
Chairman
Little man raise the cotton, beer joints get the money
Posts: 309
|
Post by fr8kar on Dec 17, 2018 22:39:53 GMT -5
I don't think it would be too bad if you've done something like that before. But if you have no experience doing this kind of modification, you may want to temper your expectations. The process for cutting in windows is essentially to cut the opening smaller than you need it then gradually enlarge it so the window casting is a snug fit. I would make a paper template of the part, then tape that to the model. Using a brand new X-acto no.11 blade, trace the outline of the window gently onto the model cutting through the paper. Once you have it traced on the model, it's just a matter of cutting the opening. Use a sharp blade and little force, taking off small slivers of plastic as you go. If the opening you're cutting isn't next to an existing opening, drill a series of holes and "connect the dots" with the blade. Here's an example of a similar process I used to cut in new windows on a caboose: 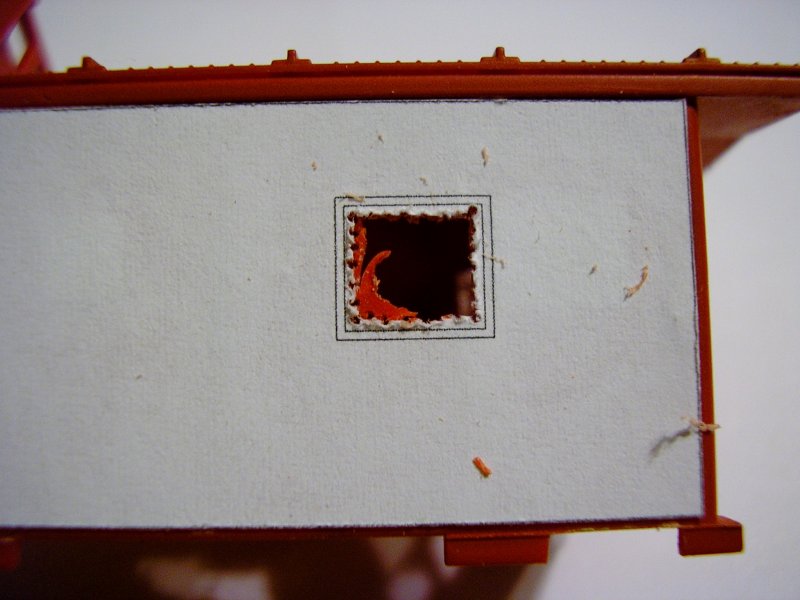 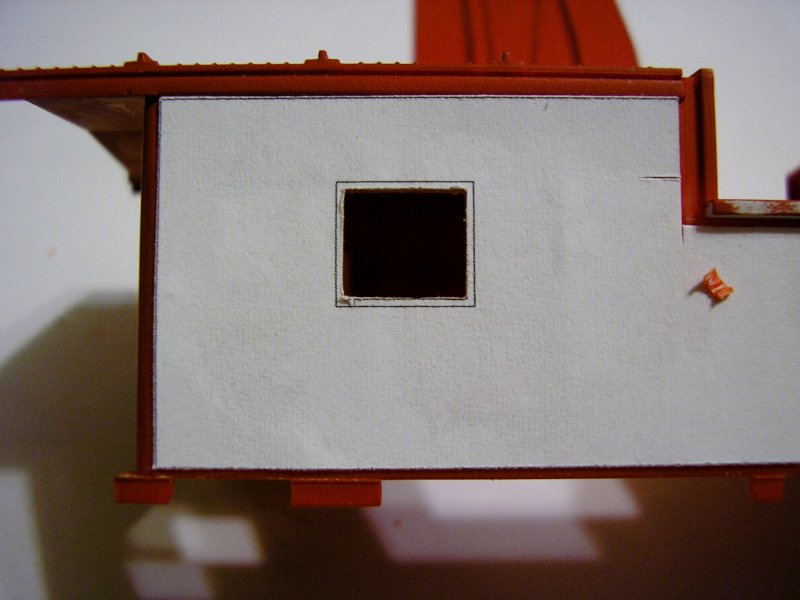 If you want to model any of the other Dash 9s, there's a lot to choose from as you've indicated. The older Heritage 1 Dash 9s in the 960-1123 series have a lot of character. Several of them (and I don't remember off hand which ones) have red walkways. All of them are equipped with Type E couplers, like the 600 series, which was standard ATSF practice. Dash 9s in the 700 and 4700 series were delivered in the red and silver warbonnet scheme only a few months later, and were all equipped with Type F couplers, a practice that continued across all future BNSF road locomotive deliveries. The type of coupler doesn't really matter if you're not using Kadee shelf couplers to represent the Fs or using the appropriate Sergent couplers, but it's one of the visible clues as to who ordered the locomotives originally and what was envisioned for their operating life. At the time they were ordered, Santa Fe had an eye on intermodal service and Burlington Northern was focused on coal service. This was underscored by the fact that Santa Fe ordered high horsepower DC traction locomotives and BN ordered AC traction locomotives. Of course once the merger went into effect they could be found in other roles besides intermodal, such as merchandise, grain and other unit trains. At this time, BNSF 960-1123 have been workhorses for BNSF for over 21 years now. Some of the older Santa Fe Dash 9s in the 600 series have been converted to AC traction with four motors instead of six. These are classified as AC44C4M and have the same trucks as the ES44C4 and ET44C4 locomotives with the load adjusting cylinders on the center axle. I'm curious how many more of these rebuilds will occur. They seem to be successful product from my point of view. If I were modeling the present day, I'd have my hands full with the AC44C4M variant. |
|
|
|
Post by bnsf6892 on Dec 18, 2018 0:46:26 GMT -5
I don't think it would be too bad if you've done something like that before. But if you have no experience doing this kind of modification, you may want to temper your expectations. The process for cutting in windows is essentially to cut the opening smaller than you need it then gradually enlarge it so the window casting is a snug fit. I would make a paper template of the part, then tape that to the model. Using a brand new X-acto no.11 blade, trace the outline of the window gently onto the model cutting through the paper. Once you have it traced on the model, it's just a matter of cutting the opening. Use a sharp blade and little force, taking off small slivers of plastic as you go. If the opening you're cutting isn't next to an existing opening, drill a series of holes and "connect the dots" with the blade. Here's an example of a similar process I used to cut in new windows on a caboose: If you want to model any of the other Dash 9s, there's a lot to choose from as you've indicated. The older Heritage 1 Dash 9s in the 960-1123 series have a lot of character. Several of them (and I don't remember off hand which ones) have red walkways. All of them are equipped with Type E couplers, like the 600 series, which was standard ATSF practice. Dash 9s in the 700 and 4700 series were delivered in the red and silver warbonnet scheme only a few months later, and were all equipped with Type F couplers, a practice that continued across all future BNSF road locomotive deliveries. The type of coupler doesn't really matter if you're not using Kadee shelf couplers to represent the Fs or using the appropriate Sergent couplers, but it's one of the visible clues as to who ordered the locomotives originally and what was envisioned for their operating life. At the time they were ordered, Santa Fe had an eye on intermodal service and Burlington Northern was focused on coal service. This was underscored by the fact that Santa Fe ordered high horsepower DC traction locomotives and BN ordered AC traction locomotives. Of course once the merger went into effect they could be found in other roles besides intermodal, such as merchandise, grain and other unit trains. At this time, BNSF 960-1123 have been workhorses for BNSF for over 21 years now. Some of the older Santa Fe Dash 9s in the 600 series have been converted to AC traction with four motors instead of six. These are classified as AC44C4M and have the same trucks as the ES44C4 and ET44C4 locomotives with the load adjusting cylinders on the center axle. I'm curious how many more of these rebuilds will occur. They seem to be successful product from my point of view. If I were modeling the present day, I'd have my hands full with the AC44C4M variant. Well.... Someone does make an AC44C4M shell. And I have seen bnsf 615 I can always get spare cabs with the bluebox and get multiple attempts at it |
|
EMDX6043
Chairman
Future ex-modeler
Posts: 837
|
Post by EMDX6043 on Dec 18, 2018 7:49:25 GMT -5
The important thing is to be patient and take your time.
Practicing on slicing/dicing an old shell (anything really, even a boxcar) is a good idea to develop a feel for working with plastic, but don't fall victim to "paralysis by analysis" AND don't get discouraged by any mistakes you think you made. I also suggest investing in a quality set of miniature files for work like this.
Good luck!
|
|
|
|
Post by bnsf6892 on Dec 18, 2018 19:03:08 GMT -5
If you guys had to do your first locomotive project, what would it be? (Has to be modern bnsf)
I think at this point I would only attempt the custom painting if I get the dash 9 for really cheap
Btw I just picked up TC-239 for my AC4400, how do you install them? Glue? Drill holes? they do have studs on the back. The details west instructions aren't very clear. Also they can bend, how careful do I need to be about over bending them?
Also the curved bit that ends near the traction motor, what happens to the end of that piece, it seems it could conflict with the top of the trucks? Finally how should I paint them? They are close to the bnsf silver but do not appear to be a match, I cannot tell.
Does anything go underneath them? Any pics showing how they should be fitted will be greatly appreciated!
|
|
fr8kar
Chairman
Little man raise the cotton, beer joints get the money
Posts: 309
|
Post by fr8kar on Dec 19, 2018 22:34:54 GMT -5
The traction motor cables are painted the same as the underframe, so just find a paint that matches and you should be fine. I haven't dealt with those parts myself, so I couldn't advise you on how they're installed.
For a first project I wouldn't tackle something that requires custom painting and kitbashing. I'd just try detailing a factory painted model. Kato and Athearn Dash 9s have the window arrangement that works for the Santa Fe/BNSF 600 series and the BNSF 960-1123 series, so I'd just find a model that has the right body with gull wing cab and go from there.
|
|
|
|
Post by bnsf6892 on Dec 19, 2018 23:12:58 GMT -5
Ok, if I can acquire one that sounds like a plan. I saw BNSF 652 in the spring on Tehachapi (caliente) in an excellent consist. It was BNSF ES44C4, CP ES44AC, NS C44-9W, Ex-ATSF C44-9W (652) and then BNSF c44-9w and ES44C4 as the DPU's. To do 652 I would have to get an unnumbered unit (I saw one sell for 60 dollars on ebay on sunday and now regret not purchasing it  and do the decals for the numbers. I've also seen 1005 which is a kato produced road number (I have heard that the paint is wrong on the kato h1 dash 9, can you confirm this?) I don't know how I feel about the athearn blue box santa fe paint but the bb h1 dash 9 looks like it might be ok. At this point I think I prefer the katos because the handrails are already of good quality same with the grab irons. I really want to do the underframe detailing. |
|
|
|
Post by bnsf6892 on Jan 5, 2019 23:25:07 GMT -5
So after some more thought I think I decided detailing and weathering are much better first projects. But for weathering I will need an airbrush to achieve my desired effect. From what you guys said earlier about harbor freight, most of the compressors on their website have a significant amount of negative reviews, same with the airbrushes. I watched a few youtube videos today and found this video: Apparently the airbrush being used is a Paasche H series single action siphon feed, which gets fairly good reviews here www.amazon.com/Paasche-H-SET-Single-Action-Airbrush/dp/B004O7HTYU It is a bit more expensive but it is not too expensive and seems simple to operate and apparently is easy to clean. So other than that all I would need is a compressor, moisture trap and pressure regulator correct? Any suggestions for those, not too expensive but also reliable (the harbor freight ones have a lot of negative reviews) |
|
fr8kar
Chairman
Little man raise the cotton, beer joints get the money
Posts: 309
|
Post by fr8kar on Jan 6, 2019 0:18:35 GMT -5
I started off using a Paasche H in 1989 and it is a great tool. It's a single action airbrush, which means you can only control the paint volume while the air volume is on or off. You can set the air volume with a knob that will limit the vertical travel of the air button, but it's not practical to adjust it on the fly.
A dual action airbrush, such as the Paasche VL series, allows you to control both the air volume and the paint volume simultaneously. You control air volume by varying the downward pressure on the button and you control the paint volume by pulling the button back toward your palm. It takes a few minutes to get used to, but it's easy once you get the hang of it. I used this brush for a few years beginning in 1991 back when I was painting t-shirts in the mall during college. I've spent many, many hours with it and it's a fantastic airbrush.
The Harbor Freight airbrushes I use are Badger dual action airbrush knock-offs. They work exactly the same way as the Paasche VL. The quality isn't the greatest, but there aren't any defects that would prevent you from doing good work with it. The main difference between the HF airbrush and the more expensive Paasche VL is the weight and feel of it in your hand. I also noted a burr at the edge of the feed tube in the gravity paint cup of one of my HF airbrushes where the Paasche airbrushes I've owned have never had any defects in workmanship. However, the burr didn't affect paint delivery or cleaning the cup. I would avoid the single action HF airbrushes.
I got rid of my VL airbrushes years ago but I always kept the old reliable Paasche H, which is going on thirty years old now. I still use it for metallic paints. For clear lacquers and white paint I use one HF airbrush and another HF airbrush for all other colors. At $20 each, it's easy to keep a couple to prevent any cross-contamination from any residue missed from cleaning.
I wouldn't say that the Paasche H is easier to clean than the HF airbrush. It's simple to remove the needle from the HF airbrush and wipe it clean, shoot some lacquer thinner through it and repeat the process until the spray pattern runs clear. The H must be disassembled by unscrewing a set screw, working the paint nozzle out of the brush handle while opening the paint volume control until it separates from the paint nozzle. It's not particularly difficult once you've done it a couple times, but it's not as easy as pulling the needle out of the dual action brush.
Another minor difference that comes into play when cleaning is the feed tube on the gravity cup. The HF airbrush feed tube is straight compared to the feed tube on the H, which has a bend in it. Harbor Freight sells a tool for cleaning this tube, which I recommend. It moves easily through the HF feed tube and can bind in the Paasche feed tube.
At the end of the day, I'd recommend a dual action airbrush over a single action brush. The HF dual action airbrush is inexpensive and good enough quality to do what you want. If you are looking for a place to spend the money you save on the airbrush, splurge on a better compressor. Mine has the regulator built in, but the moisture trap was a separate purchase. I also bought several quick connect fittings at Harbor Freight so I can quickly swap between airbrushes or other air tools.
Everyone is going to have different opinions and experiences, but these are mine.
|
|


 and do the decals for the numbers. I've also seen 1005 which is a kato produced road number (I have heard that the paint is wrong on the kato h1 dash 9, can you confirm this?) I don't know how I feel about the athearn blue box santa fe paint but the bb h1 dash 9 looks like it might be ok. At this point I think I prefer the katos because the handrails are already of good quality same with the grab irons. I really want to do the underframe detailing.