|
|
Post by m a y o r 79 on Jan 2, 2016 16:14:29 GMT -5
Its been a while since I've done any diesel modeling (not that I've finished any of my other projects), so I figured 2016 would be the year I picked up some new diesel projects. I've had this one in the works for a while now and decided to finally start it, a Milwaukee Road TR4 to use for the transfer runs on my future Beer Line layout. They'll be set in the mid 1960's, after the drawbar was removed. They weren't the most common power on the Beer Line but they did make appearances now and then. Here's a picture of the set I'm basing my build on

The basis of the build is going to be the Athearn SW7 cow and calf set. I picked these up a few years ago in anticipation. Turns out one is the old metal side frame trucks. Hopefully I don't run into issues with that. Havnet run them yet either so I may be in for it with a full mechanical rebuild.
Not sure how much I'm going to do with these since they'll be somewhat regular power. I've got a bunch of parts on order from Des Planes Hobbies, should be here sometime later next week. So far the plan is to replace the cab with a Canon cab, rebuild the rear pilot of the "calf" unit since it shouldn't have step wells, build the hump control box on top of the calf, and add a bunch of other random detail parts (grabs, lift bars, horns, bell, a new radiator screen, etc.).
 The razor saw should hit the calf tonite after the kids go to bed. I'm hoping this build doesn't get derailed like some of my other projects have in the past. |
|
|
|
Post by iomalley on Jan 2, 2016 17:48:16 GMT -5
Hey Mike, I love these old resurrection projects! You won't have any issues running the old outside bearing with new. If I could make a suggestion, if you have a Proto2000 SW cab kicking around, you might save yourself some grief in the cab area. Aside from the one piece nature of the P2K cab, you will also find it fits like a glove. You need only cut away a bit of material where it mates to the body, and shave away 0.010" or so from just inside the rear wall of the cab to allow the truck to swing better. (and round off the back of the gear tower slightly) The biggest issue with the Cannon cab is that the floor is an integral part of the assembly, and you have to cut most of it out to allow the truck to swing in there. Another big plus to the P2k cab is the click in flush glass...much better than cutting the cannon glazing. Just my op though. Here's my SW7 with a P2k cab masquerading as an SW9. 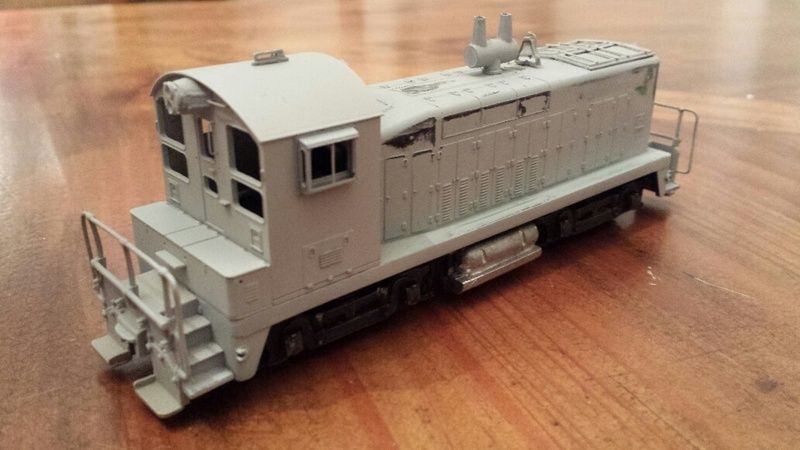 Here's another Athearn SW (1200rs this time) with the Cannon cab. If I could go back I'd use another P2K. 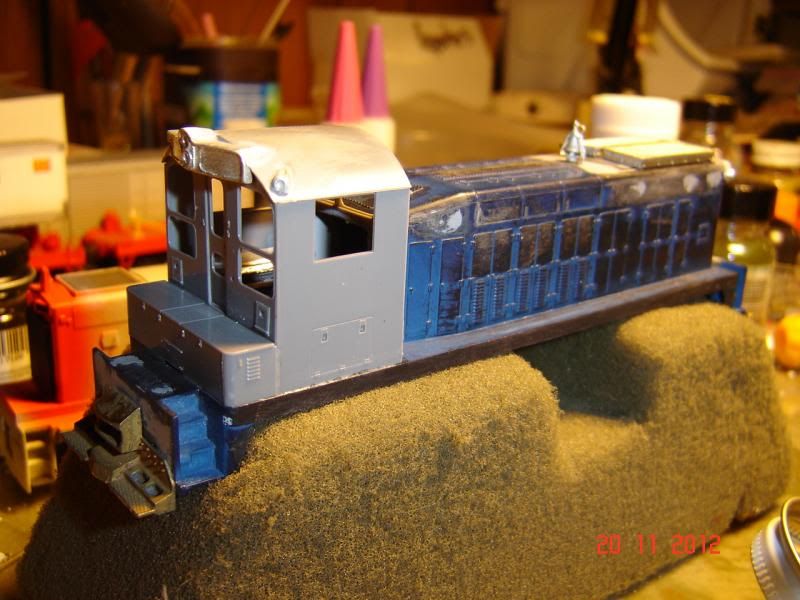 I'm not sure why Athearn didn't do this, but adding an extra stanchion to the ends (3 instead of 2) looks alot more prototypical. Try to get a top down shot to ensure that your TR4 set had the louvers or grille. Other than that, I'll be watching this build! Good luck! |
|
milw199
Superintendent
Beaded crossbucks FTW
Posts: 180
|
Post by milw199 on Jan 2, 2016 22:48:31 GMT -5
If you can find a set of Overland trash can spark arrestors, they look a lot better. I had a set installed on a P2K SW1200, too bad I sold it some years ago.
You'll probably want to rebuild or replace the drives. The old Athearn ones weren't the greatest. I think the Con-Cor/Kato SW7 drive might fit, if you can round some up. They do have traction tires, though. I have one around here somewhere, under a Cary SW1500 shell.
|
|
|
|
Post by m a y o r 79 on Jan 3, 2016 10:53:16 GMT -5
Ugh just typed up a reply and the computer crashed! Got the step wells done last nite on the calf unit. Got them all cut out and replaced with styrene to fill in the gaps, only had remake the side pieces once due to some bad measurements. Overall it worked out really good I think. I may have to build out the sides again a little more. I was looking at some pictures I have and it seems the Milwaukee units were a little different than the article I'm following but that shouldn't be a bid deal. I'm not sure about the front pilot and the cow unit, there weren't many details on these units since they didn't have MU connections, except to each other. The Athearn unit has some pretty crude details. I may sand them smooth and replace with styrene and rebuild from there. I think next up is cleaning up the bulges on the sides where the short hood is ( I'll be permanently mounting it to the shell ) and getting the hump control box built on top. Sean, good point on the Proto cab but unfortunately I don't have one lying around. Since I already bought the Cannon cab I'll just go forward with that. I was at one point going to put a cab interior in but I really don't want to loose the powered rear truck so I may just put a crew in the windows instead. Mike, I agree the OMI parts look better but I cant seem to find them anymore. Do you have a source? Otherwise I'll probably just stick with the Details Associates parts I already have. Here's a quick pic update...  Now on to the next part. |
|
|
|
Post by hotshot3305 on Jan 3, 2016 13:00:25 GMT -5
You wrote "Mike, I agree the OMI parts look better but I cant seem to find them anymore. Do you have a source? Otherwise I'll probably just stick with the Details Associates parts I already have."
Mike, go to americanscalemodels.com and you'll see the entire line of OMI detail parts there. Bill is great to work with and he'll be happy to assist you.
Bob
|
|
|
|
Post by m a y o r 79 on Jan 10, 2016 18:02:44 GMT -5
Havent posted an update on a while but I have been making progress. Got the hump control box built on the calf unit and did some more body filling and sanding. Started looking at the radiator screen parts that I bought and I thought it would look neat to model the louvers partially open so you can see the fan behind. Of course that means more body work and some careful cutting on the detail part. Now I need to get a Cannon 48" fan so its more waiting for parts to arrive. I thought about putting see thru screens on top as well but I dont know of a correct sized part, plus it would make a wide open view to the gear tower inside, may not be worth the effort.
Other smaller details are making their way on. Ill try to get some pictures posted later this week.
|
|
|
|
Post by iomalley on Jan 10, 2016 18:49:46 GMT -5
Do yourself a favour and soak the DA grille screen in acetone (or was it lacquer thinner?) to dissolve the glue that holds it to the backer. Most people know this, but for decades I've been ruining these grilles trying to peel them off, until someone told me recently. D'oh!?!? So with nothing left but the base and slats, I cut up alot of aerators to make new grilles so there's alot of excess water going down somebody's drain somewhere...  |
|
|
|
Post by m a y o r 79 on Jan 16, 2016 21:15:56 GMT -5
Well found some time this afternoon to work on the TR4 again while the kids were napping. Well kind of, my daughter woke up after about a half hour, oh well. Got a delivery of some much needed detail parts this week including the fans for the front radiator. Spent most of my time working on the calf unit. Got the stock Athearn radiator grills sanded smooth and a hole drilled for the new fans. Turns out a 1/2" drill bit is almost the perfect size for the Cannon 48" dynamic fans. Just needed to do a little clean up with the xacto and file. The picture below shows the calf unit along with the stock unit for comparison.  The fan went together rather easy. Just used the back part with the fan mount, the etched fan assembly and the plactic cover. The rest of the parts aren't really needed since I'm using the Detail Associates radiator grills. (Thanks Sean for the tip on how to remove the grill, I was wondering how I'd get that thing off). It went together surprisingly easily.  I foolishly decided to model this unit with fully open louvers so I had to completely cut out the closed louvers from the Detail Associates parts. Wasn't as hard as I though it would be. All of the individual vains needed to be trimmed up some to fit the right way. Overall I think it turned out good. Hopefully it shows up this well on the final painted model. I'm figuring I'll have to use a small paintbrush to touch up the silver on the fans. This picture also shows the new headlight assembly, drilled out for lights of course   I also got some lift rings installed, the side grab irons installed with new eyebolts and the two SW lift rings at the front. Added some additional louvers to the area where the cab would have been that seem to be a Milwaukee only detail. These shots also show the hump control box that was added shortly after they were delivered. I still need to add some piping to these to finish them up. After this its a little work on the front and rear pilots, handrails and its off to the other unit.   |
|
|
|
Post by m a y o r 79 on Jan 21, 2016 21:09:10 GMT -5
I pulled the Cannon cab out tonite to start looking over it. I see what you mean Sean about the floor. Now Im kicking around the idea of pullingbthe rear gear tower and detailing out the interior. Another decision to make. Im not sure if its worth it though, the set will have to pull about 10-12 cars up a rather steep grade pn the layout someday.
Ill probably start building it over the weekend.
|
|
|
|
Post by detlef10 on Jan 25, 2016 16:01:20 GMT -5
Excellent work. Love the radiator fan, even though that is a lot of work. Holy smokes - louvers to boot?! Again, nice work. Looking forward to seeing additional photos as the project progresses.
|
|
|
|
Post by m a y o r 79 on Jan 31, 2016 16:36:46 GMT -5
Finally an update, been too long. (sorry about the bad phone pics, i'll get the DSLR out next time) I've gotten some work done on the A unit, worked on the Cannon cab last weekend, got it mostly built and test fitted onto the shell. Not quite the fit I was expecting, it actually seems to narrow. The end that aligns with the long hood seems to be too narrow to match the width of the Athearn walkway, but it may just be that the sides are pulling in a little since it's not glued on yet and I left the floor out. I still need to do some trimming on truck gear tower to get more clearance for the truck swing. It doesn't look too bad though right now. I need to get some more brass wire to finish the handrails and grabs that go on the cab. I also need to get all weather windows on, and figure out exactly what all the Milwaukee put on the roofs (looks like antennas and a bell but I cant get a good clear shot of any of it).  Here's a shot of the back of the cab showing the filled in lower windows. I also added a DA headlight above the door. More details to be added at some point....  And of course the radiators on both units need to match So I added the Cannon fan and open louvers on the DA radiator screen parts. Same basic install as the last unit. I did discover that the Athearn light clip on the front of the frame interferes with the Cannon fan and how far back it protrudes into the shell. So before these get reattached that entire clip will be coming out. No matter, I was going to use LED's to light the headligts anyway.  That's it for now..... |
|
milw199
Superintendent
Beaded crossbucks FTW
Posts: 180
|
Post by milw199 on Jan 31, 2016 23:08:27 GMT -5
Normal 18" straight grab irons are used on the cab. Antenna on the cab, bell on top of the hood.
|
|
|
|
Post by m a y o r 79 on Feb 1, 2016 6:41:00 GMT -5
From the pictures ive seen there seems to be another bell or somrthing on the cab roof too. I assumed it had something to do with hump service since I dont think any of the oher switchers have it. Ill see if I can find a somewhat clear photo and post it.
|
|
|
|
Post by shellfish on Feb 5, 2016 15:57:17 GMT -5
You did a very clean job filling in the lower cab windows.
I have to fill in two lower cab windows on a Lima Hamilton switcher project I have down the road a ways.
|
|
|
|
Post by m a y o r 79 on Feb 6, 2016 9:25:47 GMT -5
Thanks shellfish, it actually wasnt too bad. I used 0.020" styrene to fill on the lower windows from the back side of the Cannon cab, and carefully cut out pieces of 0.005" styrene to bring the front flush with the cab wall. I trimmed the window gasket flush first. It still needs a little putty to fill on a few spots in the corners and some final sanding. It sould turn out nice when thats done (not that it looks bad now).
|
|
|
|
Post by shellfish on Feb 6, 2016 15:32:32 GMT -5
Thanks! That was exactly what I had anticipated for the job. I also have a raised window gasket on the Lima that has to be ground off. I thought a Dremel would help me do that. I have too many other projects in the works right now to deal with it but it is on the to do list.
|
|
|
|
Post by m a y o r 79 on Feb 6, 2016 16:20:14 GMT -5
Just a quick update, no pictures today. Shaved off a few more details, filled in a few holes with putty and sanded them smooth. Got the spark arrestors installed on the A unit.
Pulled off the light clips and put the shells back on the frames for the first time since this project started. Managed to bash the louvers out of both radiator grills and damaged one fan because the front trucks were tipped forward a little and caught the fan housing. Managed to get them fixed and looking good again. Lesson learned, be very careful putting the shell back on.
Probably wont do any more modeling this weekend, party to go to tonite and a super bowl party tomorow.
|
|
|
|
Post by m a y o r 79 on Feb 26, 2016 14:40:55 GMT -5
Well, placed an order with MB Klein for what I believe will be the last of the parts I need (aside from lights and decoders) for these units. I think I'm going to use the Kato NW2 handrail sets, they seem to be a good match to the SW7's, plus I may order the fuel tank parts as well to get a nicer looking air tank, so those will get ordered tonite.
Hopefully by next weekend I have all those parts and I can have these units ready for paint. Next photo update should be of them ready for the paint booth....fingers crossed.
|
|
kcw
Road Foreman
Posts: 60 
|
Post by kcw on Aug 30, 2016 22:01:01 GMT -5
Any more progress updates on the twins
|
|
|
|
Post by iomalley on Aug 30, 2016 22:09:26 GMT -5
Yeah Mike, what gives!? I got mine painted and weathered.... 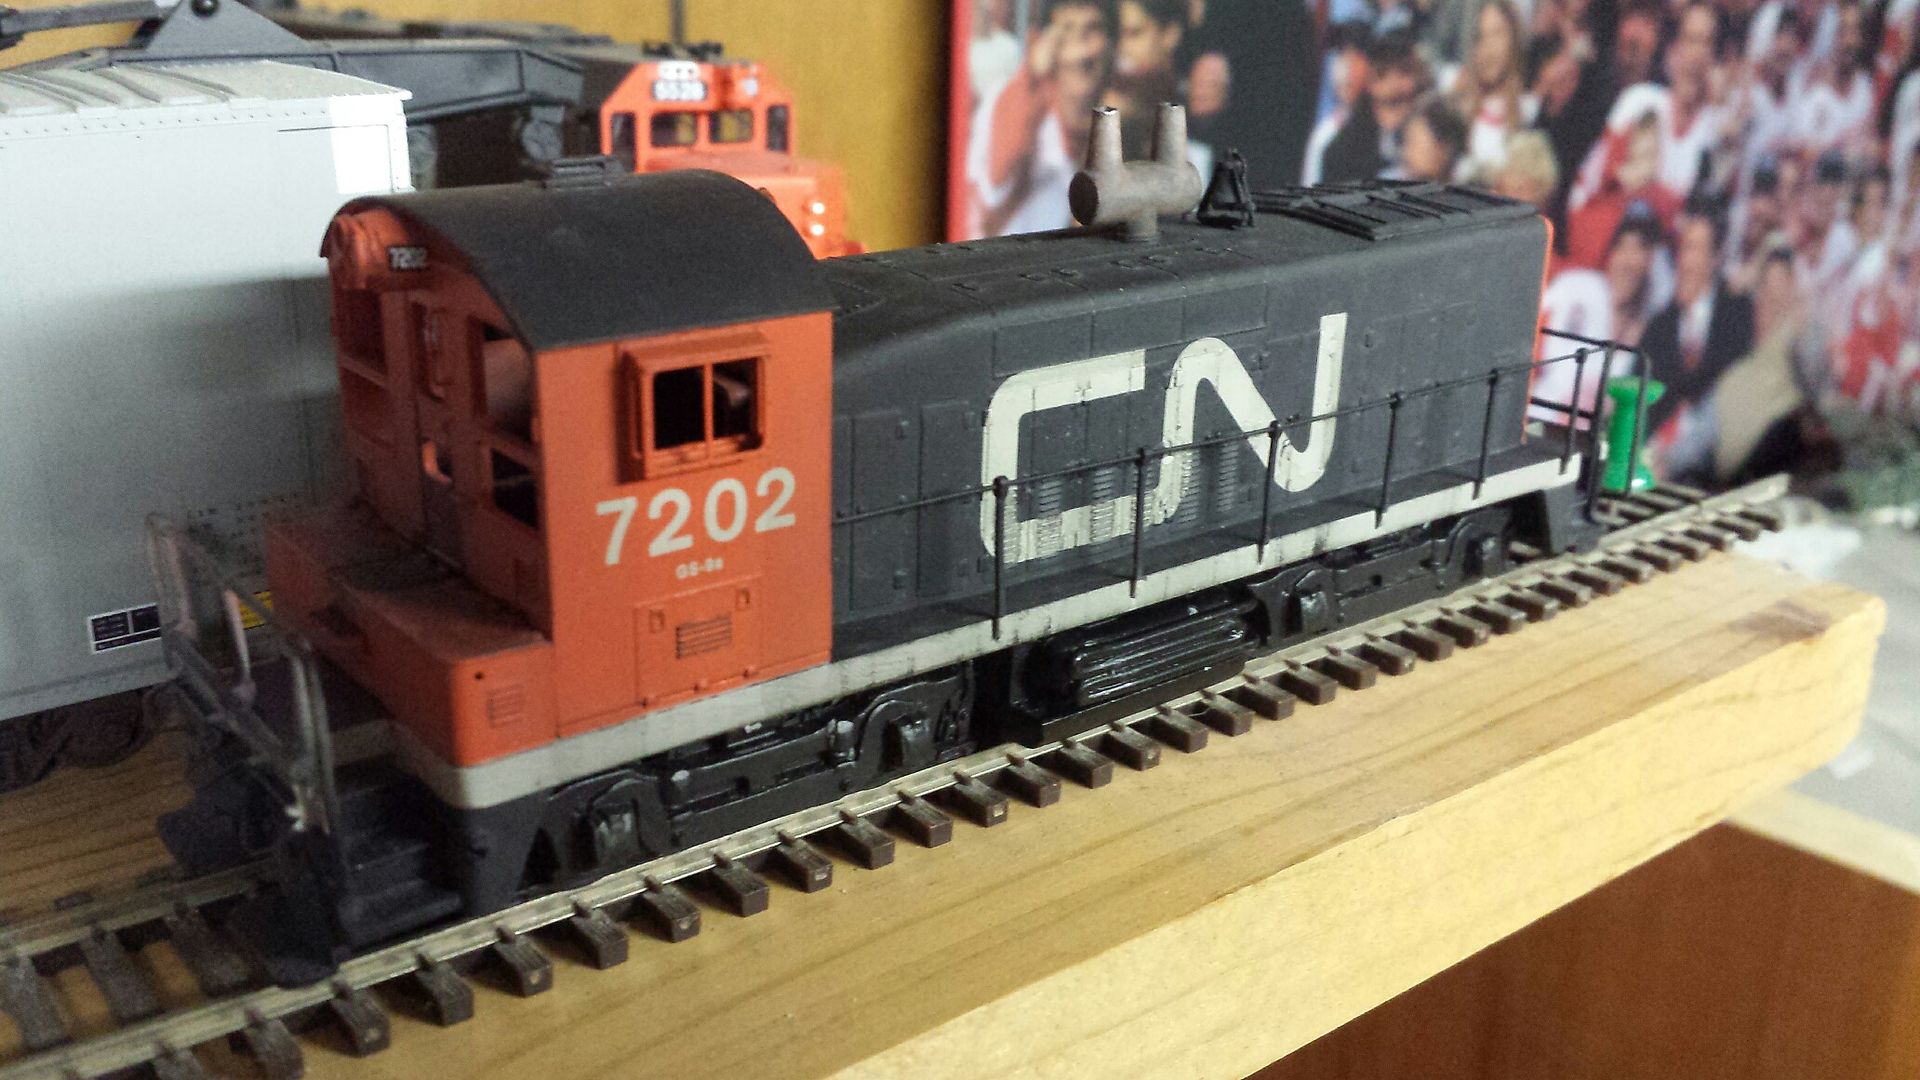 |
|