|
|
Post by rdg5310 on Feb 22, 2009 19:12:34 GMT -5
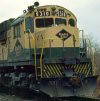
 Finally got around to posting this project that I have been working on and off for a couple years. The unit is powered. It started life as a Atlas RS11. The frame and motor comes from a Stewart RS12. The trucks are Atlas SD35. My biggest problem was finding the right frame and truck combination, then being able to power it. This is an older picture I took a couple years ago. The body is further along than pictured. Right now it's back on the bench to complete the frame work. I'm making more room for a DCC board, so I'm lowering the motor right now. After that I will finish the fuel tank mods, add the air tanks, piping and do some truck detail modifications. |
|
|
|
Post by rdg5310 on Feb 22, 2009 20:40:42 GMT -5
Stephan I'm not sure how that would work for you. I do know that this project would have been easier if I stuck to the Alco tri-mount trucks. I did the body conversion in a couple hours, matching it to a frame using the SD trucks were the problem. I tried to use Proto2000 trucks, but couldn't get the right fit. The other problem at that time was choosing the right frame to let me include a motor. I was just about ready to custom build a frame for it out of brass when I discovered the frame from a Stewart RS12. As soon as I finish the frame I'll post pics before I weather it.
|
|
|
|
Post by Randy Earle on Feb 23, 2009 0:16:43 GMT -5
That's an interesting looking critter!
|
|
dtinut
Chairman
Modeling the DT&I of the 60's & 70's
Posts: 661
|
Post by dtinut on Feb 23, 2009 11:36:25 GMT -5
Ron,
Can you post a photo of the frame for the MT6? I'd like to see what it looks like without the shell in place?
Thanks
Brian
|
|
|
|
Post by rdg5310 on Feb 23, 2009 22:11:27 GMT -5
Brian, I'll post some frame pictures latter in the week. I work crazy hours. I probably will post them sometime Thursday. Thanks
|
|
DRLOCO
Chairman
We can Railroad, Yes we can!
Posts: 237
|
Post by DRLOCO on Feb 24, 2009 15:16:39 GMT -5
I remember working on a few of these when I was cut back into the yards at Avon. The "double doors" were where the FRA required blue card was housed, along with the traction motor squirrel-cage fans.
"Horsepower: 0" I remember that much from the card.
|
|
|
|
Post by rdg5310 on Mar 13, 2009 12:31:16 GMT -5
The MT6 is moving along but at a snails pace. I'm still working on the frame details. As I mentioned earlier I had to lower the motor more to allow for a DCC board. That is done. The fuel tank area is squared up more now. And the fuel tank that I'm using from a Atlas RS11 has been modified. The air tanks are from Tiger Valley. The Atlas SD35 trucks that I'm using are really getting my attention at this time. Not as nice as others out there, but the only ones that would work with the frame. I will get the update pictures up as soon as I'm happy with the results.
|
|
|
|
Post by RunningExtra on Mar 15, 2009 9:00:31 GMT -5
I'm patently waiting Ron......... ;D
|
|
|
|
Post by rdg5310 on Mar 16, 2009 20:50:17 GMT -5
I wept in my dungeon for hours.  |
|
|
|
Post by rdg5310 on Mar 24, 2009 11:51:07 GMT -5
I'm making progress on the frame work. I did make a mounting system so I can secure the body and the frame. Since I started this project with the older Atlas RS11, it was a scale foot to short. Because of the frame that I'm using, not only do I have to rebuild the steps like Conrail did, but I did have to extend the deck by that scale foot. I will be cutting the body to extend that also. I came up with a set of air tanks that I can use. This prevented me from trying to make a set that would work. I was wrestling with the fact of using the Atlas trucks. But they are the best fit for this build. So now that I'm happy with the frame work and completely settled in on the trucks, I will be finishing the detailing of the frame and take the pictures for show and tell. ;D
|
|
|
|
Post by RunningExtra on Mar 24, 2009 19:07:35 GMT -5
Come on Ron.....the wait for updated pictures is almost unbearable  |
|
|
|
Post by rdg5310 on Mar 24, 2009 20:30:30 GMT -5
;D
|
|
|
|
Post by liquidfantasy on Mar 31, 2009 6:56:01 GMT -5
nice project! Honestly I'd love to do one too one day ... so don't be shy and share what you used :-)
|
|
|
|
Post by rdg5310 on Apr 3, 2009 0:56:43 GMT -5
Not being shy Denis, just trying to get as far as I can on the SD38. This way I can give the MT6 my all.  |
|
|
|
Post by Jack Napier on Apr 4, 2009 21:54:56 GMT -5
I remember seeing one on the "Bright Future Scheme" at CSX's Frontier Yard.
|
|
|
|
Post by mrogden on Apr 20, 2009 10:35:51 GMT -5
Any new pictures? Nice work.
MrOGDEN
|
|
|
|
Post by rdg5310 on Apr 21, 2009 12:18:45 GMT -5
Some updates to this project. The parts list: Atlas SD35 Trucks(orSD24) DA 2804 Hyatt roller bearing SMV 131 Brake cylinders .012 brass wire .045 Styrene rod This is what I did to enhance the look of the Atlas SD35 trucks. I first milled off the gaudy journals. I then plugged the holes using styrene for the brake cylinders. To do that, I enlarged the holes to except .045 styrene rod. I dipped the rod in Lacquer thinner to soften it and pushed it through. Let the rod harden before shaving any access off.  Now you need to clean up the journals using 320 grit sandpaper. Make sure you remove as much of the old journal as possible. You also want a rough surface to bond the DA 2804 journals to the delrin. Finish cleaning up the truck preparing it for the new parts. I used the Cypox bonding system to attach the the new journals to the Atlas truck. I primed the surface of the frames and carefully glued the journals by first using easy placement. This gave me time to adjust them before I added pressure to make the bond. When that was all done, I let the journals dry before I checked to see how well they bonded. Being satisfied, I drilled no.65 holes for the Smokey Valley 131 brake cylinders. I choose the SMV because they have great detail and had longer brake rods. You will have to drill out the back of the brakes using .079 drill bit for the brake lines. DA makes a nice brake cylinder also but the brake rods are to short. The brake cylinders will be centered over the journal. You will actually drill your holes right next to the old ones with a .065 drill. I did not glue these down until I formed my new brake lines. Once I bent the new lines, I attached the cylinders using the Cypox system. Make sure you prime the inside if the new holes.  The finale touch was to carefully solder the center line to the main. I did this by rotating the line overhead of the cylinders. I cleaned up any access wire and lightly filed the joint clean. I rotated the line back and used ACC to bond it in place.  The same steps have been repeated for the SD38 truck frames. I will be posting the pics soon of deck work I did. I did extend the deck and the hood to match the prototype. I haven't finished the frame yet because I've been waiting for detail parts.  |
|
|
|
Post by rdg5310 on May 4, 2009 10:19:29 GMT -5
Here's the pics of the deck. I decided to extend the deck by 1 scale foot as per the prototype. The old Atlas models were a scale foot short. The newest version from Atlas is the correct length. I had 2 shells and frames, so it was a no brainer to cannibalize the other deck. I made my cuts to each as shown. Atlas had molded in spacers to bring the deck to the correct height on the frame. I removed these also.  To weld the pieces of the deck together I used liquid cement. To get a perfect fit, I left a Little extra on each end of my cuts and sanded them true using a true sander. I also will use a glass pane from a picture frame to give me a flat surface to bond the 2 parts together. I then cut .060x.250 strip styrene for under the walkway. I had measured and made a template from a 3x5 card of the insides of the pilot ends. I then cut pieces from a sheet of .060 styrene to fit on each end of the deck. The styrene will give support to the deck and also give me the correct deck height off the frame and rail. It will also aid in mounting the body to the frame. After I made my cuts and formed my end pieces, I welded them to the bottom of the deck making sure the alignments are correct. Once again, using the glass as a glue station. The purpose of using the glass is two fold. It's nice and flat and nothing sticks to it easily. I let this all dry overnight. The next day, I positioned my frame on the deck and did all the checks and balances to make sure everything was peachy. I made pencil marks where the frame sits on the deck.  In this next shot, I'm showing the top of the deck after I sanded off the tread and to make sure it was a flush on top. As you see in this pic, the styrene on the ends is beyond the inside of the deck. I did this for a reason. Because of the frame I used and me removing the frame ends, I needed a way to center the frame on the deck. And this was the right solution for my build.  In the upcoming photo's to be posted, I have completed the mounting system for the body and frame. Rebuilt the pilot ends and completely removed the bottom steps. I have already made the inside step wells. I haven't mounted the the step wells yet. But it's proving to be a little challenge on how best to do it. I do have to attach the new steps at the same time. For the body, I also cut and added a scale half foot to that. Before I start plating the the body I will post pics of that. Slowly but surely I'm moving along here guys. |
|
|
|
Post by icghogger on May 4, 2009 14:35:06 GMT -5
Very Nice "Slice n Dice"  |
|
sd40t2
Probationary Member
Posts: 16 
|
Post by sd40t2 on May 7, 2009 18:41:34 GMT -5
It's nice to see that Conrail and CSX did not feel the need to scrap them. I see one occasionally when passing through Buffalo on my daily run, they look pretty sharp in the "bright future"scheme but still have to bow my head to the ALCO's that gave their life for them.
|
|