|
|
Post by tjmfishing on Jul 24, 2014 20:52:33 GMT -5
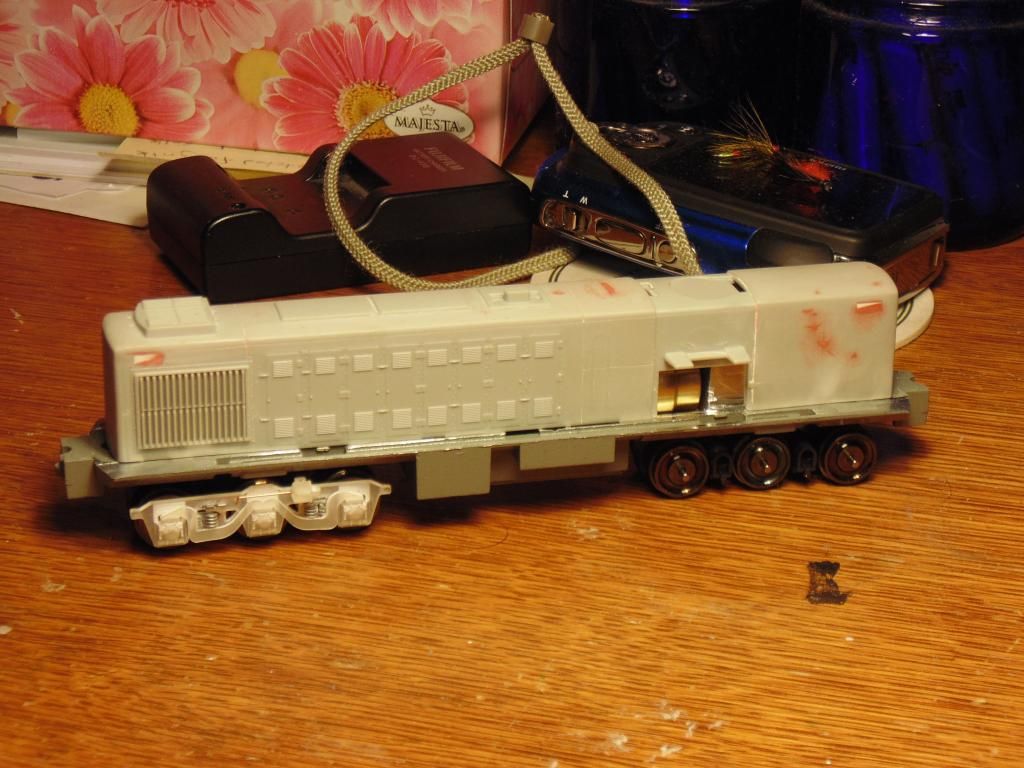
Armed with the correct sideframes and trucks (see below thread) after a three year, worldwide hunt, I am now ready to begin construction on a CNR RSC-13. dieseldetailer.proboards.com/thread/14859/hunt-over-trucked-cn-enginesBelow are two links to the elusive prototype. Only 35 of these 1000hp road switchers were ever built by the Montreal Locomotives Works, all of which between 1955 and 1957. They were initially assigned to the lighter branchlines in the Maritimes, particularly on PEI and in southern Nova Scotia, as well as several lines in Southern Ontario. A small number of these were later retrofitted to ride on B-B trucks in faster, express service. All 35 were scrapped in 1975, along with CN's three remaining RSC-24's, and the trucks were used to retrofit 38 RS-18's into RSC-14's to further service the lighter, eastern branchlines. www.cnrphotos.com/gallery2/main.php?g2_itemId=45646 (three axle, lightweight version) www.cnrphotos.com/gallery2/main.php?g2_itemId=13113 (two axle, express version) Now for the build: Atlas RS-1 shell, mounted on a "slightly" modified Kato RSC-2 powered chassis riding on Kato RSC-2 trucks bearing Shapeways A-1-A sideframes.
 On this zoomed in shot, you can see the clearance between the brake cylinder and the underside of the chassis, achieved by adding a 3 mm spacer between the truck and the chassis.  The red arrow marks the 3 mm high spacer used to gain clearance to allow the truck to swivel correctly. 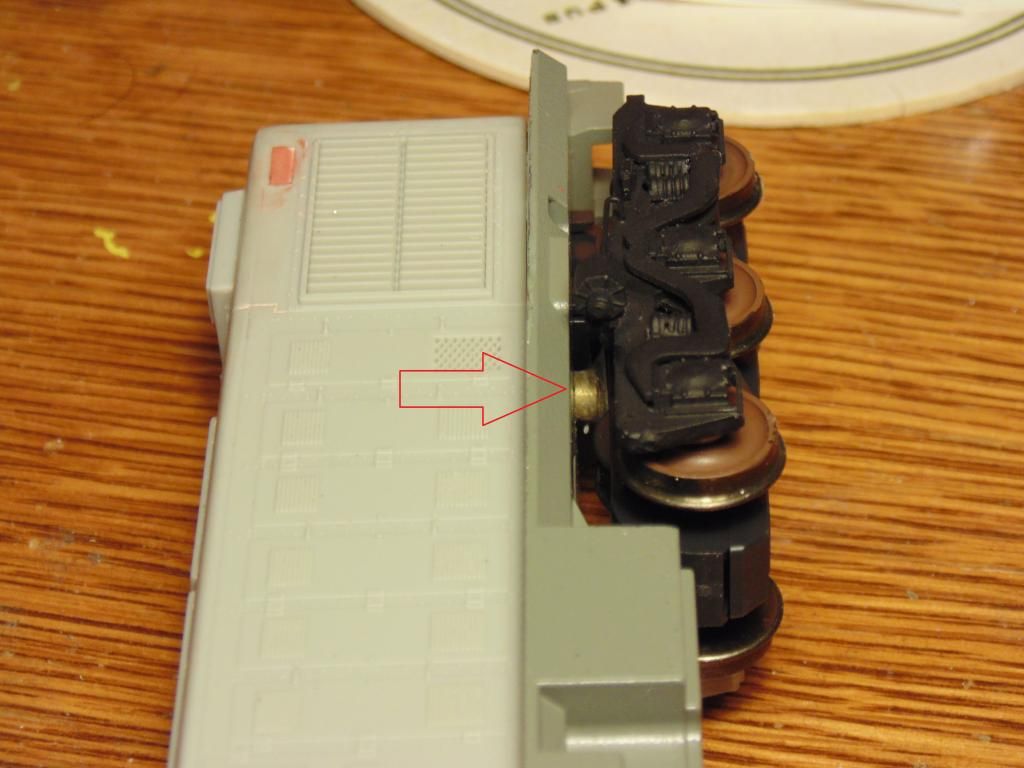 The six white arrows show the points where metal was removed from the chassis to allow the Atlas RS-1 shell to fit (also replicated on the reverse side) The Shapeways printed RSC-13 hood ends I will be using will be designed to fit the Atlas RS-1 shell with little sanding/filling. They will also contain all of the necessary details on both the front and rear hood ends. 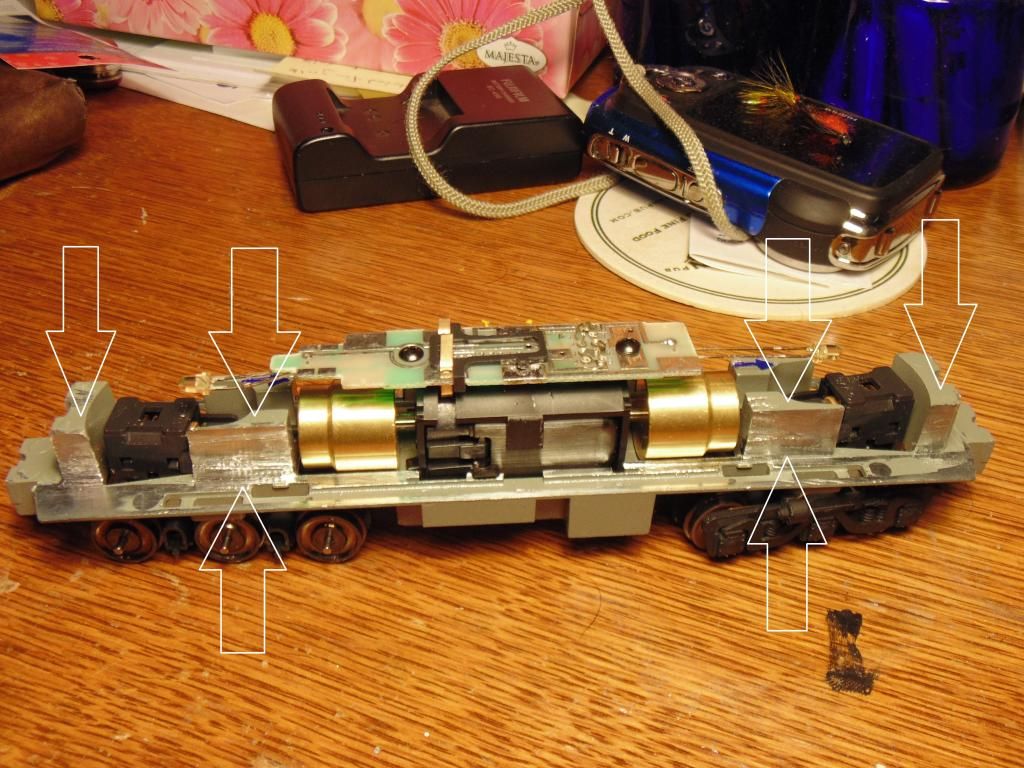 |
|
|
|
Post by jakeloyst on Jul 24, 2014 23:04:15 GMT -5
looks good so far!
|
|
|
|
Post by sbhunterca on Jul 25, 2014 7:28:32 GMT -5
Hi, Taylor:
Looking good!
I was wondering if it might be possible to grind/ mill a little pocket in the underside of the frame to give the clearance for the brake cylinder without needing to raise the frame?
It might be better in the long term, as the drive shafts would maintain the original alignment with less wear on the universal joints.
The deck height issue isn't that important unless the engine will be coupled to others with standard height decks. Some people might like to whine and criticize, but I'd tell them to show me the unit they built if it's so easy!
What are you planning for the fuel tank area- the RSC-13 had small fuel tanks set well in from the frame edge, so it appears you'll soon be embarking on the fun job of milling off the cast- in battery boxes, etc. on the Kato RSC-2 frame. A machinist friend would come in handy to save a lot of time- particularly later, if you're building multiple units.
For the new tank, will you be building it up from styrene, or are you and Chris plotting to print it too?
It's great seeing this project come together. It's come a long way since Chris started dabbling with the idea of printing sideframes, and I know you had been exploring truck options for a long time before that.
Enjoy the project- I know the finished product will be awesome!
Steve Hunter
|
|
|
|
Post by tjmfishing on Jul 25, 2014 8:44:12 GMT -5
I thought about milling a section out of the frame but I think this is the easier approach. I don't think the drive shafts are at enough of an angle to be concerned with myself.
Milling off the cast on fuel tank/ battery box weight shouldn't be the end of the world. I've done it before.
Chris and I are meeting after work tonight and we are going to get the measurements figured out for a fuel tank and then he's gonna upload the file to Shapeways. We are also going to try and cover the RS-10, RS-18 (3600 and 3800 style), RSC-13, RSC-14 and RSC-24 tanks tonight if time permits.
|
|
|
|
Post by tjmfishing on Jul 25, 2014 8:44:41 GMT -5
Also, nice to see you chose a display photo - you're no longer an "alien"
|
|
|
|
Post by chrismears on Jul 25, 2014 10:48:45 GMT -5
Just reading this thread now. I really wish the forum software would allow me to watch threads or forums for new posts.
I tend to think that milling out the frame would be the way to go as well. That said, I don't recall what the frame is shaped like in this area.
Printed fuel tanks are definitely on the radar. I have a few parts of the hood ends I need to revisit and may just get the tanks out of the way first. Since the tanks will be simple blanks they'll be quick to draw and can be printed in a lower resolution material as well (i.e. less expensive compared to the sideframes or hood ends).
Great work, Taylor. It's really exciting to see this all coming together.
|
|
|
|
Post by chrismears on Jul 25, 2014 10:51:46 GMT -5
I may be wrong but I don't think that any of the RSC13's were fitted with B-B trucks like the 1900-series GMD1's for road service. A small group had the centre axles removed from their original A1A trucks but were kept in yard service.
Here's where I'm hoping I'm wrong since I already know how much I love seeing shots of the 1900's in Toronto passenger service. RSC13's should look just as terrific leading short trains of coaches in and out of Union.
|
|
|
|
Post by sbhunterca on Jul 25, 2014 11:03:55 GMT -5
You're absolutely right, Chris.
For a while units in the Toronto area had the center idler axle removed and a long equalizer beam installed, spanning the entire 11' wheelbase. This was to increase tractive effort and reduce slipping, but was a short-lived modification and all units were put back to factory design before moving to the Maritimes.
However, a great deal of confusion is caused by photos of units on their way to the London Reclamation Yard for scrap after the RSC-14 rebuild program at Moncton Shops. The badly parted-out hulks of the RSC-13's were set on the AAR B trucks left over from the RS-18s which had received the A-1-A trucks. A few units on their way to scrap didn't look too bad with few external parts removed, while others were totally trashed.
Don't believe everything you see on the web. Unless you're modelling a dead unit, do NOT put AAR B trucks under an RSC-13.
Now, I must mention that MLW designed these units so a railway could buy a B-B version called an RS-13. This is mentioned in MLW's operator's manual. Pretty much a Canadian RS-1... but they never sold one.
Hope this helps!
Steve Hunter
|
|
|
|
Post by tjmfishing on Jul 25, 2014 11:13:26 GMT -5
www.cnrphotos.com/gallery2/main.php?g2_itemId=13113This is what I'm talking about....I guess I mistook this for B-B trucks. Thanks for the clairification! I also know what you guys mean about them riding on AAR-B's on the way to the deadline, that was not what I meant.
|
|
|
|
Post by sbhunterca on Jul 25, 2014 11:17:09 GMT -5
Yep, Taylor, that's one of the modified units... something about them just looked wrong, LOL.
:-)
Steve
|
|
|
|
Post by tjmfishing on Jul 25, 2014 12:17:12 GMT -5
I'm nowhere's near as familiar with the 1700's and 1800's (both MLW and CLC) as I am with the 2000's, 2100's 2300's, 3200's, 3500's, 3600's, 3700's or 3800's Steve. I'm more into bigger MLW power and until now the RS-18 is the only roadswitcher I had really taken an interest in.
|
|
|
|
Post by simulatortrain on Jul 26, 2014 18:48:06 GMT -5
Did you sand the sideframes at all, or did you get lucky and get a good smooth batch of parts?
|
|
|
|
Post by tjmfishing on Jul 26, 2014 19:05:32 GMT -5
Didn't have to sand them at all. I don't think you're going to have to sand the ultra frosted detail material.
|
|
|
|
Post by jakeloyst on Jul 26, 2014 19:36:31 GMT -5
have you had them made out of differernt materials, is that the best one to choose??
|
|
|
|
Post by crow5444 on Jul 26, 2014 20:07:42 GMT -5
Looking and seeing at this I see a RSC13B from the pics might be made if that happens.
|
|
|
|
Post by simulatortrain on Jul 26, 2014 21:10:37 GMT -5
I've only had parts made in FUD, and they were far from smooth. Not layered, just rough except for surfaces parallel to the laser beam. Shapeways prints multiple parts at once to fill up their build space, and sometimes the combinations are better optimized for model applications than others.
|
|
|
|
Post by sbhunterca on Jul 27, 2014 12:28:27 GMT -5
Minor point, the smooth surfaces are acually those normal (90 degrees) to the laser beam. Sloping or rounded surfaces and those parallel to the beam show the layering effect. These processes don't handle edges well but the printing on these sideframes is excellent.
It's unfortunate that Shapeways doesn't offer a premium service, in which the buyer or designer can specify the orientation of the part.
In my professional work I have the luxury of demanding orientation on my employer's equipment, however for personal stuff I'm left to chance with Shapeways.
Steve Hunter
|
|
|
|
Post by chrismears on Jul 27, 2014 20:14:05 GMT -5
The sideframes are pretty delicate parts and the Frosted Ultra Detail material is the only one that offers a fine enough print resolution to properly render those thin equalizers. It's the only material they can be printed in, at Shapeways. It works out well though since it offers us the ability to have some really nice and thin parts with a fairly decent surface finish.
I don't think the ones that Taylor is showing have been sanded or polished at all which really speaks to the quality of the print. I've printed several items now in this material and haven't had too much of a problem with ragged edges or some of the other telltale signs of RP printing methods.
|
|
|
|
Post by tjmfishing on Jul 27, 2014 20:43:38 GMT -5
No they haven't been sanded at all. I soaked them in 95% ethanol for half an hour to remove the casting wax. After adding the springs, air lines, etc, I primed them with three coats of Tamiya primer, then painted them with five coats of Model Master Aircraft Interior Black. I can start to see the grain above the journal covers (that's the worst area)when I hold them any closer that eight inches from my face under regular light and I have very, very good eyesight.
One thing to remember is that these are the pre-production samples and the final product has the remaining details added. I am simply using them so that they don't go to waste and secondly because this is the "prototype" RSC-13 from the shell to the trucks.
Just need those hood ends now.
|
|
|
|
Post by tjmfishing on Oct 1, 2014 20:36:18 GMT -5
Work continues on the RSC-13 project. For the first time since the initial test fitting on the trucks, I feel like I've made some real progress and MR-10 1724 is beginning to take shape. The cab is a combination of an Atlas RS-11/RS-3 cab. Apart from the obvious changes, a scale 1 1/2' was removed from the wall of the cab. I don't have an actual cab lenght to go by, so this could be off slightly but it looks right to the eye. The hood and frame are both Atlas RS-1 parts and this locomotive will be powered by a Kato motor and ride on Kato RSC trucks fitted with Flexicoil A-1-A sideframes provided by Mears Locomotive Works. The next big step is the addition of the 3D printed hood ends, also provided by Mears Locomotive Works. When all is said and done, this build may just be the most rewarding one ever undertaken by Mainline Industries. 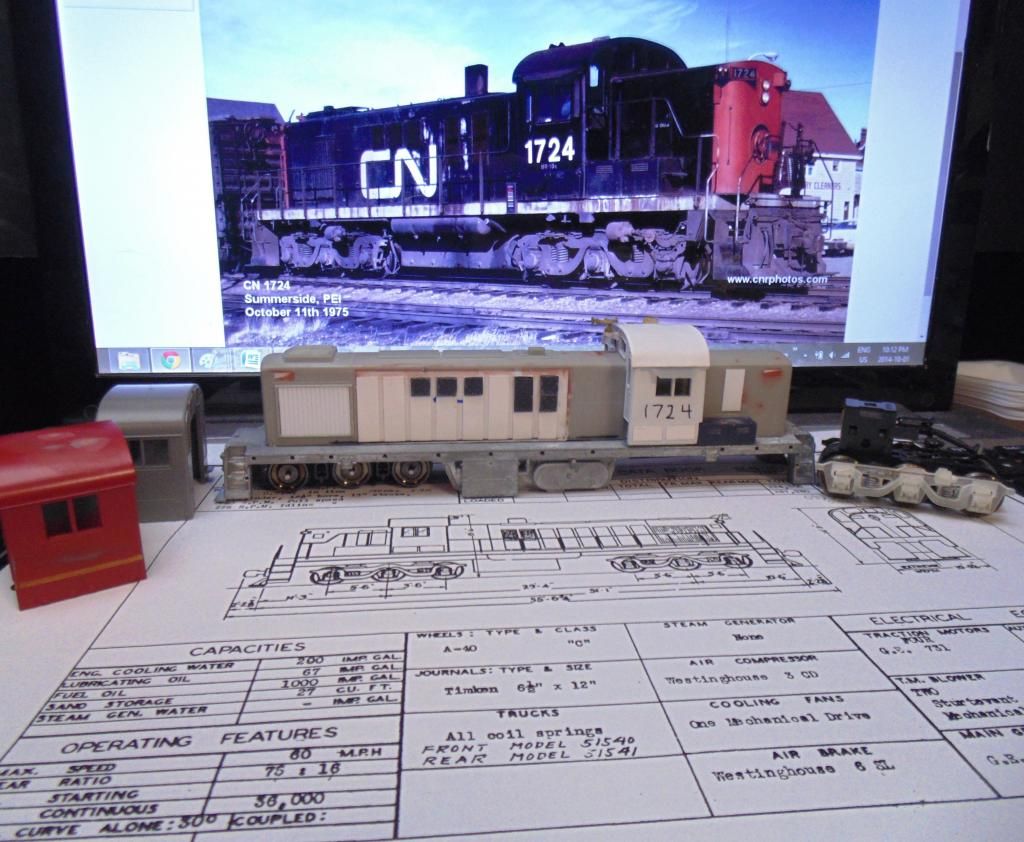  |
|