|
|
Post by mosteam3985 on Sept 29, 2010 17:18:56 GMT -5
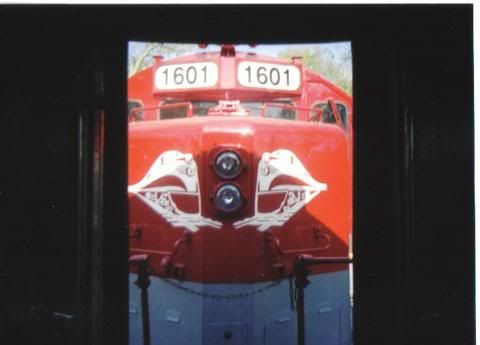
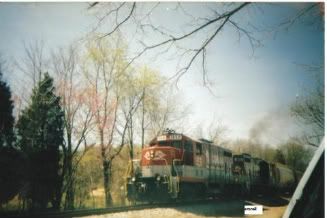
Well ladies and germs, I have decided on tackling a project that has intrigued me for a while. It is the Duluth Missabe and Iron Range's rebuilt SD-9's and SD-18's that they simply labeled SD-M's. This will be an in progress build and I hope to supply tips and tricks to fellow modelers on the process. I have scoured the internet and have yet to find an article on building one in HO so I hope this thread helps inspire others to tackle the project as well! Here are a couple of prototype photos, model photos soon to come!   |
|
|
|
Post by diesel on Sept 29, 2010 18:08:04 GMT -5
@mo! That is a really nice pick! I can't wait to see it come along.
|
|
|
|
Post by Randy Earle on Sept 29, 2010 18:36:16 GMT -5
OOOOF! That needs to be orange with Bessemer on it. Just kidding, nice pics.
|
|
|
|
Post by mosteam3985 on Sept 29, 2010 20:44:17 GMT -5
Thanks everyone! O Stephen, it's Mo not Rudy, but we're the same age so I could understand the confusion  |
|
kcs1967
Chairman
SWLA-SETX PINE SCENTED
Posts: 1,726
|
Post by kcs1967 on Sept 29, 2010 21:09:06 GMT -5
Mo, that looks to be a fun project, those sexy dynamic cheeks with a low nose, should be a great project.
|
|
|
|
Post by danielsokyrail on Sept 29, 2010 23:59:52 GMT -5
Looks to be a fairly stright forward project. Good luck.
|
|
|
|
Post by icghogger on Sept 30, 2010 9:14:36 GMT -5
Do us proud, Mo buddy, we know you got the mad skills to pull this one off!!  |
|
|
|
Post by mosteam3985 on Oct 3, 2010 14:25:44 GMT -5
Hello friends! WOW! There are some awesome builds going on in this forum! It took me 10 minutes to get down here to post something because I was looking at everyone else's updated projects!  Well my internet crapped out on Thursday night and it's totally gone still so I'm writing this from the MSU school library. Let's jump right in shall we? First I have a shot of the Proto 2000 cab with the necessary mods. This cab has a Tyco GP20 numberboard and an Athearn BB front windscreen. The seams were filled with finely stretched sprue and I used plastic cement to hold them in place. When the cement cures, it has melted the sprue into the cracks and then all you have to do is carefully trim and sand it smooth. Works slick!  Next is a shot of the inside of the cab. As you can see I marked where I thinned the edges of the bottom of the cab. This build required that I use Cannon sub bases and get rid of the old cast on ones. That also means that the Proto SD-9 cab walls are about 3 times to thick to use on the thinwall bases. There fore some sanding was required. I will get to the subbase assemblies in a moment.  Next is a side by side shot of the area behind the cab on the prototype and then the model. On the original SD-9, the area directly behind the cab has rounded edges just like the rest of the hood. On the rebuilt SD-M, the area has square edges. I fixed this by cutting out .080 of material and replacing it with two laminated pieces of .040 sheet. Like so.....   Next I will show you the sub bases. These are made by Cannon and Co. and are absolutely wonderful to work with. I had to modify the ones on the conductor's side however because both sides are a mirror image of each other on the prototype (if that makes sense). I will need to scractchbuild the steps and the end sides for three ends. I bought some cannon dynamic brake doors for the box door on the engineers side. Here it is in it's present stage....  Next is the fuel tank. Pretty simple stuff here as all I had to do was take off the cast on fuel fittings and make the two part Proto 2000 tank into one complete large tank that the DMIR modified on the SD-M.  Next is the modified fan section. I used .040 styrene to fill the fan holes. I took a square of styrene and placed it underneath the open hole and then marked with a pencil around the inside onto the styrene. Then, careful not to oversand here, I cut and filed right up to the line I had created, thus making a circular piece of filler the same size as the fan holes. Then I filled and VERY CAREFULLY sanded the roof. Don't sand off too much! Work in small circles. It takes a lot of patience so don't do it all at once. I don't need to fill the dynamic fans here as I will be using the fans from Proto. Later I will show the two new 48" fans installed. Here you are....  As you can see in the above photo there are little white dots on the hood. Well those used to be holes where the Proto 2000 piping junk was. I don't need the piping junk on top of the new hood so I filled the holes by stretching sprue. To stretch sprue, take a sprue from a kit you previously put together, then cut off a hunk of straight sprue anywhere longer than a couple inches. Then, holding one end, slowly rotate the sprue over a candle until it starts to droop and sag like a worm. Pull from both ends and Voila! You've got filler material! Pull slower for thicker sprue, pull faster for sprue that will be thinner than hair. Here is a shot from below of the sprue filler before it gets clipped.  Also you can see I joined the walkway and the body together with .010 styrene sheet. Proto did a really crappy job with these bodies and when the whole locomotive isn't assembled, the bodies tend to bow inward away from the walkways at the bottom. This was quite frustrating so I said, "screw it" and glued the sucker to the walkway.  Here is a shot of the chopped nose. This is the second time I've actually chopped a nose so it's probably not that great a job but I just worked slowly and carefully and by my standards it's not too bad. As you can see the front is still covered in unsanded Tamiya filler. I always put a lot of filler on and let it cure at least 24 hours before sanding. It greatly diminishes the fill, repeat, fill, repeat mantra.  Finally here is a shot of what I have so far assembled. Still a lot to do but I'm getting there!  And a quick comparison photo....  More to come soon! |
|
|
|
Post by diesel on Oct 3, 2010 17:20:35 GMT -5
ah, that's looking good. That makes 2 of us piecing these 1st generation cabs together to make a low nose...
|
|
|
|
Post by Randy Earle on Oct 3, 2010 20:18:14 GMT -5
Looks just fine Mo.
|
|
|
|
Post by gnsteve on Oct 3, 2010 23:24:15 GMT -5
Thanks for the step by step. This project is coming along nicely.
Steve
|
|
|
|
Post by icghogger on Oct 4, 2010 9:48:38 GMT -5
That is one Sweet Build, Mo, really Excellent Work!!
|
|
|
|
Post by m a y o r 79 on Oct 4, 2010 12:58:22 GMT -5
Lookin great. I like the use of the Tyco numberboards, proves everything is useful.
|
|
|
|
Post by kwrengo on Oct 4, 2010 19:06:55 GMT -5
Looking good!!! The one you are modeling was rebuilt from a former DM&IR SD18. The squared off area behind the cab you modeled is a carbody change that EMD did with later model SD9s though the SD18s. Also changed on these later phases was raising of the cab and short hood, which you have shown by changing the cab sub base and battery boxes. The Missabe Railroad Historical Society (missabe.com) newsletter "Ore Extra" has an article on how to build an SD-M which can be bought through our store on line at www.missabe.com/cms/content/ore-extra-volume-11I personally oversee the operations and maintenance of DM&IR SD-M 316 that CN donated to the MRHS two years ago. It was rebuilt from SD18 186. Keep up the good work! Kent Rengo MRHS Membership Chair and DM&IR 316 Project Coordinator. membership@missabe.com |
|
|
|
Post by carlmarsico on Oct 5, 2010 20:54:40 GMT -5
Nice work!
CJM
|
|
|
|
Post by mosteam3985 on Oct 10, 2010 21:35:24 GMT -5
Thank you everyone! I still don't have internet at home (grrrr) but am at the library again reading over posts. Thank you again for the compliments! It should be in primer early this week before I head to Texas for a few days. More to come!
BTW, Kent that info is just awesome! Thank you for the stats! I have a question that you are just the guy to answer! I will send you a PM
|
|
|
|
Post by kwrengo on Oct 11, 2010 16:54:34 GMT -5
Your welcome! Responded to your P.M.
Kent
|
|
drgwguy
Chairman
Modeling the DRGW in the 70s-80s!!
Posts: 528
|
Post by drgwguy on Oct 11, 2010 19:11:46 GMT -5
Hey Mo.....I don't know HOW I missed this build, but you have done an amazing job thus far!!!! I can't wait to see that bad girl in paint!
Rick
|
|
|
|
Post by mosteam3985 on Oct 12, 2010 21:33:51 GMT -5
Thanks Rick! Man I can't wait either!
|
|
|
|
Post by redneckwes on Oct 21, 2010 21:41:41 GMT -5
Nice work! My last DMIR power was back in the Wide body Athearn days.
|
|