chock
Road Foreman
Posts: 87
|
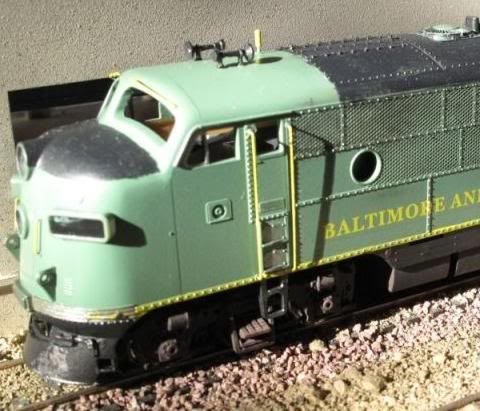
Post by chock on Sept 22, 2010 7:52:42 GMT -5
I decided to paint a cheapo Pennsylvania GP20 up in Susquehanna colours and give it a bit of a makeover. I figure I can park it up in a shed on my layout if it doesn't look that great. Since it is a non DCC cheap one, I decided that I'd scratch most of the stuff that will be added, but before that happens, I thought I'd see if it looked any good in Susie-Q colours, so I masked it off and set about spraying the yellow parts, since it is already black overall. Here's some pics of it which I snapped on my phone camera, with it masked up ready for the airbrush:   Al |
|
CIOR
Chairman
Posts: 2,046
|
Post by CIOR on Sept 23, 2010 23:42:02 GMT -5
Good LUCK! Can't wait to see it.
|
|
chock
Road Foreman
Posts: 87
|
Post by chock on Sept 24, 2010 19:25:30 GMT -5
Being a rather poor representation of the GP20 that I'm after modeling (that being NYS&W 2062), it is modeled with a one piece windscreen, which of course the real 2062 does not have, so I've stripped in some plastic card in preparation for filing that to the right shape, giving it a split windshield. I also removed the molded on conduit to the number board lights, which I'll replace with aluminium wire. The rough base coat of yellow it has at the moment will make overspraying the black a bit easier upon completion, but it's more about making surgery such as this a bit easier to see with not having to work on black plastic! I've trashed the windows, since they were deeply recessed and in any case won't sit well in the corrected cab, so they'll be replaced with clear acetate and then I can scratch build some wipers that will actually sit on the glass properly. Quick piccy:  Al |
|
|
|
Post by Randy Earle on Sept 24, 2010 22:10:37 GMT -5
Al, the Susie Q Units are GP-18s. Good luck on your build.
|
|
chock
Road Foreman
Posts: 87
|
Post by chock on Sept 25, 2010 3:43:58 GMT -5
|
|
Rudy Garbely
Chairman
Modeling Conrail from 1976-1979 in HO scale.
Posts: 1,073
|
Post by Rudy Garbely on Sept 25, 2010 7:38:30 GMT -5
The NYS&W had I believe a total of three GP20's that they got secondhand from the AT&SF (road numbers 2062, 2064, and 2066). Here's one with one of the GP18's (for comparison). Look at all of the AT&SF antennae on the cab roof: www.railpictures.net/viewphoto.php?id=112036&nseq=6 |
|
|
|
Post by Randy Earle on Sept 25, 2010 9:09:42 GMT -5
Oh, I wasn't going by 2nd hand units, didn't know about them. Susie originally only had 18s.
|
|
chock
Road Foreman
Posts: 87
|
Post by chock on Sept 25, 2010 9:41:16 GMT -5
Now I'm confused LOL. According to what I know about US locomotives (which is admittedly not a lot), the GP20s that NYS&W have (or had if you prefer since I'm modeling the 80s), are ex AT&SF ones (via TP&W). I assume they are modified to a greater or lesser degree since I think I'm right in saying that all low nose GP20s were originally built with a one piece windshield (hence the tweak on my model to give it a split windshield) unless they were built with a high nose, which apparently a few were. At the NYS&W, these are 2064, 2066 and 2062, two of which are listed as GP20u versions (2066 and 2064), which indicates some rebuilding tweaks as far as I understand it.
Al
|
|
keiffer
Trainmaster
SD40t-2
Posts: 102
|
Post by keiffer on Sept 25, 2010 20:16:21 GMT -5
Everyone is correct to a degree...
The NYSW originally bought three GP18's, numbered 1800,1802, 1804. These were recently sold and are now off the roster completely.
When Delaware Otsego (NYSW Parent company) bought the TP&W in i believe 95'(?), the GP20's on the TP&W were brought to the NYSW Utica shops for overhaul. I believe six total. Five we rebuilt/repainted and one was just repainted, thus the GP20U designation.
A few years later when the TP&W was sold off, NYSW kept three of the units (2062, 2064, and 2066) and the other three went to the new operator.
Unlike their older siblings, NYSW's GP20's still sit in Binghamton rotting away.
One the outside, the 18 and 20's look identical.
|
|
Rudy Garbely
Chairman
Modeling Conrail from 1976-1979 in HO scale.
Posts: 1,073
|
Post by Rudy Garbely on Sept 25, 2010 21:05:03 GMT -5
The NYSW originally bought three GP18's, numbered 1800,1802, 1804. These were recently sold and are now off the roster completely. Yup. They're on the East Penn RR near Quakertown, PA. A few years later when the TP&W was sold off, NYSW kept three of the units (2062, 2064, and 2066) and the other three went to the new operator. Thanks for the clarification. I didn't know they were technically still rostered under TP&W. Unlike their older siblings, NYSW's GP20's still sit in Binghamton rotting away. Shame. Those engines have a lot of history. Although I heard that the NYS&W just recently sold off almost all of their 4-axle power (the GP38, GP40, GP18's, etc.). Are the GP20's still there as of about two months ago? |
|
keiffer
Trainmaster
SD40t-2
Posts: 102
|
Post by keiffer on Sept 26, 2010 12:51:21 GMT -5
Shame. Those engines have a lot of history. Although I heard that the NYS&W just recently sold off almost all of their 4-axle power (the GP38, GP40, GP18's, etc.). Are the GP20's still there as of about two months ago?[/quote]
I believe they still are sitting in the yard, I saw a photo somewhere dated for early September showing them there.
They have sold off the GP18's, GP38, and the GE four axle units all but one. They are still use the GP40 (3040) as primary power on what is left of the Utica branch and they have a GE unit (2300) there for protection, plus the OOS GP40 3042 outside the shops.
They now lease CSX/NS GP38/40-2 for most of their switching duties on the Syracuse branch and the southern division. However they can still be seen on road trains
|
|
|
|
Post by puddlejumper on Sept 26, 2010 20:46:52 GMT -5
SDP45, you are correct. The GP7-9-18 have 2 stacks, and the GP20, being a turbo'd unit, has only one. That is the primary spotting feature between that and the 18.
|
|
chock
Road Foreman
Posts: 87
|
Post by chock on Sept 28, 2010 10:19:57 GMT -5
Not the best pic ever, since I shot it with a phone camera through a magnifier, but here you can see the added in piece of plastic card in the process of being filed to shape in order to create the radius corners and rubber window surrounds that will join up with what remains of the surrounds that were part of the original one piece windshield molding. This is fiddly stuff, done with needle files and a scalpel. It looks rough viewed at this size of course, but in reality this added part is is less than 5mm tall, so it will appear very neat when looking at the actual model:  At the rear end, I've sliced off the molded on drop grab rings, drilled some mounting holes out and added some that I made from alloy wire. The inaccurate step ends have also been trimmed down to provide room for the pilots I will make, but they will not be done until the wheels assembly is back on so the I can judge the track clearance. Some other molded detail has also been removed, such as the lugs for the bell and horns, which I will be relocating to where they are found on NYS&W's real No 2062. I also scribed a missing door onto the left hand side of the nose (dunno what is behind that door, but it's there on the real thing, so it's going to be there on mine), but that turned out a bit crappy and I was not happy with it, so I'll be filling that in and rescribing it. Since this is supposed to be an inexpensive build, there will be a lot of scratchbuilt stuff, but I think I might cheat where the S-3 horn is concerned and buy a brass one. Al |
|
chock
Road Foreman
Posts: 87
|
Post by chock on Sept 28, 2010 22:25:32 GMT -5
Some fairly vicious surgery is necessary to correct the battery boxes and front platform steps, which extend way too far forward onto the front platform and spoil the shape of the nose. Unfortunately, it appears that it was modeled this way to accommodate the overly long diecast frame that lies underneath, which probably does duty for several loco models. This means that diecast part will have to be trimmed shorter with the good old angle grinder as well; not a simple task, and were it not for the fact that this is going to be painted up in NYS&W colours, I'd be tempted to leave it as it was, but there would be no way to get the correct two-tone paint demarkation line on the nose of the thing without correcting this issue, so it has got to be done. Two big holes cut in the front end to alter the shape...  The nose and steps will have to be scratchbuilt in the correct shape, and of course that means new grab rails will also have to be made to accommodate that change. Cheap this rebuild may be, but simple it is not LOL Al |
|
|
|
Post by icghogger on Sept 29, 2010 10:06:20 GMT -5
Al, you certainly have notched up my curiosity. I am very interested to see how you will build up the front end and alter the frame to accommodate those changes. Please keep us posted!!
|
|
chock
Road Foreman
Posts: 87
|
Post by chock on Sept 29, 2010 10:48:14 GMT -5
It should be a fairly simple case of stripping in bits of plastic card to redo the plastic bodywork of the loco, so that's not really a big deal as it will mostly be straight bits with very little shaping involved. But I'll admit taking an angle grinder to the diecast chassis is not something I've done that often, although I have done it before on 'matchbox' cars to create some custom stuff a few years ago, and that's more fiddly than this thing.
Naturally, it would be a lot easier to simply buy a better GP20 model, but apart from this being the inexpensive builds bit of the forum, I quite like the idea of changing this one and rebuilding it, since that is kind of what happened to the real loco I'm trying to reproduce. I also like the idea of a cheap ugly duckling model model turning into a swan for not much outlay.
Al
|
|
chock
Road Foreman
Posts: 87
|
Post by chock on Oct 3, 2010 10:39:14 GMT -5
Here you can see some of the reconstruction of the nose, step area and platform with plastic card, which is more suited to the low nosed GP20s and how it appears on NYS&W no 2062. The lower step has yet to be added and there is still the front end of the nose to patch up. The remains of the battery box step fairing has been filed to the correct shape and been thinned down a bit too, although I will probably take it down thinner still. The rubber window surrounds which I filed into the piece of plastic card that I added to make a split windscreen is a bit more apparent on this pic as well.  All that molded on MU hose stuff will be covered up by the pilot I make for the front end and I'll scratch build some proper MU hoses instead. Al |
|
|
|
Post by CP_8530 on Oct 4, 2010 3:09:41 GMT -5
Looks like it's coming along nicely. Just a minor thing: the EMD "bugeye" classification lights at both ends should point outwards instead of forwards. You might be able to shave them off and glue them back on facing outwards. SDP45, you are correct. The GP7-9-18 have 2 stacks, and the GP20, being a turbo'd unit, has only one. That is the primary spotting feature between that and the 18. Well, there's also some minor carbody differences as well as the frame/airtank configuration. And the 3 radiator fans instead of 2 on the GP18 (probably for increased cooling capacity for the turbocharged engine). |
|
chock
Road Foreman
Posts: 87
|
Post by chock on Oct 4, 2010 3:22:05 GMT -5
Yup, those lights are indeed incorrect on the nose. Fortunately, the lights appear to be blanked off on the real 2062 with just the housings remaining, so I was simply going shave the present ones off, then drill out new holes and inset plastic rod lengths at the right angle and then file them flat to create blanked off housings.
Al
|
|
chock
Road Foreman
Posts: 87
|
Post by chock on Oct 4, 2010 17:20:12 GMT -5
More plastic card was added to fill the gaps and then I screeded Milliput Fine filler over the joins and filled in one or two other areas that needed it with that stuff too, including the scribed door line I wasn't happy with (which I'll do again). I also filled in the lug holes for various bits that will be repositioned, such as the bell and horn and some rather unrealistic and unnecessary ones on the cab sides which locate the chassis to the body. I also drilled out two new marker holes for the nose lights and trimmed off the incorrectly angled ones. As ever, when mixing up filler, you always end up with some spare, so I used that for the good old modeling trick of pushing it through the windows so that I can later pop it out and have a nice accurate template for cutting out the clear acetate that will replace the molded windows which came with the thing.  The good news is that my wife showed up tonight with a massive stack of very thin A3 metal offset litho plate sheets for me, which the printer she uses gave her for me to use for my modelling, and there is more on the way apparently, 'as much as I like' so I'm told. I used to be able to get hold of litho plate myself when I worked as a designer full-time, but these days I don't get to use it professionally as I tend to work digitally, and freelance at that, so its great to have found a source for litho plate again, because I love that stuff for scratchbuilding. Sometimes, when things like that happen, it confirms why you were smart to marry the girl you did LOL Al |
|