SP_Modeler
Chairman
SP never died in my world.
Posts: 389
|
Post by SP_Modeler on Oct 1, 2010 17:05:26 GMT -5
Nice Job Robert, its comming along very well ;D Keep up the great work!
Paul
|
|
|
|
Post by canadaandsouthern on Oct 3, 2010 10:47:22 GMT -5
looks good
|
|
|
|
Post by icghogger on Oct 26, 2010 13:59:25 GMT -5
Next step is to build up the draft gear boxes. To build them from scratch, I needed to make many different parts consistently to build up several sets. So, I set up my NWSL Chopper by clamping the rail of my vernier caliper so that it is against the blade of the Chopper. 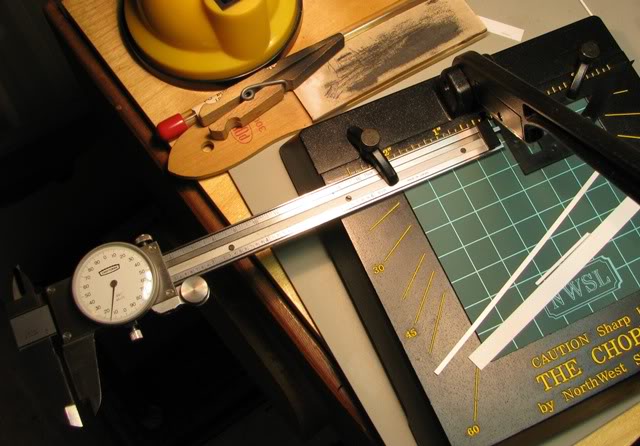 I set the depth probe to the required part size (in this case, .115") and place the stop against the probe and lock it down. 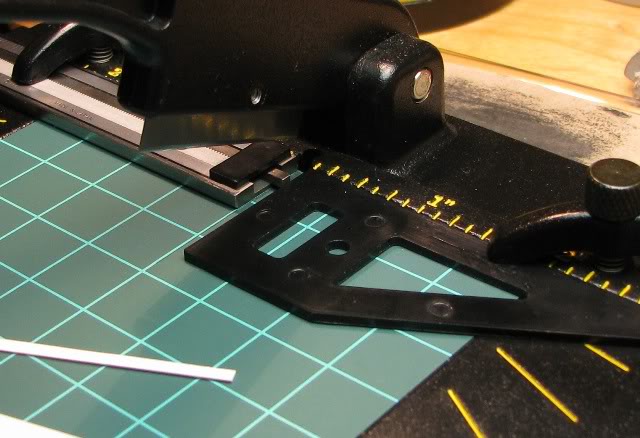 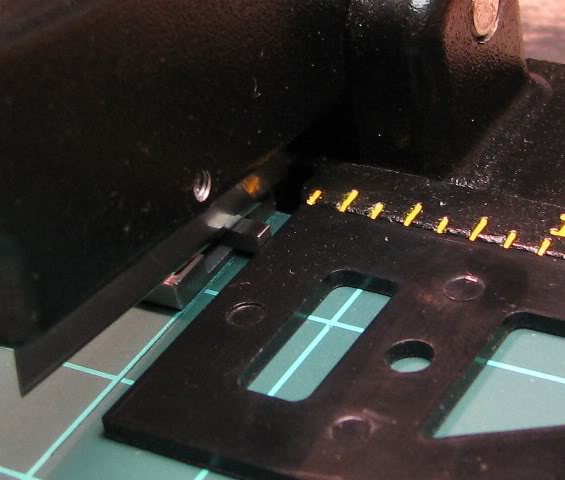 This way, I am able to cut duplicate parts with accuracy and speed. |
|
|
|
Post by icghogger on Oct 26, 2010 14:06:58 GMT -5
The draft gear (coupler plates) are built up from scratch (12 pieces in all) using various sizes and shapes of styrene stock. 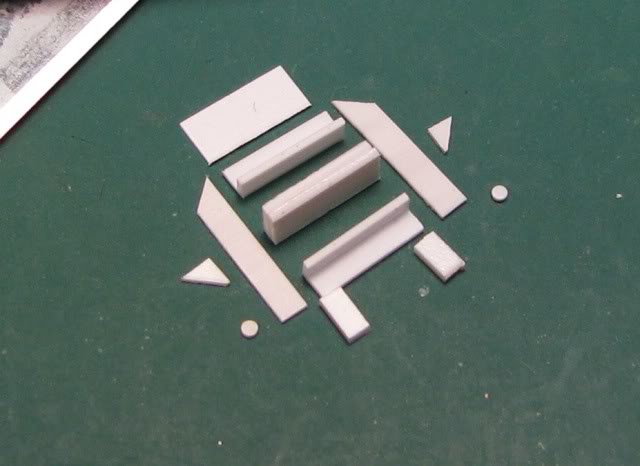 And I start the assembly by squaring up the top portion of the plate using .010" flat stock and .060" angle stock. 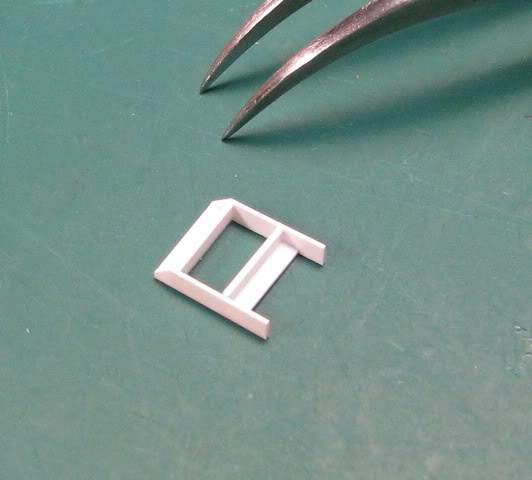 Stay tuned, more to come later........ |
|
|
|
Post by RunningExtra on Oct 26, 2010 14:16:06 GMT -5
That is sweet Robert, great job my friend!
|
|
SP_Modeler
Chairman
SP never died in my world.
Posts: 389
|
Post by SP_Modeler on Oct 26, 2010 14:18:01 GMT -5
Robert,
Those are going to look great! The Chopper is a real time saver and you've obviously put it to good use! Waiting for the next installment to see what you do next! ;D
Paul
|
|
|
|
Post by Randy Earle on Oct 26, 2010 16:46:26 GMT -5
If I tackled that I'd have to start smoking again.
|
|
DRLOCO
Chairman
We can Railroad, Yes we can!
Posts: 237
|
Post by DRLOCO on Oct 30, 2010 9:21:49 GMT -5
Yes-- an interesting build, and thanks for the in-progress photographs
|
|
|
|
Post by diesel on Nov 3, 2010 22:21:22 GMT -5
wow Robert, This is gonna be one hellofa loco!
|
|
|
|
Post by icghogger on Nov 4, 2010 9:54:58 GMT -5
Scott, Paul, Randy, Kris, Dan - Thanks for the positive feedback, guys!! I should have some more to post by the weekend.
|
|
|
|
Post by slowfreight on Nov 4, 2010 11:49:16 GMT -5
icghogger, does that version of the chopper ever give you trouble on thicker stock with the blade sliding off at a slight angle? Your cuts all look very clean and square, and sometimes mine doesn't want to make square cuts.
|
|
|
|
Post by icghogger on Nov 4, 2010 14:31:23 GMT -5
Well, Slow, what you describe happens with all of my miter-type cutters, even the high-end ones. It happens because the blade is too thin and deflects as it moves through the material. On thicker stock, I cut halfway through and turn the stock over to finish the cut. Then I use a NWSL True Sander to square up the cuts.
|
|
|
|
Post by icghogger on Nov 7, 2010 13:51:01 GMT -5
After assembling all the pieces, this is the completed coupler plate. 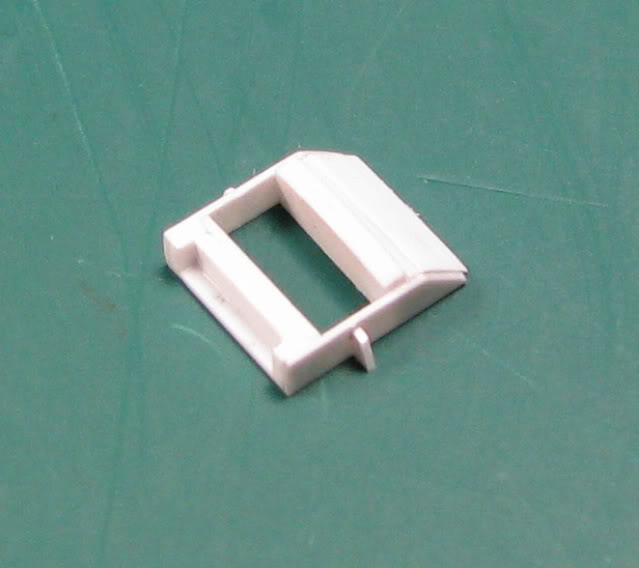 Another view. 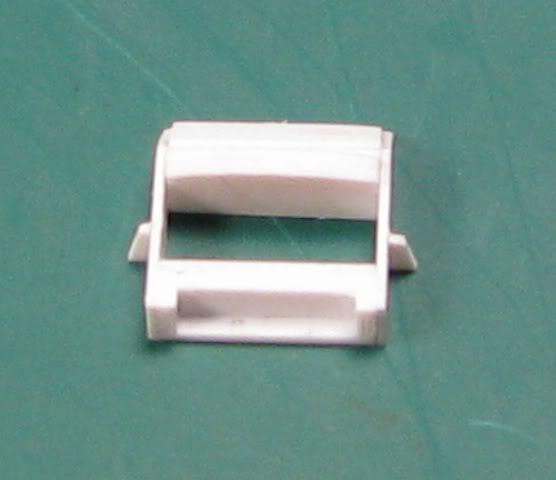 |
|
|
|
Post by icghogger on Nov 7, 2010 13:57:48 GMT -5
Here is the coupler plate attached to the pilot plate. 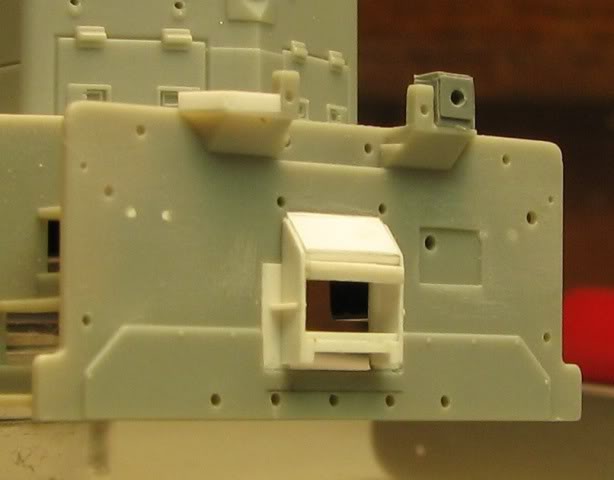 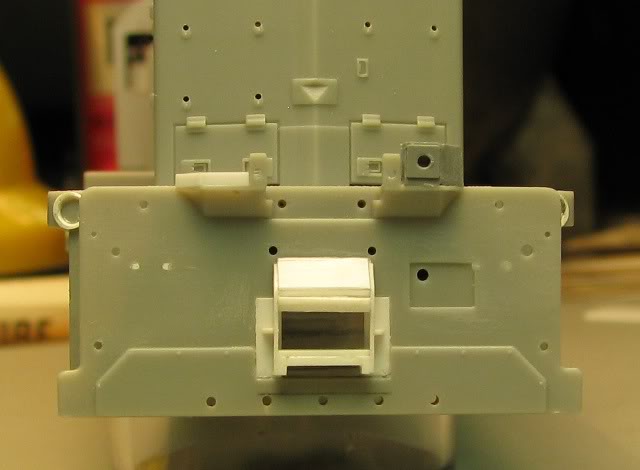 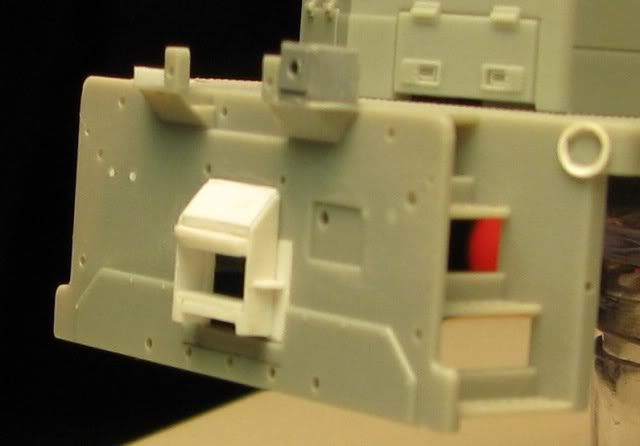 Stay tuned, next I will add the jewelry on the end, such as hoses, hose brackets, footboard, cut lever, crossover platform, MU plug, etc. |
|
|
|
Post by RunningExtra on Nov 7, 2010 17:01:43 GMT -5
Awesome Robert.....Simply awesome!
|
|
|
|
Post by icghogger on Nov 7, 2010 17:34:33 GMT -5
Thanks, Scott!!
|
|
|
|
Post by icghogger on Nov 15, 2010 12:03:14 GMT -5
Continuing the changes to the pilot plate, I modified an Atlas GP7/9 cut lever to better represent the prototype. 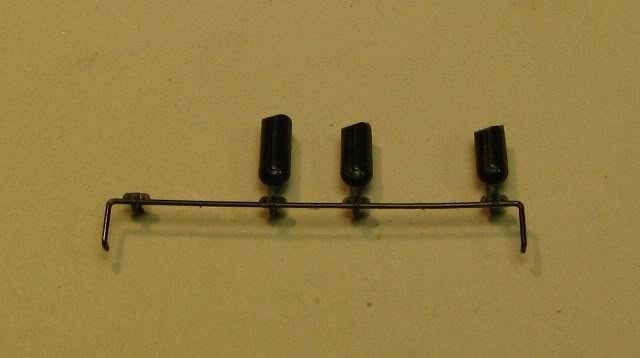 I start by cutting the two ends apart and modify the supports so they are squared off instead of rounded. 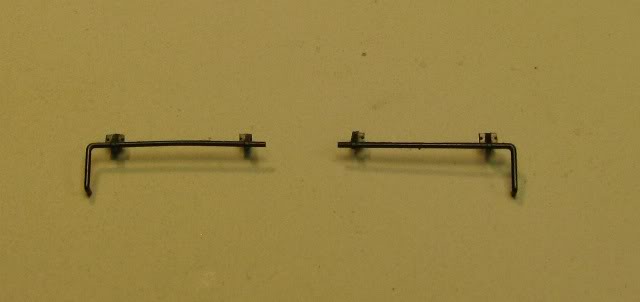 After getting a measurement for the distance between the supports, I mark a reference line on my flat-nose pliers to begin forming the uncoupling link. 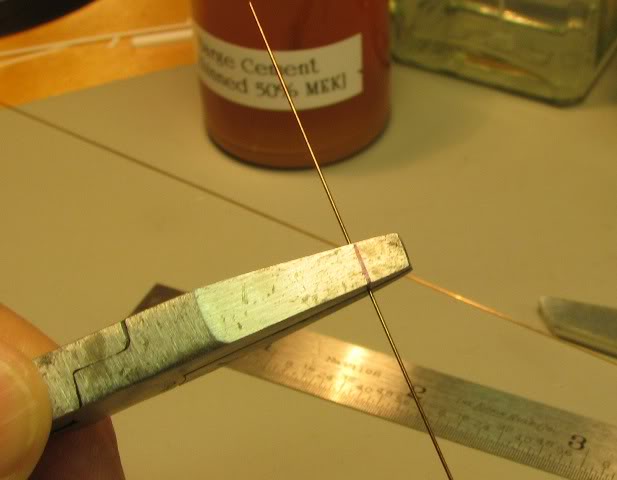 Holding the wire in the pliers, I start right-angle bends in the wire, leaving the tails at about 30 degrees or so. These tail ends will be straight when I form the curved portion of the link. 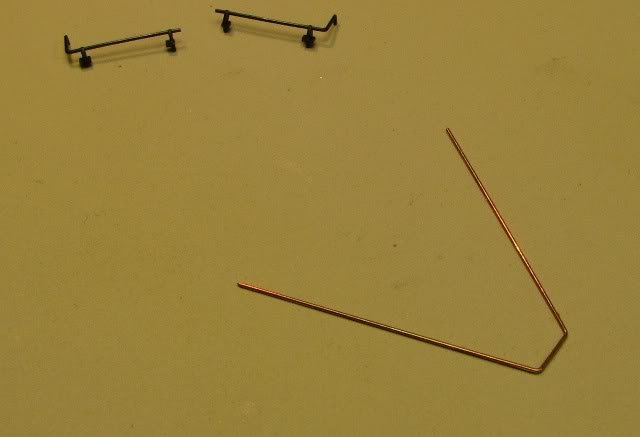 Then I use a pair of Kadee's trip pin pliers to bend a uniform curve in the wire. 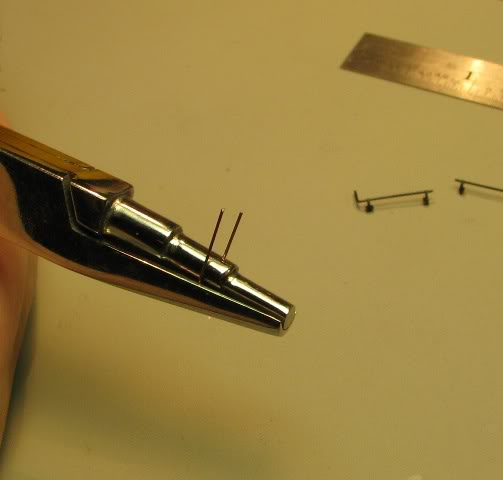 Next, I will complete forming the link and mount the cut lever to the pilot. 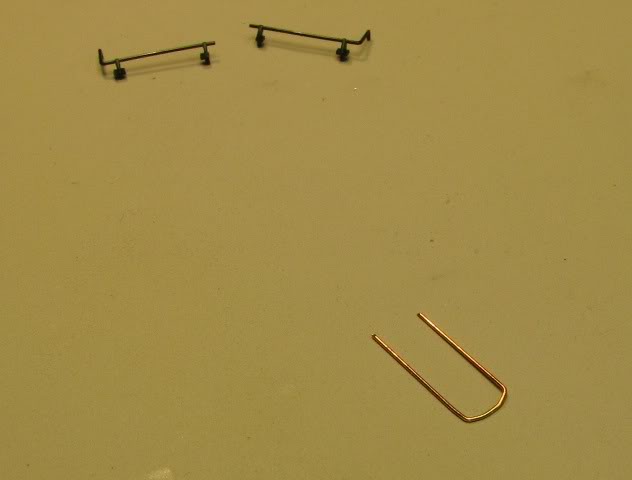 |
|
|
|
Post by Randy Earle on Nov 15, 2010 12:11:15 GMT -5
You are just surprising me more and more! Good job Robert!
|
|
|
|
Post by icghogger on Nov 15, 2010 12:14:49 GMT -5
Thanks for the kudos, Randy (I surprise myself sometimes, as well)!!
|
|
deez
Chairman
Midland Belt Railway
Posts: 949
|
Post by deez on Nov 17, 2010 0:53:57 GMT -5
Robert, the pilot looks awesome! I halted on my SD28's because I was stumped on the coupler pockets. I ordered Railflyer's coupler plates, and they looked spectacular, but were just not the right type. GP/SD35 and earlier EMD's have the plates with flat sides and not notched like the later 40 series and up. Your home made one is very impressive!
Another thing to note on the pilot faces is that the Atlas SD35 pilot faces have a taller rounded edge where they notch outwards at the bottom. Take a look at your photos and you should be able to see the difference. I was going to use Kato's GP35 pilot face to get an accurate pattern of how it should look. Interesting enough is that the Atlas SD35 pilot face is more true to early '66, SD40 & 45 series EMD's.
|
|