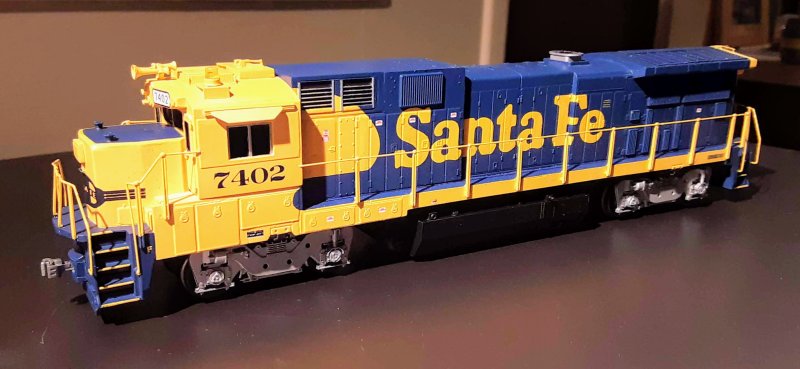
Post by fr8kar on Mar 11, 2017 18:16:41 GMT -5
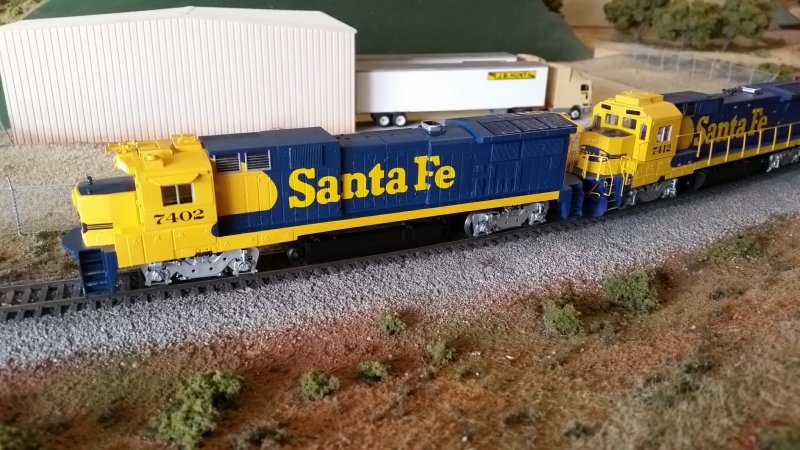
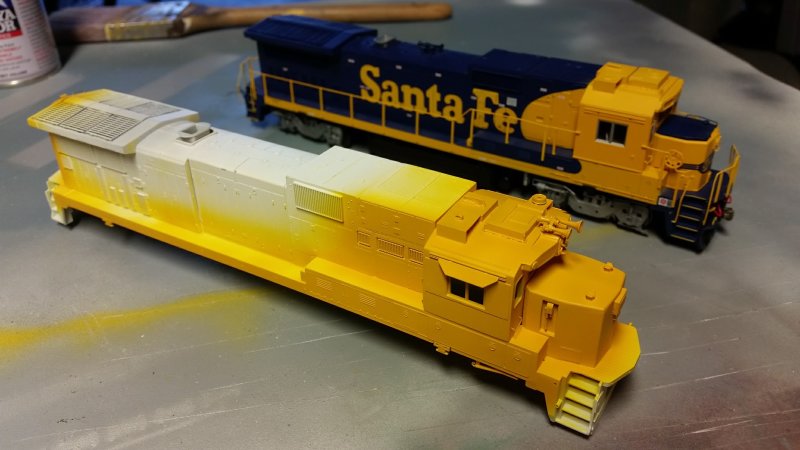
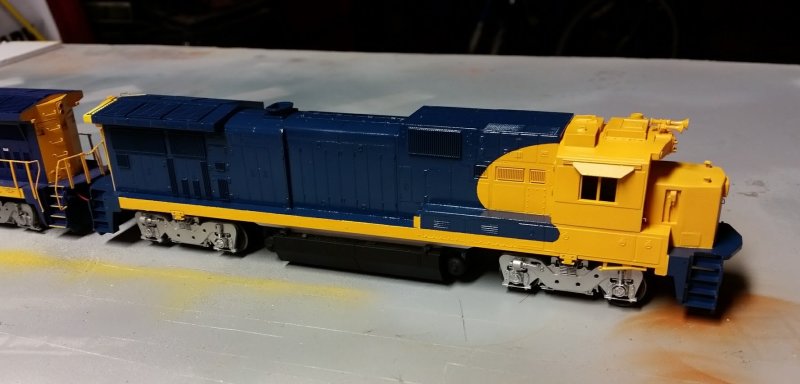
In the mid 80s, GE produced the first locomotives in the new Dash 8 line. Both four and six axle versions were offered in both high and mid-range horsepower models (3200 and 3900 horsepower). The naming convention followed the Dash 7 system, with either B or C representing the number of powered axles per truck, two digits for the horsepower and finally a "-8" at the end. Some models took off and became production models, others became nothing, well for awhile anyway. This model represents one of the three B39-8 demonstrator models leased by Santa Fe.
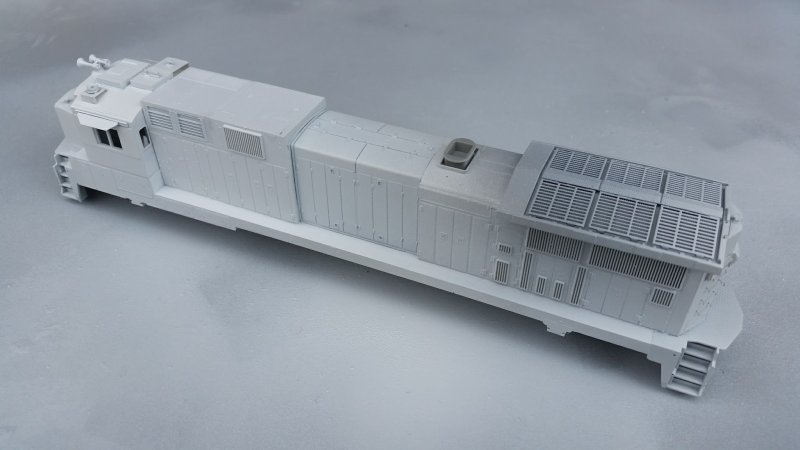
These things were radically different from their Dash 7 predecessors. New cab, nose, radiators, angled hood ends, raised clean air section. The asymmetrical hood made them look more like something out of a science fiction movie than the successor to the spartan and brutish Dash Sevens. If there was one clue, one vestigial reminder of their lineage it was the engine room, that plain row of doors and rounded roof tucked in between boxy protrusions at each end.
It seemed like almost as soon as the prototypes were roaming the rails, Rail Power Products was right alongside GE offering their C32-8. If you're familiar with their shells - especially those that became part of the Athearn RTR line - they were hit and miss, but RPP got better as they accumulated experience tooling shells. Unfortunately, the C32-8 was one of their first shell kits (if not the first). It was very crude with only raised outlines for the doors (it was later revised to have doors that sit proud of the hood sides), chunky pilots and steps, and like some other Rail Power shells, this one was infamous for the mismatch/offset between the hood sides and roof. In other words, it takes a lot of effort to clean it up. But back then and even now it remains the only starting point for an HO scale model of the B32-8, B39-8, C32-8 or C39-8.
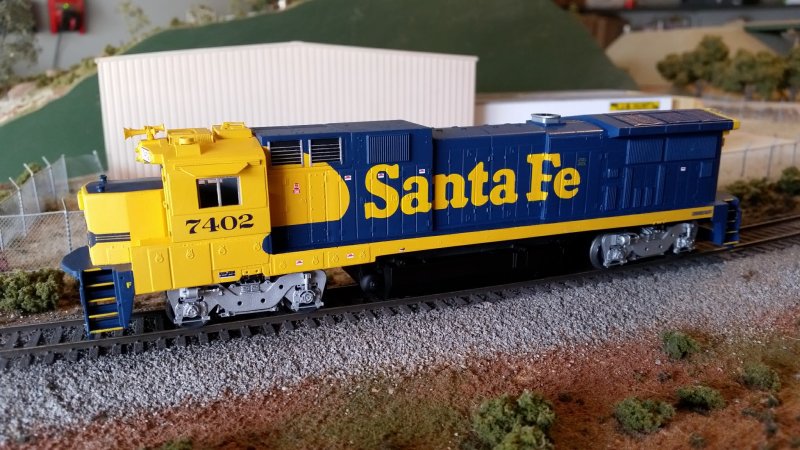
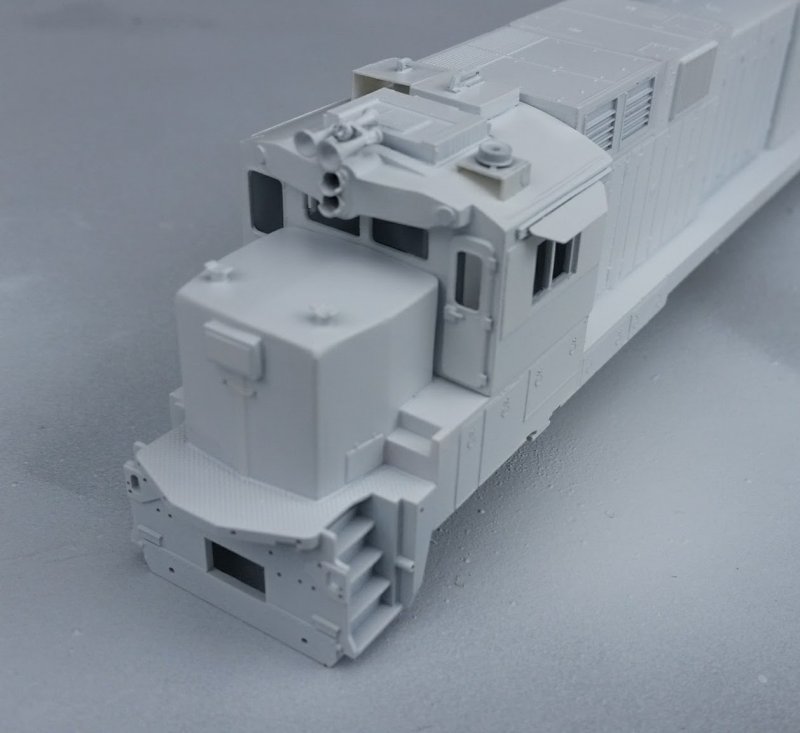
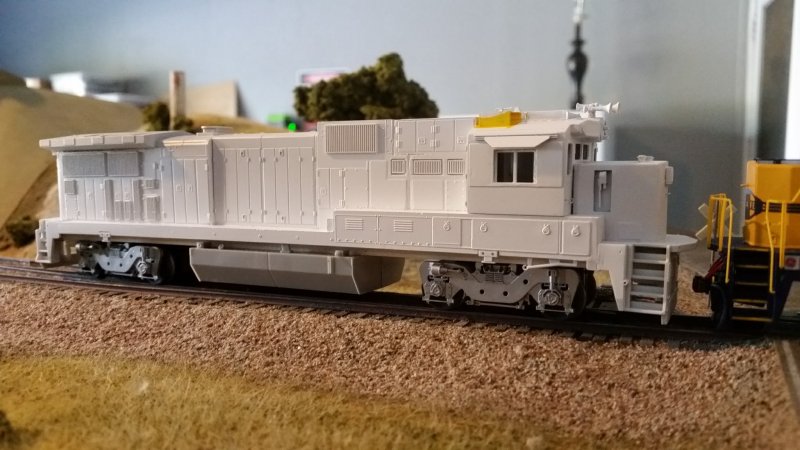
The cab is one of the weakest points of the model with its rectangular gasket-free windows and poor numberboard details. But there's no easy way to build a model of this cab starting with any commercially available cab. The front center windows are shorter in height than the standard GE cab windows and there is nothing that resembles that numberboard. The roof contour was also new for these early Dash 8s. The large radius over the center of the cab was retained but the hips with angled sections over the seats was eliminated in favor of a continuous curve to the eaves.
Like most GE models, the difference in length between the B and C versions of any given model are made up in the clean air section. Where some length had to be given up for the clean air section, a new hood was required for the engine compartment, since the 3200 horsepower models feature a six door per side arrangement versus the eight door per side configuration of the 3900 horsepower version. This shifted everything forward of the engine room toward the cab. Some creative cutting was required to shorten this section and retain the details. I had an extra Atlas B40-8 hood and radiator section leftover from a handful of standard cab C40-9 conversions I did years ago, so this is what I used for the engine room.

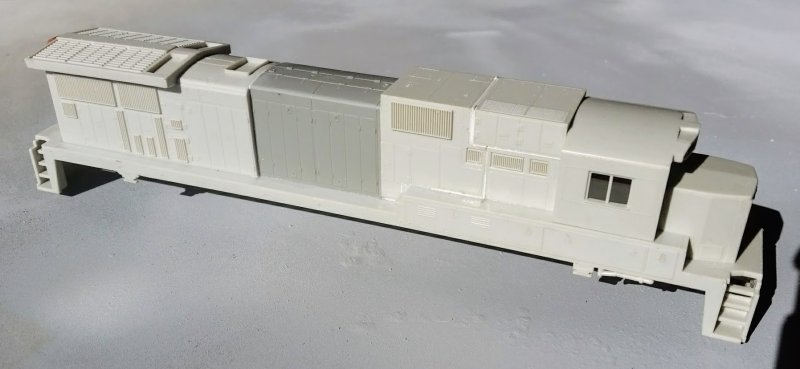
As it turns out, all the effort spent shortening the model really had no effect on the sill and I was able to retain the integrity of the shell. However, GE's six axle locomotives have a different stepwell for the four axle versions than the six axle versions, so it was either modify the stepwells and pilots extensively or simply replace them with the same parts cut from an Atlas B40-8 sill. I would have used the entire Atlas sill, but there's no good way to model the fireman's side of the sill without a lot of cutting or scratchbuilding.
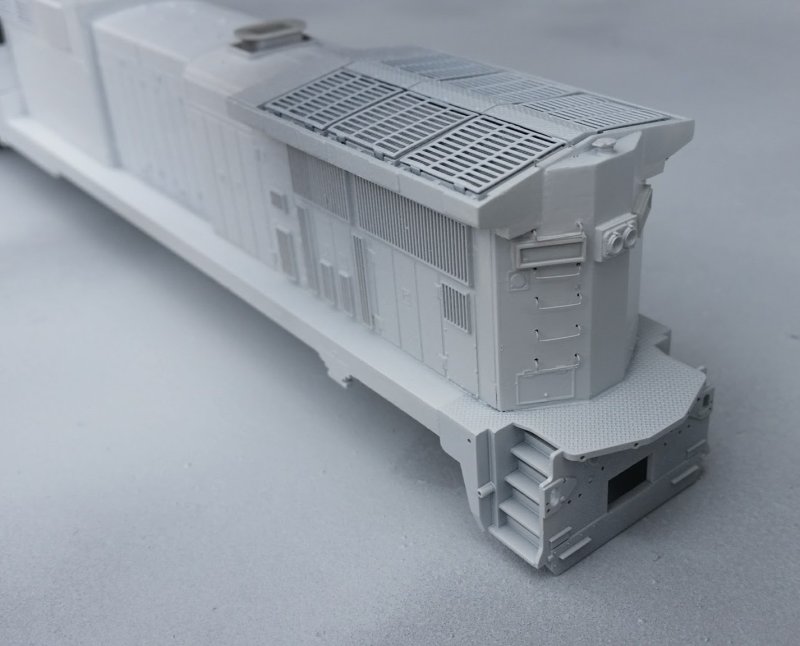
Rather than try to upgrade the horrific radiator exhaust grilles with the Detail Associates parts, I chose to use the leftover Atlas radiator section. This was certainly a trial-and-error affair as I blended the long hood end into the radiator wings. The effect is really well worth it. I replaced the exhaust with the Atlas B40-8 exhaust, which appears to be a good match for the prototype.

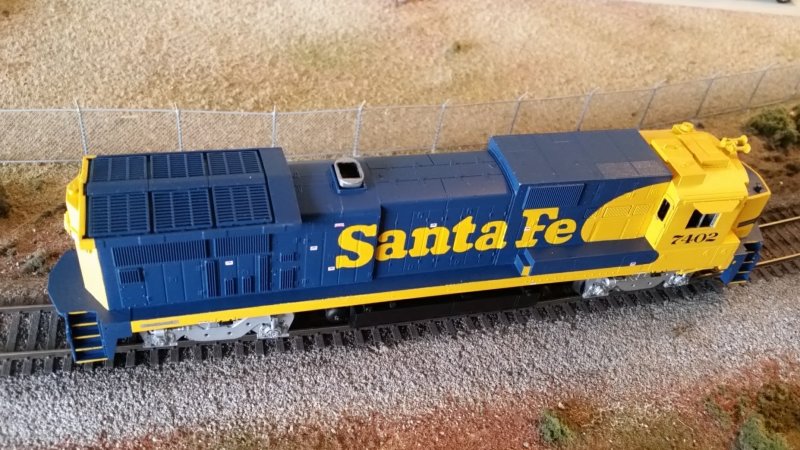
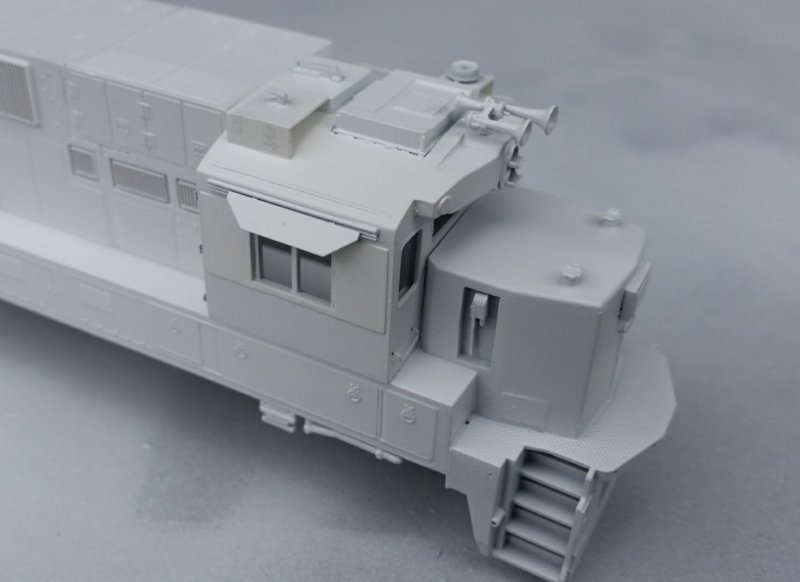
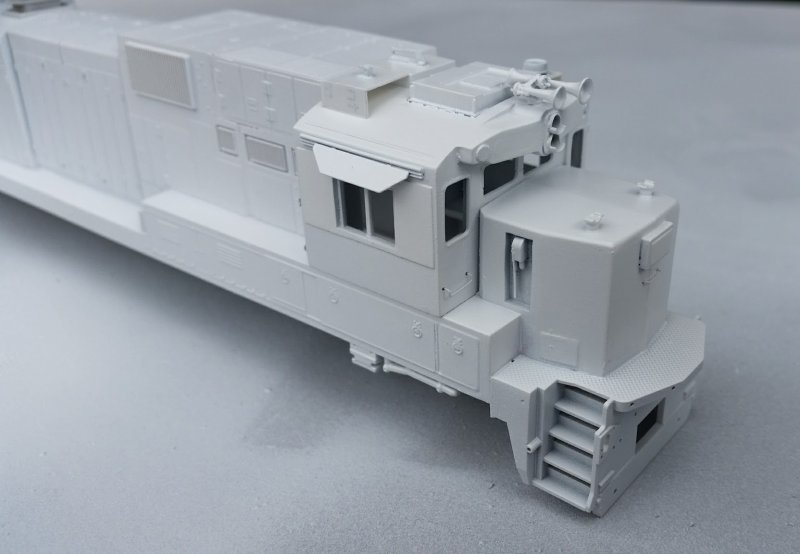
Back to the cab and nose, I spent quite a bit of time dealing with this area because it's the focus point of the model (sadly, not true of some of my blurry photos!) and it will be painted yellow, so everything shows up. I reshaped the nose using Bondo, then added a nose light block and blank, sand filler hatches and a Cannon & Company ratchet handbrake from an old high hood kit (molded in black, so you know it's old).
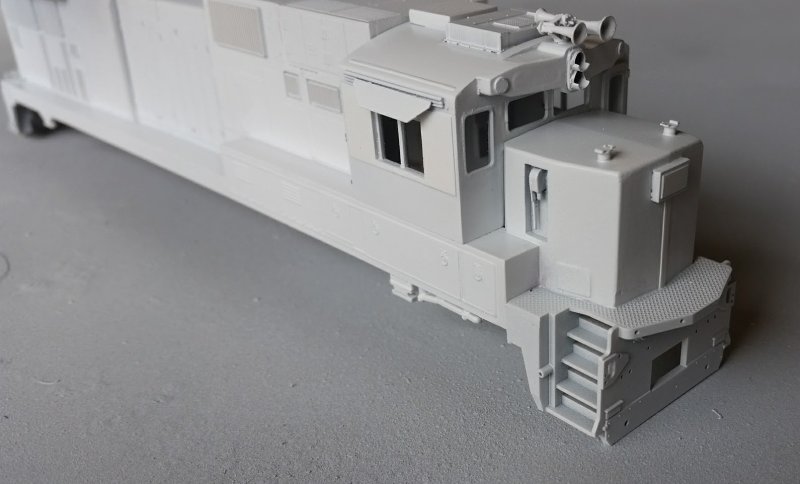
For the cab, I cut up a Hi-Tech cab kit for the windows and used the doors modified to look like the rectangular Dash 8 doors on the prototype. Basically what I did was trim around the Hi-Tech windows until I had a rectangle shape. Then I enlarged the RPP cab windows until the window frame with gasket could fill the rectangular opening in the cab. The center windows were not so straightforward since they had to be shortened vertically. The side windows got cleaned up but I overlaid a rectangle of 0.005" styrene sheet to represent the cover over the sliding windows. After this dried I sliced around the window frames and removed the covering to reveal the stock windows underneath.
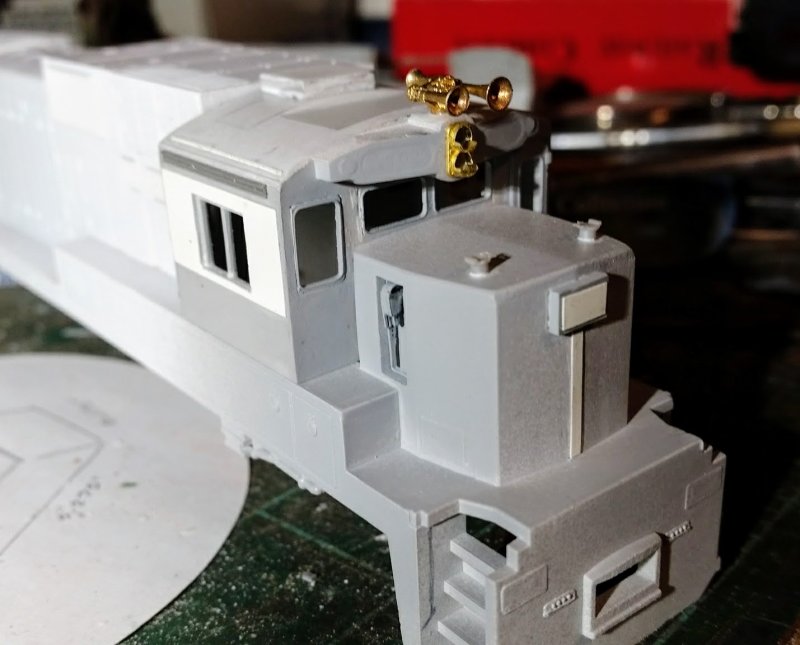
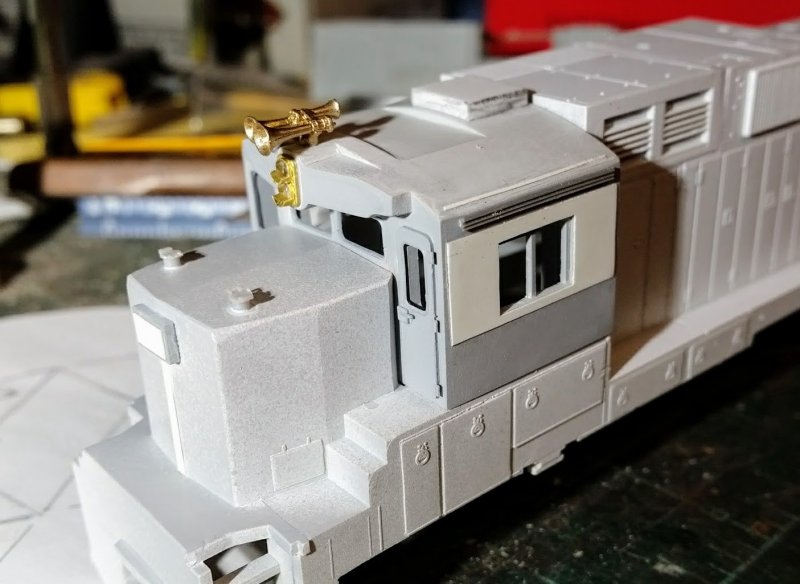
For the cab details, I filed a flat section for the Detail Associates air conditioner, then built up a boxy ground plane for the large Sinclair antenna. I filled in the numberboards and class lights with more Bondo, capped the class lights with some small round covers from another Cannon hood kit, and added a brass horn and vertical light with visors. I added some rain gutters cut from thin styrene sheet and installed Cannon sun shade tracks and brass (A-line?) sun shades. The small ground plane for the ETD antenna and the flasher beacon are simply cut from 0.010" styrene sheet. I like to use 0.005" thick brass or styrene for this ordinarily, but I'd rather have it be durable and look good for a long time than look right once and have to be replaced frequently. The flasher beacon and both the small and large antennas came from the parts bag included with an old Proto2000 SD60 I painted (and sold) years ago.
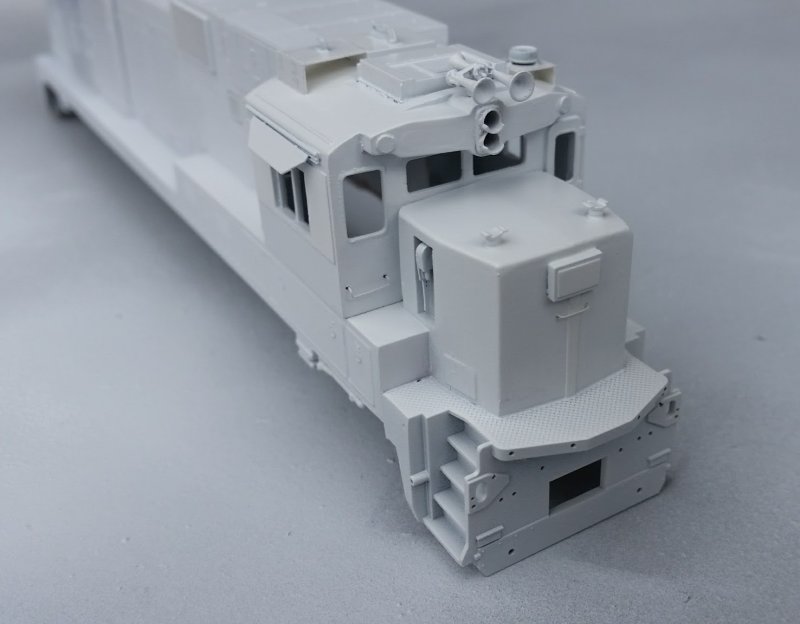
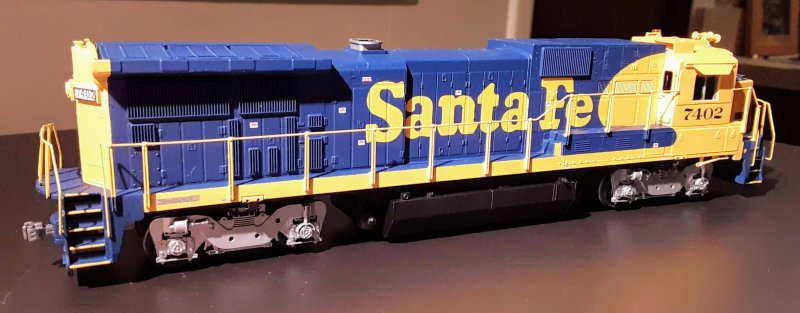
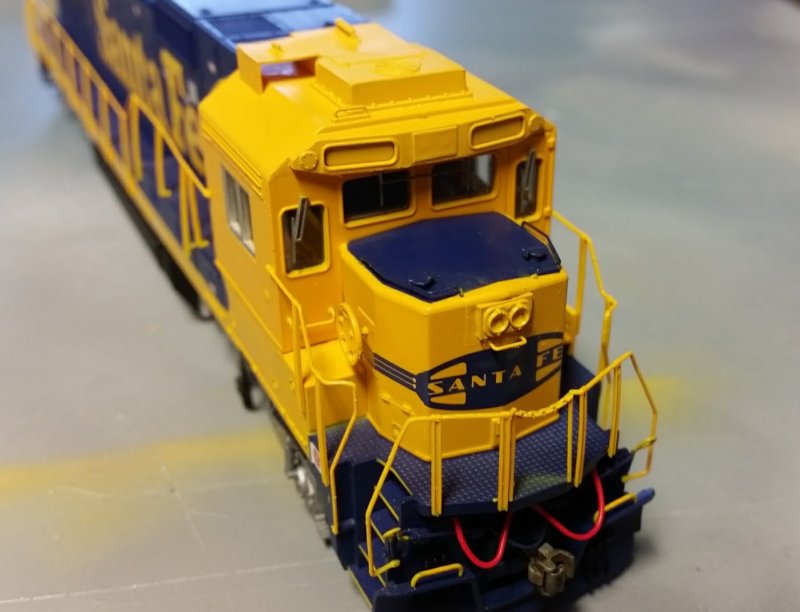
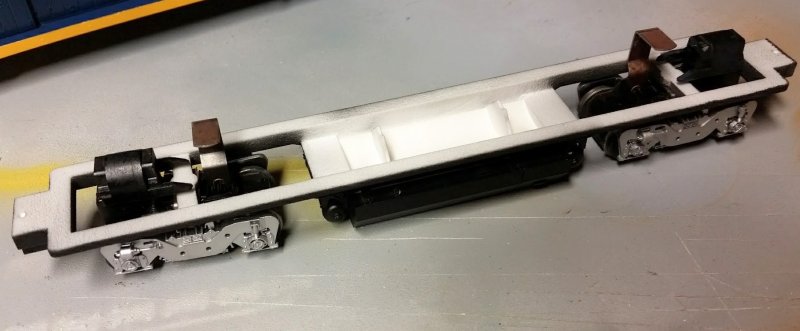
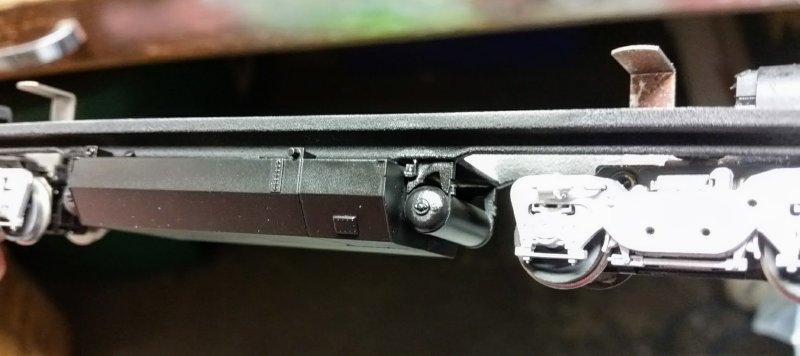
So, now it's ready for yellow paint, which should really pop on the white primer. Theoretically, this shell should fit on an Atlas B40-8 drive (some modification of the RPP sills may be required), but I am instead thinking of 3D printing a frame for it and using Atlas fuel tank parts and Athearn trucks and hex drive components along with a Kato motor. I haven't started any of that process for this model, but I have worked up a prototype for a B36-7 I'm working on. That's another thread, though.
These things were radically different from their Dash 7 predecessors. New cab, nose, radiators, angled hood ends, raised clean air section. The asymmetrical hood made them look more like something out of a science fiction movie than the successor to the spartan and brutish Dash Sevens. If there was one clue, one vestigial reminder of their lineage it was the engine room, that plain row of doors and rounded roof tucked in between boxy protrusions at each end.
It seemed like almost as soon as the prototypes were roaming the rails, Rail Power Products was right alongside GE offering their C32-8. If you're familiar with their shells - especially those that became part of the Athearn RTR line - they were hit and miss, but RPP got better as they accumulated experience tooling shells. Unfortunately, the C32-8 was one of their first shell kits (if not the first). It was very crude with only raised outlines for the doors (it was later revised to have doors that sit proud of the hood sides), chunky pilots and steps, and like some other Rail Power shells, this one was infamous for the mismatch/offset between the hood sides and roof. In other words, it takes a lot of effort to clean it up. But back then and even now it remains the only starting point for an HO scale model of the B32-8, B39-8, C32-8 or C39-8.
The cab is one of the weakest points of the model with its rectangular gasket-free windows and poor numberboard details. But there's no easy way to build a model of this cab starting with any commercially available cab. The front center windows are shorter in height than the standard GE cab windows and there is nothing that resembles that numberboard. The roof contour was also new for these early Dash 8s. The large radius over the center of the cab was retained but the hips with angled sections over the seats was eliminated in favor of a continuous curve to the eaves.
Like most GE models, the difference in length between the B and C versions of any given model are made up in the clean air section. Where some length had to be given up for the clean air section, a new hood was required for the engine compartment, since the 3200 horsepower models feature a six door per side arrangement versus the eight door per side configuration of the 3900 horsepower version. This shifted everything forward of the engine room toward the cab. Some creative cutting was required to shorten this section and retain the details. I had an extra Atlas B40-8 hood and radiator section leftover from a handful of standard cab C40-9 conversions I did years ago, so this is what I used for the engine room.
As it turns out, all the effort spent shortening the model really had no effect on the sill and I was able to retain the integrity of the shell. However, GE's six axle locomotives have a different stepwell for the four axle versions than the six axle versions, so it was either modify the stepwells and pilots extensively or simply replace them with the same parts cut from an Atlas B40-8 sill. I would have used the entire Atlas sill, but there's no good way to model the fireman's side of the sill without a lot of cutting or scratchbuilding.
Rather than try to upgrade the horrific radiator exhaust grilles with the Detail Associates parts, I chose to use the leftover Atlas radiator section. This was certainly a trial-and-error affair as I blended the long hood end into the radiator wings. The effect is really well worth it. I replaced the exhaust with the Atlas B40-8 exhaust, which appears to be a good match for the prototype.
Back to the cab and nose, I spent quite a bit of time dealing with this area because it's the focus point of the model (sadly, not true of some of my blurry photos!) and it will be painted yellow, so everything shows up. I reshaped the nose using Bondo, then added a nose light block and blank, sand filler hatches and a Cannon & Company ratchet handbrake from an old high hood kit (molded in black, so you know it's old).
For the cab, I cut up a Hi-Tech cab kit for the windows and used the doors modified to look like the rectangular Dash 8 doors on the prototype. Basically what I did was trim around the Hi-Tech windows until I had a rectangle shape. Then I enlarged the RPP cab windows until the window frame with gasket could fill the rectangular opening in the cab. The center windows were not so straightforward since they had to be shortened vertically. The side windows got cleaned up but I overlaid a rectangle of 0.005" styrene sheet to represent the cover over the sliding windows. After this dried I sliced around the window frames and removed the covering to reveal the stock windows underneath.
For the cab details, I filed a flat section for the Detail Associates air conditioner, then built up a boxy ground plane for the large Sinclair antenna. I filled in the numberboards and class lights with more Bondo, capped the class lights with some small round covers from another Cannon hood kit, and added a brass horn and vertical light with visors. I added some rain gutters cut from thin styrene sheet and installed Cannon sun shade tracks and brass (A-line?) sun shades. The small ground plane for the ETD antenna and the flasher beacon are simply cut from 0.010" styrene sheet. I like to use 0.005" thick brass or styrene for this ordinarily, but I'd rather have it be durable and look good for a long time than look right once and have to be replaced frequently. The flasher beacon and both the small and large antennas came from the parts bag included with an old Proto2000 SD60 I painted (and sold) years ago.
So, now it's ready for yellow paint, which should really pop on the white primer. Theoretically, this shell should fit on an Atlas B40-8 drive (some modification of the RPP sills may be required), but I am instead thinking of 3D printing a frame for it and using Atlas fuel tank parts and Athearn trucks and hex drive components along with a Kato motor. I haven't started any of that process for this model, but I have worked up a prototype for a B36-7 I'm working on. That's another thread, though.


 )
)