|
|
Post by iomalley on Mar 30, 2015 18:50:05 GMT -5
Ha, here we go again... This time, this one wasn't an Ebay or swap meet find, but rather a resident of dad's 1973era CP layout. After months of "what are you going to do with that old CN switcher" he showed up at the house yesterday with this gem in his hands. I think he picked this one up uber cheap at an estate auction, but since he's a CP modeler, it just sat, and sat, and sat, and sat...you get the picture... So here we are, this one was definitely cared for in a past life, with every possible wire accessory added, grabs, lift rings etc, which is no small feat on a Cary!!! 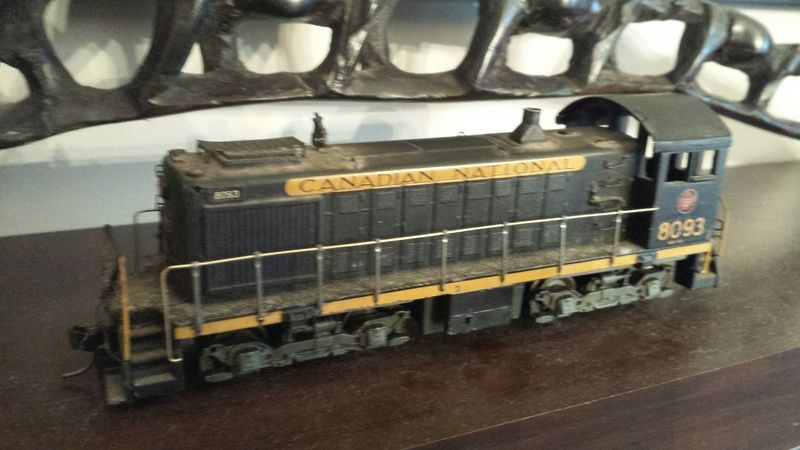 So the plan for this badboy is to repaint in the post 1961 scheme, but avec the AK chipping fluid, so I can flake off copius amounts of paint to reveal this paint scheme underneath...I'll keep you posted! |
|
|
|
Post by PVRR 2647 on Mar 30, 2015 19:04:56 GMT -5
Sean~
Nice looking unit, being a Cary I'll bet it has to weigh about 10lbs. It must pull like heck though.
PVRR2647
|
|
|
|
Post by Eccentric_Crank on Mar 30, 2015 19:36:10 GMT -5
NOOooo not that awful (gag)wet noodle!  If it needs paint, keep it "Gorgeous Green", some hung on for years. What a great gift from your Dad! Dan M. |
|
|
|
Post by iomalley on Mar 31, 2015 14:44:57 GMT -5
Well if it was an 8100 like a proper S2 I might keep it, but that number is actually a GTW unit, so we paint over!!!  |
|
|
|
Post by Eccentric_Crank on Mar 31, 2015 15:18:55 GMT -5
Well if it was an 8100 like a proper S2 I might keep it, but that number is actually a GTW unit, so we paint over!!! You could repaint in "Gorgeous Green" in deference to your elders...  Think of how proud your Dad would feel! Regardless, its still a nice unit, each to his zone. Dan M. |
|
|
|
Post by iomalley on Apr 3, 2015 21:35:54 GMT -5
Loving this AK chipping fluid! Very easy to use! 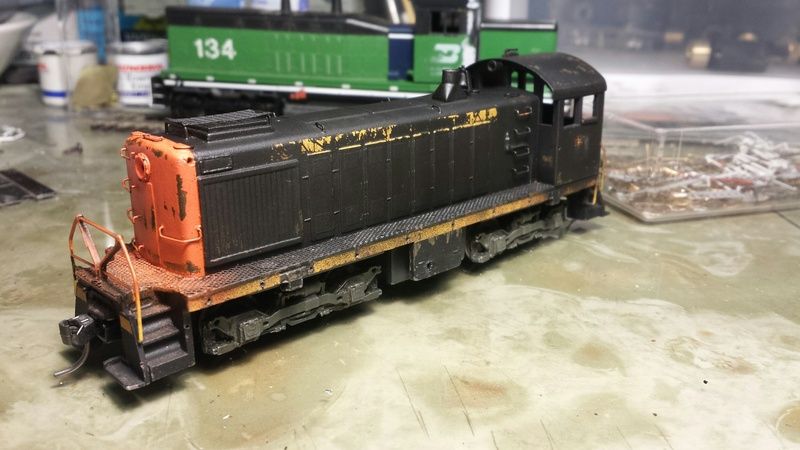 It was a bit tricky masking out the orange to spray the black, but I used post it notes and some careful aiming of the gun to curb overspray. 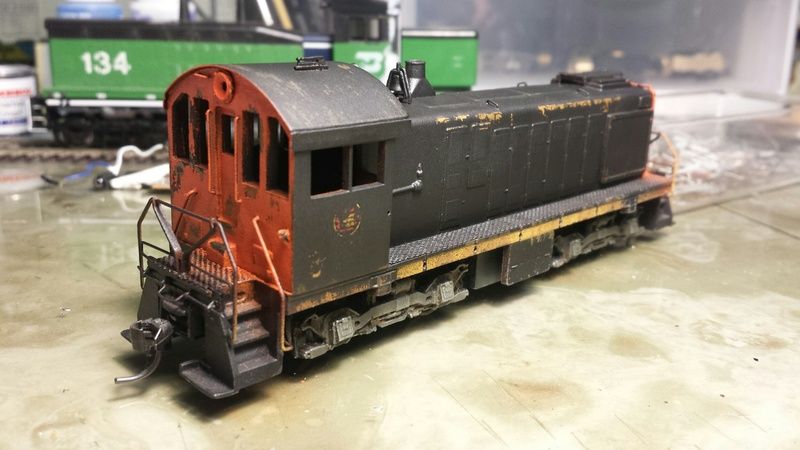 I gonna drybrush and streak on the grey sill stripe, and finish touching up the decks and handrails. It'll look something like this messy sill... www.cnrphotos.com/gallery2/main.php?g2_itemId=90943&g2_imageViewsIndex=1Not sure how I'm going to attack the decals to show some primer bleed thru but I'm sure I'll figure it out. Sorry Dan, the ol' black is buried, and the green is yuck!  |
|
|
|
Post by Eccentric_Crank on Apr 3, 2015 22:01:07 GMT -5
It's OK Sean, I'll let you live this time.
On a sunny day with fresh green shiny paint, it's so much classier than that black/red they designed so even summer students could do it!
Just don't take me seriously,
Dan M.
|
|
|
|
Post by iomalley on Apr 4, 2015 11:41:52 GMT -5
Ah much better! 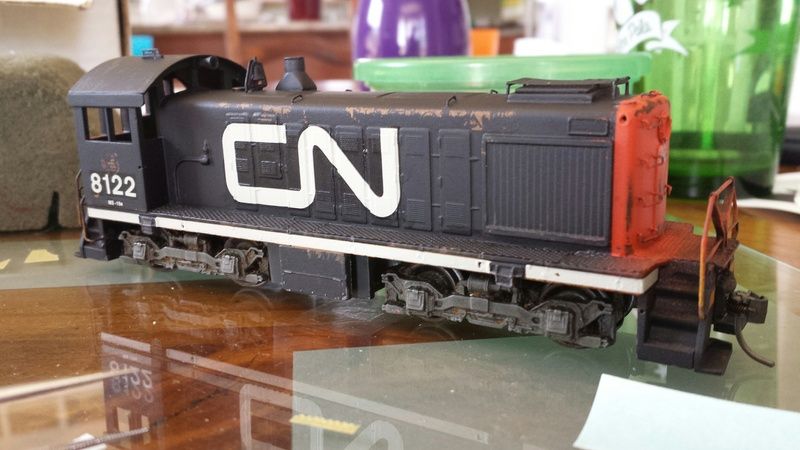 No offence taken Dan! |
|
|
|
Post by Eccentric_Crank on Apr 4, 2015 18:01:34 GMT -5
Ah much better! No offence taken Dan! Good! I'll keep trying!  At least they never desecrated a steam loco with the limp noodle! LOL. Happy Easter Sean & DD. Dan M. |
|
|
|
Post by emd16645 on Apr 4, 2015 18:40:51 GMT -5
At least they never desecrated a steam loco with the limp noodle! LOL. That sounds like a challenge to me! |
|
|
|
Post by iomalley on Apr 6, 2015 18:48:34 GMT -5
So, I started rifling thru my 2 parts 'tins' (repurposed xmas cookie tins) for a pack of Cary S stanchions, and low and behold! I found a pack! So I'm putting the proper Cary handrails down the sides using 015 steel wire. (steel will help hold its straightness, while handling this heavyweight)
I also had a wow moment...2 tins pretty well stuffed with little 3x2 detail packets. Al told, maybe $2000 worth of parts? (Probably more with my penchant for overpriced Rzasa parts...)
I also started brushing the copius amounts of greasy dust off the trucks, and low and behold! (deja vu?) Ernst gears in the trucks! (Woulda discovered that earlier if I wasn't so eager to bury the steam era paint scheme, and actually ran it for a bit) Its the only Ernst-gear-equipped unit I have, so it'll run solo. I'm looking for a tiny Sagami to put under the hood to do it up right, but for now will use the Athearn grinder.
|
|
|
|
Post by CP_8530 on Apr 7, 2015 17:23:20 GMT -5
Hmm, if I had seen this photo earlier, I would have suggested something like this www.flickr.com/photos/45938292@N02/16854611858/in/photostream/I'm not sure what's with all the white, I can only guess they initially painted that whole area white, masked the noodle off, and sprayed the black on. Fast forward to that photo, all the (cheap?) black washed/weathered off, exposing the white undercoat for the noodle, and the old scheme lettering too. |
|
|
|
Post by iomalley on Apr 7, 2015 18:44:50 GMT -5
Not sure either. You can see the prep paint coats clearly on faded GP40-2Ws where the overspray lays underneath, but in this case, maybe they used the CN grey as a primer?
I steer clear of modeling anomalies like this, as they stand out on the layout and make too much of a statement.
Awesome photostream!!!
|
|
|
|
Post by iomalley on Apr 7, 2015 20:32:04 GMT -5
Handrail's on, and a general grey wash applied. Now to flush fit some glazing, add winter bay window and awnings. That should do it!  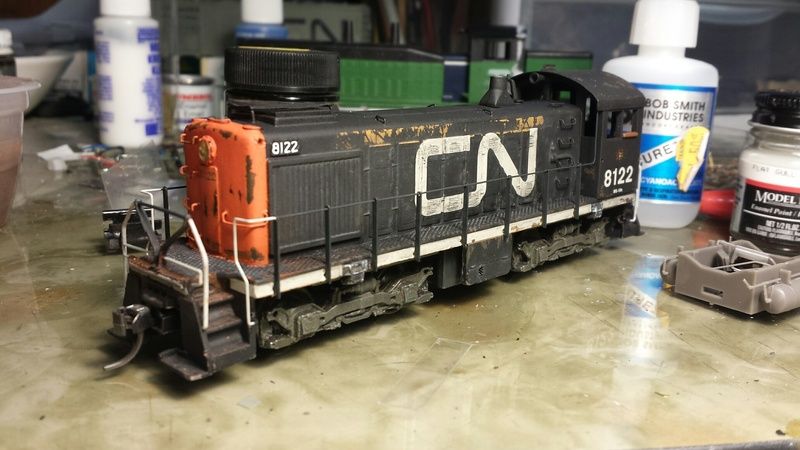 |
|
|
|
Post by iomalley on Apr 11, 2015 8:59:41 GMT -5
|
|
artur
Chairman
Posts: 580
|
Post by artur on Apr 25, 2015 7:58:13 GMT -5
Sean that looks awesome, I should get you to weather some of my models |
|
|
|
Post by iomalley on Apr 27, 2015 14:21:09 GMT -5
I'd be terrified to botch one of your beauty models. This one had no stress, cuz if I botched it, I could strip this Cary without fear.
I typically have a 10%-15% failure rate on weathering, and I just changed airbrushes and am relearning the technique all over again.
Speaking of stripping Cary's...just picked up the next rabbit, a Cary SW1500 with chassis I picked up at the Port Huron show for $10!
|
|
|
|
Post by emd16645 on Apr 27, 2015 15:01:06 GMT -5
Sean, do you have any tips for drilling holes (ie grab irons) for Cary shells? I have a SW that stalled at that step.
|
|
|
|
Post by iomalley on Apr 27, 2015 15:36:39 GMT -5
I use tungsten bits, they cut thru like butter. They are very brittle though, and require extra care to cut thru. If the bits are cold, or the material is too thick (0.100" or thicker) the bit will break. I usually keep the shank end in my mouth for a few minutes before I put it in my pinvise to warm it up, and I drill to 0.050" or so and finish the hole with a HSS bit. Also, they tend to snap just when they break thru the material, so I use a bit of cutting oil and spin the bit backwards as I break thru to the other side. here's where I get my bits from... www.drillbitcity.com/I buy the model RR set, plus 10 sets of the #80, #79 and #78 sizes. I also limit the bit size to #78 on these Carys. I haven't had much luck with burrowing thru with the #80. I've also heard of some guys using a 1/32" steel bit and drilling out the grab holes, and plugging the holes again with heated and stretched sprue, then drilling out the plugs with a #80 bit. |
|
|
|
Post by emd16645 on Apr 27, 2015 16:38:58 GMT -5
Thanks for the tips. I've tried #79s from drill bit city (my preferred supplier) in the past without great success. Will try some of your tips and hopefully it goes a little smoother.
|
|


