Gav Smart
Engineer
Standard gauge in the late 1960's, in 1:29th.
Posts: 43 
|
Post by Gav Smart on Oct 1, 2014 8:15:16 GMT -5
Hi, I wanted to share some progress photos my latest large scale project. I'm re-working another 1:29 USA Trains F3A into a Southern Railway dual-service passenger/freight unit. This is the sister unit to one I had posted earlier, and I hope to do this one in Southern's Tuxedo Black paint scheme. Some of these Southern F units lasted on until around 1972 I think (?) so I'm hoping to capture the feeling a of a hard working, battle worn old unit in the twilight of its career! I really like how the Southern mounted all the air tank kit on the roof to make room for the larger tanks below, so I knew I wanted to recreate that with this unit. Progress is slow so far, I'm mainly just working on all the body work right now. I've finished most of the air tanks and piping, although without any clear roof photos or diagrams, a lot of it is an approximation based on looking through loads of photos. The other major job was to cut and fit a new 48' cap top dynamic brake fan and a piece of styrene to mount it on: 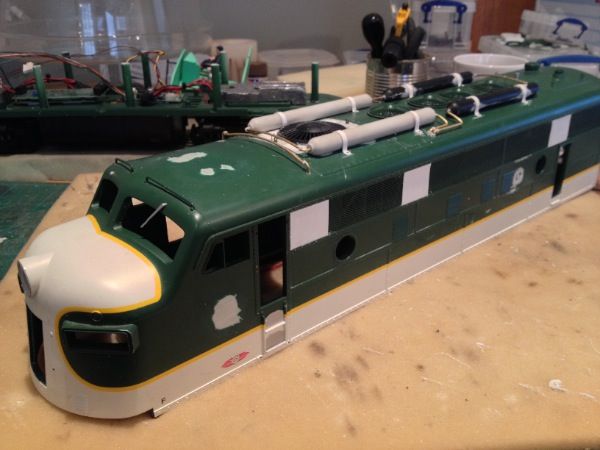 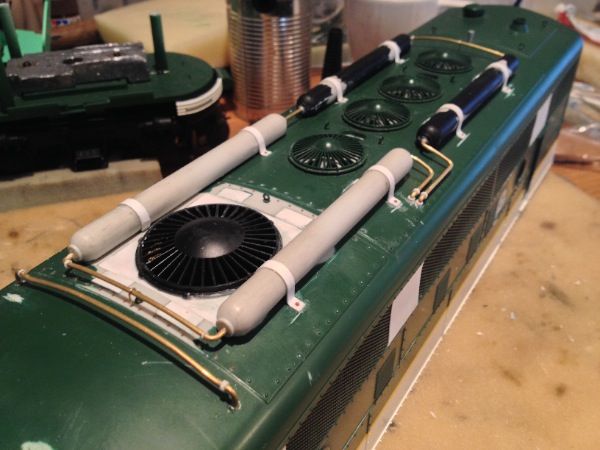 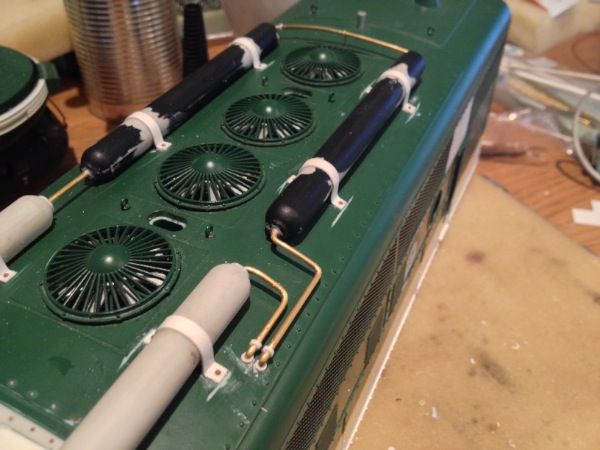 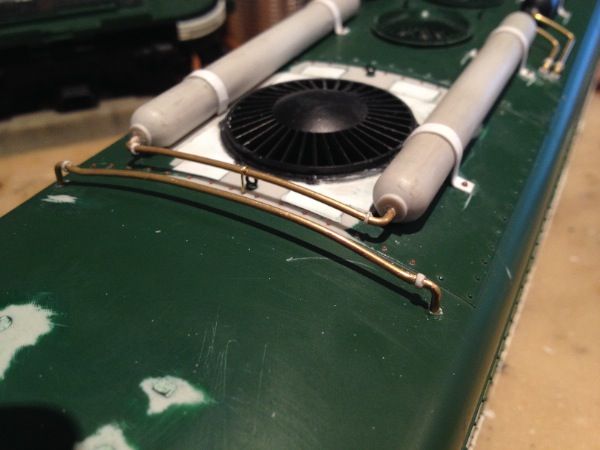 Here are some more showing more progress on the bodywork. I've blanked off parts of the side grills as per the prototype, and the single chime horns are gone and sanded down, ready for a new firecracker antenna and 5 chime horn. I've also added a cover on the nose to simulate the MU connection too. The old large style filler caps on the side have gone and I will add a smaller recessed version that seems to be common on these Southern units. 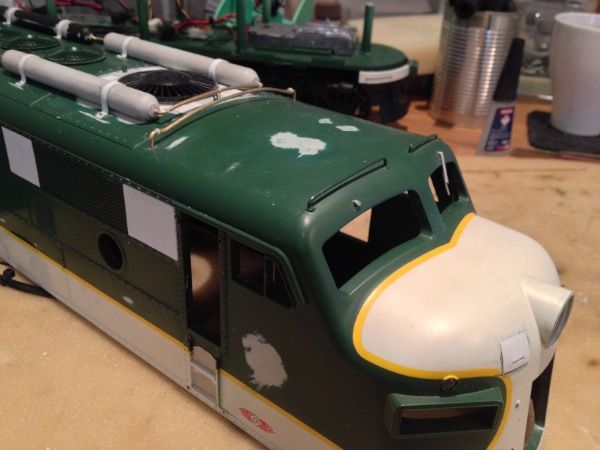 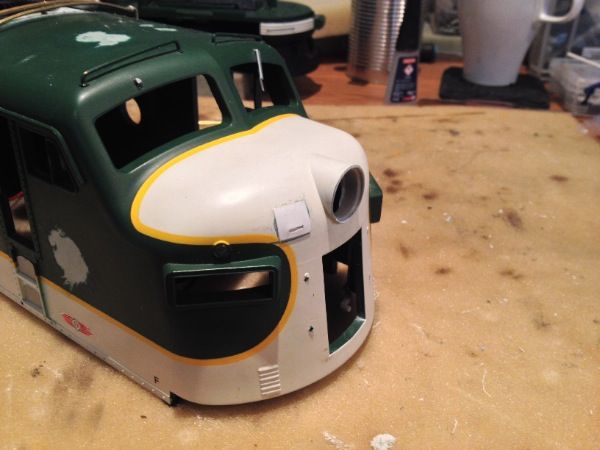 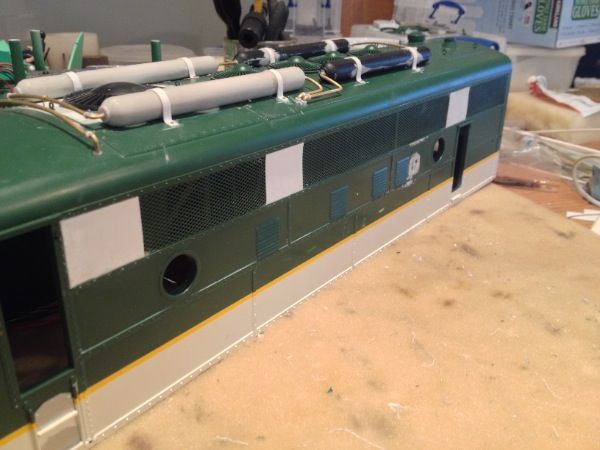 It's still a little rough at this stage with all the cutting, drilling and sanding but I hope it gives you an idea of where I'm headed! As always I don't claim to be any kind of expert, so please all comments, thoughts, suggestions and criticisms are warmly welcomed  Many thanks, Gavin |
|
|
|
Post by icghogger on Oct 1, 2014 14:08:25 GMT -5
Excellent start, Gav, keep us posted!!
|
|
|
|
Post by enginseer on Oct 1, 2014 15:38:11 GMT -5
Boy that looks cool, can't wait to see some more photos.
|
|
dekon
Staff Member
Posts: 634
|
Post by dekon on Oct 1, 2014 19:48:49 GMT -5
Outstanding!
|
|
|
|
Post by analogbeatmaker on Oct 2, 2014 2:16:54 GMT -5
REAL nice work Gavin! It's great to see such a large scale get a super detailing job. I can't wait to see this one weather beaten!
|
|
|
|
Post by NS91 on Oct 2, 2014 5:02:45 GMT -5
Looks great! You are correct the F3's stayed on the Southern roster until 1972-1973 with most being traded to GE/EMD on new orders. I can't wait to see this one finished.
|
|
Gav Smart
Engineer
Standard gauge in the late 1960's, in 1:29th.
Posts: 43
|
Post by Gav Smart on Oct 2, 2014 9:40:43 GMT -5
Thanks for the kind words folks, it really means a lot Here a couple of quick photos showing some more progress made today. I removed the raised sand filler hatches to recreate the recessed version on these units. From flicking through various books and photos it seems that some of the hatches had round recesses and other had rectangular. For ease of drilling I decided to just copy the round style. I also added some detail to the blanking plates over the chicken wire grills. Again, still a long way to go but every little piece seems to add a little bit of character to the loco:  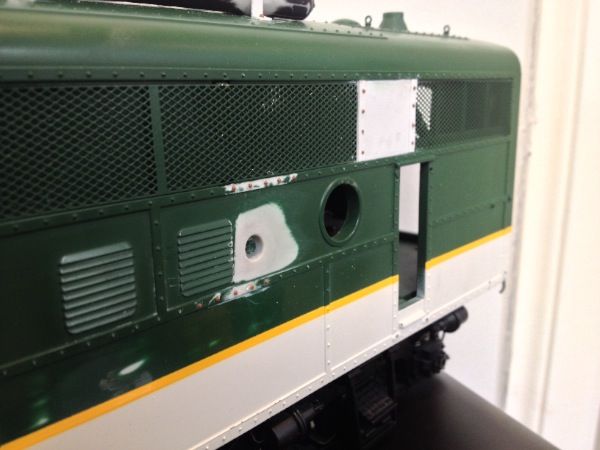 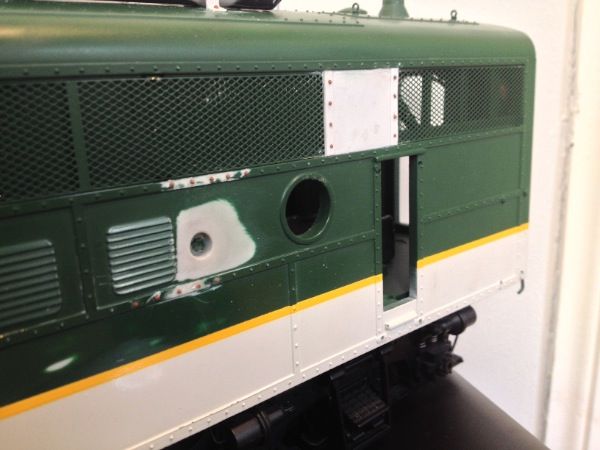 And here it is so far, with the shell back on just for a quick mock up: 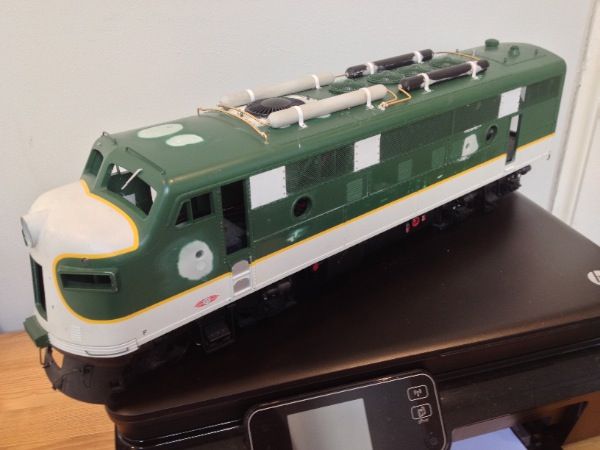 Sorry this isn't such a great shot, but you can see the work I've already done on the lower frame. The side skirts have all gone and the tanks have been fattened up, with the fuel filler details saved from the skirt pieces and re-used on the tanks: 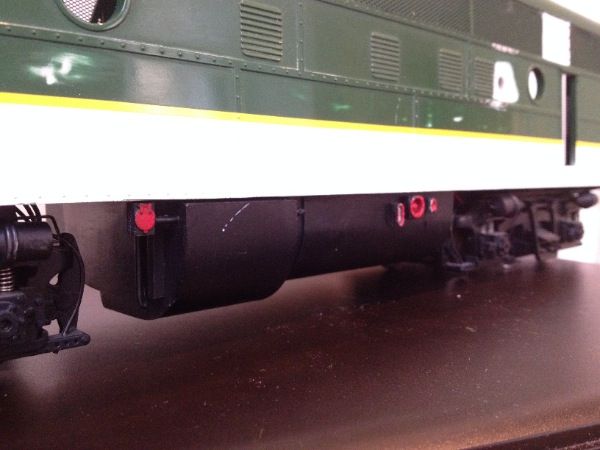 Thanks again, G |
|
|
|
Post by ednadolski on Oct 2, 2014 18:34:19 GMT -5
Very nice work Gavin! At 1:29, the in-person 'presence' of such a model must be impressive indeed  Ed
|
|
Gav Smart
Engineer
Standard gauge in the late 1960's, in 1:29th.
Posts: 43
|
Post by Gav Smart on Oct 3, 2014 5:37:54 GMT -5
Thanks for all the kind comments!
Ed, that is one of the advantages of working in this scale. It's all a compromise really, things are much bigger and so much easier to cut and modify, but then there aren't really many after-maket detail parts available. Sometimes you have to be a little bit creative when you can't find what you need! USA Trains are pretty good to deal with though as you can source bits and pieces from their spare parts department which really helps. The 48' dynamic fan is actaully from another USAT loco, but in this case they supplied it as undecorated piece. I also get a lot of glad hands, brake hoses, and other bits and pieces that way too.
Thanks again,
G
|
|
Gav Smart
Engineer
Standard gauge in the late 1960's, in 1:29th.
Posts: 43
|
Post by Gav Smart on Oct 3, 2014 10:05:57 GMT -5
Another quick update on the F unit... I made a little more progress today with the nose mounted grab irons and the stepping plate. I also added a small piece in to represent the hinge on the first of the two port holes. Lastly finished up all the detail around the grills: 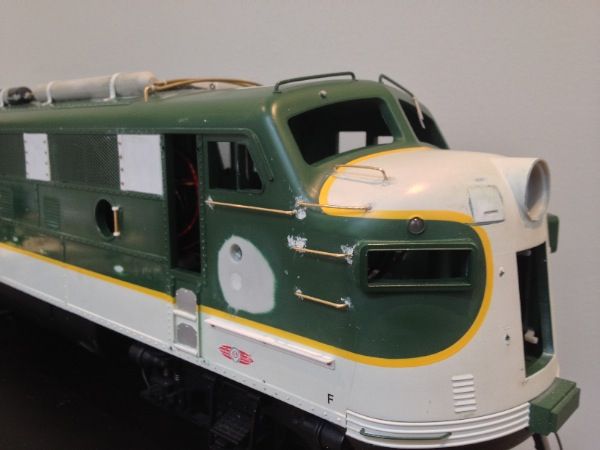 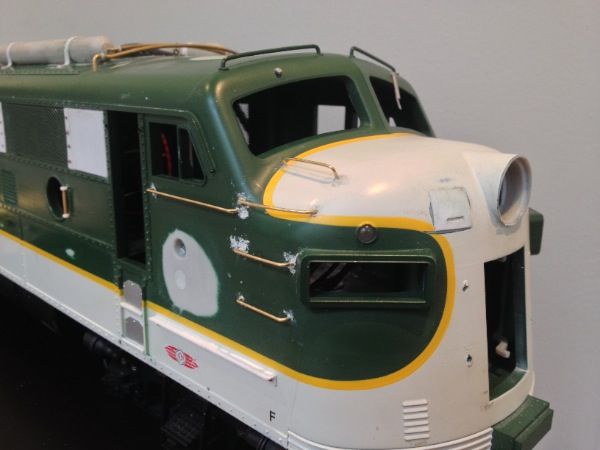 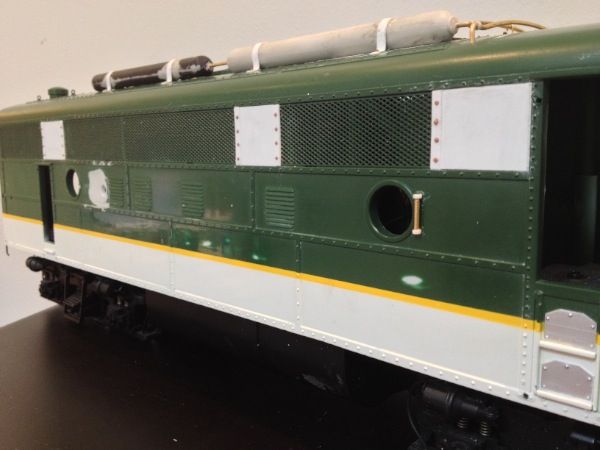 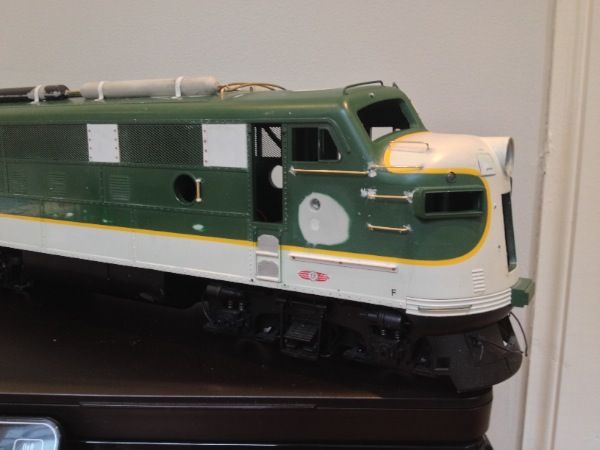 Thanks again for keeping up with this! G |
|
dale
Superintendent
Posts: 157
|
Post by dale on Oct 4, 2014 6:43:50 GMT -5
What size wire do you use for piping on the air tanks?
|
|
Gav Smart
Engineer
Standard gauge in the late 1960's, in 1:29th.
Posts: 43
|
Post by Gav Smart on Oct 4, 2014 7:43:20 GMT -5
Hi Dale,
I used 1.5mm brass wire on the air tank piping.
For the rest of the loco I used 0.8mm for the new grab irons on the nose. On the truck frames I used 1.5mm wire for the sand lines and 0.5mm for the piping between the brake cylinders.
Thanks,
G
|
|
Gav Smart
Engineer
Standard gauge in the late 1960's, in 1:29th.
Posts: 43
|
Post by Gav Smart on Oct 5, 2014 8:15:11 GMT -5
A little more progress to report. I neatened up around the new grab irons and added some more detail to represent where they were riveted/welded (?) to the body. I also added a Nathan M5 horn and a firecracker antenna on the top of the cab roof. The M5 is a white metal casting from Ozark Miniatures, and the firecracker is a spare part from Charles Ro, originally from the USA Trains SD40 model: (PS: The front windshield wiper got broken somewhere along the line, but I have a few spare and will replace it when the body shell is back together.) 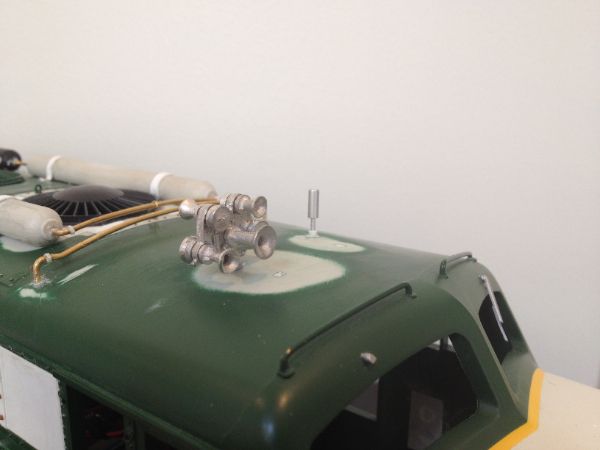 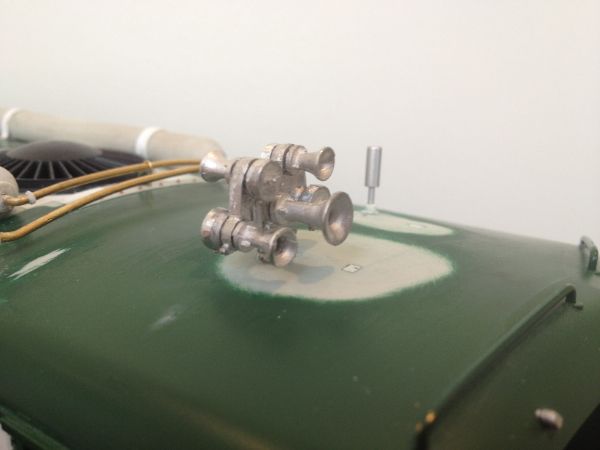 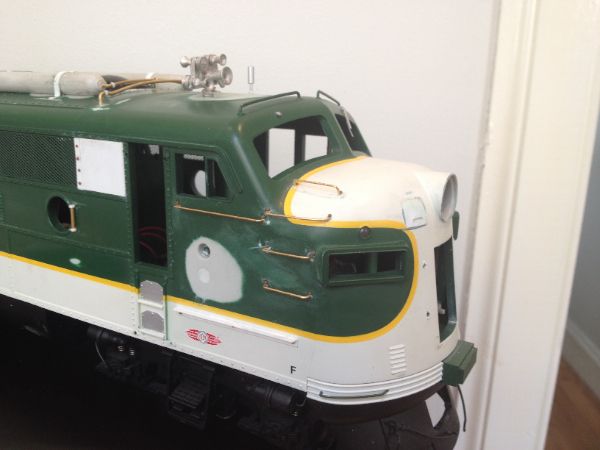 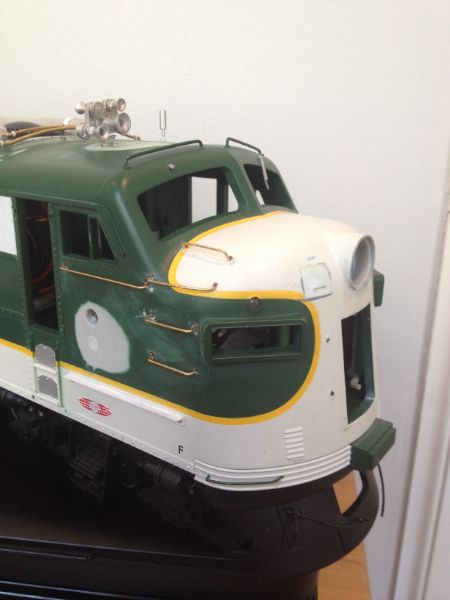 Thanks again for keeping up with this! G |
|
Deleted
Deleted Member
Posts: 0
|
Post by Deleted on Oct 6, 2014 20:49:42 GMT -5
WOW is all I can say Gav that is turning into a real masterpiece
|
|
Gav Smart
Engineer
Standard gauge in the late 1960's, in 1:29th.
Posts: 43
|
Post by Gav Smart on Nov 4, 2014 10:09:16 GMT -5
Hi, Just a quick update on progress so far. I've pretty much finished the painting and I'm beginning to reassemble all the bits and pieces that were removed along the way. I decided I just couldn't live with the original USA Trains glazing in the front windshield panes as they were just too thick and chunky. I used some Evergreen clear styrene to make some new pieces which are a little bit more authentic looking (thanks for the tip ednadolski!) I still have a little bit more work to do around the fuel tanks and the front pilot, as well as wire up and install the new headlight LED and reflector, but things are finally starting to come together. Also a big thank you to Bob Harpe for his very kind help to figure out the right builders plate for this loco! Here are a couple of shots of the new windshield glazing: 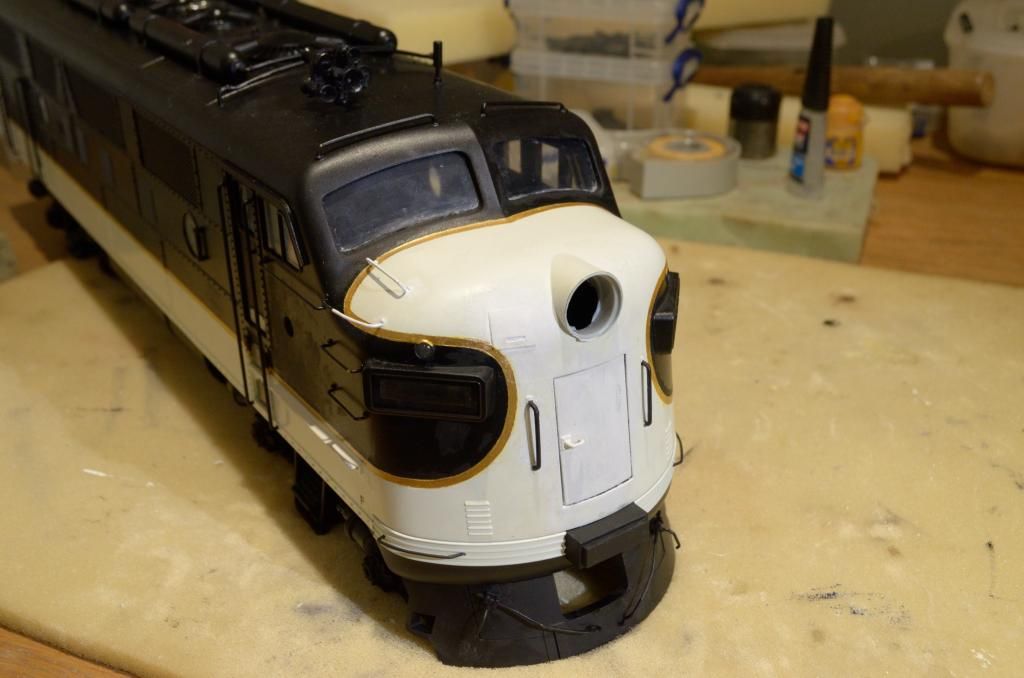 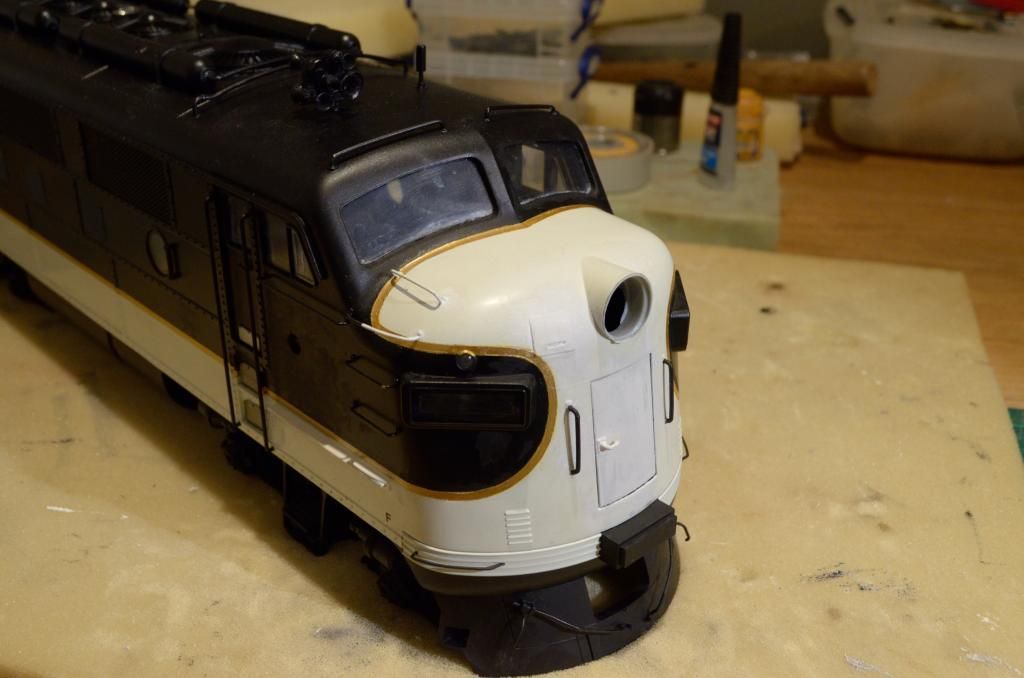 Thanks again, Gavin |
|
|
|
Post by analogbeatmaker on Nov 4, 2014 14:03:53 GMT -5
Awesome! Keep the progress pics coming. I can't wait to see this finished.  |
|
|
|
Post by emd16645 on Nov 6, 2014 22:13:58 GMT -5
Looks great Gavin. Love seeing the big scale stuff.
|
|
Gav Smart
Engineer
Standard gauge in the late 1960's, in 1:29th.
Posts: 43
|
Post by Gav Smart on Nov 15, 2014 23:05:32 GMT -5
Hi, Just a quick update... I made a little more progress on the F-unit over the last few days. I really wanted to get the all LEDs wired up and re-connected so that I can get the body screwed back on. I hooked everything back up to the DCC chip and sound board before closing the shell up, that way I can progress with some more of the finer details. Here is a quick shot of the twin beam headlight reflector I installed in the nose. The part is originally from Ozark Miniatures as they produce a pack with a selection of different types of F-unit reflectors with different bulb configurations. The headlight is completed with two warm white 5mm LEDs and a AAA sized mini MAG light lens cover:  Here is a prototype picture of loco #6706 that I'm modelling, showing the headlight that I'm trying to imitate with this: 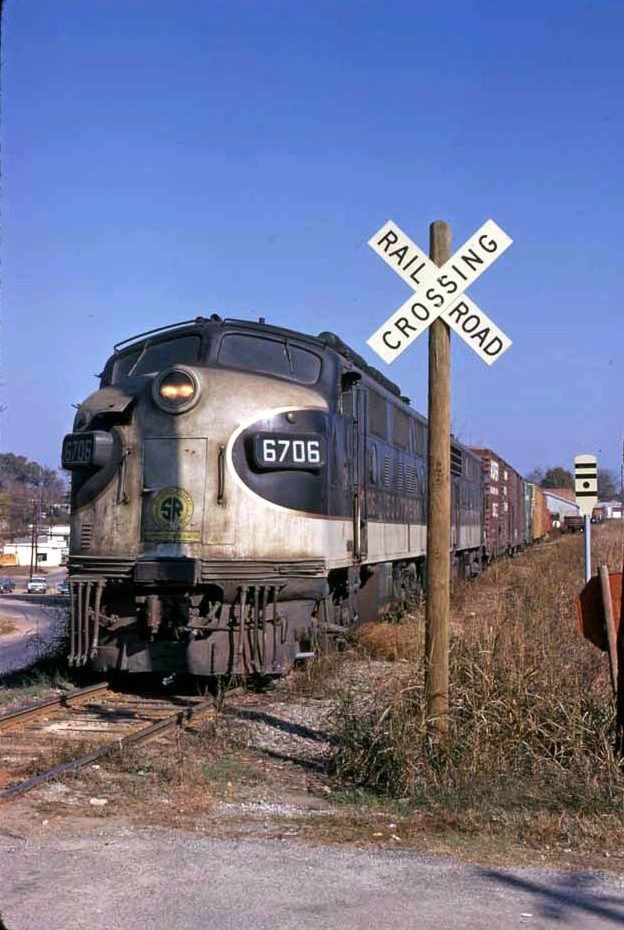 Thanks again for keeping up with progress and I'll post some more pictures as work progresses! Best wishes, Gavin |
|
|
|
Post by enginseer on Nov 16, 2014 6:49:24 GMT -5
That looks really nice.
|
|
Gav Smart
Engineer
Standard gauge in the late 1960's, in 1:29th.
Posts: 43
|
Post by Gav Smart on Mar 13, 2015 8:17:04 GMT -5
Hi, Apologies for the lack of updates on this thread. I was really busy at the end of last year that I didn't have much time to finish this loco! I was determined though to push on and get this one completed and out into revenue service in our next ops session! Here are a few photos of the finished loco. The decals are all on and the loco has been weathered, with a final coat of matt varnish to seal everything in. I tried to follow various photos of this unit in the late 60's, which show it still hard at work although far from pristine! It was retired from service in '72, so in 1967 which we model, I wanted to capture the look of a well used locomotive. PS: It doesn't come across well in the photos, but the number board decals are done like the originals on the prototype: a black background with clear lettering. There is a warm white LED mounted just behind each board so it gives it that nice old-time look that the boards on these F-units had, unlike the newer Southern locos in the 70's which seem (to my un-educated eye!) to have white lettering instead. 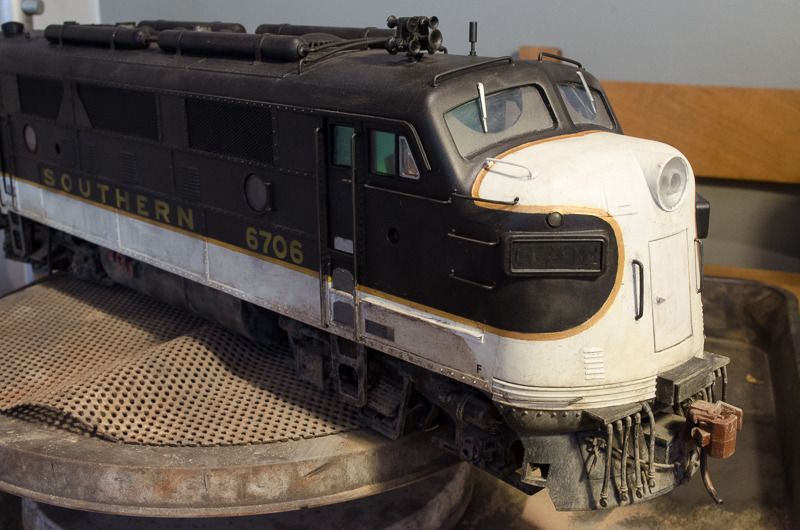 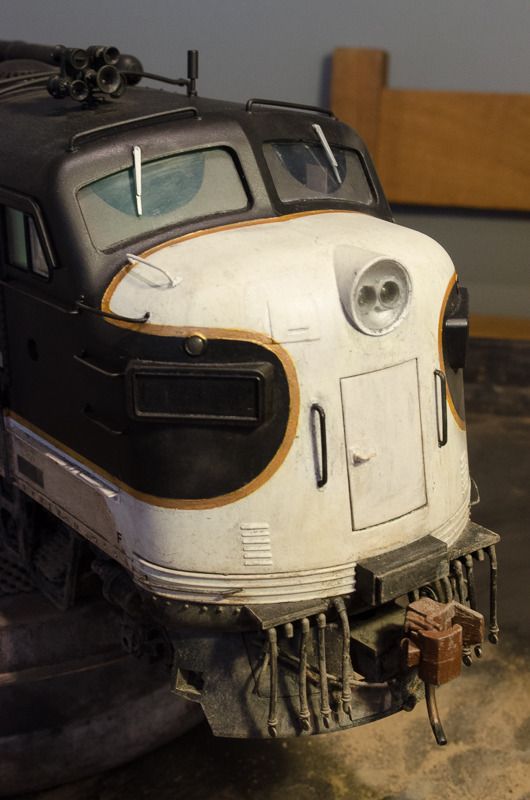  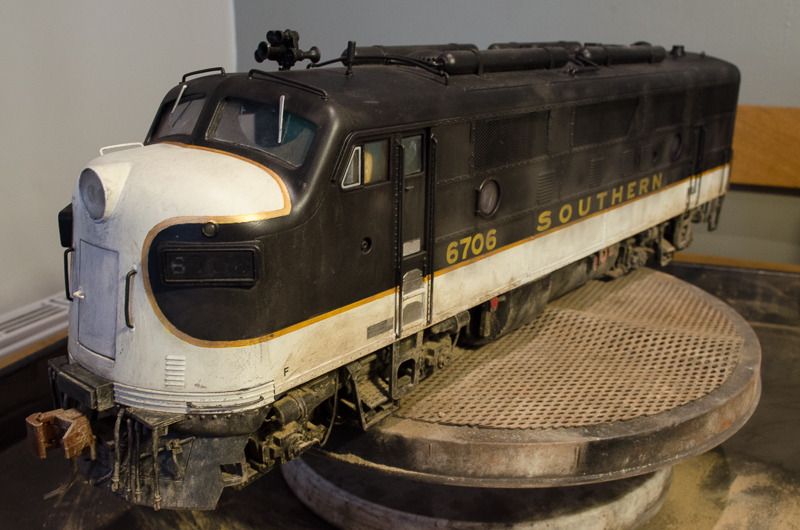 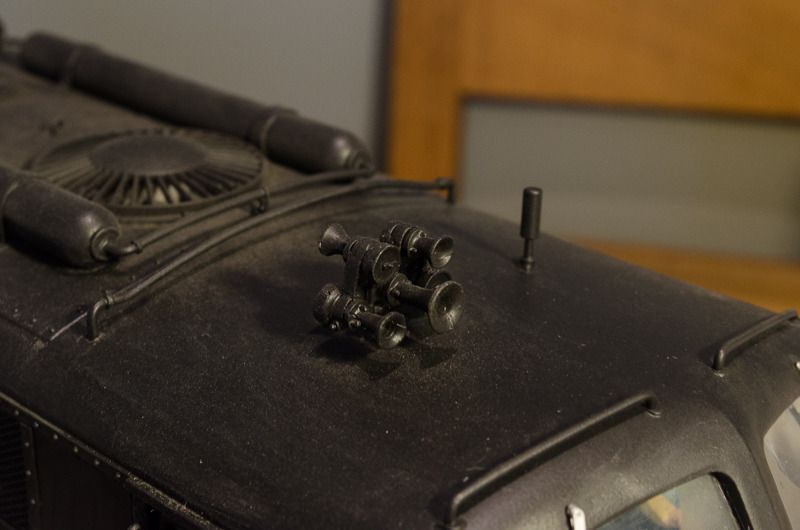 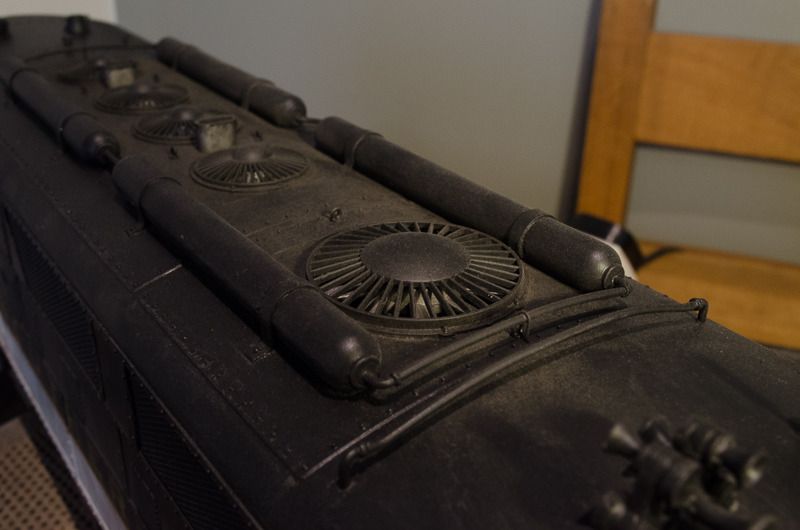 And here is a quick photo of the prototype I'm trying to base things on: 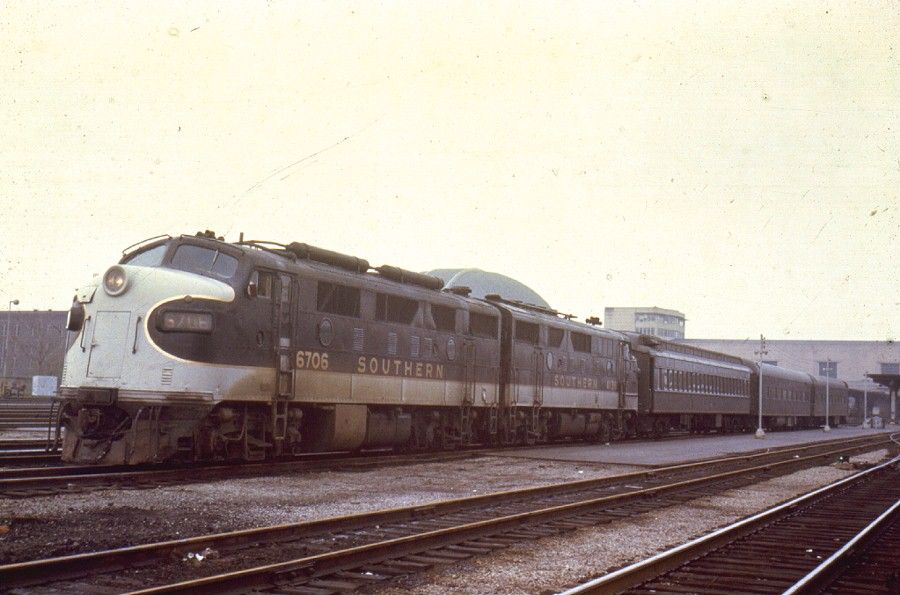 As soon as I can I'll try and get outside and take some photos of it hard at work on our railroad! Thanks again to Bob Harpe for his kind advice on selecting the correct builders plate for this project, much appreciated! Best wishes, Gavin |
|