|
|
Post by ednadolski on Jun 29, 2014 12:41:05 GMT -5
At long last, the parts are starting to come together, and the project is coming to life. Here are some recent pics and a couple of quick videos. Here you can see that the DCC decoders and wiring for the motor and speaker are in place. Everything had to be removed and re-installed in order to get the speaker/fuel tank into the proper place. The Digitrax DH465 is set to DCC address 132 and controls the motor functions. It can handle 4 amps which is enough for this Pitman can motor. I've also programmed it for basic speed and momentum settings. The Tsunami TSU-1000 is set to address 9132 and controls the EMD 567 sound, and will also control the lighting. To run the engine, I set up an advanced consist with the 9132 as the lead engine. 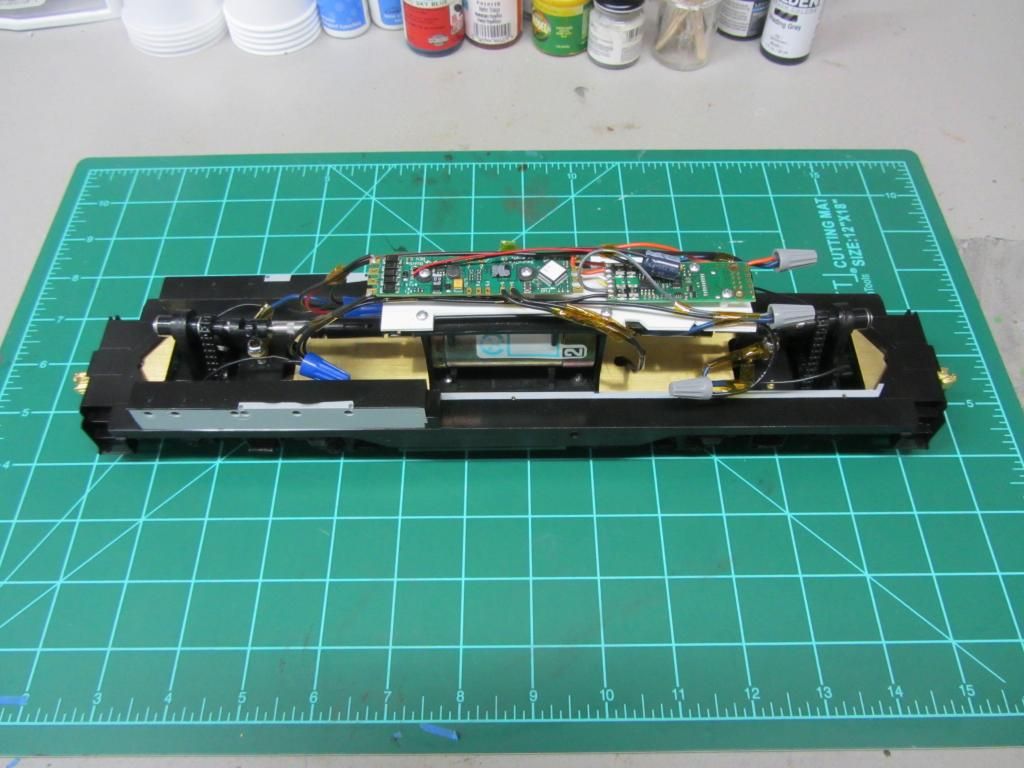 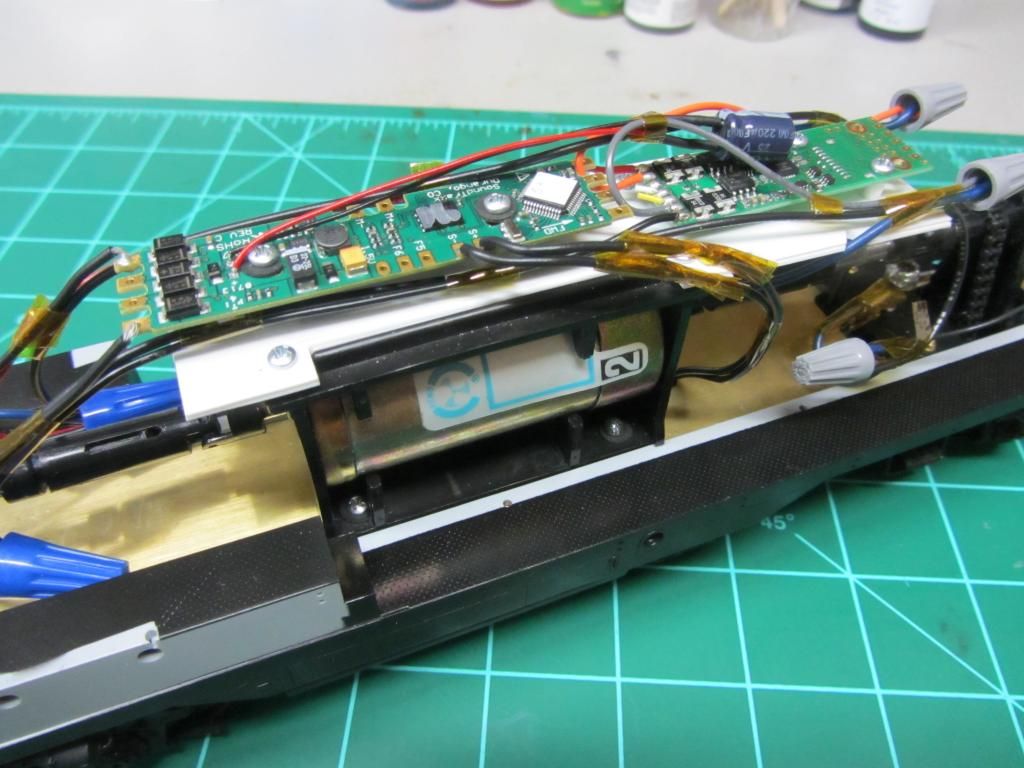 One little trick with the wiring was installing it such that the wires would not contact the drive shaft or any other moving parts. I may revisit this area at some point. These shots show the shell with some of the detail parts installed. The grabirons are handmade from 0.020" brass wire. The kit did come with plastic ones which were very delicate, but I did use the bolt detail from them. Lift rings are PSC 48278 which are cast brass. The numberboards, fans, and grills/shutters will be installed later. The walkway/sills/pilots have been painted, and the shell/cab are pretty much ready for paint. 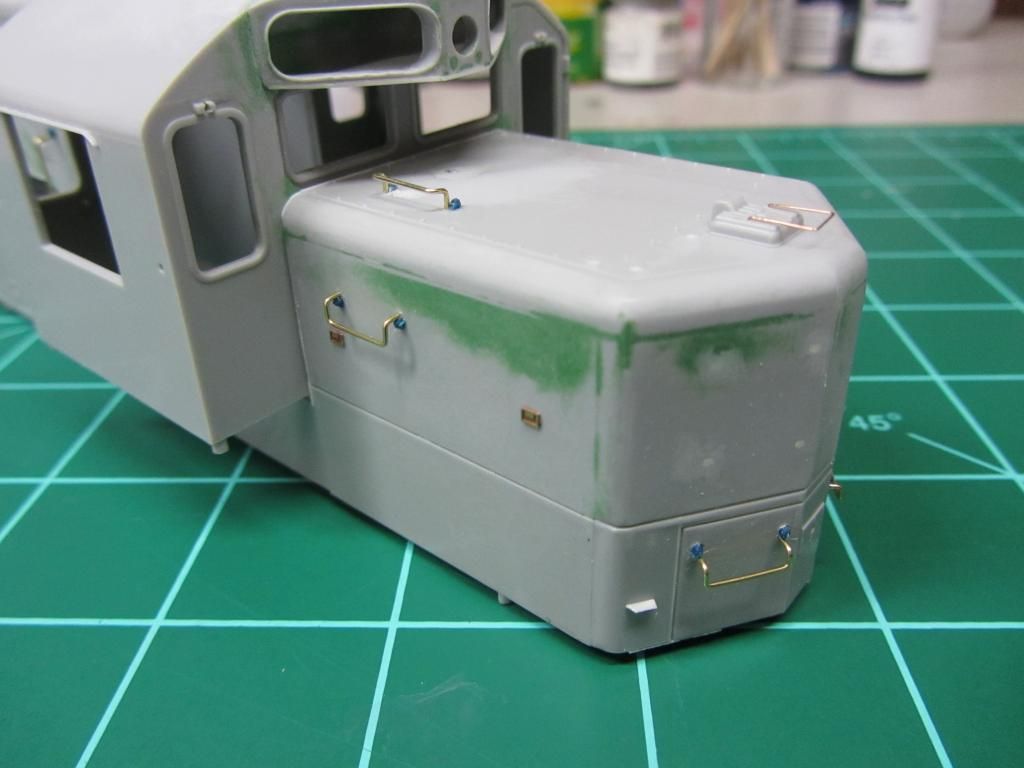 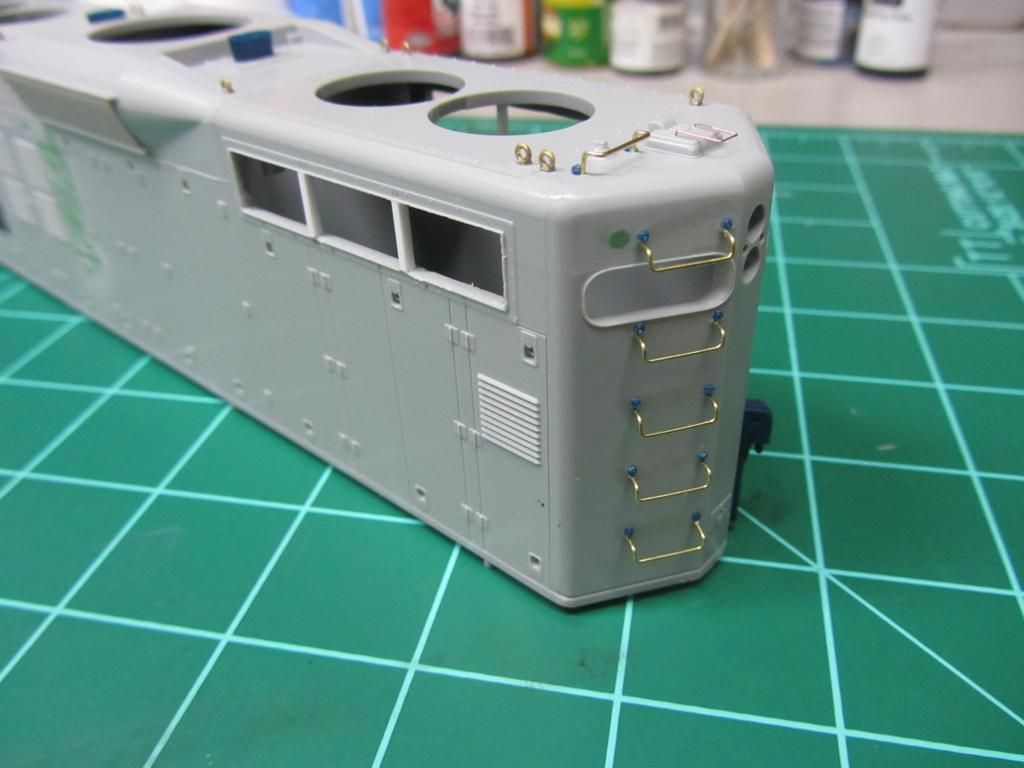 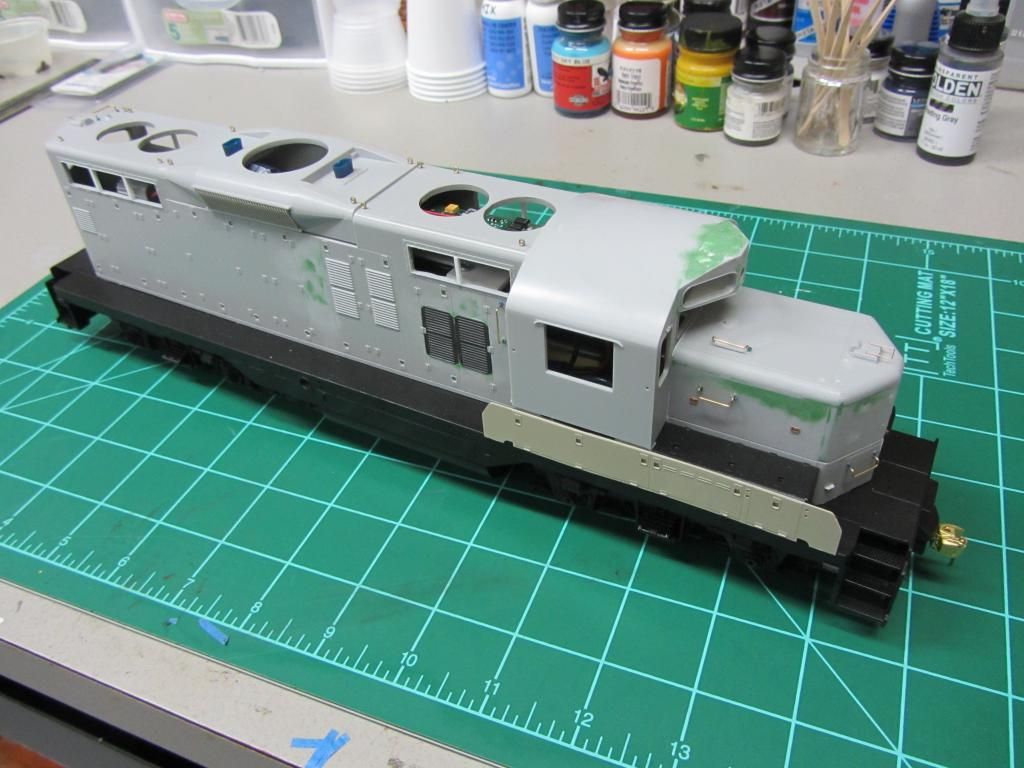 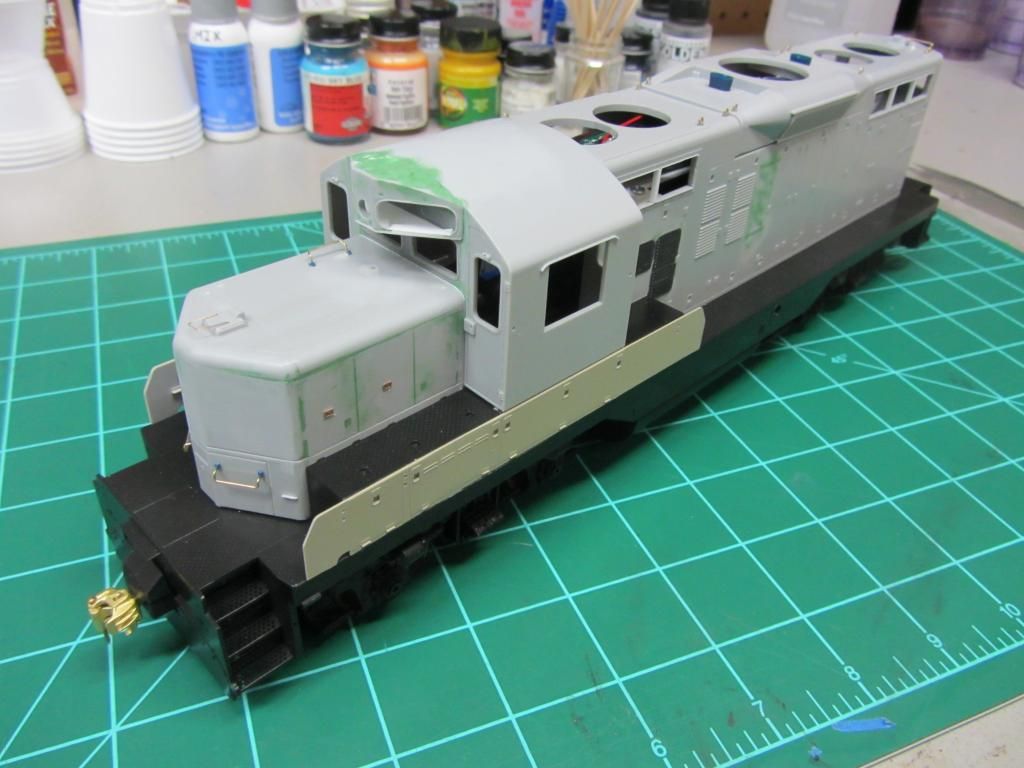 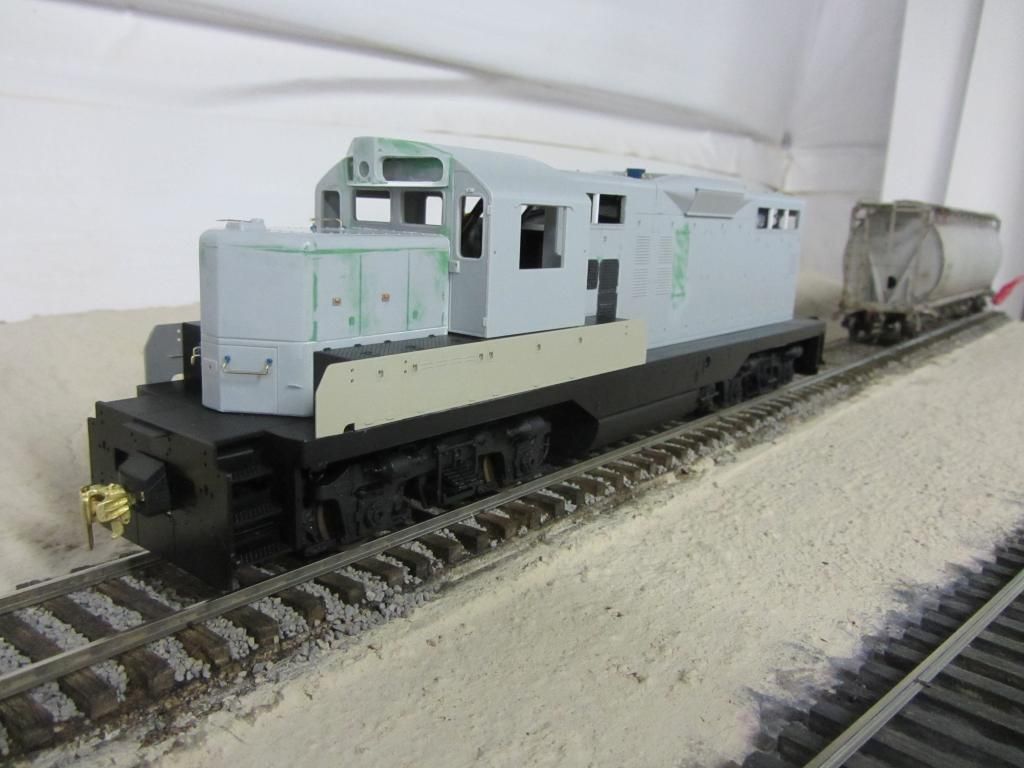 Here is a closeup of one of the couplers. It is the Protocraft fully operational coupler from cast brass. The castings take a bit of cleanup with a file but operate very nicely. I will be chemically blackening these, and then cosmetically painting and weathering the exterior, non-contacting surfaces. (At this point I have not trimmed the brass pin, since these will be disassembled again for the painting.) I will be adding operating cut levers. Another option with these couplers is to add small bit of steel wire into the top of the pin, and then they can be operated with a magnetic wand. 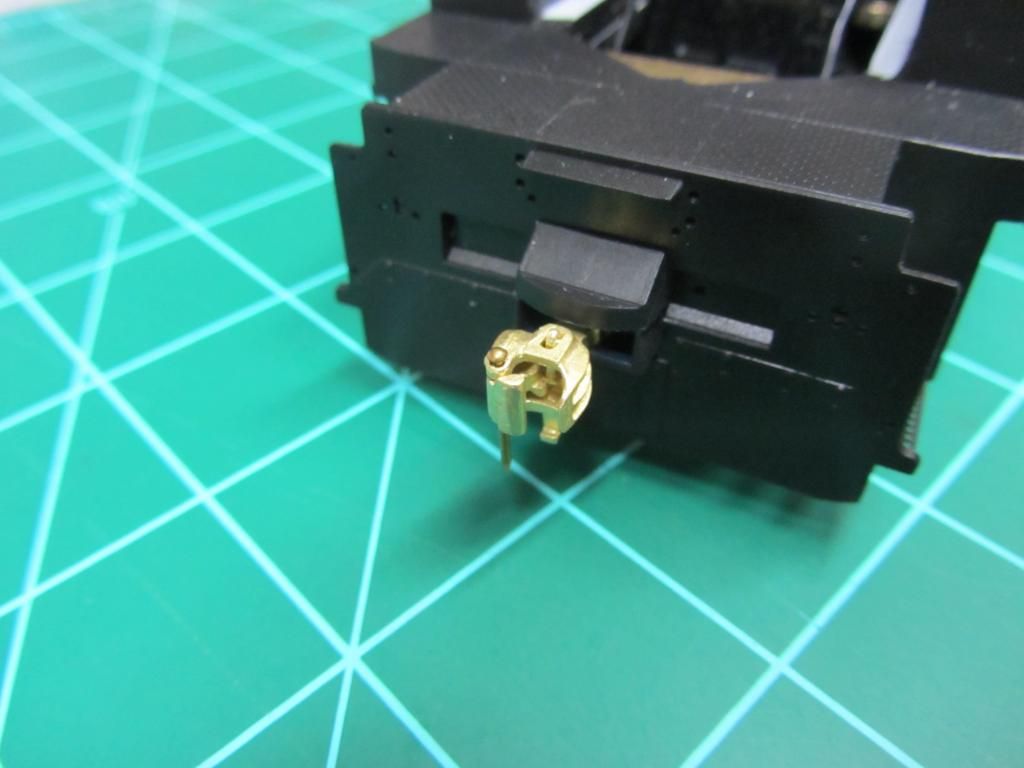 One thing that will look really cool with these: those magnetically-joining air hoses  Also here are a few quickie-type videos, showing the unit in operation on my little Proto:48 test diorama. First is a simple startup/run/shutdown: And here is a basic reverse/coupling move: (Ya gotta love the whine of that 567!)  Thanks for looking! Ed |
|
|
|
Post by analogbeatmaker on Jun 29, 2014 14:56:34 GMT -5
This is a great build Ed! Keep the progress pics coming.
|
|
|
|
Post by antlorch on Jun 29, 2014 16:06:47 GMT -5
This is sweet. I am going to have to build at least one O scale engine one of these days. I am afraid I might not want to go back to HO if I do.
Is Atlas the only company that makes modern stuff in O now a days?
|
|
|
|
Post by ednadolski on Jun 30, 2014 22:27:54 GMT -5
Thaks Nick, glad you are liking this. Today the shell got a gray primer coat, so more pics are on the way Anthony, Atlas O is the main game if you want 2-rail, esp. modern. I have heard some folks do impressive work with Weaver and even Lionel. I have a few of the Atlas O boxcars which I consider a starting point in terms of detailing. For my purposes they need the Proto:48 wheelsets and the brass couplers anyways. The Atlas Berwick 60' hi-cube boxcar is a real beast... 16" long over the couplers! Their GP7/9 shell is based upon the old Red Caboose tooling. Ed |
|
|
|
Post by antlorch on Jul 1, 2014 8:34:22 GMT -5
Ed I thought for 2 rail Atlas was pretty much the best game in town. Might have to start looking into this.
I like the P&D Gees so that's good to hear.
|
|
|
|
Post by big train james on Jul 1, 2014 11:19:58 GMT -5
Anthony,
There are about five big players in the O scale market, ranging from Atlas to Lionel. Also included in this group are Weaver, MTH, and Sunset. There are a couple of brass players doing very nice work including OMI and Key. Atlas, Weaver, and Sunset all do models that are 2-rail out of the box. MTH now offers the option for certain models for fixed pilots and scale sized wheels. Lionel makes some nice stuff, but everything must be converted from 3-rail to 2-rail.
I'll run down the pros and cons for each as I see them.
Atlas - Take what you know about Atlas in HO and apply it to O. They offer nicely detailed, generally accurate models, but no modern motive power and a few modern freight cars. Their most modern loco would be the gp60. They make a nice sd40, but of course no sd40-2. Also a very nice Trinity 5161 hopper, a coil car, and some modern tank cars. The vast majority of their product line falls into the transition era up to maybe the '70's. The gp9's and F units they make are pretty nice. The gp's are based on the Red Caboose tooling, and the F's are based on the P&D tooling.
Weaver - Decent quality, decently detailed locos and rolling stock. Items are offered 2-rail out of the box. They have offered an sd40-2, gp38-2, rs11, and rs3 over the years. I have read that they sold most of that tooling to MTH though. I've seen the sd40-2's an gp's and they are older tooling with some crude details. Think Athearn blue box era. No road specific details. They would probably be a good starting point for a detailer, but you have to remember that parts availability is very limited in O scale. There is no Cannon or DW or DA like in HO. The Weaver rolling stock is decent, but mostly blue box level detail like molded on grabs until you get to their newest items.
Sunset is sort of a hybrid importer. They do nice brass steam at a better price point ($900-$1500) than Key or Kohs ($5000-$7000 for a steamer) but they have jumped into the plastic diesel market recently and are doing pretty well at it. They have a great rep for getting things right, or very close to it, and they have a great rep for standing behind their products when things go wrong. Currently though they are working the first generation angle working through versions of f units and e units.
Which brings us to MTH. Again, think of what you know about MTH in HO scale and apply it to O. Some clunky details and proportions. DCS as the control system. However, MTH has improved their offerings recently as they seem to recognize the possible market for 2-railers. Detailing is improving on their newer locos, they offer the 2-rail option on some new models, and they include Kadee coupler box mounting holes for people converting over. I think any new models with newer tooling for the truck gearboxes have the option for 2-rail. I will give them credit for recognizing a market for 2-rail and being willing to offer improved options for the market segment.
And lastly is Lionel. I am calling them last only because they have seemed determined to ignore the 2-rail aspect of the market. No options for 2-rail. No Kadee mounting locations predrilled. Still have to put the "Made by Lionel" plaque on the side of their products. They have some things that are very nice, like the aluminum centerflow hoppers. Nice separate details on the end cages and roofs. Their locos cab be converted, but will require adjusting the electronics for 2-rail and changing and insulating wheelsets. Lionel may finally be coming around though as they just released a nice scale length autorack that had Kadee mounting holes predrilled. It caused quite a stir in the O scale world.
There is a lot of 30's to 70's era stuff available in O scale. If you want really modern "today" type locos, then MTH and Lionel (and OMI in brass) are really the only two players. NS and UP heritage stuff? Gevo's? You will have to pick one of these two and hope for the best on conversion, accuracy and control systems. Want an sd40-2 even as good as just the Athearn RTR version? Build it yourself. Dcc is largely unsupported out of the box, except for Atlas.
O scale is a very different culture and market than HO, and manufacturers react differently to it. Lots of guys in O love DCS and Lionel's Legacy control systems. Dcc is a very small component of the scale. Lots of guys love the toy train aspect of O scale. The scale side is growing, but very slowly. It's going to be a long grind.
As far as brass goes, the latest stuff being imported is really really nice. OMI just did the sd70ace and sd70m-2 variants. Beautiful engines. Key has been doing a lot of transition era locos and is doing the Cal Zephyr but has road switchers like the sd40-2 on the drawing board. $2200ish for new diesels. $1200ish for the Cal Zephyr cars. $7000ish for the new SP cab forward. Although to be fair the detailing on the AC is crazy.
If you have any other questions, feel free to ask. I'm a bit player as I'm still fairly new to O scale. But I read a lot, and observe a lot, and get frustrated a lot. I'm willing to talk about it.
Jim
|
|
Deleted
Deleted Member
Posts: 0
|
Post by Deleted on Jul 3, 2014 20:07:22 GMT -5
Ed that unit put a wide smile on my face listening to it lord it has been to long since I throttled those old 567's it is perfect only thing missing is the radio chatter that is going to one cool Geep when done
|
|
|
|
Post by ednadolski on Jul 11, 2014 22:18:00 GMT -5
Well, sometimes finding a color that looks right can become an exercise in persistence. Trivia question, how many different shades of blue can you spot in the following pic: 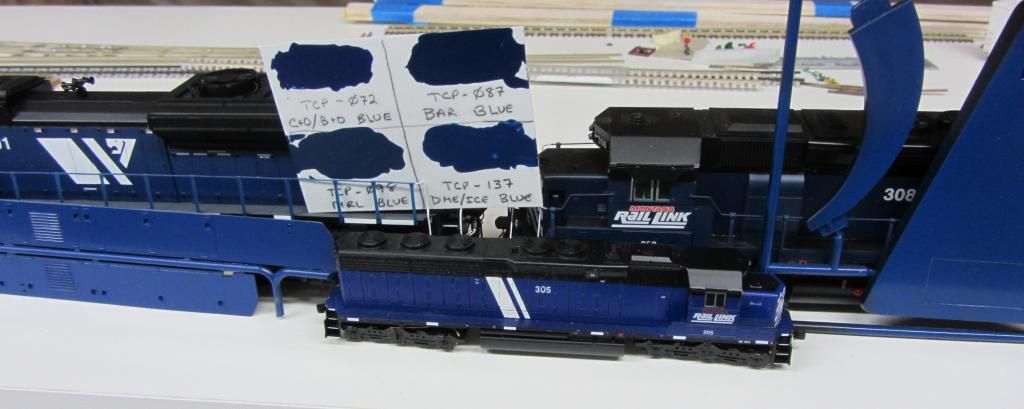 The paint that was labeled "MRL Blue" ended up looking hardly like the MRL blue that I am used to seeing in pics and videos. I think part of it is, on the prototype the blue paint picks up the reflections of the sky, which is of course very bright and so we have to compensate for that in our models. The dabs of paint on the white plastic sheet came straight from the bottle, and even so they end up looking different (darker) when painted onto a model.... :facepalm: Ed |
|
Gav Smart
Engineer
Standard gauge in the late 1960's, in 1:29th.
Posts: 43 
|
Post by Gav Smart on Jul 15, 2014 6:05:09 GMT -5
Hi Ed,
That is looking very nice so far! I look forward to seeing and hearing the finished model.
Keep up the good work,
G
|
|
Deleted
Deleted Member
Posts: 0
|
Post by Deleted on Jul 15, 2014 20:34:39 GMT -5
I might be able to help I called the MRL shops one day a long time back when was given the actual acrylic piant code and refered to Sherwin Williams I think I still have this actual paint at the house Ed I have no use for it as the pigment is to big for my little Pasche brush if I still have it i'll let you know and you can have it for the shipping cost but I have to find it first only problem it would have to go ups or fed ex as the postal service wont touch it
|
|
Deleted
Deleted Member
Posts: 0
|
Post by Deleted on Jul 15, 2014 20:36:19 GMT -5
Well, sometimes finding a color that looks right can become an exercise in persistence. Trivia question, how many different shades of blue can you spot in the following pic: The paint that was labeled "MRL Blue" ended up looking hardly like the MRL blue that I am used to seeing in pics and videos. I think part of it is, on the prototype the blue paint picks up the reflections of the sky, which is of course very bright and so we have to compensate for that in our models. The dabs of paint on the white plastic sheet came straight from the bottle, and even so they end up looking different (darker) when painted onto a model.... :facepalm: Ed Ed the smaller 305 looks pretty close to the actual MRL paint I have +/- but close |
|
|
|
Post by ednadolski on Jul 19, 2014 14:13:15 GMT -5
Thanks for the offer but like yourself I probably would not be able to use it in my airbrush. And like every other blue it likely would look very different under the indoor lighting. Here is a blue that I made up from one part TCP-072 C&O/B&O Blue with two parts TCP-137 DME/ICE Blue. It does look lighter in the pics than in person. I did have a surprise after applying a layer of Dullcote, as that really lightened the color more than I ever expected it would. Fortunately I was able to spray a layer of Glosscote over it, and that restored the color. But from here on, I will use the TCP Clear Flat instead of the Dullcote. 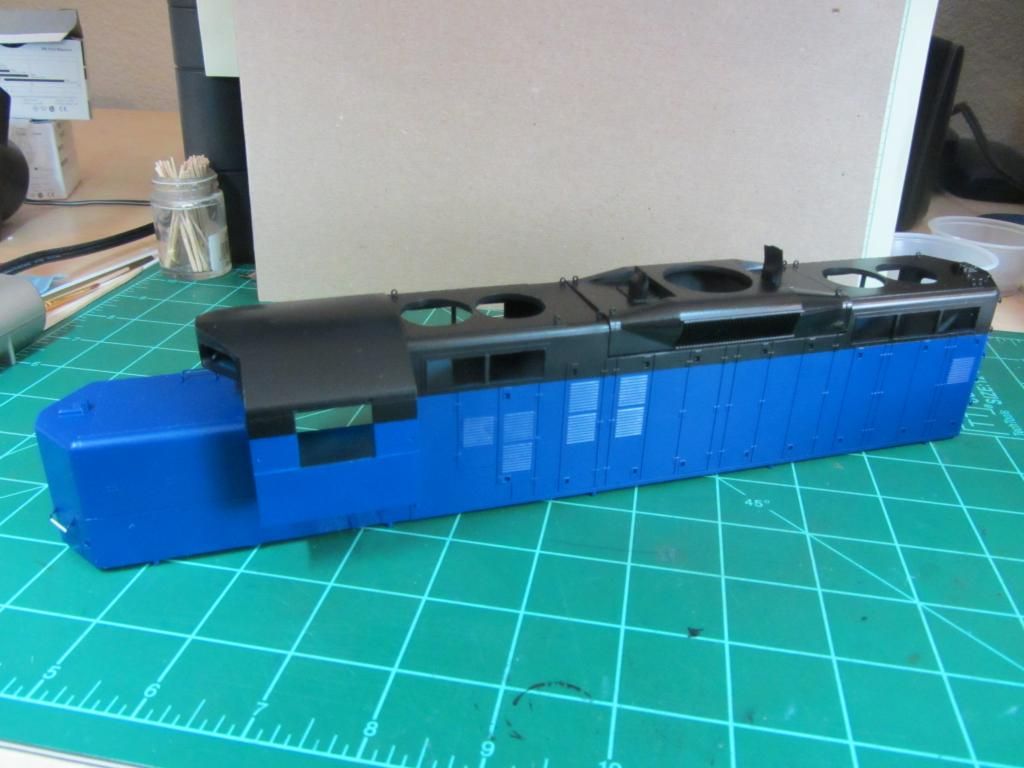 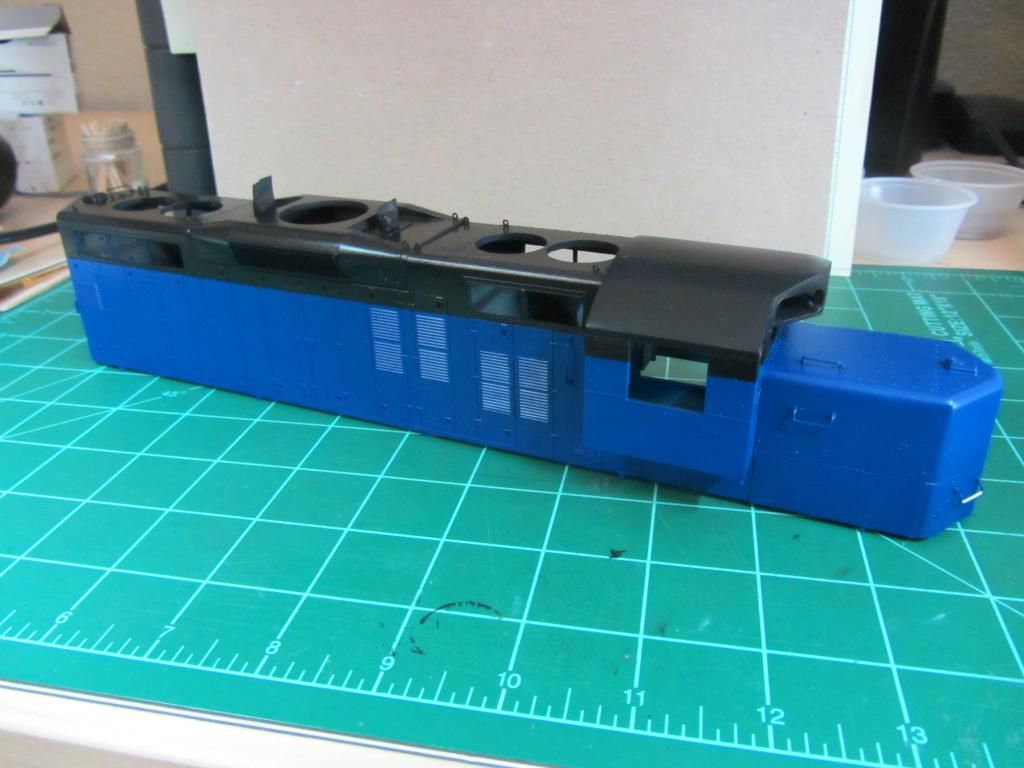 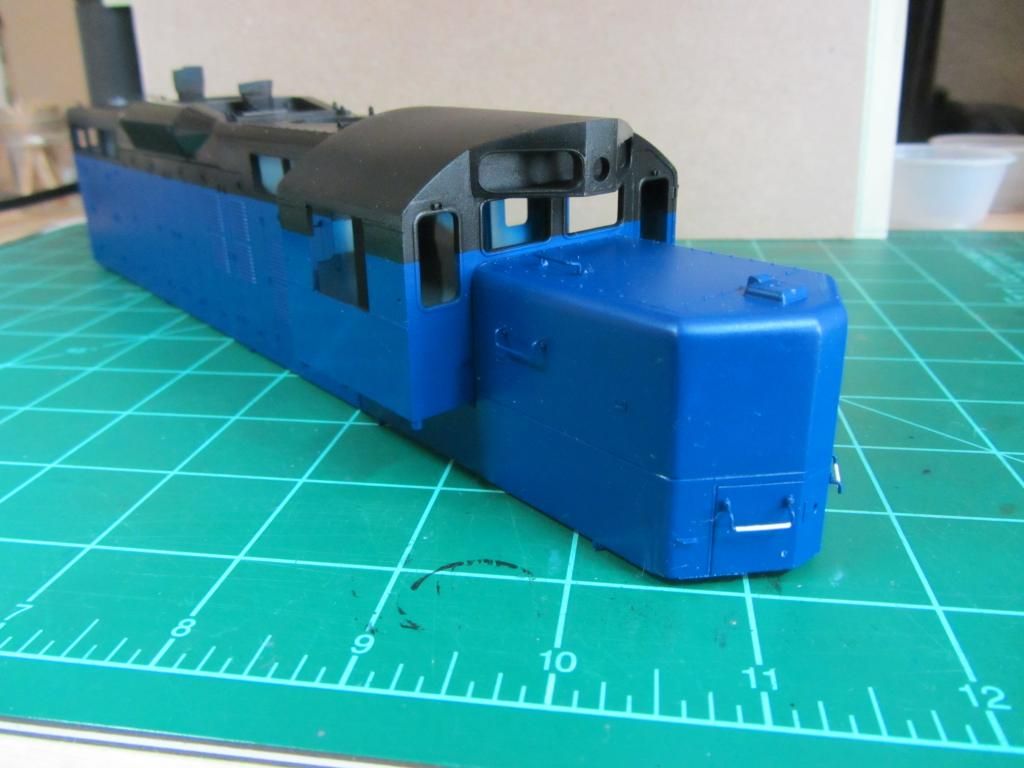 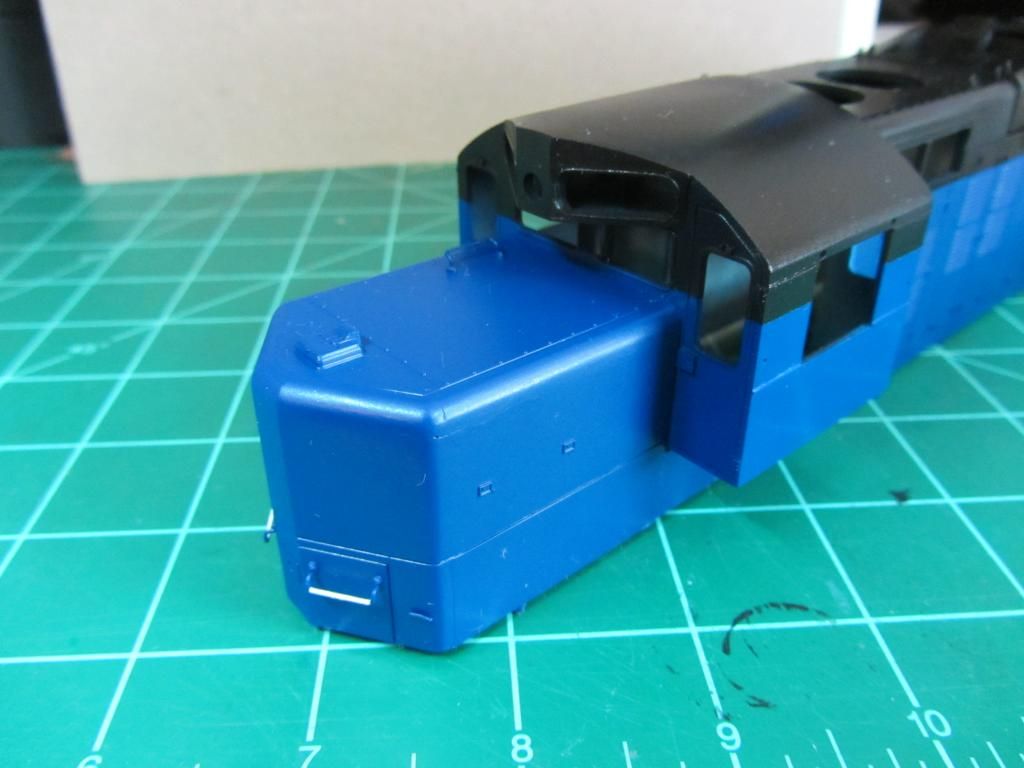 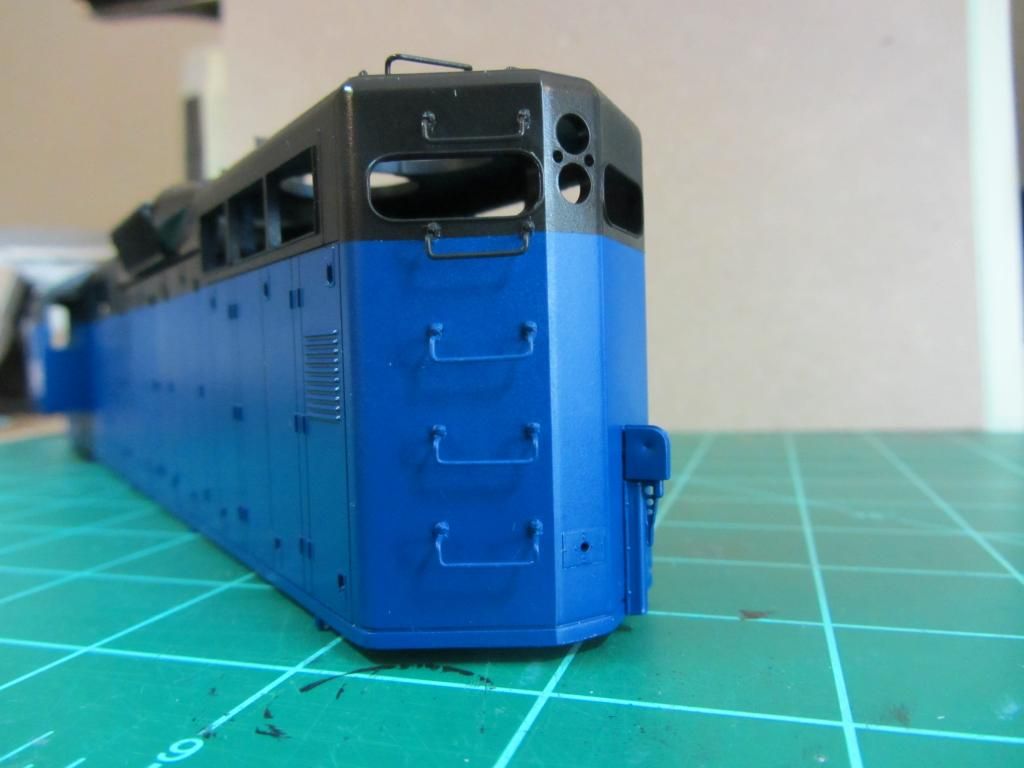 I have a few touch-ups to do, then it will be time for decals Ed |
|
Deleted
Deleted Member
Posts: 0
|
Post by Deleted on Jul 19, 2014 16:09:14 GMT -5
looking better and better each time Ed
|
|
|
|
Post by ednadolski on Aug 16, 2014 9:51:39 GMT -5
Time for an update. The bulk of the painting and graphics are done. The decals are Microscale plus a custom set from Highball Graphics. 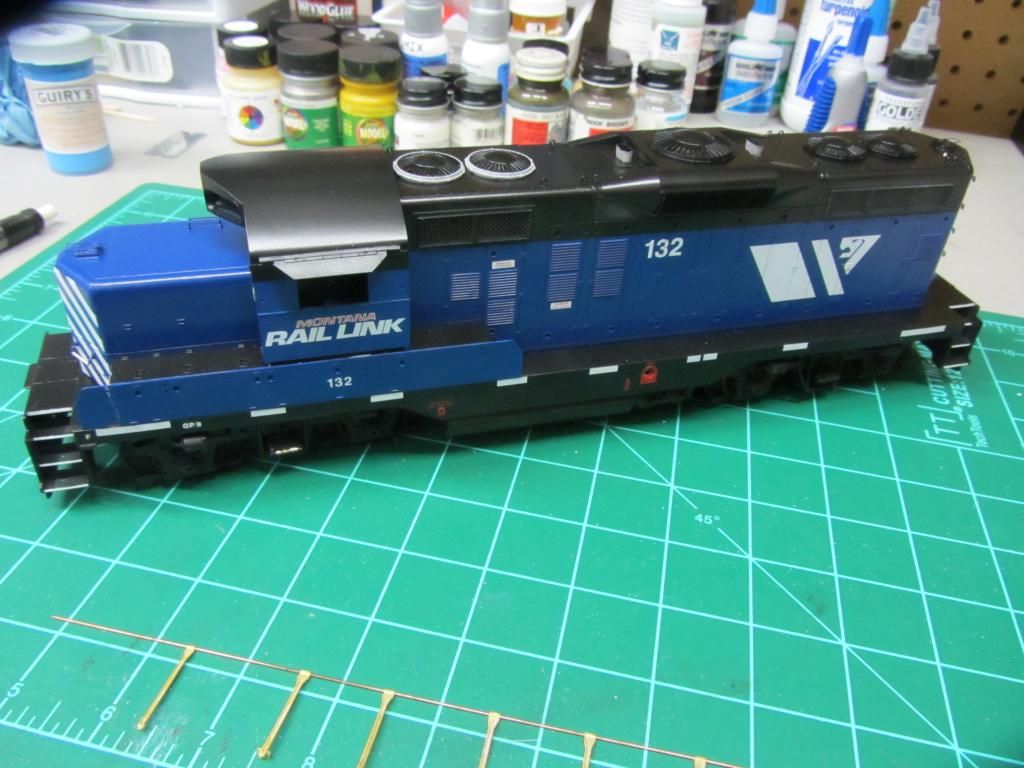 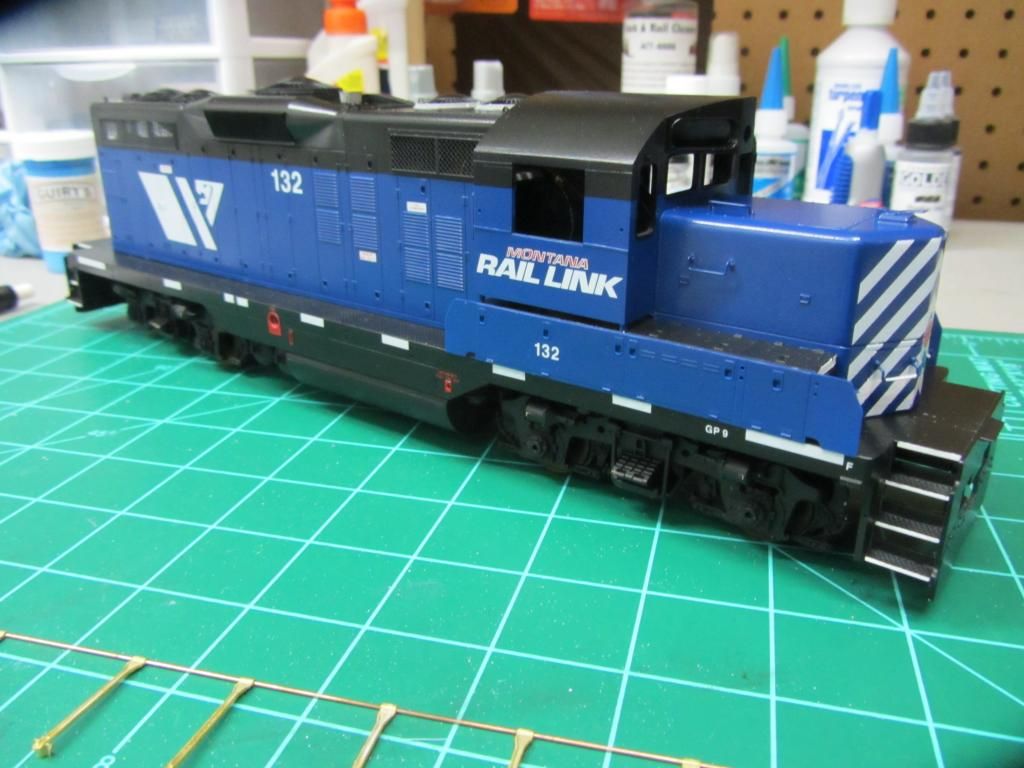 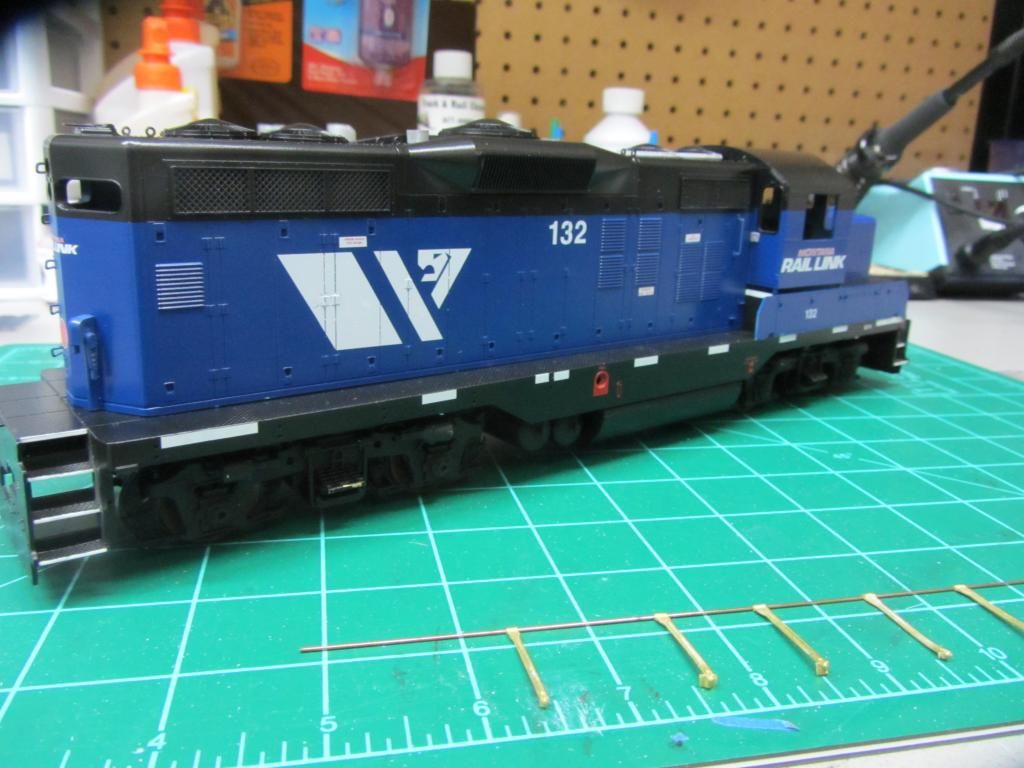 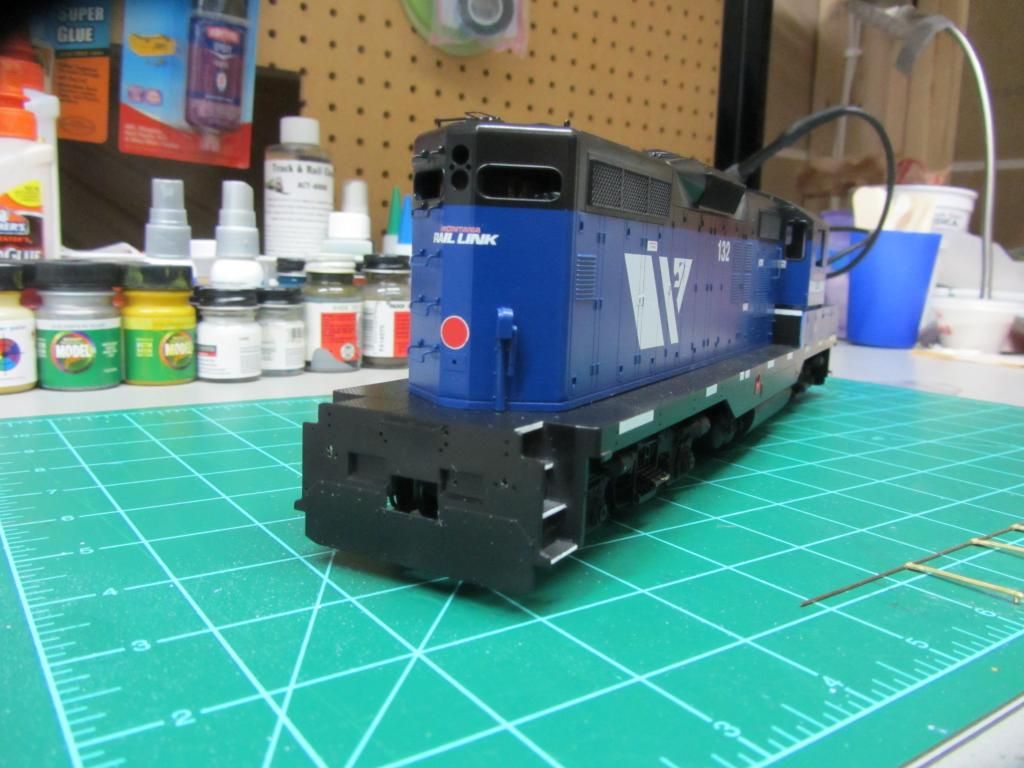 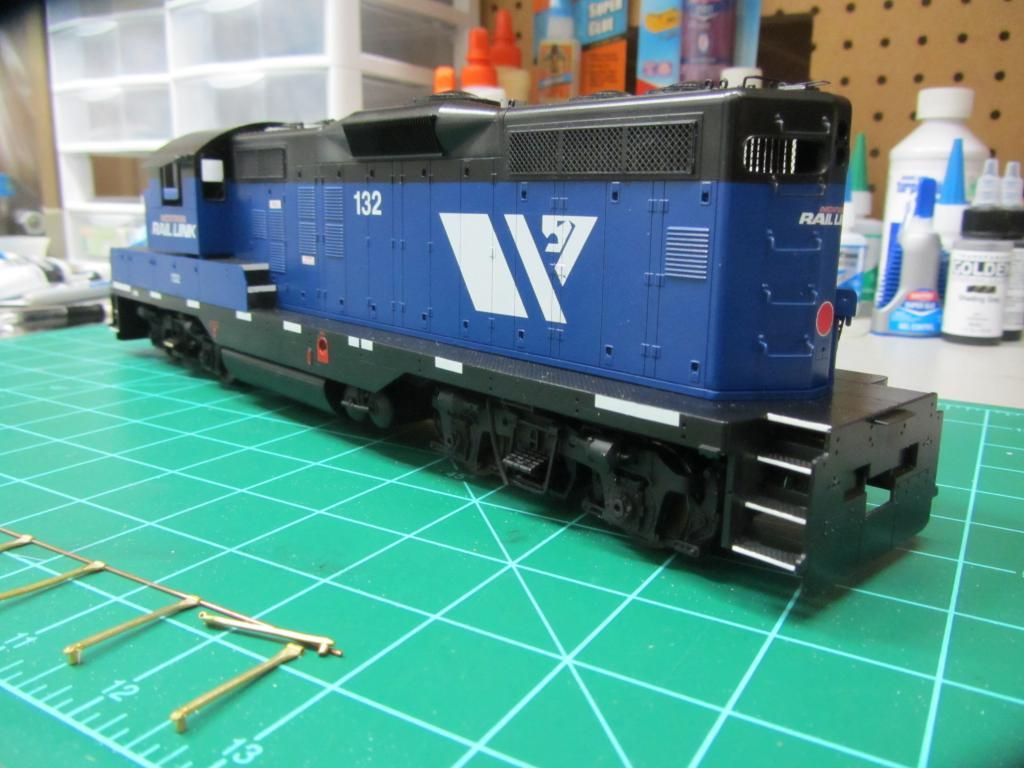 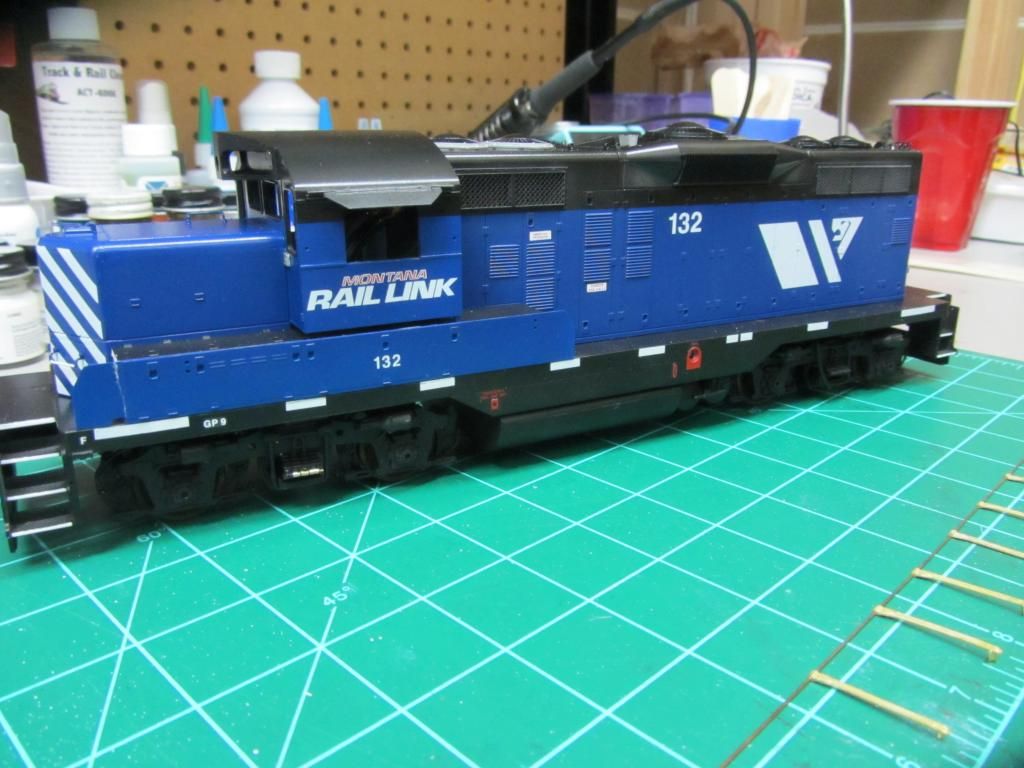 You'll notice in the one pic that the panel in front of the battery boxes on the conductor's side is showing a nasty crack. This is my own *very* stupid fault from some inexcusably careless and clumsy handling (where is the smiley icon for kicking oneself?). It's back in one piece, but I have to hide/disguise the crack. Part of it will be covered by a stanchion, which helps a bit <groan>. Here is what the shutters/grilles look like when painted and installed. At some angles you can see clear thru & out the other side (or where the numberboards are supposed to go). I know I've said this before, but you really have to see these in-person to get the full effect of the 3D look. 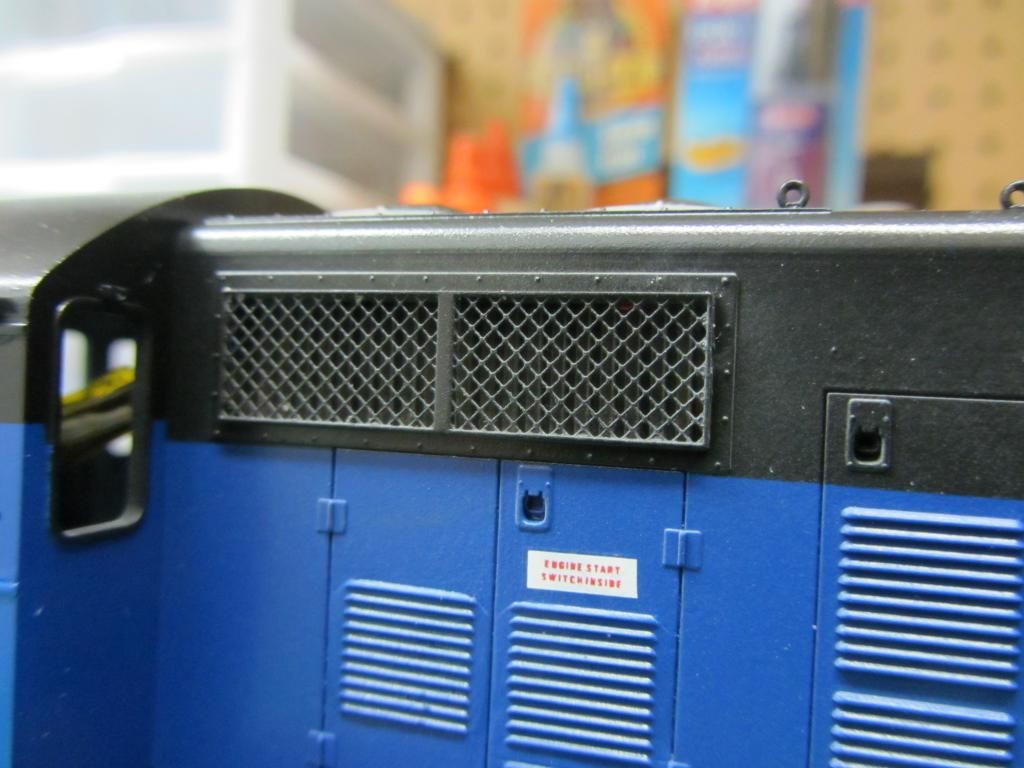 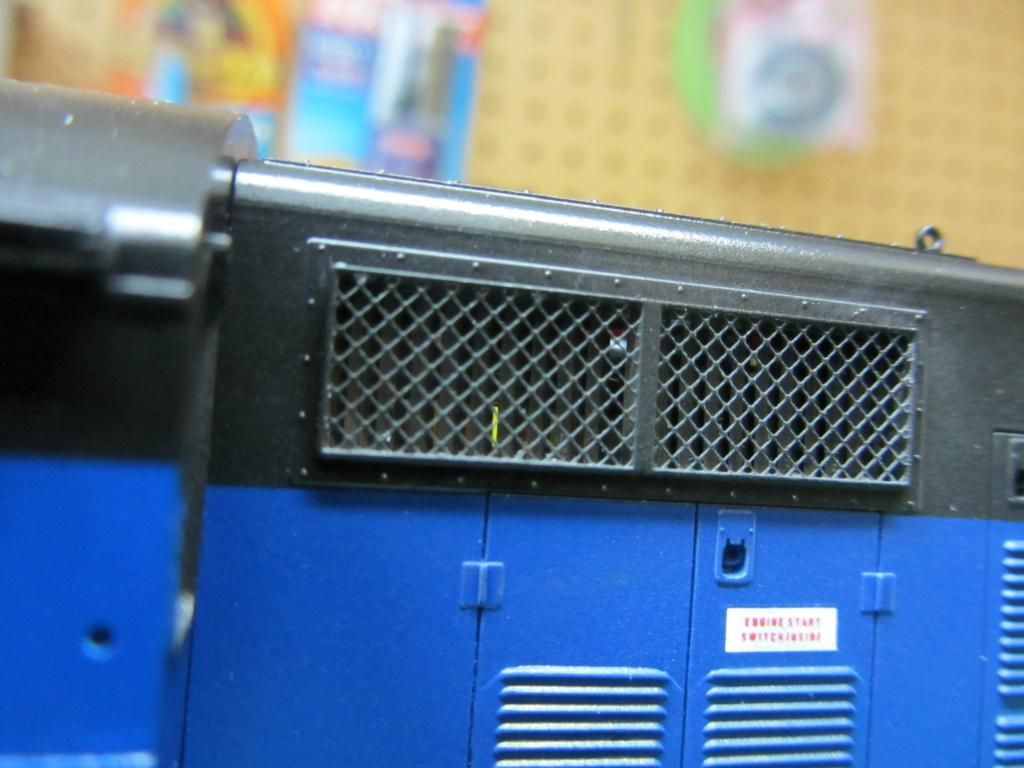 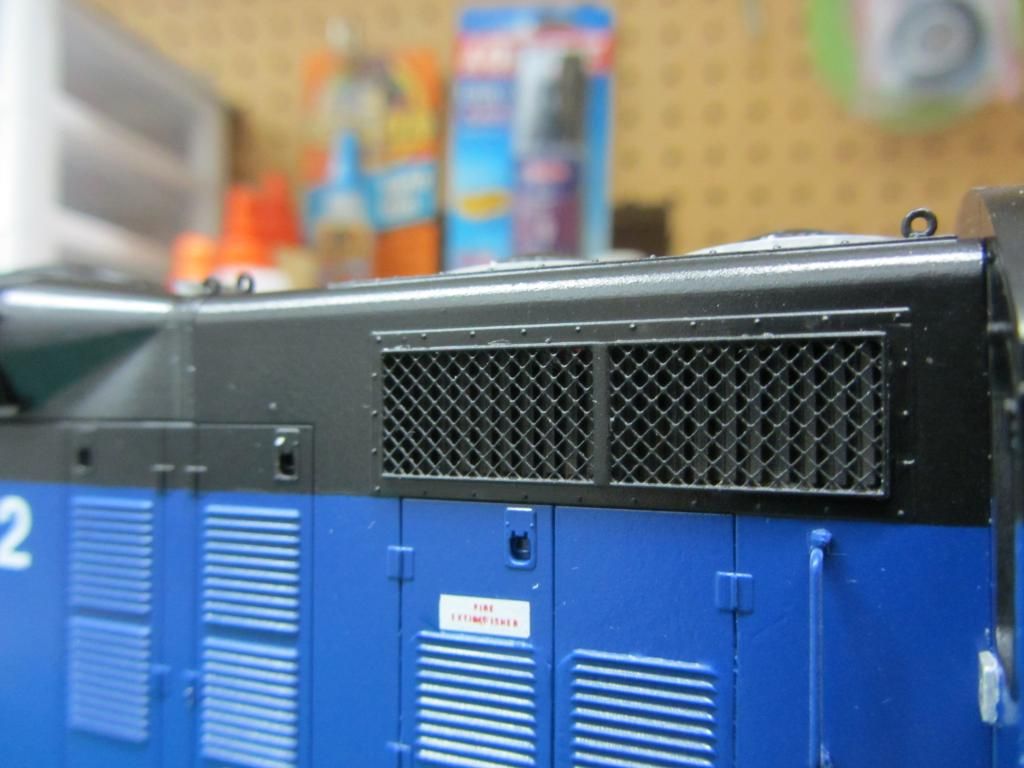 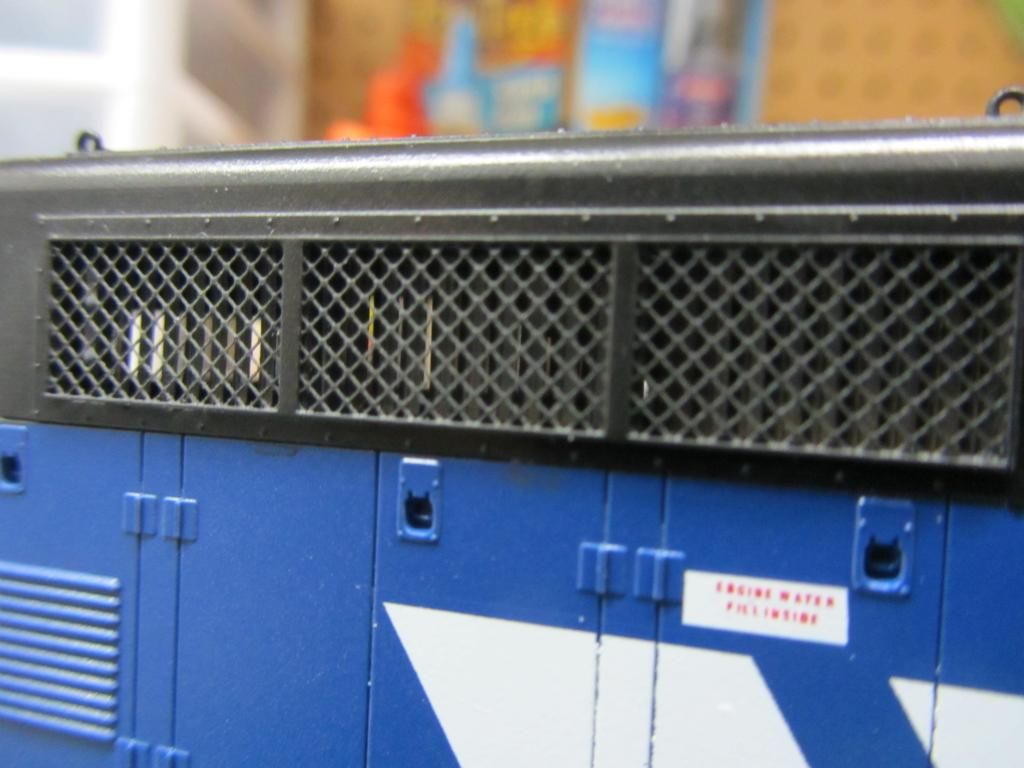 Here is the 48" dynamic brake fan, weathered prior to assembly. If you blow on this thing, it will spin freely: 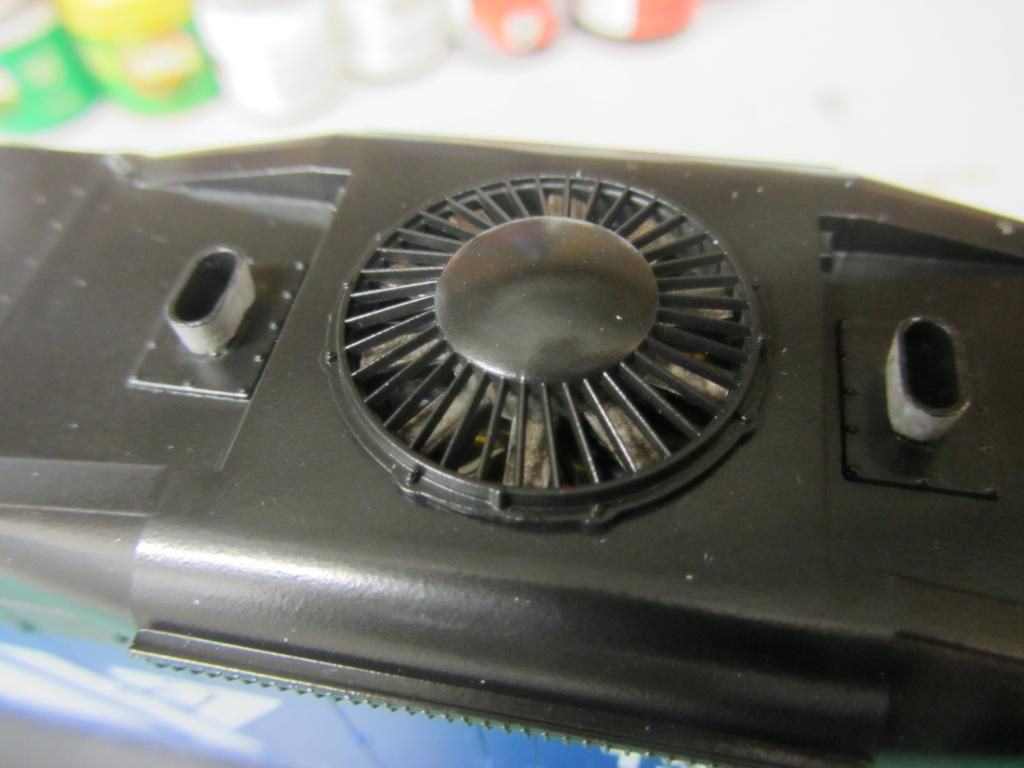 Next up is (literally!) a "plate full" of detail parts: 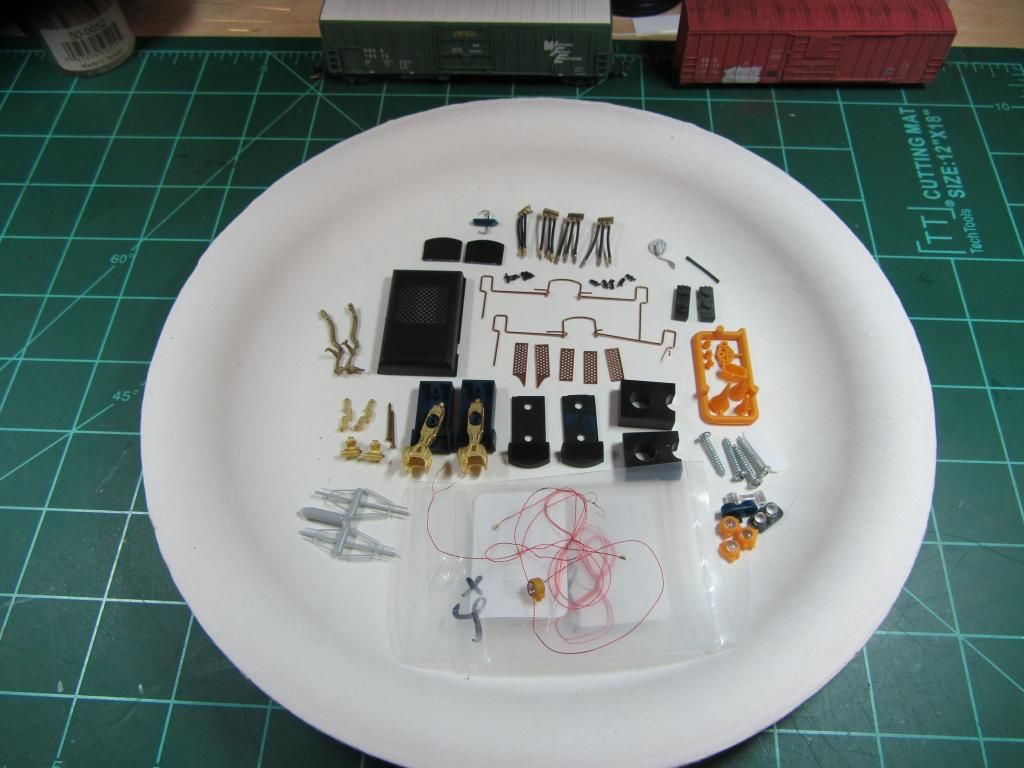 The cut levers are hand-made from wire (as you can see, they are not quite finished). I really get a kick of of these MU hoses, these are made from individual PSC glad hands and brackets, with the "hoses" made from black wire insulation (I thought the PSC hoses were too thick): 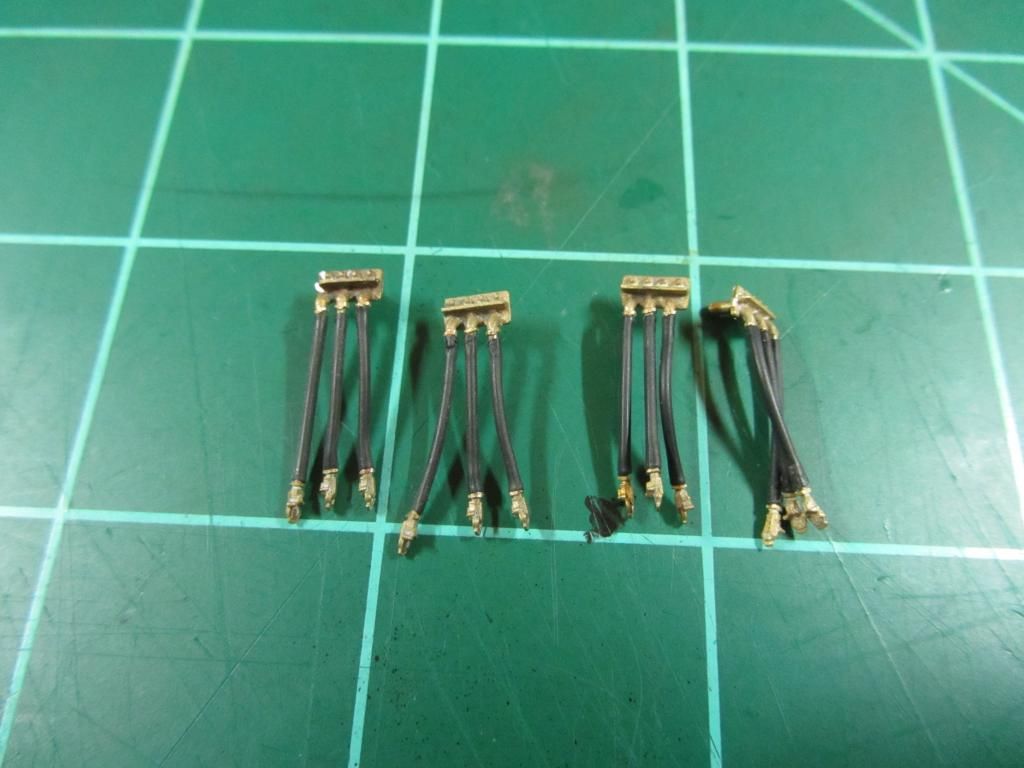 I roughed up the "hoses" with some fine sandpaper to knock off the shine of the plastic insulation, and hopefully give a bit of tooth for the weathering to stick. There are still more details to come after these. I will be making the windows from clear plastic sheet. The lighting will be made from small SMD LEDs, I may have to grind away a bit of the frame in order to make a place for the wires to run. The kit does come with plastic stanchions & handrails, but I am also considering the cast brass ones with handmade wire for the handrails (that part of it is much like N scale!  ). I'm pretty pleased with how this build has gone so far. Thanks for looking, hope you enjoy this! Cheers, Ed |
|
Deleted
Deleted Member
Posts: 0
|
Post by Deleted on Aug 18, 2014 19:42:13 GMT -5
looking very good there
|
|
|
|
Post by ednadolski on Aug 24, 2014 17:38:52 GMT -5
Here are some of the pilot details added. The cut levers are hand made, and they work to open the knuckle just like the proto. 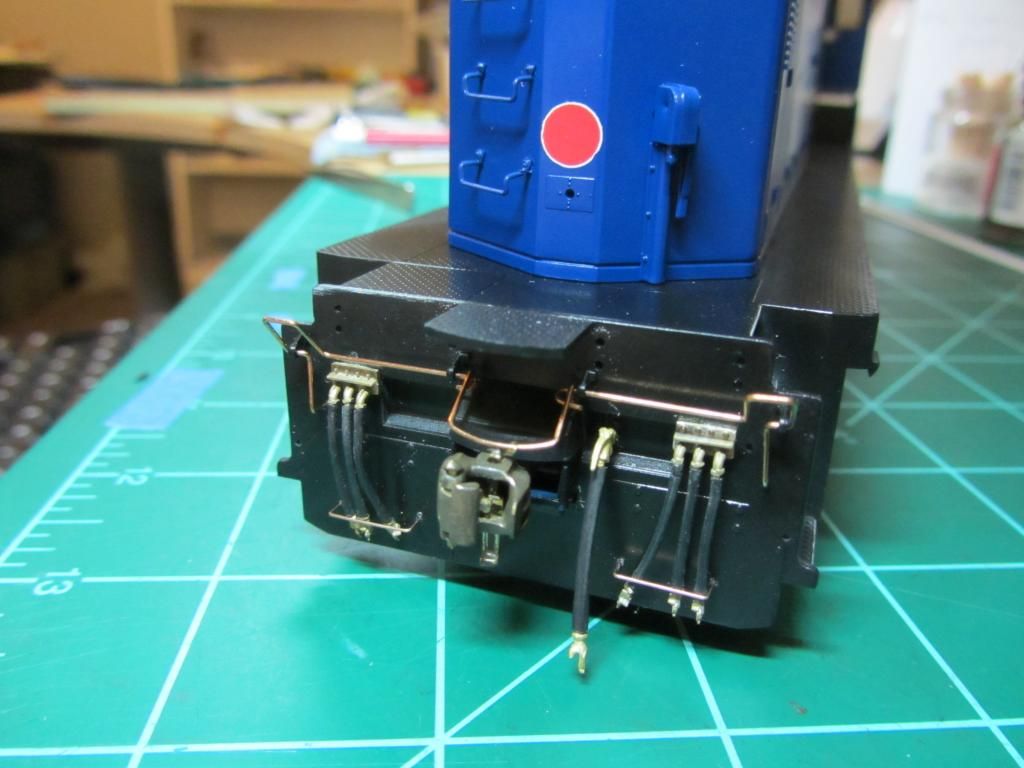 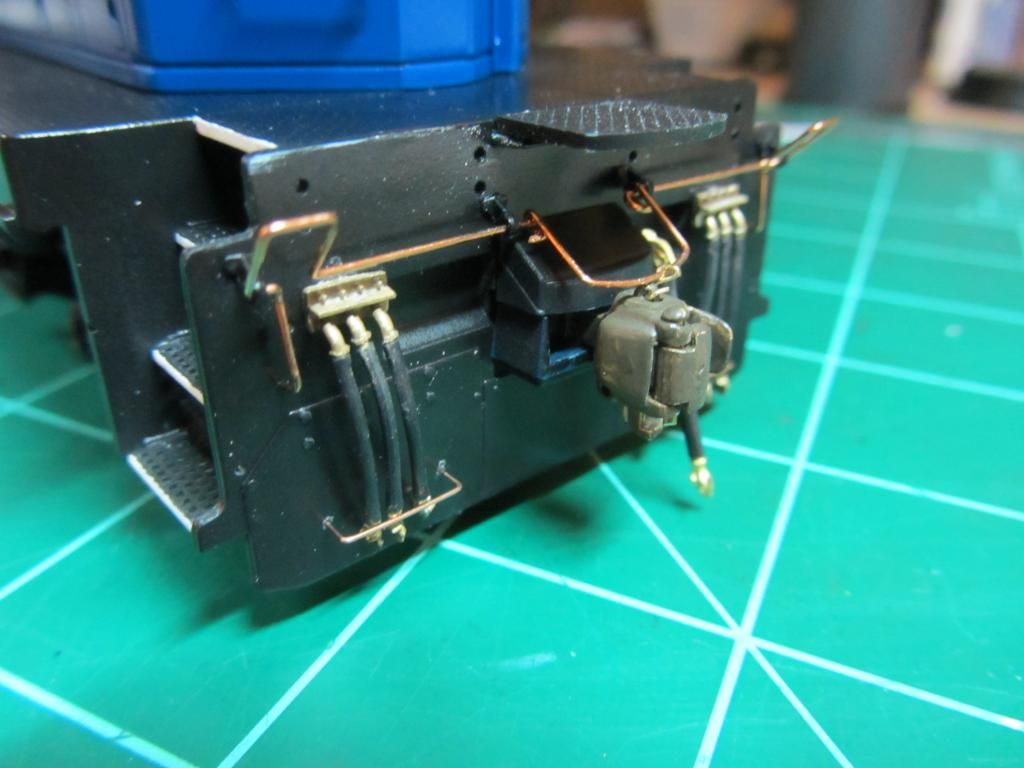 Here is a quick little vid showing how the couplers work. These things are the bee's knees Thanks for checking this out. Ed |
|
|
|
Post by icghogger on Aug 25, 2014 9:08:57 GMT -5
Them working cut levers, are sexier than sox on a snake, Ed!!
|
|
Deleted
Deleted Member
Posts: 0
|
Post by Deleted on Aug 25, 2014 15:34:06 GMT -5
ED I'm so GREEN with Envy but n scale just doesn't have those options you really knocked that out of the park way cool. keep up the great work
|
|
|
|
Post by big train james on Aug 26, 2014 0:20:43 GMT -5
Wow. Everything looks fantastic!
I presume those are Protocraft couplers?
Jim
|
|
|
|
Post by ednadolski on Oct 12, 2014 21:27:23 GMT -5
Hi Jim, yes those are the Protocraft brass couplers. Here is some of the latest work on this. I've added some scratchbuilt window glass and numberboards to the cab, made from 0.010" clear styrene and glued in with Micro Kristal Klear: 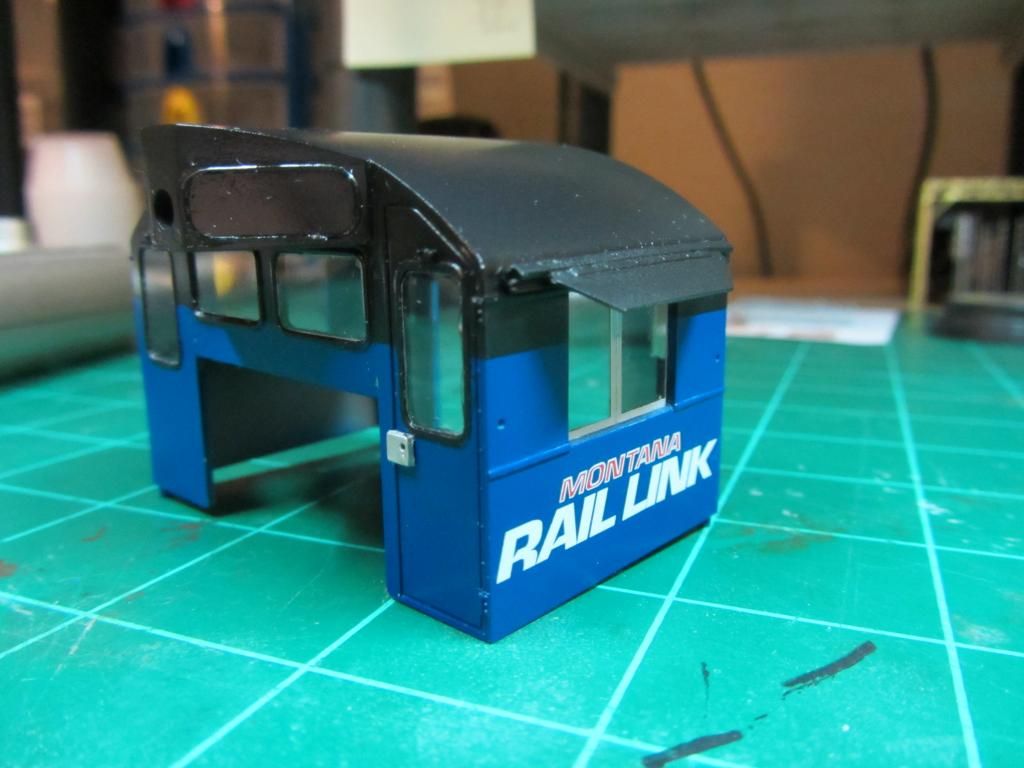 Here are the all-weather window and Sinclair antenna. There are no commercial parts for these. So I made my own out of photoetched metal, assembled by forming and soldering. It was a trick to form the window frame, since the metal parts being very thin frames are hard to get a grip and bend uniformly. I'm pretty pleased with the way these came out. 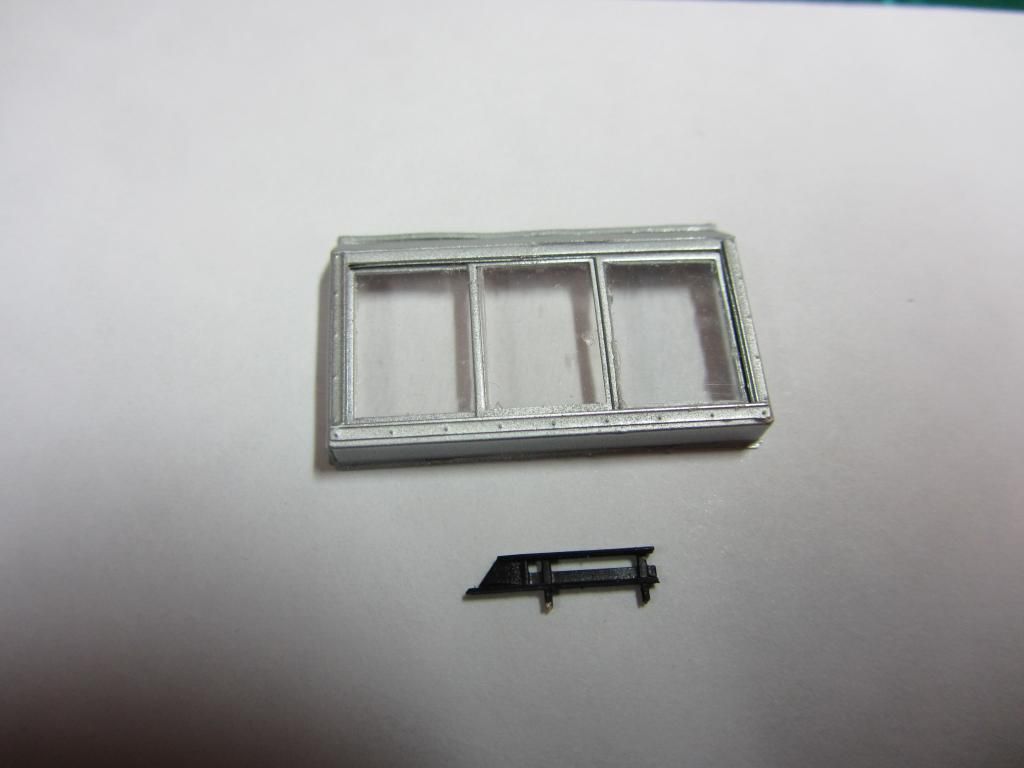 Next challenge will be the lighting... Ed |
|


 ).
).